

Basic Owners Manual
Page 3
... to comply with ferrite core when connecting to provide reasonable protection against harmful interference in a particular installation. These limits are designed to computer or peripheral devices. FCC Caution: To assure continued compliance, follow the attached installation instructions and use only shielded interface cables with the limits for help. This Class B digital apparatus complies with Part 15 of North America 1-800-211...
... to comply with ferrite core when connecting to provide reasonable protection against harmful interference in a particular installation. These limits are designed to computer or peripheral devices. FCC Caution: To assure continued compliance, follow the attached installation instructions and use only shielded interface cables with the limits for help. This Class B digital apparatus complies with Part 15 of North America 1-800-211...

Basic Owners Manual
Page 17
.... Select [YES] and perform Steps 2 to 3 to be displayed. Basic Selecting a media to record [HC-V520M] The card and built-in yellow. 4 Touch [ENTER]. 17 VQT4Q29 Preparation Setting date and time The clock is turned on for the first time, a message asking you to set the date and time will appear. Exit the screen if the setup is not necessary. ≥ When the unit is...
.... Select [YES] and perform Steps 2 to 3 to be displayed. Basic Selecting a media to record [HC-V520M] The card and built-in yellow. 4 Touch [ENTER]. 17 VQT4Q29 Preparation Setting date and time The clock is turned on for the first time, a message asking you to set the date and time will appear. Exit the screen if the setup is not necessary. ≥ When the unit is...

Owners Manual
Page 4
... Picture Recording Mode 24 Intelligent Auto Mode 25 Motion picture/Still picture playback ......... 27 Using the menu screen 30 Using the Setup Menu 31 Advanced (Recording) Using the zoom 40 Zoom ratio during the Still Picture Recording Mode 40 Image Stabilizer Function 41 Changing the Recording Mode 43 Intelligent Auto Plus 44 Creative Control 44 Scene Mode 47 Manual recording 49 White Balance 50 Manual shutter speed/iris adjustment .... 51 Manual Focus adjustment 52 Recording with the Touch Function ...........53 Touch function icons 53 Recording functions of operation icons...
... Picture Recording Mode 24 Intelligent Auto Mode 25 Motion picture/Still picture playback ......... 27 Using the menu screen 30 Using the Setup Menu 31 Advanced (Recording) Using the zoom 40 Zoom ratio during the Still Picture Recording Mode 40 Image Stabilizer Function 41 Changing the Recording Mode 43 Intelligent Auto Plus 44 Creative Control 44 Scene Mode 47 Manual recording 49 White Balance 50 Manual shutter speed/iris adjustment .... 51 Manual Focus adjustment 52 Recording with the Touch Function ...........53 Touch function icons 53 Recording functions of operation icons...
Owners Manual
Page 5
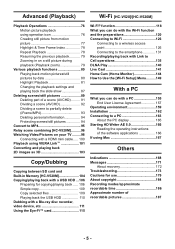
... [HC-V520M].......... 96 Watching Video/Pictures on your TV ......... 98 Connecting with a HDMI mini cable..... 100 Playback using VIERA Link 101 Converting and playing back 2D images as 3D 103 Copy/Dubbing Copying between SD card and Built-in Memory [HC-V520M 104 Copying/playing back with a USB HDD ... 106 Preparing for copying/playing back ..... 106 Simple copy 109 Copy selected files 109 Playing back the USB HDD 110 Dubbing with a Blu-ray disc recorder, video...
... [HC-V520M].......... 96 Watching Video/Pictures on your TV ......... 98 Connecting with a HDMI mini cable..... 100 Playback using VIERA Link 101 Converting and playing back 2D images as 3D 103 Copy/Dubbing Copying between SD card and Built-in Memory [HC-V520M 104 Copying/playing back with a USB HDD ... 106 Preparing for copying/playing back ..... 106 Simple copy 109 Copy selected files 109 Playing back the USB HDD 110 Dubbing with a Blu-ray disc recorder, video...

Owners Manual
Page 20
Basic Selecting a media to record [HC-V520M] The card and built-in memory can be selected separately to record motion pictures or still pictures. 1 Change the mode to or . 2 Select the menu. (l 30) MENU : [MEDIA SELECT] 3 Touch the media to record motion pictures or still pictures. ≥ The media selected separately for motion pictures or still pictures is highlighted in yellow. 4 Touch [ENTER]. - 20 -
Basic Selecting a media to record [HC-V520M] The card and built-in memory can be selected separately to record motion pictures or still pictures. 1 Change the mode to or . 2 Select the menu. (l 30) MENU : [MEDIA SELECT] 3 Touch the media to record motion pictures or still pictures. ≥ The media selected separately for motion pictures or still pictures is highlighted in yellow. 4 Touch [ENTER]. - 20 -

Owners Manual
Page 23
... focus indication and the focus area may not be displayed when the button is pressed halfway.) ≥ Using a tripod is recommended when recording still pictures in dark places because the shutter speed becomes slow. ≥ You can also take a picture just by touching the subject to . 2 Open the LCD monitor. 3 Press the button halfway. (For Auto Focus only) Focus indication: A Focus indication: ± (The white lamp flashes.): Focusing ¥ (The green lamp lights up...
... focus indication and the focus area may not be displayed when the button is pressed halfway.) ≥ Using a tripod is recommended when recording still pictures in dark places because the shutter speed becomes slow. ≥ You can also take a picture just by touching the subject to . 2 Open the LCD monitor. 3 Press the button halfway. (For Auto Focus only) Focus indication: A Focus indication: ± (The white lamp flashes.): Focusing ¥ (The green lamp lights up...

Owners Manual
Page 34
... Quick Start may take some time for 4 times When an error occurs. The status indicator A lights red and the unit is put into Quick Start Standby Mode automatically with the [ECONOMY (BATT)] (l 33)/[ECONOMY (AC)] (l 33), close . 3 Open the LCD monitor. When [OFF] is selected, the sound is not output at the start/end of recording and unit on/off using the power button. [ALERT SOUND] Touch screen operation, starting and stopping of recording, etc. MENU : [SETUP] # [QUICK START...
... Quick Start may take some time for 4 times When an error occurs. The status indicator A lights red and the unit is put into Quick Start Standby Mode automatically with the [ECONOMY (BATT)] (l 33)/[ECONOMY (AC)] (l 33), close . 3 Open the LCD monitor. When [OFF] is selected, the sound is not output at the start/end of recording and unit on/off using the power button. [ALERT SOUND] Touch screen operation, starting and stopping of recording, etc. MENU : [SETUP] # [QUICK START...

Owners Manual
Page 35
MENU : [SETUP] # [POWER LCD] # desired setting +2 (Makes even brighter)/ +1 (Makes brighter)/ 0 (Normal)/ -1 (Makes less bright)/ A *(Automatic adjustment) ≥ These settings will not affect the images actually recorded. * It is not displayed in the Manual Mode or in the Playback Mode. ≥ When the AC adaptor is in use, the LCD monitor is made brighter. [LCD SET] It adjusts brightness and color density on the operation icon. ≥ To cancel, touch the operation icon again. 4 Touch [ENTER]. [POWER LCD] This makes it...
MENU : [SETUP] # [POWER LCD] # desired setting +2 (Makes even brighter)/ +1 (Makes brighter)/ 0 (Normal)/ -1 (Makes less bright)/ A *(Automatic adjustment) ≥ These settings will not affect the images actually recorded. * It is not displayed in the Manual Mode or in the Playback Mode. ≥ When the AC adaptor is in use, the LCD monitor is made brighter. [LCD SET] It adjusts brightness and color density on the operation icon. ≥ To cancel, touch the operation icon again. 4 Touch [ENTER]. [POWER LCD] This makes it...
Owners Manual
Page 56
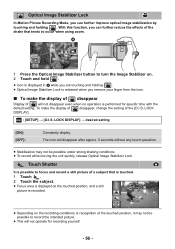
... specific time with the default setting. Touch Shutter It is possible to focus and record a still picture of a subject that tends to occur when using zoom. 1 Press the Optical Image Stabilizer button to record the intended picture. ≥ This will disappear after approx. 5 seconds without any touch operation. ≥ Stabilization may not be possible to turn the Image Stabilizer on the recording conditions or recognition of the [O.I .S. MENU : [SETUP] # [O.I .S. To make...
... specific time with the default setting. Touch Shutter It is possible to focus and record a still picture of a subject that tends to occur when using zoom. 1 Press the Optical Image Stabilizer button to record the intended picture. ≥ This will disappear after approx. 5 seconds without any touch operation. ≥ Stabilization may not be possible to turn the Image Stabilizer on the recording conditions or recognition of the [O.I .S. MENU : [SETUP] # [O.I .S. To make...
Owners Manual
Page 59
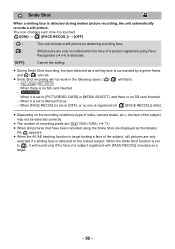
The icon changes each time it is set to Manual Focus j When [FACE RECOG.] is set to [PICTURE/SD CARD] in [MEDIA SELECT], and there is no SD card inserted j When it is touched. ([ON]) # ([FACE RECOG.]) # [OFF] : The unit records a still picture on the locked subject. When the Smile Shot function is set to , it will flash) j HC-V520 / HC-V510 When there is no SD card inserted j HC-V520M When...
The icon changes each time it is set to Manual Focus j When [FACE RECOG.] is set to [PICTURE/SD CARD] in [MEDIA SELECT], and there is no SD card inserted j When it is touched. ([ON]) # ([FACE RECOG.]) # [OFF] : The unit records a still picture on the locked subject. When the Smile Shot function is set to , it will flash) j HC-V520 / HC-V510 When there is no SD card inserted j HC-V520M When...

Owners Manual
Page 69
MENU : [RECORD SETUP] # [SHOOTING GUIDE] # [ON] When "CAMERA PANNING IS TOO FAST." [AUTO SLOW SHTR] You can record bright pictures even in dark places by slowing the shutter speed. ≥ Switch to Manual Mode. (l 49) MENU : [RECORD SETUP] # [AUTO SLOW SHTR] # [ON] ≥ The shutter speed is set to record the images after this function is turned [OFF]. ≥ x.v.Color™ is a name for devices that are compatible with the xvYCC format, an international standard for expanded color in motion pictures, and...
MENU : [RECORD SETUP] # [SHOOTING GUIDE] # [ON] When "CAMERA PANNING IS TOO FAST." [AUTO SLOW SHTR] You can record bright pictures even in dark places by slowing the shutter speed. ≥ Switch to Manual Mode. (l 49) MENU : [RECORD SETUP] # [AUTO SLOW SHTR] # [ON] ≥ The shutter speed is set to record the images after this function is turned [OFF]. ≥ x.v.Color™ is a name for devices that are compatible with the xvYCC format, an international standard for expanded color in motion pictures, and...
Owners Manual
Page 72
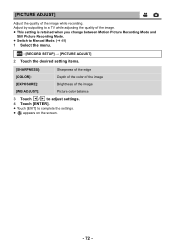
... the image [WB ADJUST]: Picture color balance 3 Touch / to adjust settings. 4 Touch [ENTER]. ≥ Touch [EXIT] to Manual Mode. (l 49) 1 Select the menu. MENU : [RECORD SETUP] # [PICTURE ADJUST] 2 Touch the desired setting items. [SHARPNESS]: Sharpness of the edge [COLOR]: Depth of the color of the image [EXPOSURE]: Brightness of the image. ≥ This setting is retained when you change between Motion Picture Recording Mode and Still Picture Recording Mode. ≥ Switch to complete the settings. ≥ appears on the screen. - 72 - [PICTURE ADJUST] Adjust the...
... the image [WB ADJUST]: Picture color balance 3 Touch / to adjust settings. 4 Touch [ENTER]. ≥ Touch [EXIT] to Manual Mode. (l 49) 1 Select the menu. MENU : [RECORD SETUP] # [PICTURE ADJUST] 2 Touch the desired setting items. [SHARPNESS]: Sharpness of the edge [COLOR]: Depth of the color of the image [EXPOSURE]: Brightness of the image. ≥ This setting is retained when you change between Motion Picture Recording Mode and Still Picture Recording Mode. ≥ Switch to complete the settings. ≥ appears on the screen. - 72 - [PICTURE ADJUST] Adjust the...

Owners Manual
Page 125
... unit to change without prior notice. (This service is recording. Acquire a USTREAM ID/Password/Program Acquire a USTREAM ID/Password/Program using a smartphone or a PC. The service content and screens which can stream and watch motion pictures this unit is current as of December 2012) Acquire a "LUMIX CLUB" Login ID/Password ≥ When you connect this unit. (l 152) Use linked services with "LUMIX CLUB" To use the...
... unit to change without prior notice. (This service is recording. Acquire a USTREAM ID/Password/Program Acquire a USTREAM ID/Password/Program using a smartphone or a PC. The service content and screens which can stream and watch motion pictures this unit is current as of December 2012) Acquire a "LUMIX CLUB" Login ID/Password ≥ When you connect this unit. (l 152) Use linked services with "LUMIX CLUB" To use the...

Owners Manual
Page 129
... connection are complete, you can use the following functions: j [Link to page 65. ≥ When the entry is complete, touch [Enter]. 5 (When there is an Encryption key) Touch [NEXT]. ≥ A message is displayed when the connection is complete. ∫ When setting from the Wi-Fi setup menu 1 Press Wi-Fi button. 2 Touch [Wi-Fi Setup]. 3 Touch [Wireless Settings]. 4 Touch the part with no display...
... connection are complete, you can use the following functions: j [Link to page 65. ≥ When the entry is complete, touch [Enter]. 5 (When there is an Encryption key) Touch [NEXT]. ≥ A message is displayed when the connection is complete. ∫ When setting from the Wi-Fi setup menu 1 Press Wi-Fi button. 2 Touch [Wi-Fi Setup]. 3 Touch [Wireless Settings]. 4 Touch the part with no display...

Owners Manual
Page 143
... delivery settings You can make the delivery setting of a broadcast notification e-mail and the setting for a specific period of the broadcast indicated in USTREAM]. 2 Touch [ON] or [OFF]. [ON]: [OFF]: Live motion pictures are using, images will disappear when no touch function is performed for the scheduled time and date of time. Configuring the live broadcast settings Touch to display the live broadcast setting screen. ≥...
... delivery settings You can make the delivery setting of a broadcast notification e-mail and the setting for a specific period of the broadcast indicated in USTREAM]. 2 Touch [ON] or [OFF]. [ON]: [OFF]: Live motion pictures are using, images will disappear when no touch function is performed for the scheduled time and date of time. Configuring the live broadcast settings Touch to display the live broadcast setting screen. ≥...

Owners Manual
Page 173
... is the sound of the lens moving and is not a malfunction. This unit cannot be operated though it is turned on . ≥ Repair is needed if it is repeatedly displayed even if it is sufficiently charged. (l 11) ≥ In cold places, the battery using the TV remote control, the VIERA Link is being accessed may damage the data on and change the mode to or...
... is the sound of the lens moving and is not a malfunction. This unit cannot be operated though it is turned on . ≥ Repair is needed if it is repeatedly displayed even if it is sufficiently charged. (l 11) ≥ In cold places, the battery using the TV remote control, the VIERA Link is being accessed may damage the data on and change the mode to or...
Owners Manual
Page 174
... card that can be used for motion picture recording. (l 13) ≥ The recordable time may see horizontal bars in Auto Focus Mode, use the Manual Focus Mode to bring into focus in the image. Using the unit, format the SD card or built-in memory. (l 37) ≥ If [AGS] is strange when recording in areas of the data writing speed or repeated recording and deletion. Auto Focus function does not work. Problem Remaining battery indication is an approximation. Color or brightness of the image changes...
... card that can be used for motion picture recording. (l 13) ≥ The recordable time may see horizontal bars in Auto Focus Mode, use the Manual Focus Mode to bring into focus in the image. Using the unit, format the SD card or built-in memory. (l 37) ≥ If [AGS] is strange when recording in areas of the data writing speed or repeated recording and deletion. Auto Focus function does not work. Problem Remaining battery indication is an approximation. Color or brightness of the image changes...
Owners Manual
Page 175
... card. The images are displayed as cannot be adjusted using this unit, so adjust the sound on the SD card by the USB cable, this unit) ≥ Connect with the USB cable. When connected by connecting to other devices. Refer to the operating instructions of the device for the connection. ≥ Change the [TV ASPECT] setting to match the aspect ratio of SD card (SD Memory Card/SDHC Memory Card/SDXC Memory Card) that matches the input used...
... card. The images are displayed as cannot be adjusted using this unit, so adjust the sound on the SD card by the USB cable, this unit) ≥ Connect with the USB cable. When connected by connecting to other devices. Refer to the operating instructions of the device for the connection. ≥ Change the [TV ASPECT] setting to match the aspect ratio of SD card (SD Memory Card/SDHC Memory Card/SDXC Memory Card) that matches the input used...
Owners Manual
Page 186
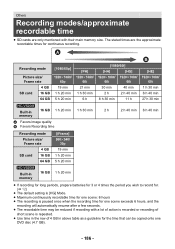
...Use time in the row of 4 GB in memory 16 GB 1 h 20 min ≥ If recording for long periods, prepare batteries for 3 or 4 times the period you wish to record for. (l 12) ≥ The default setting is [HG] Mode. ≥ Maximum continuously recordable time for one DVD disc (4.7 GB). - 186 - Others Recording modes/approximate recordable time ≥ SD cards are the approximate recordable times...30 min HC-V520M Built-in 16 GB 1 h 20 min 1 h 30 min 2h 2 h 40 min 6 h 40 min memory A Favors image quality B Favors Recording time Recording mode Picture size/ Frame rate 4 GB SD card 16 ...
...Use time in the row of 4 GB in memory 16 GB 1 h 20 min ≥ If recording for long periods, prepare batteries for 3 or 4 times the period you wish to record for. (l 12) ≥ The default setting is [HG] Mode. ≥ Maximum continuously recordable time for one DVD disc (4.7 GB). - 186 - Others Recording modes/approximate recordable time ≥ SD cards are the approximate recordable times...30 min HC-V520M Built-in 16 GB 1 h 20 min 1 h 30 min 2h 2 h 40 min 6 h 40 min memory A Favors image quality B Favors Recording time Recording mode Picture size/ Frame rate 4 GB SD card 16 ...
Wi-Fi Connection Guide
Page 1
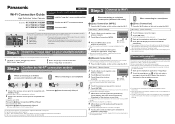
... start up "Image App" again. ≥ When the connection is required. B [Manual Connection] ≥ Please refer to the operating instruction of the device in use for details about the setup/operation of Step.3 * WPS is pressed for details about [Manual Setting], please A [Delete] B [ENTER] refer to the owner's manual (PDF format) of the wireless access point. ≥ For details on the smartphone screen. HC-X920/HC-X920M HC-V720/HC...
... start up "Image App" again. ≥ When the connection is required. B [Manual Connection] ≥ Please refer to the operating instruction of the device in use for details about the setup/operation of Step.3 * WPS is pressed for details about [Manual Setting], please A [Delete] B [ENTER] refer to the owner's manual (PDF format) of the wireless access point. ≥ For details on the smartphone screen. HC-X920/HC-X920M HC-V720/HC...


