
User Manual
Page 6
..., electromagnetic waves, breakage, and failures, back up data periodically. k Be sure to take some test pictures beforehand Before those important events, be sure to take some trial pictures to confirm that result in loss of recording or edited content, and does not guarantee any content if ...recording or editing does not work properly. k Indemnity about recorded content Panasonic does not accept any responsibility for damages directly ...
..., electromagnetic waves, breakage, and failures, back up data periodically. k Be sure to take some test pictures beforehand Before those important events, be sure to take some trial pictures to confirm that result in loss of recording or edited content, and does not guarantee any content if ...recording or editing does not work properly. k Indemnity about recorded content Panasonic does not accept any responsibility for damages directly ...

User Manual
Page 20
.../exiting the Menu Screen 45 Using the Menu 46 Overview of the Menu Screen 48 INTELLIGENT AUTO MODE 56 „ BASIC OPERATION SHOOTING BEFORE TAKING PICTURES 59 For best results 59 How to use the accessories 60 VIDEO RECORDING 61 TAKING PHOTOS 62 Shoot a photo while recording a video 64 MACRO-PHOTOGRAPHY...
.../exiting the Menu Screen 45 Using the Menu 46 Overview of the Menu Screen 48 INTELLIGENT AUTO MODE 56 „ BASIC OPERATION SHOOTING BEFORE TAKING PICTURES 59 For best results 59 How to use the accessories 60 VIDEO RECORDING 61 TAKING PHOTOS 62 Shoot a photo while recording a video 64 MACRO-PHOTOGRAPHY...

User Manual
Page 23
... the HDMI terminal 160 PLAYING BACK ON A TV 161 Playback using VIERA Link™ (HDAVI Control 161 COPYING/DUBBING COPYING/DUBBING 164 Dubbing in standard picture quality 164 „ IMPORTANT MESSAGES AND ALERTS COMMONLY ASKED QUESTIONS 166 TROUBLESHOOTING 173 Camera 173 Restrictions concerning the Scene Mode and Colour Mode features 180...
... the HDMI terminal 160 PLAYING BACK ON A TV 161 Playback using VIERA Link™ (HDAVI Control 161 COPYING/DUBBING COPYING/DUBBING 164 Dubbing in standard picture quality 164 „ IMPORTANT MESSAGES AND ALERTS COMMONLY ASKED QUESTIONS 166 TROUBLESHOOTING 173 Camera 173 Restrictions concerning the Scene Mode and Colour Mode features 180...

User Manual
Page 45
... tab menu, while the screen shown above is displayed, press [G]; MENU button Arrow keys VQT3P45 45 h The Menu Screen appears. Tab RECORDING MENU 1 1 2 3 REC MODE PICTURE SIZE 1080-30p 16M-S SCENE MODE 1 COLOUR MODE 2 FLASH 3 SELF TIMER SET ENTER Option tab k To display a different Tab Menu h The Menu Screen consists of...
... tab menu, while the screen shown above is displayed, press [G]; MENU button Arrow keys VQT3P45 45 h The Menu Screen appears. Tab RECORDING MENU 1 1 2 3 REC MODE PICTURE SIZE 1080-30p 16M-S SCENE MODE 1 COLOUR MODE 2 FLASH 3 SELF TIMER SET ENTER Option tab k To display a different Tab Menu h The Menu Screen consists of...
User Manual
Page 46
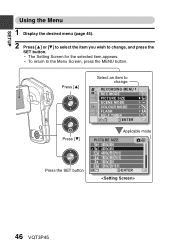
Press [I ] or [J] to select the item you wish to change RECORDING MENU 1 1 2 3 REC MODE PICTURE SIZE 1080-30p 16M-S SCENE MODE 1 COLOUR MODE 2 FLASH 3 SELF TIMER ENTER Applicable mode PICTURE SIZE 16M-H 4608x3456 16M-S 4608x3456 12M 4608x2592[16:9] 2M 1920x1080[16:9] 2M 1600x1200 0.9M 1280x720[16:9] ENTER 46 VQT3P45 SETUP Using the Menu...
Press [I ] or [J] to select the item you wish to change RECORDING MENU 1 1 2 3 REC MODE PICTURE SIZE 1080-30p 16M-S SCENE MODE 1 COLOUR MODE 2 FLASH 3 SELF TIMER ENTER Applicable mode PICTURE SIZE 16M-H 4608x3456 16M-S 4608x3456 12M 4608x2592[16:9] 2M 1920x1080[16:9] 2M 1600x1200 0.9M 1280x720[16:9] ENTER 46 VQT3P45 SETUP Using the Menu...

User Manual
Page 48
SETUP Overview of the Menu Screen Recording Menu RECORDING MENU 1 1 2 3 REC MODE PICTURE SIZE 1080-30p 1 16M-S 2 SCENE MODE 3 1 COLOUR MODE 4 2 FLASH 5 3 SELF TIMER 6 ENTER 7 1 Recording mode (page 78) : Record at 1920 × 1080 pixels (60i). : Record at 1920 × 1080 pixels (30p). : Record at 1280 × 720 pixels (60p). : Record at 1280 × 720 pixels (30p). : Record at 960 × 540 pixels (30p). : Record at 640 × 480 pixels (30p).
SETUP Overview of the Menu Screen Recording Menu RECORDING MENU 1 1 2 3 REC MODE PICTURE SIZE 1080-30p 1 16M-S 2 SCENE MODE 3 1 COLOUR MODE 4 2 FLASH 5 3 SELF TIMER 6 ENTER 7 1 Recording mode (page 78) : Record at 1920 × 1080 pixels (60i). : Record at 1920 × 1080 pixels (30p). : Record at 1280 × 720 pixels (60p). : Record at 1280 × 720 pixels (30p). : Record at 960 × 540 pixels (30p). : Record at 640 × 480 pixels (30p).

User Manual
Page 58
... 8 Sunrise or sunset 9 Candlelight 9 1 000K If the automatic white balance is surrounded by objects with glossy surfaces or by highly reflective objects 58 VQT3P45 Record pictures in the following situations. If so, manually adjust these settings. i Auto focus does not work correctly in the Manual Focus Mode. (page 85) h Recording distant...
... 8 Sunrise or sunset 9 Candlelight 9 1 000K If the automatic white balance is surrounded by objects with glossy surfaces or by highly reflective objects 58 VQT3P45 Record pictures in the following situations. If so, manually adjust these settings. i Auto focus does not work correctly in the Manual Focus Mode. (page 85) h Recording distant...
User Manual
Page 59
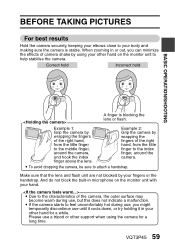
BASIC OPERATION SHOOTING BASIC OPERATION/SHOOTING BEFORE TAKING PICTURES For best results Hold the camera securely, keeping your elbows close to attach a handstrap. Example 2: Grip the camera by wrapping the fingers of the camera, ...
BASIC OPERATION SHOOTING BASIC OPERATION/SHOOTING BEFORE TAKING PICTURES For best results Hold the camera securely, keeping your elbows close to attach a handstrap. Example 2: Grip the camera by wrapping the fingers of the camera, ...
User Manual
Page 65
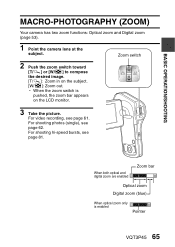
... lens at the subject. Zoom switch 2 Push the zoom switch toward [T/]] or [W/P] to compose the desired image. [T/]]: Zoom in on the LCD monitor. 3 Take the picture.
... lens at the subject. Zoom switch 2 Push the zoom switch toward [T/]] or [W/P] to compose the desired image. [T/]]: Zoom in on the LCD monitor. 3 Take the picture.
User Manual
Page 66
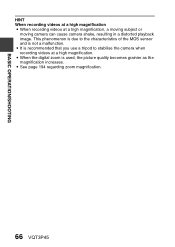
This phenomenon is due to the characteristics of the MOS sensor and is recommended that you use a tripod to stabilise the camera when recording videos at a high magnification, a moving subject or moving camera can cause camera shake, resulting in a distorted playback image. i It is not a malfunction. BASIC OPERATION/SHOOTING HINT When recording videos at a high magnification i When recording videos at a high magnification. i When the digital zoom is used, the picture quality becomes grainier as the magnification increases. i See page 194 regarding zoom magnification. 66 VQT3P45
This phenomenon is due to the characteristics of the MOS sensor and is recommended that you use a tripod to stabilise the camera when recording videos at a high magnification, a moving subject or moving camera can cause camera shake, resulting in a distorted playback image. i It is not a malfunction. BASIC OPERATION/SHOOTING HINT When recording videos at a high magnification i When recording videos at a high magnification. i When the digital zoom is used, the picture quality becomes grainier as the magnification increases. i See page 194 regarding zoom magnification. 66 VQT3P45

User Manual
Page 84
... make it may be insignificant. i When the scene mode function is not a malfunction. Motion compensation (image stabiliser) setting (page 51) Your camera can minimize a jittery picture by compensating for violent motion.
... make it may be insignificant. i When the scene mode function is not a malfunction. Motion compensation (image stabiliser) setting (page 51) Your camera can minimize a jittery picture by compensating for violent motion.
User Manual
Page 89
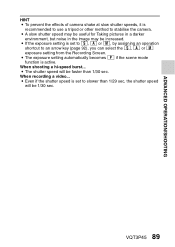
... will be increased. When recording a video... i Even if the shutter speed is set to stabilise the camera. i A slow shutter speed may be useful for Taking pictures in a darker environment, but noise in the image may be 1/30 sec.
... will be increased. When recording a video... i Even if the shutter speed is set to stabilise the camera. i A slow shutter speed may be useful for Taking pictures in a darker environment, but noise in the image may be 1/30 sec.
User Manual
Page 113
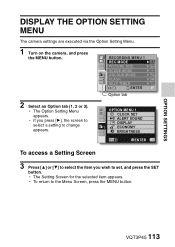
... the item you press [H], the screen to select a setting to change appears. h To return to set, and press the SET button. RECORDING MENU 1 1 2 3 REC MODE PICTURE SIZE 1080-30p 16M-S SCENE MODE 1 COLOUR MODE 2 FLASH 3 SELF TIMER SET ENTER Option tab 2 Select an Option tab (1, 2 or 3). h If you wish to the...
... the item you press [H], the screen to select a setting to change appears. h To return to set, and press the SET button. RECORDING MENU 1 1 2 3 REC MODE PICTURE SIZE 1080-30p 16M-S SCENE MODE 1 COLOUR MODE 2 FLASH 3 SELF TIMER SET ENTER Option tab 2 Select an Option tab (1, 2 or 3). h If you wish to the...
User Manual
Page 131
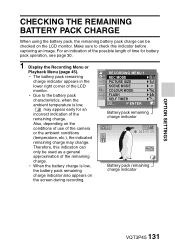
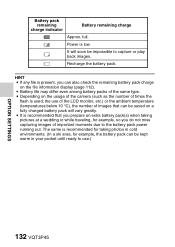
For an indication of the possible length of the LCD monitor. Therefore, this indicator before capturing an image. RECORDING MENU 1 1 2 3 REC MODE PICTURE SIZE 1080-30p 16M-S SCENE MODE 1 COLOUR MODE 2 FLASH 3 SELF TIMER ENTER Battery pack remaining charge indicator 2M 1080-30p 000:00:09 Battery pack ...
For an indication of the possible length of the LCD monitor. Therefore, this indicator before capturing an image. RECORDING MENU 1 1 2 3 REC MODE PICTURE SIZE 1080-30p 16M-S SCENE MODE 1 COLOUR MODE 2 FLASH 3 SELF TIMER ENTER Battery pack remaining charge indicator 2M 1080-30p 000:00:09 Battery pack ...
User Manual
Page 132
Recharge the battery pack. i It is recommended for taking pictures at a wedding or while traveling, for example, the battery pack can be kept warm in your pocket until ready to use of the LCD monitor, ...
Recharge the battery pack. i It is recommended for taking pictures at a wedding or while traveling, for example, the battery pack can be kept warm in your pocket until ready to use of the LCD monitor, ...
User Manual
Page 139
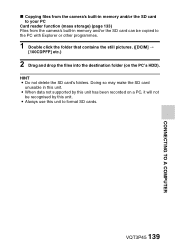
... be recognised by this unit. i Always use this unit to the PC with Explorer or other programmes. 1 Double click the folder that contains the still pictures. ([DCIM] _ [100CDPFP] etc.) 2 Drag and drop the files into the destination folder (on a PC, it will not be copied to format SD cards. CONNECTING TO...
... be recognised by this unit. i Always use this unit to the PC with Explorer or other programmes. 1 Double click the folder that contains the still pictures. ([DCIM] _ [100CDPFP] etc.) 2 Drag and drop the files into the destination folder (on a PC, it will not be copied to format SD cards. CONNECTING TO...
User Manual
Page 142
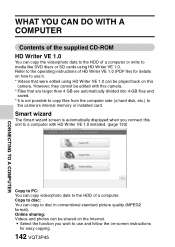
... video/photo data to media like DVD discs or SD cards using HD Writer VE 1.0 can be shared on how to disc in conventional standard picture quality (MPEG2 format). Online sharing: Videos and photos can be played back on -screen instructions for details on the Internet. i Select the function you connect...
... video/photo data to media like DVD discs or SD cards using HD Writer VE 1.0 can be shared on how to disc in conventional standard picture quality (MPEG2 format). Online sharing: Videos and photos can be played back on -screen instructions for details on the Internet. i Select the function you connect...
User Manual
Page 143
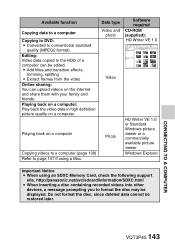
... Extract frames from the video Online sharing: You can be edited. Playing back on a computer: Play back the video data in high definition picture quality on the Internet and share them with your family and friends. Do not format the disc, since deleted data cannot be displayed. Editing: ...Video data copied to format the disc may be restored later. http://panasonic.net/avc/sdcard/information/SDXC.html i When inserting a disc containing recorded videos into other devices, a message prompting you to the HDD of a...
... Extract frames from the video Online sharing: You can be edited. Playing back on a computer: Play back the video data in high definition picture quality on the Internet and share them with your family and friends. Do not format the disc, since deleted data cannot be displayed. Editing: ...Video data copied to format the disc may be restored later. http://panasonic.net/avc/sdcard/information/SDXC.html i When inserting a disc containing recorded videos into other devices, a message prompting you to the HDD of a...
User Manual
Page 148
... access (required for online functions "Online sharing") i Supplied CD-ROM is not guaranteed. Note that are not displayed. i Some files that other time-shifting motion picture editing software or video capture products. h Be sure to malfunction. h Please update the standard graphics modules such as OS and DirectX to the latest version...
... access (required for online functions "Online sharing") i Supplied CD-ROM is not guaranteed. Note that are not displayed. i Some files that other time-shifting motion picture editing software or video capture products. h Be sure to malfunction. h Please update the standard graphics modules such as OS and DirectX to the latest version...
User Manual
Page 164
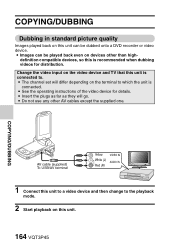
COPYING/DUBBING COPYING/DUBBING COPYING/DUBBING Dubbing in standard picture quality Images played back on this unit can be dubbed onto a DVD recorder or video device. i Images can be played back even on this is ...
COPYING/DUBBING COPYING/DUBBING COPYING/DUBBING Dubbing in standard picture quality Images played back on this unit can be dubbed onto a DVD recorder or video device. i Images can be played back even on this is ...


