
Brochure
Page 2
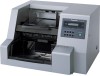
... ipm KV-S3105C Up to be saved as they are subject to 80% RH External Dimensions 24.7" (W) x 21.5" (D) x 16.3" (H) (627 mm x 546 mm x 415 mm) Weight Approx. 114 lb (52 Kg) Accessories CD ROM: Operation instructions, Installation manual, Maintenance manual, RTIV™ manual, PIE manual, RTIV...174;, ISIS® and ISIS-CertifiedTM are trademarks of North America Two Panasonic Way, Secaucus, NJ 07094 Call 1-800-742-8086 for a local dealer http://panasonic.com/scanners Specifications KV-S3105C KV-S3085 Scanning face Duplex, Sheet Feed Scanning Scanning Method 3-Line CCD image ...
... ipm KV-S3105C Up to be saved as they are subject to 80% RH External Dimensions 24.7" (W) x 21.5" (D) x 16.3" (H) (627 mm x 546 mm x 415 mm) Weight Approx. 114 lb (52 Kg) Accessories CD ROM: Operation instructions, Installation manual, Maintenance manual, RTIV™ manual, PIE manual, RTIV...174;, ISIS® and ISIS-CertifiedTM are trademarks of North America Two Panasonic Way, Secaucus, NJ 07094 Call 1-800-742-8086 for a local dealer http://panasonic.com/scanners Specifications KV-S3105C KV-S3085 Scanning face Duplex, Sheet Feed Scanning Scanning Method 3-Line CCD image ...

Operating Instructions
Page 1
Model No. KV-S3085 These instructions contain information on operating the scanner. Do not expose the CD-ROM to direct sunlight or extreme heat and do not scratch or smudge the surface of the CD-ROM. Keep all documentation in the protective case. Please carefully read these instructions, please read the installation manual enclosed with this unit. Before reading these instructions, the enclosed installation manual and maintenance manual. Keep the CD-ROM in a safe place for future reference. KV-S3105C Model No.
Model No. KV-S3085 These instructions contain information on operating the scanner. Do not expose the CD-ROM to direct sunlight or extreme heat and do not scratch or smudge the surface of the CD-ROM. Keep all documentation in the protective case. Please carefully read these instructions, please read the installation manual enclosed with this unit. Before reading these instructions, the enclosed installation manual and maintenance manual. Keep the CD-ROM in a safe place for future reference. KV-S3105C Model No.

Operating Instructions
Page 32
...ADF selector is located on the left side of the scanner. ≥ If thin paper (with paper weight 40 to "MANUAL". ¥ Continuous scanning Setting Position Status 1 When double feeding occurs at the paper feed component. ADF selector 12 3 4 5 MANUAL ADF ADJ. Paper path selector ∫ Setting the ... paper 5 When a jam occurs at the paper feed component, the optional roller exchange kit for thin paper (KV-SS027) is located on the left side of the scanner. When double feeding occurs 2 frequently or scanning a document with a rough face as in the correct position for...
...ADF selector is located on the left side of the scanner. ≥ If thin paper (with paper weight 40 to "MANUAL". ¥ Continuous scanning Setting Position Status 1 When double feeding occurs at the paper feed component. ADF selector 12 3 4 5 MANUAL ADF ADJ. Paper path selector ∫ Setting the ... paper 5 When a jam occurs at the paper feed component, the optional roller exchange kit for thin paper (KV-SS027) is located on the left side of the scanner. When double feeding occurs 2 frequently or scanning a document with a rough face as in the correct position for...

Operating Instructions
Page 45
Replacing Consumables Feed rollers Green levers ADF selector 12 3 4 5 MANUAL The ADF selector is located on the left side of the arrows until they click into place. ≥ After installing the paper feed roller module, confirm that the feed rollers can be moved lightly in vertical direction. µ Retard roller module 8 Set the ADF selector to the "MANUAL" position. (See page 32). 7 Push up the green levers at both ends in the direction of the scanner. 45
Replacing Consumables Feed rollers Green levers ADF selector 12 3 4 5 MANUAL The ADF selector is located on the left side of the arrows until they click into place. ≥ After installing the paper feed roller module, confirm that the feed rollers can be moved lightly in vertical direction. µ Retard roller module 8 Set the ADF selector to the "MANUAL" position. (See page 32). 7 Push up the green levers at both ends in the direction of the scanner. 45
Operating Instructions
Page 51
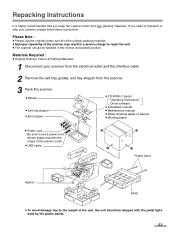
...the exit tray guides, exit tray stopper from the scanner. 3 Pack the scanner. ≥ Blower ≥ Exit tray stopper ≥ Exit stopper ≥ CD-ROM (1 piece) Operating instructions Driver software ≥ Installation manual ≥ Maintenance manual ≥ Roller cleaning paper (3 pieces) ≥ ...Shading paper ≥ Power cord Be sure to repair the unit. ≥ The scanner should be handled in a service charge to use the...
...the exit tray guides, exit tray stopper from the scanner. 3 Pack the scanner. ≥ Blower ≥ Exit tray stopper ≥ Exit stopper ≥ CD-ROM (1 piece) Operating instructions Driver software ≥ Installation manual ≥ Maintenance manual ≥ Roller cleaning paper (3 pieces) ≥ ...Shading paper ≥ Power cord Be sure to repair the unit. ≥ The scanner should be handled in a service charge to use the...

Operating Instructions
Page 52
...KV-S3105C KV-S3085 Duplex scanning Front side : 3-line (RGB) color CCD Back side : 3-line (RGB) color CCD 302 mm (11.9 in.) 302 mm (11.9 in the scanner. Simplex scanning Letter 88 pages /min. Duplex scanning Letter 166 images /min. A4 160 images /min. Duplex scanning Letter 190 images /min. Refer to PIE Reference Manual... for thin paper (KV-SS027) is 400 dpi. Duplex ...
...KV-S3105C KV-S3085 Duplex scanning Front side : 3-line (RGB) color CCD Back side : 3-line (RGB) color CCD 302 mm (11.9 in.) 302 mm (11.9 in the scanner. Simplex scanning Letter 88 pages /min. Duplex scanning Letter 166 images /min. A4 160 images /min. Duplex scanning Letter 190 images /min. Refer to PIE Reference Manual... for thin paper (KV-SS027) is 400 dpi. Duplex ...
Operating Instructions
Page 54
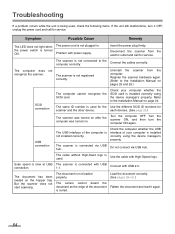
...Do not connect via USB hub. The scanner is connected with power supply. Problem with USB 1.1. The scanner is not registered correctly. The scanner is not connected to the computer correctly. Register the scanner hardware again. (Refer to the Installation Manual on pages 25 and 26.) SCSI ... Cause Remedy The LED does not light when the power switch is not plugged in. Refer to the Installation Manual on page 24. But the scanner does not start scanning. Check your computer is installed correctly using the device manager's property. Connect with High-Speed...
...Do not connect via USB hub. The scanner is connected with power supply. Problem with USB 1.1. The scanner is not registered correctly. The scanner is not connected to the computer correctly. Register the scanner hardware again. (Refer to the Installation Manual on pages 25 and 26.) SCSI ... Cause Remedy The LED does not light when the power switch is not plugged in. Refer to the Installation Manual on page 24. But the scanner does not start scanning. Check your computer is installed correctly using the device manager's property. Connect with High-Speed...


