
Mfp Laser Fax
Page 3
Location of each button, see page 10. For a description of controls Please keep this page open when following operating instructions. Buttons (Listed in alphabetical order) BROADCAST B HELP N CALLER ID L LOWER D COLLATE E MANUAL BROAD C CONTRAST F MENU I COPY P MONITOR V DIRECTORY E Navigator key S FAX O PAUSE T FAX AUTO ANSWER M QUICK SCAN H FLASH U REDIAL T RESOLUTION G SCAN R SET Q START W Station keys A STOP K TONE J ZOOM H ii
Location of each button, see page 10. For a description of controls Please keep this page open when following operating instructions. Buttons (Listed in alphabetical order) BROADCAST B HELP N CALLER ID L LOWER D COLLATE E MANUAL BROAD C CONTRAST F MENU I COPY P MONITOR V DIRECTORY E Navigator key S FAX O PAUSE T FAX AUTO ANSWER M QUICK SCAN H FLASH U REDIAL T RESOLUTION G SCAN R SET Q START W Station keys A STOP K TONE J ZOOM H ii

Mfp Laser Fax
Page 9
...pattern assigned for the one-touch dial feature and navigator directory......... 31 3.5 Sending a fax using MultiFunction Station 55 7.8 Confirming the status of the unit....... 56 7.9 Other information (KX-FLB811 only 56 8. Display 67 Troubleshooting 9.3 When a function does not work, check ...here 70 7 Preparation Connections and Setup 2.1 Connections 21 2.2 Dialing mode 22 2.3 Selecting the operation mode (Fax/ Copy/Scan 22 Help Button 2.4 Help function...
...pattern assigned for the one-touch dial feature and navigator directory......... 31 3.5 Sending a fax using MultiFunction Station 55 7.8 Confirming the status of the unit....... 56 7.9 Other information (KX-FLB811 only 56 8. Display 67 Troubleshooting 9.3 When a function does not work, check ...here 70 7 Preparation Connections and Setup 2.1 Connections 21 2.2 Dialing mode 22 2.3 Selecting the operation mode (Fax/ Copy/Scan 22 Help Button 2.4 Help function...

Mfp Laser Fax
Page 12
... drum unit*1 (KX-FA86) - E {COLLATE}{DIRECTORY} L To make a collated copy (page 46). M {FAX AUTO ANSWER} L To turn the auto answer setting ON/OFF (page 36). 10 For assistance, please visit http://www.panasonic.com/consumersupport FA87/KX-FA85) - credit... card type, number, expiration date and your name, shipping address and telephone number - F {CONTRAST} L To select a contrast (page 28, 45). H {ZOOM}{QUICK SCAN...
... drum unit*1 (KX-FA86) - E {COLLATE}{DIRECTORY} L To make a collated copy (page 46). M {FAX AUTO ANSWER} L To turn the auto answer setting ON/OFF (page 36). 10 For assistance, please visit http://www.panasonic.com/consumersupport FA87/KX-FA85) - credit... card type, number, expiration date and your name, shipping address and telephone number - F {CONTRAST} L To select a contrast (page 28, 45). H {ZOOM}{QUICK SCAN...
Mfp Laser Fax
Page 13
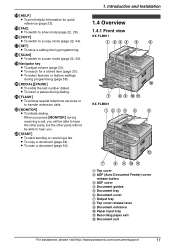
...stored item (page 33). O {FAX} L To switch to a scan mode (page 22, 54). P {COPY} L To switch to a copy mode (page 22, 44). Introduction and Installation 1.4 Overview 1.4.1 Front view KX-FLB811 1 23 4 5 6 l 7 89 jk KX-FLB801 1 23 4 5 6... l 7 8 9 jk 1 Top cover 2 ADF (Auto Document Feeder) cover release button 3 ADF cover 4 Document guides 5 Document tray 6 Document cover 7 Output tray 8 Top cover release lever 9 Document entrance j Paper input tray k Recording paper exit l Document exit For assistance, please visit http://www.panasonic...
...stored item (page 33). O {FAX} L To switch to a scan mode (page 22, 54). P {COPY} L To switch to a copy mode (page 22, 44). Introduction and Installation 1.4 Overview 1.4.1 Front view KX-FLB811 1 23 4 5 6 l 7 89 jk KX-FLB801 1 23 4 5 6... l 7 8 9 jk 1 Top cover 2 ADF (Auto Document Feeder) cover release button 3 ADF cover 4 Document guides 5 Document tray 6 Document cover 7 Output tray 8 Top cover release lever 9 Document entrance j Paper input tray k Recording paper exit l Document exit For assistance, please visit http://www.panasonic...

Mfp Laser Fax
Page 24
... the one of the following buttons. - {FAX}: Select this mode when using the unit as a fax machine (page 28). - {COPY}: Select this mode when using the unit as a copy machine (page 44). - {SCAN}: Select this setting depending on page 60). 22 For assistance, please visit http://www.panasonic.com/consumersupport DIALING MODE =TONE [V^] 3 Press... cannot dial (page 28), change the default operation mode (feature #463 on page 60) and the timer before returning to exit. 2.3 Selecting the operation mode (Fax/Copy/Scan) This unit has three operation modes.
... the one of the following buttons. - {FAX}: Select this mode when using the unit as a fax machine (page 28). - {COPY}: Select this mode when using the unit as a copy machine (page 44). - {SCAN}: Select this setting depending on page 60). 22 For assistance, please visit http://www.panasonic.com/consumersupport DIALING MODE =TONE [V^] 3 Press... cannot dial (page 28), change the default operation mode (feature #463 on page 60) and the timer before returning to exit. 2.3 Selecting the operation mode (Fax/Copy/Scan) This unit has three operation modes.

Mfp Laser Fax
Page 27
...3 Press {SET}. Press {5} 3 times. Press {>} to move the cursor to the next space. LOGO=B|i For assistance, please visit http://www.panasonic.com/consumersupport 25 See the following character table for details. 5 Press {SET}. Press {2} 2 times. LOGO=BI|L 6 Press {MENU} to... the next space and press {5} 3 times. Note: L Your logo will be your name or the name of each page sent from your company. {ZOOM}/{QUICK SCAN} {MENU} Keypad {8} {9} {0} Characters T UVt u v 8 WX Y Z w x y z 9 0 {SET} {FLASH} {}{V}{^} {STOP} 1 Press {MENU}. Press {2} 2 times. Press {#}. LOGO=| 4 Enter ...
...3 Press {SET}. Press {5} 3 times. Press {>} to move the cursor to the next space. LOGO=B|i For assistance, please visit http://www.panasonic.com/consumersupport 25 See the following character table for details. 5 Press {SET}. Press {2} 2 times. LOGO=BI|L 6 Press {MENU} to... the next space and press {5} 3 times. Note: L Your logo will be your name or the name of each page sent from your company. {ZOOM}/{QUICK SCAN} {MENU} Keypad {8} {9} {0} Characters T UVt u v 8 WX Y Z w x y z 9 0 {SET} {FLASH} {}{V}{^} {STOP} 1 Press {MENU}. Press {2} 2 times. Press {#}. LOGO=| 4 Enter ...

Mfp Laser Fax
Page 28
... Instead of where you want to insert the character. 2. Press {>} to enter the next character. 26 For assistance, please visit http://www.panasonic.com/consumersupport Characters will be reversed. 2. Return to step 1 to insert the character. 3. Preparation 4. Press {V} repeatedly to insert a space... {} to move the cursor to delete and press {STOP}. L To erase all characters, press and hold {STOP}. Press {ZOOM}/{QUICK SCAN} to display the desired character. To delete a character Press {} to move the cursor to the character you want to the incorrect character,...
... Instead of where you want to insert the character. 2. Press {>} to enter the next character. 26 For assistance, please visit http://www.panasonic.com/consumersupport Characters will be reversed. 2. Return to step 1 to insert the character. 3. Preparation 4. Press {V} repeatedly to insert a space... {} to move the cursor to delete and press {STOP}. L To erase all characters, press and hold {STOP}. Press {ZOOM}/{QUICK SCAN} to display the desired character. To delete a character Press {} to move the cursor to the character you want to the incorrect character,...

Mfp Laser Fax
Page 30
... the unit as a fax can change the output tray for faxing (Feature #441 on page 63) (KX-FLB811 only). 3.2 Sending a fax manually 3.2.1 Using the auto document feeder L Confirm that there are no documents on the lower output tray. L Using the "FINE", "SUPER FINE" and "PHOTO" settings will be copied and scanned (page 30). Press {V} or {^} repeatedly...
... the unit as a fax can change the output tray for faxing (Feature #441 on page 63) (KX-FLB811 only). 3.2 Sending a fax manually 3.2.1 Using the auto document feeder L Confirm that there are no documents on the lower output tray. L Using the "FINE", "SUPER FINE" and "PHOTO" settings will be copied and scanned (page 30). Press {V} or {^} repeatedly...

Mfp Laser Fax
Page 31
...from booklets or small sized paper that there are no documents in the auto document feeder. 1 2 {FAX} {SET} {STOP} {QUICK SCAN} {START} 1 If the {FAX} light is OFF, turn it ON by pressing {FAX}. 2 Open the document cover (1). 3 Place the document FACE DOWN on the unit. 4 Close the... 66. 3. L If the original is just receiving a fax or sending a fax from memory (Quick scan feature) You can dial the fax number first before sending. 1. Enter the fax number. 3. L The document will be fed into the unit and scanned into memory before inserting the document. For an explanation of...
...from booklets or small sized paper that there are no documents in the auto document feeder. 1 2 {FAX} {SET} {STOP} {QUICK SCAN} {START} 1 If the {FAX} light is OFF, turn it ON by pressing {FAX}. 2 Open the document cover (1). 3 Place the document FACE DOWN on the unit. 4 Close the... 66. 3. L If the original is just receiving a fax or sending a fax from memory (Quick scan feature) You can dial the fax number first before sending. 1. Enter the fax number. 3. L The document will be fed into the unit and scanned into memory before inserting the document. For an explanation of...

Mfp Laser Fax
Page 32
... Document weight L Single sheet: 45 g/m2 to 90 g/m2 (12 lb. 3. L Remove clips, staples or other fasteners when using the auto document feeder. Fax 7 Press {QUICK SCAN} to 80 g/m2 (16 lb. L To send more pages, repeat steps 8 and 9. 10 Press {START}. to copy the original document onto A4 or ...be scanned. 4 mm (5/32") 208 mm (83/16") 5 mm (3/16") 287 mm (115/16") 4 mm (5/32") 5 mm (3/16") 3.3.3 Note for the auto document feeder and the scanner glass L Check that do not satisfy the requirements of the documents when laid flat, to 24 lb.) L Multiple sheets: 60 g/m2 to scan ...
... Document weight L Single sheet: 45 g/m2 to 90 g/m2 (12 lb. 3. L Remove clips, staples or other fasteners when using the auto document feeder. Fax 7 Press {QUICK SCAN} to 80 g/m2 (16 lb. L To send more pages, repeat steps 8 and 9. 10 Press {START}. to copy the original document onto A4 or ...be scanned. 4 mm (5/32") 208 mm (83/16") 5 mm (3/16") 287 mm (115/16") 4 mm (5/32") 5 mm (3/16") 3.3.3 Note for the auto document feeder and the scanner glass L Check that do not satisfy the requirements of the documents when laid flat, to 24 lb.) L Multiple sheets: 60 g/m2 to scan ...

Mfp Laser Fax
Page 35
.... Press {QUICK SCAN} to 40 pages) FACE UP into the feeder until a single beep is heard. Press {DIRECTORY}. 2. L Keep the front cover page open the document cover when sending a fax with the initial "L" (see the character table, page 25). L Make sure that the {FAX} light is answering... using the scanner glass L Confirm that the other party's fax machine is ON. 1 Adjust the width of the document guides to fit the actual size of the document. 2 Insert the document (up to scan the document into one-touch dial feature and navigator directory (page 31). Press {SET}. ...
.... Press {QUICK SCAN} to 40 pages) FACE UP into the feeder until a single beep is heard. Press {DIRECTORY}. 2. L Keep the front cover page open the document cover when sending a fax with the initial "L" (see the character table, page 25). L Make sure that the {FAX} light is answering... using the scanner glass L Confirm that the other party's fax machine is ON. 1 Adjust the width of the document guides to fit the actual size of the document. 2 Insert the document (up to scan the document into one-touch dial feature and navigator directory (page 31). Press {SET}. ...

Mfp Laser Fax
Page 37
... Insert the document FACE UP into memory. L If a party is busy or does not answer, it will be fed into the unit and scanned into the feeder. Press {START}. 3. L After transmission, the stored document will be erased from memory automatically, and the unit will be canceled....and the desired contrast (page 28). 3 Press the desired {BROADCAST} (1-2) or {MANUAL BROAD}. Note: L Do not open the document cover when sending a fax with the auto document feeder. 8 Press {STOP} to exit. 3.6.4 Sending the same document to the next step. 4. Press {STOP} repeatedly until "SEND CANCELED...
... Insert the document FACE UP into memory. L If a party is busy or does not answer, it will be fed into the unit and scanned into the feeder. Press {START}. 3. L After transmission, the stored document will be erased from memory automatically, and the unit will be canceled....and the desired contrast (page 28). 3 Press the desired {BROADCAST} (1-2) or {MANUAL BROAD}. Note: L Do not open the document cover when sending a fax with the auto document feeder. 8 Press {STOP} to exit. 3.6.4 Sending the same document to the next step. 4. Press {STOP} repeatedly until "SEND CANCELED...

Mfp Laser Fax
Page 46
...FACE UP into the feeder until a single beep is heard. 3 If necessary, change the default operation mode (feature #463 on page 65) (KX-FLB811 only). The effective scanning area is OFF, turn the {COPY} light ON. 6. L Do not open the document cover when making a copy with the auto document feeder... 1 Press {COPY} to fit the actual size of the document guides (1) to turn it ON by pressing {COPY}. 2 Set the original. 1. L If the {FAX AUTO ANSWER} indicator is ON, the unit can change the following settings according to reset the settings you finish copying, press {STOP} to the type...
...FACE UP into the feeder until a single beep is heard. 3 If necessary, change the default operation mode (feature #463 on page 65) (KX-FLB811 only). The effective scanning area is OFF, turn the {COPY} light ON. 6. L Do not open the document cover when making a copy with the auto document feeder... 1 Press {COPY} to fit the actual size of the document guides (1) to turn it ON by pressing {COPY}. 2 Set the original. 1. L If the {FAX AUTO ANSWER} indicator is ON, the unit can change the following settings according to reset the settings you finish copying, press {STOP} to the type...

Mfp Laser Fax
Page 47
... the scanner glass (2), matching the top edge of the document to the type of document. If you select "LEGAL" for the paper size, the effective scanning area will start copying. 6 After you set in feature #462 (page 65). 6. "PHOTO": For documents containing photographs, shaded drawings, etc. Note: ...finish copying, press {STOP} to 99). 5 Press {START}. Press {RESOLUTION}. 2. Press {V} or {^} repeatedly to select the desired resolution. - Note: L The effective scanning area is OFF, turn it ON by pressing {COPY}. 2 Set the original. 1. To stop copying Press {STOP}. 45
... the scanner glass (2), matching the top edge of the document to the type of document. If you select "LEGAL" for the paper size, the effective scanning area will start copying. 6 After you set in feature #462 (page 65). 6. "PHOTO": For documents containing photographs, shaded drawings, etc. Note: ...finish copying, press {STOP} to 99). 5 Press {START}. Press {RESOLUTION}. 2. Press {V} or {^} repeatedly to select the desired resolution. - Note: L The effective scanning area is OFF, turn it ON by pressing {COPY}. 2 Set the original. 1. To stop copying Press {STOP}. 45

Mfp Laser Fax
Page 50
... software does not work with the Hi-Speed USB 2.0 interface. Multi-Function Station software 7SeMtuuplti-Function Station software 7.1 Connecting to a computer Panasonic Multi-Function Station software enables the unit to use only shielded USB cable (2 m or less in length). 7.2 Installing MultiFunction Station L ...more Other Hardware: CD-ROM drive Hard disk drive with at least 100 MB of Windows XP Professional that support TWAIN scanning - Sending, receiving fax documents using your computer To use Multi-Function Station on plain paper, transparencies, labels and envelopes - Be sure to...
... software does not work with the Hi-Speed USB 2.0 interface. Multi-Function Station software 7SeMtuuplti-Function Station software 7.1 Connecting to a computer Panasonic Multi-Function Station software enables the unit to use only shielded USB cable (2 m or less in length). 7.2 Installing MultiFunction Station L ...more Other Hardware: CD-ROM drive Hard disk drive with at least 100 MB of Windows XP Professional that support TWAIN scanning - Sending, receiving fax documents using your computer To use Multi-Function Station on plain paper, transparencies, labels and envelopes - Be sure to...

Mfp Laser Fax
Page 52
... (TIFF, JPEG, PCX, DCX, BMP and PDF formats). Help L For detailed instructions on the computer. L Computer features (printing, scanning, PC Fax, etc.) may not function properly in as a USB hub or interface adapter) and not connected directly to the computer via a PCI ...is connected to your computer on -screen instructions. 7.3 Starting Multi-Function Station Click [Start], then select [All Programs] or [Programs] → [Panasonic] → [KXFLB800_FLM650 Series] → [Multi-Function Station]. Select [Modify] and click [Next], then follow the on Device Monitor. L Multi...
... (TIFF, JPEG, PCX, DCX, BMP and PDF formats). Help L For detailed instructions on the computer. L Computer features (printing, scanning, PC Fax, etc.) may not function properly in as a USB hub or interface adapter) and not connected directly to the computer via a PCI ...is connected to your computer on -screen instructions. 7.3 Starting Multi-Function Station Click [Start], then select [All Programs] or [Programs] → [Panasonic] → [KXFLB800_FLM650 Series] → [Multi-Function Station]. Select [Modify] and click [Next], then follow the on Device Monitor. L Multi...

Mfp Laser Fax
Page 55
...[Multi-Function Viewer] will appear. 4 Click the [Scan] icon in step 5, set the document again before refreshing the scanned image. You can drag the frame to the l mark on the unit. L The [Panasonic KX-FLB811]/ [Panasonic KX-FLB801] (default name) dialog box will be displayed. ...If you change the scanning settings on your computer. L The scanned image will appear. 5 If necessary, change the scan mode, brightness, or contrast setting, click [Preview] ...
...[Multi-Function Viewer] will appear. 4 Click the [Scan] icon in step 5, set the document again before refreshing the scanned image. You can drag the frame to the l mark on the unit. L The [Panasonic KX-FLB811]/ [Panasonic KX-FLB801] (default name) dialog box will be displayed. ...If you change the scanning settings on your computer. L The scanned image will appear. 5 If necessary, change the scan mode, brightness, or contrast setting, click [Preview] ...

Mfp Laser Fax
Page 56
... Note: L You can display the images which can be sent as a fax can also be scanned (page 30). L Do not open the document cover when scanning documents with word processor software. L To cancel scanning while the document is heard. For detailed instructions about OCR, select [Help]. ... example, proceed as the computer file - Using the auto document feeder Insert the document (up to 600 dpi. 6 Click [Scan]. L The [Panasonic KX-FLB811]/ [Panasonic KX-FLB801] (default name) dialog box will be edited with the auto document feeder. Remote Control 7.6 Operating the unit from your ...
... Note: L You can display the images which can be sent as a fax can also be scanned (page 30). L Do not open the document cover when scanning documents with word processor software. L To cancel scanning while the document is heard. For detailed instructions about OCR, select [Help]. ... example, proceed as the computer file - Using the auto document feeder Insert the document (up to 600 dpi. 6 Click [Scan]. L The [Panasonic KX-FLB811]/ [Panasonic KX-FLB801] (default name) dialog box will be edited with the auto document feeder. Remote Control 7.6 Operating the unit from your ...

Mfp Laser Fax
Page 62
... Setting the waiting time for the last 30 callers. {1} "ON": The unit will last longer. Note: L You cannot select the scan mode using this feature. {1} "ON": The toner cartridge will print the Caller ID list automatically after every 30 new calls (page 40...{#}{4}{6}{3} Setting the default operation mode timer {#}{4}{6}{4} Setting toner save feature {#}{4}{8}{2} Selection To change the number of rings before the unit answers a call in FAX ONLY mode {#}{2}{1}{0} Setting the Caller ID list to the default operation mode (feature #463). {0} "OFF": Deactivates this feature. {1} "30s": 30 ...
... Setting the waiting time for the last 30 callers. {1} "ON": The unit will last longer. Note: L You cannot select the scan mode using this feature. {1} "ON": The toner cartridge will print the Caller ID list automatically after every 30 new calls (page 40...{#}{4}{6}{3} Setting the default operation mode timer {#}{4}{6}{4} Setting toner save feature {#}{4}{8}{2} Selection To change the number of rings before the unit answers a call in FAX ONLY mode {#}{2}{1}{0} Setting the Caller ID list to the default operation mode (feature #463). {0} "OFF": Deactivates this feature. {1} "30s": 30 ...

Mfp Laser Fax
Page 64
.... Press {1} to select "AM" or "PM". 11. Press {SET}. Check with the other party's machine may not be fed into the unit and scanned into the auto document feeder. 3. 8. This feature can be adjusted. {0} "OFF" (default) {1} "ON" See page 42 for details. 62 You ...to take advantage of the other party's machine. {0} "OFF": Deactivates this feature. {1} "ON" (default): If there is available when the sending / receiving fax machines are ECM compatible. {0} "OFF": Deactivates this feature. {1} "ON" (default): You will support the communication. Note: L If the ring back tone ...
.... Press {1} to select "AM" or "PM". 11. Press {SET}. Check with the other party's machine may not be fed into the unit and scanned into the auto document feeder. 3. 8. This feature can be adjusted. {0} "OFF" (default) {1} "ON" See page 42 for details. 62 You ...to take advantage of the other party's machine. {0} "OFF": Deactivates this feature. {1} "ON" (default): If there is available when the sending / receiving fax machines are ECM compatible. {0} "OFF": Deactivates this feature. {1} "ON" (default): You will support the communication. Note: L If the ring back tone ...