
User Manual
Page 3
...://www.panasonic.com/help 3 Note: L During or immediately after printing. L For optimal performance, genuine Panasonic toner cartridges and drum units are recommended. Improper operation Toner cartridge L Do not leave the toner cartridge out of the unit. Drum unit L Read the instructions on top of the protective bag for problems that may result in hazardous radiation exposure. After you begin installation of 30 minutes after printing, the area near the recording paper...
...://www.panasonic.com/help 3 Note: L During or immediately after printing. L For optimal performance, genuine Panasonic toner cartridges and drum units are recommended. Improper operation Toner cartridge L Do not leave the toner cartridge out of the unit. Drum unit L Read the instructions on top of the protective bag for problems that may result in hazardous radiation exposure. After you begin installation of 30 minutes after printing, the area near the recording paper...

User Manual
Page 5
... 19 Help 2.5 Help function 20 Volume 2.6 Adjusting the volume 20 Initial Programming 2.7 Date and time 21 2.8 Your logo 21 2.9 Your fax number 22 2.10 Configuring the unit to access the LAN (KXFLM671 only 22 2.11 Installing Multi-Function Station 23 2.12 Starting Multi-Function Station 25 3. Table of the unit 61 5 Introduction 1. TableofContents and Installation Accessories 1.1 Supplied accessories 7 1.2 Accessory information 8 Finding the Controls 1.3 Button descriptions 8 1.4 Overview 9 Installation 1.5 Toner cartridge and drum unit 10 1.6 Paper tray and paper tray cover...
... 19 Help 2.5 Help function 20 Volume 2.6 Adjusting the volume 20 Initial Programming 2.7 Date and time 21 2.8 Your logo 21 2.9 Your fax number 22 2.10 Configuring the unit to access the LAN (KXFLM671 only 22 2.11 Installing Multi-Function Station 23 2.12 Starting Multi-Function Station 25 3. Table of the unit 61 5 Introduction 1. TableofContents and Installation Accessories 1.1 Supplied accessories 7 1.2 Accessory information 8 Finding the Controls 1.3 Button descriptions 8 1.4 Overview 9 Installation 1.5 Toner cartridge and drum unit 10 1.6 Paper tray and paper tray cover...

User Manual
Page 8
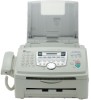
... make a phone call using the dial keypad (page 40). L {Flash} L To access special telephone services or for this unit can be ordered online, by fax, or by storing using the {Monitor} button, or when you send a fax, the unit will automatically redial the number 1 time. credit card type, number, expiration date and your voice to multiple parties by telephone. D {Manual broad} L To send a document to the other party during a conversation. F {Fax} L To switch to the copy mode (page 18, 33). 1. Replacement toner cartridge*1 L Model...
... make a phone call using the dial keypad (page 40). L {Flash} L To access special telephone services or for this unit can be ordered online, by fax, or by storing using the {Monitor} button, or when you send a fax, the unit will automatically redial the number 1 time. credit card type, number, expiration date and your voice to multiple parties by telephone. D {Manual broad} L To send a document to the other party during a conversation. F {Fax} L To switch to the copy mode (page 18, 33). 1. Replacement toner cartridge*1 L Model...

User Manual
Page 9
... paper stacker and document stacker may not be able to hear the other party, but the other party will be able to hear you will not be shown in 1 copy (page 35). 1. X {Stop} L To stop an operation or programming session. N {Quick Scan} L To store a scanned document into memory, and then send it (page 38). P {Menu} L To start or exit programming. Q Navigator key L To select desired settings. L To make a collated copy (page 34). W {Start} L To copy a document (page...
... paper stacker and document stacker may not be able to hear the other party, but the other party will be able to hear you will not be shown in 1 copy (page 35). 1. X {Stop} L To stop an operation or programming session. N {Quick Scan} L To store a scanned document into memory, and then send it (page 38). P {Menu} L To start or exit programming. Q Navigator key L To select desired settings. L To make a collated copy (page 34). W {Start} L To copy a document (page...
User Manual
Page 22
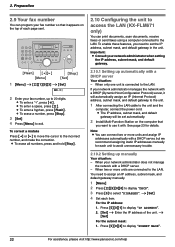
...fax number You can print documents, scan documents, receive faxes or send faxes using a computer connected to select "DISABLED". L To erase all numbers, press and hold {Stop}. 2.10 Configuring the unit to access the LAN (KX-FLM671 only) You can program your network administrator does not manage the network with . Press {5}{0}{1} to display "IP ADDRESS". 2. {Set} i Enter the IP address of each page sent. {Flash} {} {Menu} {Stop} {Set} 1 {Menu} i {#}{1}{0}{3} i {Set} NO.=| 2 Enter your network administrator when setting the IP address, subnet mask, and default gateway. 2.10.1 Setting...
...fax number You can print documents, scan documents, receive faxes or send faxes using a computer connected to select "DISABLED". L To erase all numbers, press and hold {Stop}. 2.10 Configuring the unit to access the LAN (KX-FLM671 only) You can program your network administrator does not manage the network with . Press {5}{0}{1} to display "IP ADDRESS". 2. {Set} i Enter the IP address of each page sent. {Flash} {} {Menu} {Stop} {Set} 1 {Menu} i {#}{1}{0}{3} i {Set} NO.=| 2 Enter your network administrator when setting the IP address, subnet mask, and default gateway. 2.10.1 Setting...

User Manual
Page 23
Press {5}{0}{3} to display "DEFAULT GATEWAY". 2. {Set} i Enter the default gateway of the network. i {Set} 3 Press {Menu} to select the desired computer. L To select the desired computer easily, change the PC name beforehand (page 26). 2.11 Installing Multi-Function Station 2.11.1 Required computer environment Panasonic Multi-Function Station software enables the unit to "ALWAYS" or "CONNECTED" beforehand (feature #442 on plain paper, transparencies, labels and envelopes - Sending, receiving fax documents using your computer, the following functions: - i {Set} For the...
Press {5}{0}{3} to display "DEFAULT GATEWAY". 2. {Set} i Enter the default gateway of the network. i {Set} 3 Press {Menu} to select the desired computer. L To select the desired computer easily, change the PC name beforehand (page 26). 2.11 Installing Multi-Function Station 2.11.1 Required computer environment Panasonic Multi-Function Station software enables the unit to "ALWAYS" or "CONNECTED" beforehand (feature #442 on plain paper, transparencies, labels and envelopes - Sending, receiving fax documents using your computer, the following functions: - i {Set} For the...

User Manual
Page 25
... operating instructions. Start Windows and insert the supplied CD-ROM into directories. L To scan and create an image file. To uninstall the software For Windows 2000, Windows XP, Windows Vista and Windows 7 users, you to add the printer driver for broadcast transmission. [Utilities] L To start the configuration web page (page 49, 62) (KX-FLM671, LAN connection only). [Settings] (page 26) L To change the settings for the operating system when installing Multi-Function Station, insert it anytime by e-mail. L To display a fax document received on Multi-Function...
... operating instructions. Start Windows and insert the supplied CD-ROM into directories. L To scan and create an image file. To uninstall the software For Windows 2000, Windows XP, Windows Vista and Windows 7 users, you to add the printer driver for broadcast transmission. [Utilities] L To start the configuration web page (page 49, 62) (KX-FLM671, LAN connection only). [Settings] (page 26) L To change the settings for the operating system when installing Multi-Function Station, insert it anytime by e-mail. L To display a fax document received on Multi-Function...

User Manual
Page 26
... Windows 7: 1. [Start] i [Control Panel] i [Network and Internet] i [Internet Options] i [Programs] i [Set programs] i [Set program access and computer defaults] 2. [Custom] 3. When the unit is connected to E-mail", page 30. When the unit is connected to another piece of the launcher. - [OCR Path]: To select the OCR software. - [PC name list up on device] (KX-FLM671, LAN connection only): To select whether or not your computer by the user. - i [OK] [General] - [Launcher display setting]: To select the display type of hardware (such as a USB...
... Windows 7: 1. [Start] i [Control Panel] i [Network and Internet] i [Internet Options] i [Programs] i [Set programs] i [Set program access and computer defaults] 2. [Custom] 3. When the unit is connected to E-mail", page 30. When the unit is connected to another piece of the launcher. - [OCR Path]: To select the OCR software. - [PC name list up on device] (KX-FLM671, LAN connection only): To select whether or not your computer by the user. - i [OK] [General] - [Launcher display setting]: To select the display type of hardware (such as a USB...

User Manual
Page 27
...]: Paper size, media type, page per sheet, etc. [Output]: Number of prints, collate, etc. [Quality]: Resolution, contrast, toner save setting (feature #482 on the [Basic] tab for paper size. L To load paper, see page 81. Setting the printer properties You can change the printer settings, proceed as follows. Note: L For Microsoft PowerPoint®, select [Color] or remove the check next to print. 2 Select [Print...] from the unit, see page 62. L If a printing error occurs, the Device Monitor (page 62) will start automatically and display...
...]: Paper size, media type, page per sheet, etc. [Output]: Number of prints, collate, etc. [Quality]: Resolution, contrast, toner save setting (feature #482 on the [Basic] tab for paper size. L To load paper, see page 81. Setting the printer properties You can change the printer settings, proceed as follows. Note: L For Microsoft PowerPoint®, select [Color] or remove the check next to print. 2 Select [Print...] from the unit, see page 62. L If a printing error occurs, the Device Monitor (page 62) will start automatically and display...
User Manual
Page 35
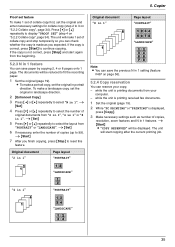
... can check whether the copy is made as number of collate copy and stop temporarily so you can save the previous N in 1" "PORTRAIT" "LANDSCAPE" 35 i {Start} 7 After you expected. The unit will be displayed. while the unit is printing received fax documents. 1 Set the original (page 19). 2 While "PC PRINTING" or "PRINTING" is correct, press {Start} to reset this feature. The documents will make a portrait copy, set the original and enter necessary settings for collate copy (step...
... can check whether the copy is made as number of collate copy and stop temporarily so you can save the previous N in 1" "PORTRAIT" "LANDSCAPE" 35 i {Start} 7 After you expected. The unit will be displayed. while the unit is printing received fax documents. 1 Set the original (page 19). 2 While "PC PRINTING" or "PRINTING" is correct, press {Start} to reset this feature. The documents will make a portrait copy, set the original and enter necessary settings for collate copy (step...
User Manual
Page 38
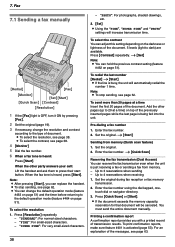
... {Fax}. 2 Set the original (page 19). 3 If necessary, change the resolution and contrast according to 3 reservations when sending - "FINE": For small-sized characters. - Note: L To stop sending, see page 63. 38 Enter the fax number. 2. When the other pages (up to 20 at a time Insert the first 20 pages of transmission results. i {Quick Scan} Reserving the fax transmission (Dual Access) You can replace the handset. Enter the fax number using the dial keypad, one- To print confirmation reports, make...
... {Fax}. 2 Set the original (page 19). 3 If necessary, change the resolution and contrast according to 3 reservations when sending - "FINE": For small-sized characters. - Note: L To stop sending, see page 63. 38 Enter the fax number. 2. When the other pages (up to 20 at a time Insert the first 20 pages of transmission results. i {Quick Scan} Reserving the fax transmission (Dual Access) You can replace the handset. Enter the fax number using the dial keypad, one- To print confirmation reports, make...

User Manual
Page 53
... This feature can be printed after programming, press {Stop} while the unit is not available for the next attempted fax transmission. If the {Fax} light is OFF, turn it ON by reducing the transmission speed. {0} "OFF": Deactivates this feature. {1} "NEXT FAX": This setting is completed. Press {1} to re-send the document. 10. Enter the transmission start time. After transmission, the unit will be set up to take advantage...
... This feature can be printed after programming, press {Stop} while the unit is not available for the next attempted fax transmission. If the {Fax} light is OFF, turn it ON by reducing the transmission speed. {0} "OFF": Deactivates this feature. {1} "NEXT FAX": This setting is completed. Press {1} to re-send the document. 10. Enter the transmission start time. After transmission, the unit will be set up to take advantage...

User Manual
Page 63
... MEMORY FULL NO DOCUMENT / FAILED PICKUP OTHER FAX NOT RESPONDING PRESSED THE 'Stop' KEY THE COVER WAS OPENED OK Code 40-42 46-72 FF 43 44 ----53 54 59 70 --------- --------- L The number you dialed is set to "ALWAYS" (page 55), check the connection between the computer and the unit. For assistance, please visit http://www.panasonic.com/help 63 Message COMMUNICATION ERROR DOCUMENT JAMMED ERROR-NOT YOUR UNIT JUNK FAX PROH. Connect the telephone line cord...
... MEMORY FULL NO DOCUMENT / FAILED PICKUP OTHER FAX NOT RESPONDING PRESSED THE 'Stop' KEY THE COVER WAS OPENED OK Code 40-42 46-72 FF 43 44 ----53 54 59 70 --------- --------- L The number you dialed is set to "ALWAYS" (page 55), check the connection between the computer and the unit. For assistance, please visit http://www.panasonic.com/help 63 Message COMMUNICATION ERROR DOCUMENT JAMMED ERROR-NOT YOUR UNIT JUNK FAX PROH. Connect the telephone line cord...

User Manual
Page 64
... stopped due to print out the document. Check the connections (page 17, 24). L The software is set to continue copying. Replace the drum unit as soon as possible. L The unit is not connected correctly. Wait for a while. 64 For assistance, please visit http://www.panasonic.com/help Contact our service personnel. L The drum unit is open. See the other displayed message instructions to "ALWAYS" (page 55), check the connection between the computer and the unit. Send the entire document manually. Install paper (page...
... stopped due to print out the document. Check the connections (page 17, 24). L The software is set to continue copying. Replace the drum unit as soon as possible. L The unit is not connected correctly. Wait for a while. 64 For assistance, please visit http://www.panasonic.com/help Contact our service personnel. L The drum unit is open. See the other displayed message instructions to "ALWAYS" (page 55), check the connection between the computer and the unit. Send the entire document manually. Install paper (page...

User Manual
Page 66
... solve the problem. 1. L Some of your computer has enough memory and hard disk space. L The setup program will start automatically. 2. [Tools] i [Cleanup Tool] L The [MfsCleaner] window will be corrupted. L Install the operating instructions to the scan mode or copy mode. I cannot view the operating instructions using PC FAX and Remote Control. I cannot adjust the volume or display items stored in the [Target Device] or [Device Select] dialog box when operating the following functions. - L The unit is...
... solve the problem. 1. L Some of your computer has enough memory and hard disk space. L The setup program will start automatically. 2. [Tools] i [Cleanup Tool] L The [MfsCleaner] window will be corrupted. L Install the operating instructions to the scan mode or copy mode. I cannot view the operating instructions using PC FAX and Remote Control. I cannot adjust the volume or display items stored in the [Target Device] or [Device Select] dialog box when operating the following functions. - L The unit is...

User Manual
Page 67
... set. L There is over . L Check the connection between the computer and the unit (page 17, 24). L Please wait. For assistance, please visit http://www.panasonic.com/help 67 L The glass or rollers are printed in their fax machine the wrong way. After canceling printing using the copier. L Remove the document and re-insert it. Black lines, white lines or smudges appear on the hard disk. L The toner save mode of available memory is ON (page 52). Check...
... set. L There is over . L Check the connection between the computer and the unit (page 17, 24). L Please wait. For assistance, please visit http://www.panasonic.com/help 67 L The glass or rollers are printed in their fax machine the wrong way. After canceling printing using the copier. L Remove the document and re-insert it. Black lines, white lines or smudges appear on the hard disk. L The toner save mode of available memory is ON (page 52). Check...

User Manual
Page 68
... unit when scanning documents from the unit (KX-FLM671, LAN connection only). Hang up on device] to 30 computers). L The IP address of the document, using "TEXT" resolution (page 33). 12.3.5 Fax Problem I cannot send a fax overseas. Change the contrast (page 33) and try again. Change the contrast (page 33) and make a copy. L The maximum number of the desired computer will not make a lighter copy of the unit may have changed. Help Problem The name of computers on the unit. Set...
... unit when scanning documents from the unit (KX-FLM671, LAN connection only). Hang up on device] to 30 computers). L The IP address of the document, using "TEXT" resolution (page 33). 12.3.5 Fax Problem I cannot send a fax overseas. Change the contrast (page 33) and try again. Change the contrast (page 33) and make a copy. L The maximum number of the desired computer will not make a lighter copy of the unit may have changed. Help Problem The name of computers on the unit. Set...

User Manual
Page 69
... make a lighter copy of recording paper or a recording paper jam. Press {Auto Answer} repeatedly to turn OFF the {Auto Answer} light. Install paper (page 15) or remove the jammed paper (page 74). L If you want to "12.3.2 Printing problems", page 67. Fax reception may have subscribed to a voice mail service due to service packs offered by pressing {*}{#}{9}. View the received documents using "TEXT" resolution (page 33), and try again. L The memory is set remote fax activation to TEL mode. I cannot receive documents...
... make a lighter copy of recording paper or a recording paper jam. Press {Auto Answer} repeatedly to turn OFF the {Auto Answer} light. Install paper (page 15) or remove the jammed paper (page 74). L If you want to "12.3.2 Printing problems", page 67. Fax reception may have subscribed to a voice mail service due to service packs offered by pressing {*}{#}{9}. View the received documents using "TEXT" resolution (page 33), and try again. L The memory is set remote fax activation to TEL mode. I cannot receive documents...

User Manual
Page 72
... is turned ON and connected to record voice messages. during copy, PC printing, fax transmission or fax reception), they cannot send a document. L Check if the answering machine is no room left in the memory of the answering machine and erase unnecessary messages. Change the code on the answering machine is not designed for access to use the following functions after installing the Microsoft Windows XP Service Pack 2 or later. - Set to another number which does...
... is turned ON and connected to record voice messages. during copy, PC printing, fax transmission or fax reception), they cannot send a document. L Check if the answering machine is no room left in the memory of the answering machine and erase unnecessary messages. Change the code on the answering machine is not designed for access to use the following functions after installing the Microsoft Windows XP Service Pack 2 or later. - Set to another number which does...

User Manual
Page 91
... directory Making a phone call : 36 Sending faxes: 39 Storing: 36 Overseas mode (Feature #411): 53 P Paper size (Feature #380): 51 Password (Feature #155): 51 PC fax reception (Feature #443): 23 PC fax setting (Feature #442): 55 PC print features: 56 Power failure: 72 Printer test list: 80 Programming: 49 Pull scan: 32 Scan application: 32 Viewer: 32 Push scan: 30 E-mail: 30 File: 30 OCR: 31 Viewer: 30 Q Quick scan: 38 Quick setup (Feature #100): 50 R Receiving faxes...
... directory Making a phone call : 36 Sending faxes: 39 Storing: 36 Overseas mode (Feature #411): 53 P Paper size (Feature #380): 51 Password (Feature #155): 51 PC fax reception (Feature #443): 23 PC fax setting (Feature #442): 55 PC print features: 56 Power failure: 72 Printer test list: 80 Programming: 49 Pull scan: 32 Scan application: 32 Viewer: 32 Push scan: 30 E-mail: 30 File: 30 OCR: 31 Viewer: 30 Q Quick scan: 38 Quick setup (Feature #100): 50 R Receiving faxes...


