
Installation Guide
Page 5
Installation/Troubleshooting Table of Contents 1 Before Using 6 1.1 1.1.1 1.1.2 1.1.3 IMPORTANT SAFETY INSTRUCTIONS 6 FCC and Other Information 7 Security Cautions 8 User Name and Password Protection 8 1.2 Included Items 9 1.3 1.3.1 1.3.2 1.3.3 Camera Feature Locations 10 Front View 10 Rear View 11 Bottom View 11 1.4 Connecting the Camera to Your Router 12 1.5 Connecting the ...
Installation/Troubleshooting Table of Contents 1 Before Using 6 1.1 1.1.1 1.1.2 1.1.3 IMPORTANT SAFETY INSTRUCTIONS 6 FCC and Other Information 7 Security Cautions 8 User Name and Password Protection 8 1.2 Included Items 9 1.3 1.3.1 1.3.2 1.3.3 Camera Feature Locations 10 Front View 10 Rear View 11 Bottom View 11 1.4 Connecting the Camera to Your Router 12 1.5 Connecting the ...

Installation Guide
Page 8
Panasonic Communications Co., Ltd. 1.1.3 User Name and Password Protection The use of a unique User Name and secret Password is an important tool that will not be stolen. • You are responsible for this product's user information, such as user name and password, to factory default, or erase ... the camera will help limit unauthorized individuals from accessing the camera. This information should not be repaired with a company not related to Panasonic, make back-up copies of files, if necessary, and reset this product to factory default. • When transferring this product to...
Panasonic Communications Co., Ltd. 1.1.3 User Name and Password Protection The use of a unique User Name and secret Password is an important tool that will not be stolen. • You are responsible for this product's user information, such as user name and password, to factory default, or erase ... the camera will help limit unauthorized individuals from accessing the camera. This information should not be repaired with a company not related to Panasonic, make back-up copies of files, if necessary, and reset this product to factory default. • When transferring this product to...

Installation Guide
Page 17
Click [Automatic Setup (Local Access Only)]. 4. Enter the user name and password you wish to use, and click [Save]. 6. Installation/Troubleshooting • For the first time installation or after performing the [Automatic Setup (Local Access Only)], run ... with Static or DHCP settings, after pressing the FACTORY DEFAULT RESET button, only [Automatic Setup (Local Access Only)] can be selected. Enter the name and password that were entered above, and click [OK]. [For assistance, please call: 1-800-272-7033] 17
Click [Automatic Setup (Local Access Only)]. 4. Enter the user name and password you wish to use, and click [Save]. 6. Installation/Troubleshooting • For the first time installation or after performing the [Automatic Setup (Local Access Only)], run ... with Static or DHCP settings, after pressing the FACTORY DEFAULT RESET button, only [Automatic Setup (Local Access Only)] can be selected. Enter the name and password that were entered above, and click [OK]. [For assistance, please call: 1-800-272-7033] 17
Installation Guide
Page 20
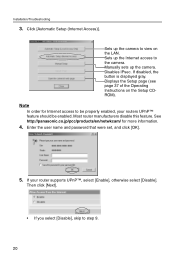
... camera. Enter the user name and password that were set, and click [OK]. 5. If your routers UPnP™ feature should be properly enabled, your router supports UPnP™, select [Enable], otherwise select [Disable]. Installation/Troubleshooting 3. If disabled, the button is displayed gray. See http://panasonic.co.jp/pcc/products/en/netwkcam/ for...
... camera. Enter the user name and password that were set, and click [OK]. 5. If your routers UPnP™ feature should be properly enabled, your router supports UPnP™, select [Enable], otherwise select [Disable]. Installation/Troubleshooting 3. If disabled, the button is displayed gray. See http://panasonic.co.jp/pcc/products/en/netwkcam/ for...

Installation Guide
Page 21
... is displayed, and enter the user name and password that the router is displayed, confirm that were set Port Forwarding manually following the router's manual and try Automatic Setup again. For detailed information, access at http://panasonic.co.jp/pcc/products/en/ netwkcam/. • If the message "...your router may not support UPnP™ or UPnP™ is displayed. For more information about setting up a router, refer to the Panasonic Network Camera support website at http://www.viewnetcam.com. • If you have multiple cameras, you can use Viewnetcam.com service registering it ...
... is displayed, and enter the user name and password that the router is displayed, confirm that were set Port Forwarding manually following the router's manual and try Automatic Setup again. For detailed information, access at http://panasonic.co.jp/pcc/products/en/ netwkcam/. • If the message "...your router may not support UPnP™ or UPnP™ is displayed. For more information about setting up a router, refer to the Panasonic Network Camera support website at http://www.viewnetcam.com. • If you have multiple cameras, you can use Viewnetcam.com service registering it ...

Installation Guide
Page 28
Installation/Troubleshooting 3. Enter the user name and password that were set, and click [OK]. 28 The Enter Network Password window is displayed. Enter the user name and password, and click [Save]. 4.
Installation/Troubleshooting 3. Enter the user name and password that were set, and click [OK]. 28 The Enter Network Password window is displayed. Enter the user name and password, and click [Save]. 4.
Installation Guide
Page 30
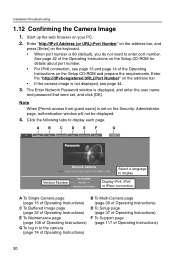
...-registered URL):Port Number" on the address bar. • If the camera image is displayed, and enter the user name and password that were set on the Security: Administrator page, authentication window will not be displayed. 4. Select a language to display each page....CD-ROM and prepare the requirements. A B C D E F G Top Single Multi Buffered Image Setup Maintenance Support Login Network Camera Version Number KX-HCM280A Version ∗.∗∗ Running in to enter port number. A To Single Camera page (page 15 of Operating Instructions) C To Buffered Image ...
...-registered URL):Port Number" on the address bar. • If the camera image is displayed, and enter the user name and password that were set on the Security: Administrator page, authentication window will not be displayed. 4. Select a language to display each page....CD-ROM and prepare the requirements. A B C D E F G Top Single Multi Buffered Image Setup Maintenance Support Login Network Camera Version Number KX-HCM280A Version ∗.∗∗ Running in to enter port number. A To Single Camera page (page 15 of Operating Instructions) C To Buffered Image ...

Installation Guide
Page 43
... the Setup Program. • The Setup Program causes the error message. The camera list shows the MAC address labeled beside the Ethernet (LAN) port. The password has been forgotten. • Press the FACTORY DEFAULT RESET button to reset the camera to the MAC address. Error is displayed on the Setup Program...
... the Setup Program. • The Setup Program causes the error message. The camera list shows the MAC address labeled beside the Ethernet (LAN) port. The password has been forgotten. • Press the FACTORY DEFAULT RESET button to reset the camera to the MAC address. Error is displayed on the Setup Program...

Installation Guide
Page 45
... camera again. the Internet. • UPnP™ is disabled on the router is blocking camera access. Authentication windows are consequently displayed. • User name and password for details. • Firewalls such as packet filtering on the router. Upgrade Internet Explorer to the camera under the router with the global IP address...
... camera again. the Internet. • UPnP™ is disabled on the router is blocking camera access. Authentication windows are consequently displayed. • User name and password for details. • Firewalls such as packet filtering on the router. Upgrade Internet Explorer to the camera under the router with the global IP address...

Installation Guide
Page 51
... Setup CD-ROM). transfers the old image. [For assistance, please call: 1-800-272-7033] 51 Make sure that you enter your correct login ID and password. Assign them correctly (see page 84 or page 94 of the Operating Instructions on the Image Buffer/Transfer page. Some cell phones do not support... to [Mobile Phone]. Set the resolution to [160 x 120] and the image quality to [Mobile Phone] on the Setup CD-ROM). • Login ID and password for E-mail or FTP are not assigned correctly.
... Setup CD-ROM). transfers the old image. [For assistance, please call: 1-800-272-7033] 51 Make sure that you enter your correct login ID and password. Assign them correctly (see page 84 or page 94 of the Operating Instructions on the Image Buffer/Transfer page. Some cell phones do not support... to [Mobile Phone]. Set the resolution to [160 x 120] and the image quality to [Mobile Phone] on the Setup CD-ROM). • Login ID and password for E-mail or FTP are not assigned correctly.


