Operating Instructions
Page 1
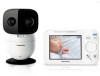
Before initial use, see "Getting Started" on page 9. Please read these operating instructions before using the unit and save them for customers in the U.S.A. KX-HNM300) Model shown is KX-HN4001. Consulte "Guía Rápida Española", página 31. For assistance, please visit our Web site: http://shop.panasonic.com/support for future reference. KX-HNC300) (Monitor Model No. Please register...
Before initial use, see "Getting Started" on page 9. Please read these operating instructions before using the unit and save them for customers in the U.S.A. KX-HNM300) Model shown is KX-HN4001. Consulte "Guía Rápida Española", página 31. For assistance, please visit our Web site: http://shop.panasonic.com/support for future reference. KX-HNC300) (Monitor Model No. Please register...
Operating Instructions
Page 2
... Monitor Baby monitor 19 Viewing live camera images 19 Listening/talking to the camera unit 19 Adjusting the speaker volume 20 Adjusting the chime/beep volume 20 Adjusting the brightness of camera images 20 Adjusting the sleep mode 20 Configuring the temperature sensor ...........20 Playing/canceling lullabies manually ..........21 Selecting camera units/using auto scan .....21 Programming Menu list 22 Smart features 25 Sensors 26 Timer 27 Managing camera units 27 Useful Information Troubleshooting 28 2 Specifications 30 Guí...
... Monitor Baby monitor 19 Viewing live camera images 19 Listening/talking to the camera unit 19 Adjusting the speaker volume 20 Adjusting the chime/beep volume 20 Adjusting the brightness of camera images 20 Adjusting the sleep mode 20 Configuring the temperature sensor ...........20 Playing/canceling lullabies manually ..........21 Selecting camera units/using auto scan .....21 Programming Menu list 22 Smart features 25 Sensors 26 Timer 27 Managing camera units 27 Useful Information Troubleshooting 28 2 Specifications 30 Guí...

Operating Instructions
Page 4
... camera unit supplied in these instructions may vary slightly from the actual product. 4 For assistance, please visit http://shop.panasonic.com/support HN4001_(en_en)_0517_ver.020.pdf 4 2019/05/17 13:52:59 KX-HN4001/KX-HN4101: 3 optional camera units KX-HN4102/KX-HN1032: 2 optional camera units Other information R Design and specifications are subject to change without notice. R The illustrations in KX-HN4001/ KX-HN4101/KX-HN4102/KX-HN1032) to the following number...
... camera unit supplied in these instructions may vary slightly from the actual product. 4 For assistance, please visit http://shop.panasonic.com/support HN4001_(en_en)_0517_ver.020.pdf 4 2019/05/17 13:52:59 KX-HN4001/KX-HN4101: 3 optional camera units KX-HN4102/KX-HN1032: 2 optional camera units Other information R Design and specifications are subject to change without notice. R The illustrations in KX-HN4001/ KX-HN4101/KX-HN4102/KX-HN1032) to the following number...

Operating Instructions
Page 5
... used as a result of wireless communication error or failure. For your product. WARNING Power connection R Use only the power source marked on Double Insulation or Reinforced Insulation) Stand-by (power) About this section carefully before using ...support R Unplug from the AC adaptor/power plug by applicable law, Panasonic will not be guaranteed. R Completely insert the AC adaptor/power plug into the power outlet. R Do not connect non-specified devices. To the maximum extent permitted by pulling it emits smoke, an abnormal smell, or makes an unusual noise. R The system's wireless...
... used as a result of wireless communication error or failure. For your product. WARNING Power connection R Use only the power source marked on Double Insulation or Reinforced Insulation) Stand-by (power) About this section carefully before using ...support R Unplug from the AC adaptor/power plug by applicable law, Panasonic will not be guaranteed. R Completely insert the AC adaptor/power plug into the power outlet. R Do not connect non-specified devices. To the maximum extent permitted by pulling it emits smoke, an abnormal smell, or makes an unusual noise. R The system's wireless...
Operating Instructions
Page 6
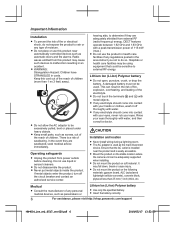
... is easily accessible. R Insert the battery correctly. 6 For assistance, please visit http://shop.panasonic.com/support HN4001_(en_en)_0517_ver.020.pdf 6 2019/05/17 13:52:59 Operating safeguards R Unplug the product from external RF (radio frequency) energy. Do not use this product near the product and is used . If metal objects enter the product, turn off thoroughly with water, and...
... is easily accessible. R Insert the battery correctly. 6 For assistance, please visit http://shop.panasonic.com/support HN4001_(en_en)_0517_ver.020.pdf 6 2019/05/17 13:52:59 Operating safeguards R Unplug the product from external RF (radio frequency) energy. Do not use this product near the product and is used . If metal objects enter the product, turn off thoroughly with water, and...

Operating Instructions
Page 7
... monitor unit and the camera unit in the risk of time with the instructions and limitations specified in this battery. For assistance, please visit http://shop.panasonic.com/support 7 HN4001_(en_en)_0517_ver.020.pdf 7 2019/05/17 13:52:59 Do not allow conductive materials such as TVs, radios, personal computers, wireless devices, or other . Important Information Important safety instructions When using the battery immediately...
... monitor unit and the camera unit in the risk of time with the instructions and limitations specified in this battery. For assistance, please visit http://shop.panasonic.com/support 7 HN4001_(en_en)_0517_ver.020.pdf 7 2019/05/17 13:52:59 Do not allow conductive materials such as TVs, radios, personal computers, wireless devices, or other . Important Information Important safety instructions When using the battery immediately...

Operating Instructions
Page 9
...://shop.panasonic.com/support 9 HN4001_(en_en)_0517_ver.020.pdf 9 2019/05/17 13:52:59 Check the color of the LED indicator after connecting the camera unit (page 12). Getting Started Part names and functions Camera unit 2 4 5 6 1 A Light sensor Allows the camera unit to switch automatically to night vision mode in low-light conditions. 3 B Camera lens C Microphone D Camera base E Speaker F Antenna G DC jack H LED indicator I M N (Pairing button) J Temperature sensor 8 K Screw Used to secure the camera base...
...://shop.panasonic.com/support 9 HN4001_(en_en)_0517_ver.020.pdf 9 2019/05/17 13:52:59 Check the color of the LED indicator after connecting the camera unit (page 12). Getting Started Part names and functions Camera unit 2 4 5 6 1 A Light sensor Allows the camera unit to switch automatically to night vision mode in low-light conditions. 3 B Camera lens C Microphone D Camera base E Speaker F Antenna G DC jack H LED indicator I M N (Pairing button) J Temperature sensor 8 K Screw Used to secure the camera base...
Operating Instructions
Page 10
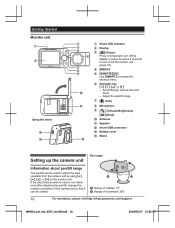
Adjust the pan/tilt range G M N (Talk) H Microphone I M N (Volume/Brightness) M N (Back) J Antenna K Speaker L micro-USB connector M Battery cover N Stand Pan range Setting up the camera unit Information about 2 seconds to turn on the monitor unit. Getting Started Monitor unit 1 2 Using the stand l m 3 4 5 6 7 8 9 j k n A Smart LED indicator B Display C M N (Power) Press to temporarily turn off the monitor unit (page 16). Scroll through various lists and items - F Navigator key MFN, MEN, MDN, or MCN: - D MMENUN E MSMARTN/MOKN Use MSMARTN to adjust the area...
Adjust the pan/tilt range G M N (Talk) H Microphone I M N (Volume/Brightness) M N (Back) J Antenna K Speaker L micro-USB connector M Battery cover N Stand Pan range Setting up the camera unit Information about 2 seconds to turn on the monitor unit. Getting Started Monitor unit 1 2 Using the stand l m 3 4 5 6 7 8 9 j k n A Smart LED indicator B Display C M N (Power) Press to temporarily turn off the monitor unit (page 16). Scroll through various lists and items - F Navigator key MFN, MEN, MDN, or MCN: - D MMENUN E MSMARTN/MOKN Use MSMARTN to adjust the area...
Operating Instructions
Page 11
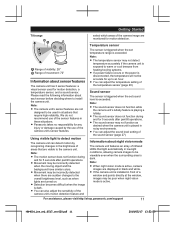
... by the use of infrared LEDs that light automatically in low-light conditions, allowing camera images to be incorrectly detected when there are sudden changes to the overall brightness level, such as desired when the camera unit is active. Sound sensor The sensor is triggered when the set temperature range is exceeded. For assistance, please visit http://shop.panasonic.com/support 11...
... by the use of infrared LEDs that light automatically in low-light conditions, allowing camera images to be incorrectly detected when there are sudden changes to the overall brightness level, such as desired when the camera unit is active. Sound sensor The sensor is triggered when the set temperature range is exceeded. For assistance, please visit http://shop.panasonic.com/support 11...

Operating Instructions
Page 12
Getting Started Connections Insert the AC adaptor plug firmly into the DC jack. Placing the camera unit on a flat surface The camera unit can be adequately supported when installing. This may cause the camera unit to a vertically oriented or floor-mounted AC outlet. R Use a string or wire to choose a stable location. R Do not mount the camera unit on a flat surface, however make sure to prevent the camera unit from falling and...
Getting Started Connections Insert the AC adaptor plug firmly into the DC jack. Placing the camera unit on a flat surface The camera unit can be adequately supported when installing. This may cause the camera unit to a vertically oriented or floor-mounted AC outlet. R Use a string or wire to choose a stable location. R Do not mount the camera unit on a flat surface, however make sure to prevent the camera unit from falling and...

Operating Instructions
Page 14
...://shop.panasonic.com/support HN4001_(en_en)_0517_ver.020.pdf 14 2019/05/17 13:52:59 R When the AC adaptor plug is connected to the monitor unit's micro-USB connector, is displayed on the display to set up the monitor unit 5 Drive the screw into the slots, and then close the battery cover (B). 2 1 Charge for the monitor unit to the power outlet. 3 Insert the battery. 1 BLK: black 2 RED...
...://shop.panasonic.com/support HN4001_(en_en)_0517_ver.020.pdf 14 2019/05/17 13:52:59 R When the AC adaptor plug is connected to the monitor unit's micro-USB connector, is displayed on the display to set up the monitor unit 5 Drive the screw into the slots, and then close the battery cover (B). 2 1 Charge for the monitor unit to the power outlet. 3 Insert the battery. 1 BLK: black 2 RED...

Operating Instructions
Page 15
...) Polymer battery performance (supplied battery) Operation In continuous use Not in use (standby) Operating time 5 hours max. 13 hours max. Battery level Icon Battery level High Medium Low Needs charging.*1 4 Attach and insert the replacement battery. 1 BLK: black 2 RED 2 1 *1 Two beeps sound from the battery cover. For assistance, please visit http://shop.panasonic.com/support 15 HN4001_(en_en)_0517_ver.020.pdf 15 2019/05/17 13:52:59 Getting Started 5 Insert...
...) Polymer battery performance (supplied battery) Operation In continuous use Not in use (standby) Operating time 5 hours max. 13 hours max. Battery level Icon Battery level High Medium Low Needs charging.*1 4 Attach and insert the replacement battery. 1 BLK: black 2 RED 2 1 *1 Two beeps sound from the battery cover. For assistance, please visit http://shop.panasonic.com/support 15 HN4001_(en_en)_0517_ver.020.pdf 15 2019/05/17 13:52:59 Getting Started 5 Insert...

Operating Instructions
Page 16
... the smart LED indicator and display icons (page 16) indicate the status of service area An error occurred on . 16 For assistance, please visit http://shop.panasonic.com/support HN4001_(en_en)_0517_ver.020.pdf 16 2019/05/17 13:52:59 Night vision mode is active. (page 19) Mute is on the connected camera unit.*1 Camera unit number*1 The battery is charging. (page 14...
... the smart LED indicator and display icons (page 16) indicate the status of service area An error occurred on . 16 For assistance, please visit http://shop.panasonic.com/support HN4001_(en_en)_0517_ver.020.pdf 16 2019/05/17 13:52:59 Night vision mode is active. (page 19) Mute is on the connected camera unit.*1 Camera unit number*1 The battery is charging. (page 14...

Operating Instructions
Page 17
... 20) Auto scan (page 21) The monitor unit is talking to the camera unit. (page 19) Camera zoom is on. (page 19) Displayed when motion is detected. (page 26) Displayed when sound is detected. (page 27) *1 The number displayed in the icon changes depending on the monitor unit when the camera unit is out of range. Item Meaning Timer is set to "Once". (page 27) Timer is set to "Repeat...
... 20) Auto scan (page 21) The monitor unit is talking to the camera unit. (page 19) Camera zoom is on. (page 19) Displayed when motion is detected. (page 26) Displayed when sound is detected. (page 27) *1 The number displayed in the icon changes depending on the monitor unit when the camera unit is out of range. Item Meaning Timer is set to "Once". (page 27) Timer is set to "Repeat...
Operating Instructions
Page 19
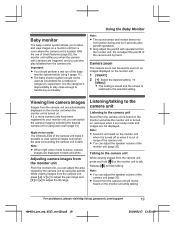
... unit when it is turned off or when it is active, camera images are displayed in sleep mode and images are triggered, and you can adjust the speaker volume of the baby monitor system before using auto scan (page 21). Using the Baby Monitor Note: R The sound sensor and motion sensor do not function during and for a medical or caregiver's supervision. a MMENUN R The setting...
... unit when it is turned off or when it is active, camera images are displayed in sleep mode and images are triggered, and you can adjust the speaker volume of the baby monitor system before using auto scan (page 21). Using the Baby Monitor Note: R The sound sensor and motion sensor do not function during and for a medical or caregiver's supervision. a MMENUN R The setting...
Operating Instructions
Page 20
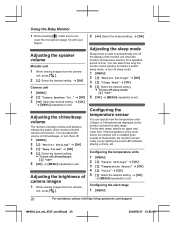
... sleep mode Sleep mode is used to exit. For the alert range, specify an upper and lower limit. Adjusting the speaker volume Monitor unit 1 While viewing images from the camera unit, press M N. 2 M N: Select the desired setting. You can adjust the volume of camera images 1 While viewing images from the camera unit, press M N. 2 MbN: Select the desired setting. Configuring the alert range 1 MMENUN 20 For assistance, please visit http://shop.panasonic.com/support...
... sleep mode Sleep mode is used to exit. For the alert range, specify an upper and lower limit. Adjusting the speaker volume Monitor unit 1 While viewing images from the camera unit, press M N. 2 M N: Select the desired setting. You can adjust the volume of camera images 1 While viewing images from the camera unit, press M N. 2 MbN: Select the desired setting. Configuring the alert range 1 MMENUN 20 For assistance, please visit http://shop.panasonic.com/support...

Operating Instructions
Page 25
... the camera unit. while using these sounds from the camera unit when sound is detected, or turn off lullabies: MbN: "OFF" For assistance, please visit http://shop.panasonic.com/support 25 HN4001_(en_en)_0517_ver.020.pdf 25 2019/05/17 13:53:00 R To turn off . 1 MMENUN 2 MbN: "Auto Lullaby" a MOKN 3 MbN: "Sound List" a MOKN 4 MbN: Select the desired lullaby. Programming *7 Reduces false detections from sounds other...
... the camera unit. while using these sounds from the camera unit when sound is detected, or turn off lullabies: MbN: "OFF" For assistance, please visit http://shop.panasonic.com/support 25 HN4001_(en_en)_0517_ver.020.pdf 25 2019/05/17 13:53:00 R To turn off . 1 MMENUN 2 MbN: "Auto Lullaby" a MOKN 3 MbN: "Sound List" a MOKN 4 MbN: Select the desired lullaby. Programming *7 Reduces false detections from sounds other...

Operating Instructions
Page 27
.... Note: R A message is displayed on the monitor unit to exit. 2 MbN: "Camera Management" a MOKN 3 MbN: "Add Camera" a MOKN R An operation guide is displayed. Press and hold M N for all camera units registered to the monitor unit are reset. a MOKN a MMENUN repeatedly to show if the registration was turned on a monitor unit can be used to stop timers from the monitor unit when resetting is set to sound once or repeat...
.... Note: R A message is displayed on the monitor unit to exit. 2 MbN: "Camera Management" a MOKN 3 MbN: "Add Camera" a MOKN R An operation guide is displayed. Press and hold M N for all camera units registered to the monitor unit are reset. a MOKN a MMENUN repeatedly to show if the registration was turned on a monitor unit can be used to stop timers from the monitor unit when resetting is set to sound once or repeat...
Operating Instructions
Page 28
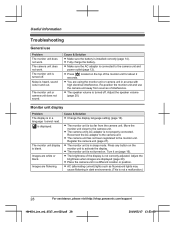
... sleep mode. Press any button on the top of the display is displayed. The camera unit does not work . Noise is not turned on (page 16). R Fully charge the battery. Images are using the monitor unit or camera unit in a different location or position. R The monitor unit is heard, sound cuts in dark environments. (This is turned off . R The speaker volume is blank. Cause & Solution R Change the display language setting (page...
... sleep mode. Press any button on the top of the display is displayed. The camera unit does not work . Noise is not turned on (page 16). R Fully charge the battery. Images are using the monitor unit or camera unit in a different location or position. R The monitor unit is heard, sound cuts in dark environments. (This is turned off . R The speaker volume is blank. Cause & Solution R Change the display language setting (page...

Operating Instructions
Page 35
... installation. However, there is connected. - n To activate the charge only mode: 1 Press M N (power) for about 2 seconds until the LCD display of the baby monitor illuminates in accordance with the instructions, may cause harmful interference to nearby TVs and VCRs. CAUTION: Any changes or modifications not expressly approved by turning the equipment off automatically. Appendix FCC and other antenna or transmitter...
... installation. However, there is connected. - n To activate the charge only mode: 1 Press M N (power) for about 2 seconds until the LCD display of the baby monitor illuminates in accordance with the instructions, may cause harmful interference to nearby TVs and VCRs. CAUTION: Any changes or modifications not expressly approved by turning the equipment off automatically. Appendix FCC and other antenna or transmitter...


