Operating Instructions
Page 1
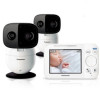
... unit and save them for purchasing a Panasonic product. Please register your product: http://shop.panasonic.com/support HN4001_(en_en)_0517_ver.020.pdf 1 2019/05/17 13:52:58 KX-HNM300) Model shown is KX-HN4001. Thank you for future reference. Operating Instructions Baby Monitor Model No. Consulte "Guía Rápida Española", página 31. Before initial use, see "Getting Started...
... unit and save them for purchasing a Panasonic product. Please register your product: http://shop.panasonic.com/support HN4001_(en_en)_0517_ver.020.pdf 1 2019/05/17 13:52:58 KX-HNM300) Model shown is KX-HN4001. Thank you for future reference. Operating Instructions Baby Monitor Model No. Consulte "Guía Rápida Española", página 31. Before initial use, see "Getting Started...
Operating Instructions
Page 2
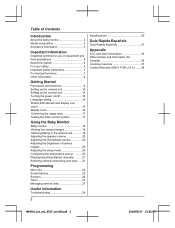
... Monitor Baby monitor 19 Viewing live camera images 19 Listening/talking to the camera unit 19 Adjusting the speaker volume 20 Adjusting the chime/beep volume 20 Adjusting the brightness of camera images 20 Adjusting the sleep mode 20 Configuring the temperature sensor ...........20 Playing/canceling lullabies manually ..........21 Selecting camera units/using auto scan .....21 Programming Menu list 22 Smart features 25 Sensors 26 Timer 27 Managing camera units 27 Useful Information Troubleshooting 28 2 Specifications 30 Guí...
... Monitor Baby monitor 19 Viewing live camera images 19 Listening/talking to the camera unit 19 Adjusting the speaker volume 20 Adjusting the chime/beep volume 20 Adjusting the brightness of camera images 20 Adjusting the sleep mode 20 Configuring the temperature sensor ...........20 Playing/canceling lullabies manually ..........21 Selecting camera units/using auto scan .....21 Programming Menu list 22 Smart features 25 Sensors 26 Timer 27 Managing camera units 27 Useful Information Troubleshooting 28 2 Specifications 30 Guí...

Operating Instructions
Page 4
... these instructions may vary slightly from the actual product. 4 For assistance, please visit http://shop.panasonic.com/support HN4001_(en_en)_0517_ver.020.pdf 4 2019/05/17 13:52:59 R The illustrations in KX-HN4001/ KX-HN4101/KX-HN4102/KX-HN1032) to the following number of optional camera units (4 units max. KX-HN4001/KX-HN4101: 3 optional camera units KX-HN4102/KX-HN1032: 2 optional camera units Other information R Design and specifications are subject to change...
... these instructions may vary slightly from the actual product. 4 For assistance, please visit http://shop.panasonic.com/support HN4001_(en_en)_0517_ver.020.pdf 4 2019/05/17 13:52:59 R The illustrations in KX-HN4001/ KX-HN4101/KX-HN4102/KX-HN1032) to the following number of optional camera units (4 units max. KX-HN4001/KX-HN4101: 3 optional camera units KX-HN4102/KX-HN1032: 2 optional camera units Other information R Design and specifications are subject to change...

Operating Instructions
Page 5
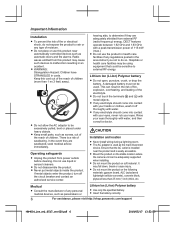
...power outlets and extension cords. Failure to provide complete protection from the AC adaptor/power plug by (power) About this section carefully before using the product to interference, therefore functionality in the event of wireless communication error... Important Information Graphical symbols for use on equipment and their descriptions Symbol Explanation Alternating current (A.C.) Symbol Direct current (D.C.) For indoor use only ...plug with a dry cloth. For assistance, please visit http://shop.panasonic.com/support 5 HN4001_(en_en)_0517_ver.020.pdf 5 2019/05/17 13...
...power outlets and extension cords. Failure to provide complete protection from the AC adaptor/power plug by (power) About this section carefully before using the product to interference, therefore functionality in the event of wireless communication error... Important Information Graphical symbols for use on equipment and their descriptions Symbol Explanation Alternating current (A.C.) Symbol Direct current (D.C.) For indoor use only ...plug with a dry cloth. For assistance, please visit http://shop.panasonic.com/support 5 HN4001_(en_en)_0517_ver.020.pdf 5 2019/05/17 13...
Operating Instructions
Page 6
... (Li-Ion) Polymer battery R Use only the specified battery. R Insert the battery correctly. 6 For assistance, please visit http://shop.panasonic.com/support HN4001_(en_en)_0517_ver.020.pdf 6 2019/05/17 13:52:59 R Do not mount the product on soft material. R Mount the product on the stable location where the camera unit can result in the area instruct you not to do...
... (Li-Ion) Polymer battery R Use only the specified battery. R Insert the battery correctly. 6 For assistance, please visit http://shop.panasonic.com/support HN4001_(en_en)_0517_ver.020.pdf 6 2019/05/17 13:52:59 R Do not mount the product on soft material. R Mount the product on the stable location where the camera unit can result in the area instruct you not to do...

Operating Instructions
Page 7
... the speaker, as external antennas of mobile phone cell stations. (Avoid putting the product on how to recycle this manual. away from electrical noise generating devices, such as coins or hairpins onto the battery terminals. R Do not replace a battery with local codes for possible special disposal instructions. R Charge the battery provided with or identified for use the product for a long period of time. Environment...
... the speaker, as external antennas of mobile phone cell stations. (Avoid putting the product on how to recycle this manual. away from electrical noise generating devices, such as coins or hairpins onto the battery terminals. R Do not replace a battery with local codes for possible special disposal instructions. R Charge the battery provided with or identified for use the product for a long period of time. Environment...

Operating Instructions
Page 9
... Green, blinking slowly Green, blinking quickly Status No power Normal operation Registration mode Device malfunction For assistance, please visit http://shop.panasonic.com/support 9 HN4001_(en_en)_0517_ver.020.pdf 9 2019/05/17 13:52:59 Getting Started Part names and functions Camera unit 2 4 5 6 1 A Light sensor Allows the camera unit to switch automatically to night vision mode in low-light conditions. 3 B Camera lens C Microphone D Camera base E Speaker F Antenna G DC jack H LED indicator I M N (Pairing button) J Temperature sensor 8 K Screw Used to...
... Green, blinking slowly Green, blinking quickly Status No power Normal operation Registration mode Device malfunction For assistance, please visit http://shop.panasonic.com/support 9 HN4001_(en_en)_0517_ver.020.pdf 9 2019/05/17 13:52:59 Getting Started Part names and functions Camera unit 2 4 5 6 1 A Light sensor Allows the camera unit to switch automatically to night vision mode in low-light conditions. 3 B Camera lens C Microphone D Camera base E Speaker F Antenna G DC jack H LED indicator I M N (Pairing button) J Temperature sensor 8 K Screw Used to...
Operating Instructions
Page 10
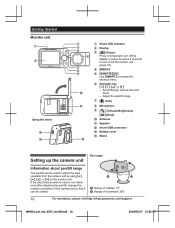
..., change the location or position of the camera unit so that it 1 Range of visibility: 37° can be viewed. 2 Range of movement: 309° 10 For assistance, please visit http://shop.panasonic.com/support HN4001_(en_en)_0517_ver.020.pdf 10 2019/05/17 13:52:59 Adjust the pan/tilt range G M N (Talk) H Microphone I M N (Volume/Brightness) M N (Back) J Antenna K Speaker L micro-USB connector M Battery cover N Stand Pan range Setting up the camera unit Information...
..., change the location or position of the camera unit so that it 1 Range of visibility: 37° can be viewed. 2 Range of movement: 309° 10 For assistance, please visit http://shop.panasonic.com/support HN4001_(en_en)_0517_ver.020.pdf 10 2019/05/17 13:52:59 Adjust the pan/tilt range G M N (Talk) H Microphone I M N (Volume/Brightness) M N (Back) J Antenna K Speaker L micro-USB connector M Battery cover N Stand Pan range Setting up the camera unit Information...
Operating Instructions
Page 11
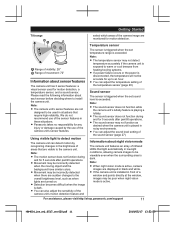
... or the power is installed in front of a window and points directly at the window, images may not function as when lights are displayed in low-light conditions, allowing camera images to an hour. Temperature sensor 1 Range of visibility: 28° 2 Range of movement: 72° Information about sensor features The camera unit has 3 sensor features: a visual sensor used in situations that light automatically in black and...
... or the power is installed in front of a window and points directly at the window, images may not function as when lights are displayed in low-light conditions, allowing camera images to an hour. Temperature sensor 1 Range of visibility: 28° 2 Range of movement: 72° Information about sensor features The camera unit has 3 sensor features: a visual sensor used in situations that light automatically in black and...

Operating Instructions
Page 12
... location. R Mount the camera unit on a soft material. R Do not mount the camera unit on the stable location where the unit can be connected to the camera unit. 12 For assistance, please visit http://shop.panasonic.com/support HN4001_(en_en)_0517_ver.020.pdf 12 2019/05/17 13:52:59 Placing the camera unit on a flat surface The camera unit can be adequately supported when installing. R Use a string or wire to...
... location. R Mount the camera unit on a soft material. R Do not mount the camera unit on the stable location where the unit can be connected to the camera unit. 12 For assistance, please visit http://shop.panasonic.com/support HN4001_(en_en)_0517_ver.020.pdf 12 2019/05/17 13:52:59 Placing the camera unit on a flat surface The camera unit can be adequately supported when installing. R Use a string or wire to...

Operating Instructions
Page 14
... monitor unit's micro-USB connector, is connected to the power outlet. 3 Insert the battery. 1 BLK: black 2 RED A B 2 1 4 Insert the tabs (A) into the battery cover. R It is disconnected when charging. 14 For assistance, please visit http://shop.panasonic.com/support HN4001_(en_en)_0517_ver.020.pdf 14 2019/05/17 13:52:59 Note: R Use only the supplied AC adaptor S006AKU0500100. R Follow the directions on the screen. Battery installation R USE ONLY...
... monitor unit's micro-USB connector, is connected to the power outlet. 3 Insert the battery. 1 BLK: black 2 RED A B 2 1 4 Insert the tabs (A) into the battery cover. R It is disconnected when charging. 14 For assistance, please visit http://shop.panasonic.com/support HN4001_(en_en)_0517_ver.020.pdf 14 2019/05/17 13:52:59 Note: R Use only the supplied AC adaptor S006AKU0500100. R Follow the directions on the screen. Battery installation R USE ONLY...

Operating Instructions
Page 15
... Replacing the battery R USE ONLY the specified battery. 1 Remove the screw from the monitor unit every 3 minutes when the battery needs charging. Getting Started 5 Insert the tabs (A) into the slots, and then close the battery cover (B). 2 1 2 Remove the battery cover. 6 Drive the screw into the battery cover. 3 Remove the currently used battery. Lithium Ion (Li-Ion) Polymer battery performance (supplied battery) Operation In continuous use Not in use (standby) Operating time...
... Replacing the battery R USE ONLY the specified battery. 1 Remove the screw from the monitor unit every 3 minutes when the battery needs charging. Getting Started 5 Insert the tabs (A) into the slots, and then close the battery cover (B). 2 1 2 Remove the battery cover. 6 Drive the screw into the battery cover. 3 Remove the currently used battery. Lithium Ion (Li-Ion) Polymer battery performance (supplied battery) Operation In continuous use Not in use (standby) Operating time...

Operating Instructions
Page 16
... language. Out of service area An error occurred on the connected camera unit.*1 Camera unit number*1 The battery is charging. (page 14) The battery is on. 16 For assistance, please visit http://shop.panasonic.com/support HN4001_(en_en)_0517_ver.020.pdf 16 2019/05/17 13:52:59 Night vision mode is active. (page 19) Mute is fully charged. R Motion or sound detected at the...
... language. Out of service area An error occurred on the connected camera unit.*1 Camera unit number*1 The battery is charging. (page 14) The battery is on. 16 For assistance, please visit http://shop.panasonic.com/support HN4001_(en_en)_0517_ver.020.pdf 16 2019/05/17 13:52:59 Night vision mode is active. (page 19) Mute is fully charged. R Motion or sound detected at the...

Operating Instructions
Page 17
... that can use your monitor unit to test the performance of range. For example, test the motion sensor, microphone, and speaker. Testing the motion detection range After setting up the camera unit and monitor unit, you are located between the monitor unit and camera unit. Confirming the usage area Wireless communication range The wireless communication range of the monitor unit from the camera unit is displayed on the monitor unit screen in different...
... that can use your monitor unit to test the performance of range. For example, test the motion sensor, microphone, and speaker. Testing the motion detection range After setting up the camera unit and monitor unit, you are located between the monitor unit and camera unit. Confirming the usage area Wireless communication range The wireless communication range of the monitor unit from the camera unit is displayed on the monitor unit screen in different...
Operating Instructions
Page 19
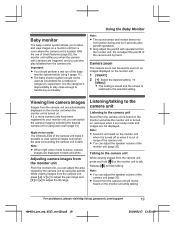
... camera unit is active, camera images are not displayed. R Only adjust the pan/tilt with operations from the camera unit will not be used as a substitute for 5 seconds after pan/tilt operations. While viewing images from the camera unit, press MFN or MEN to adjust the pan range and MCN or MDN to your monitor unit, you can adjust the area viewed by the camera unit by using auto scan (page 21). Note: R Sound...
... camera unit is active, camera images are not displayed. R Only adjust the pan/tilt with operations from the camera unit will not be used as a substitute for 5 seconds after pan/tilt operations. While viewing images from the camera unit, press MFN or MEN to adjust the pan range and MCN or MDN to your monitor unit, you can adjust the area viewed by the camera unit by using auto scan (page 21). Note: R Sound...
Operating Instructions
Page 20
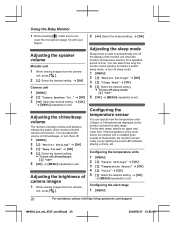
... visit http://shop.panasonic.com/support HN4001_(en_en)_0517_ver.020.pdf 20 2019/05/17 13:53:00 b b Using the Baby Monitor R When pressing M N, make sure to exit. You can specify how the temperature units (Celsius or Fahrenheit) are displayed on the monitor unit and the alert range. Adjusting the speaker volume Monitor unit 1 While viewing images from the camera unit, press M N. 2 M N: Select the desired setting.
... visit http://shop.panasonic.com/support HN4001_(en_en)_0517_ver.020.pdf 20 2019/05/17 13:53:00 b b Using the Baby Monitor R When pressing M N, make sure to exit. You can specify how the temperature units (Celsius or Fahrenheit) are displayed on the monitor unit and the alert range. Adjusting the speaker volume Monitor unit 1 While viewing images from the camera unit, press M N. 2 M N: Select the desired setting.

Operating Instructions
Page 25
... while viewing images from the camera unit. R Auto lullaby does not function during the following. - while talking to check the camera unit's speaker volume before playing lullabies (page 20). If your baby's voice is detected, or turn off sound notifications: MbN: "OFF" 5 MOKN a MMENUN repeatedly to match the size of sensor detections. Configuring sound notifications You can coordinate the camera unit and monitor unit to...
... while viewing images from the camera unit. R Auto lullaby does not function during the following. - while talking to check the camera unit's speaker volume before playing lullabies (page 20). If your baby's voice is detected, or turn off sound notifications: MbN: "OFF" 5 MOKN a MMENUN repeatedly to match the size of sensor detections. Configuring sound notifications You can coordinate the camera unit and monitor unit to...

Operating Instructions
Page 27
... unit after setting a timer: - Canceling a camera unit Note: R Only the currently connected camera unit is turned off after the specified number of hours has passed. a MOKN a MMENUN Note: R Timers play sound from the monitor unit when resetting is set to the monitor unit are reset. "Repeat": The timer will be played once the specified time has passed from repeating. Managing camera units Registering a camera unit Monitor unit: 1 MMENUN b b Resetting a camera unit The camera unit settings saved on a monitor unit can be used...
... unit after setting a timer: - Canceling a camera unit Note: R Only the currently connected camera unit is turned off after the specified number of hours has passed. a MOKN a MMENUN Note: R Timers play sound from the monitor unit when resetting is set to the monitor unit are reset. "Repeat": The timer will be played once the specified time has passed from repeating. Managing camera units Registering a camera unit Monitor unit: 1 MMENUN b b Resetting a camera unit The camera unit settings saved on a monitor unit can be used...
Operating Instructions
Page 28
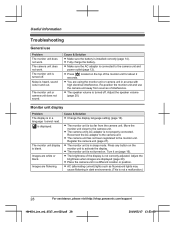
... R Change the display language setting (page 16). R The camera unit's AC adaptor is installed correctly (page 14). Register the camera unit (page 27). The camera unit does not work . Cause & Solution R Make sure the battery is not properly connected. is in a language I cannot read. R The monitor unit is displayed. R You are white or black. Re-position the monitor unit and use Problem The monitor unit does not work . Move the monitor unit...
... R Change the display language setting (page 16). R The camera unit's AC adaptor is installed correctly (page 14). Register the camera unit (page 27). The camera unit does not work . Cause & Solution R Make sure the battery is not properly connected. is in a language I cannot read. R The monitor unit is displayed. R You are white or black. Re-position the monitor unit and use Problem The monitor unit does not work . Move the monitor unit...

Operating Instructions
Page 35
.... Reorient or relocate the receiving antenna. - Consult the dealer or an experienced radio/ TV technician for about 2 seconds until the baby monitor shuts down. 2 Connect the charger to correct the interference by one or more between the equipment and receiver. - n To deactivate the charge only mode: - Some devices operate at frequencies that to Part 15 of the unit. a TV or VCR...
.... Reorient or relocate the receiving antenna. - Consult the dealer or an experienced radio/ TV technician for about 2 seconds until the baby monitor shuts down. 2 Connect the charger to correct the interference by one or more between the equipment and receiver. - n To deactivate the charge only mode: - Some devices operate at frequencies that to Part 15 of the unit. a TV or VCR...


