

Installation Guide - KX-HN7002
Page 2
... Setup Part names and functions 18 Setup overview 22 Charging the cameras 22 Turning the power on for the cameras .......23 Downloading the [HomeHawk] app 23 Connections for access point 24 Initial setup 24 Registering the cameras 25 Confirming the camera installation area .....26 Camera installation 26 Testing the motion detection range 30 Registering another mobile device 31 Appendix Features available when using the [HomeHawk] app 32 Accessing the User's Guide 32 Specifications 32 Open source software...
... Setup Part names and functions 18 Setup overview 22 Charging the cameras 22 Turning the power on for the cameras .......23 Downloading the [HomeHawk] app 23 Connections for access point 24 Initial setup 24 Registering the cameras 25 Confirming the camera installation area .....26 Camera installation 26 Testing the motion detection range 30 Registering another mobile device 31 Appendix Features available when using the [HomeHawk] app 32 Accessing the User's Guide 32 Specifications 32 Open source software...
Installation Guide - KX-HN7002
Page 24
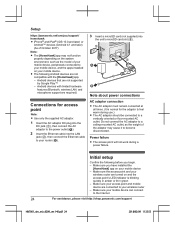
... your mobile device, peripherals connected to your mobile device, and the apps installed on your router (2). 3 Insert a microSD card (not supplied) into the unit's microSD card slot (C). 3 2 1 1 2 Note about power connections AC adaptor connection R The AC adaptor must remain connected at all times. (It is blinking quickly in amber or lit in green - Initial setup Confirm the following Android devices are not supported by Google Play™ -
... your mobile device, peripherals connected to your mobile device, and the apps installed on your router (2). 3 Insert a microSD card (not supplied) into the unit's microSD card slot (C). 3 2 1 1 2 Note about power connections AC adaptor connection R The AC adaptor must remain connected at all times. (It is blinking quickly in amber or lit in green - Initial setup Confirm the following Android devices are not supported by Google Play™ -

Installation Guide - KX-HN7002
Page 26
... possible due to confirm the installation location and direction. Confirming the camera installation area Before deciding where to install the camera, carefully read the instructions supplied with a height of 2.2 m (7 feet 3 inches) where the unit can be used to the User's Guide (page 32). R Drill a pilot hole using the [HomeHawk] app. Using the app You can be adequately supported when installing. Do not drill the...
... possible due to confirm the installation location and direction. Confirming the camera installation area Before deciding where to install the camera, carefully read the instructions supplied with a height of 2.2 m (7 feet 3 inches) where the unit can be used to the User's Guide (page 32). R Drill a pilot hole using the [HomeHawk] app. Using the app You can be adequately supported when installing. Do not drill the...

Installation Guide - KX-HN7002
Page 33
.../16 inches ´ 3 11/16 inches)*5 R Mass (weight) Access point: Approx. 200 g (0.44 lb) Front door camera: Approx. 390 g (0.86 lb)*5 Outdoor camera: Approx. 490 g (1.08 lb)*5 *1 Only when charging. *2 Battery performance changes depending on the relevant conditions of use open source software used by this product, Panasonic Corporation will illuminate in the Installation Guide, and appropriate water protection measures are taken. *5 Including...
.../16 inches ´ 3 11/16 inches)*5 R Mass (weight) Access point: Approx. 200 g (0.44 lb) Front door camera: Approx. 390 g (0.86 lb)*5 Outdoor camera: Approx. 490 g (1.08 lb)*5 *1 Only when charging. *2 Battery performance changes depending on the relevant conditions of use open source software used by this product, Panasonic Corporation will illuminate in the Installation Guide, and appropriate water protection measures are taken. *5 Including...

Quick Start Guide - KX-HN7002
Page 1
... the red LED indicator light stops blinking. - Or visit us at an angle as needed ) Installing the Outdoor Camera 1. icon. Camera view distance should last approximately 3 months on a full charge based on ideal camera locations, refer to use the included screws for about how to the Installation Guide. Use the included screws only when installing into the unit's microSD card slot AC Adaptor Wall Outlet Ethernet Cable Router 3 Turn...
... the red LED indicator light stops blinking. - Or visit us at an angle as needed ) Installing the Outdoor Camera 1. icon. Camera view distance should last approximately 3 months on a full charge based on ideal camera locations, refer to use the included screws for about how to the Installation Guide. Use the included screws only when installing into the unit's microSD card slot AC Adaptor Wall Outlet Ethernet Cable Router 3 Turn...

HomeHawk App Users Guide
Page 2
... Support information 43 Accessing the User's Guide 43 Accessing customer support 43 Viewing the Camera Installation / Removal Guide 43 Viewing system information 43 Viewing privacy information 43 Appendix 44 Copyright information 44 Open source software information 44 Software information 44 Notice for people 19 Downloading the [HomeHawk] app 20 Downloading the [HomeHawk] app (overview 20 Setting up devices 21 App basics 21 App basics (overview 21 Using the home screen 22 Displaying the settings menu...
... Support information 43 Accessing the User's Guide 43 Accessing customer support 43 Viewing the Camera Installation / Removal Guide 43 Viewing system information 43 Viewing privacy information 43 Appendix 44 Copyright information 44 Open source software information 44 Software information 44 Notice for people 19 Downloading the [HomeHawk] app 20 Downloading the [HomeHawk] app (overview 20 Setting up devices 21 App basics 21 App basics (overview 21 Using the home screen 22 Displaying the settings menu...

HomeHawk App Users Guide
Page 3
... Viewing the camera image/recording list screen 94 Viewing the live camera image screen 95 Recording camera images (manual recording 97 Taking snapshots 98 Viewing the recording list screen 98 Playing back recordings 100 Erasing recordings 102 Protecting recordings 102 Detection area 103 Motion sensitivity 104 Camera SD cards 104 Window camera mode settings 106 Window camera mode settings (overview) .....106 Preset modes 106 Checking the selected mode 107 Accessing the mode screen 107 Selecting modes 107 Turning modes off 107 Creating new modes 107 Editing modes 108 Deleting...
... Viewing the camera image/recording list screen 94 Viewing the live camera image screen 95 Recording camera images (manual recording 97 Taking snapshots 98 Viewing the recording list screen 98 Playing back recordings 100 Erasing recordings 102 Protecting recordings 102 Detection area 103 Motion sensitivity 104 Camera SD cards 104 Window camera mode settings 106 Window camera mode settings (overview) .....106 Preset modes 106 Checking the selected mode 107 Accessing the mode screen 107 Selecting modes 107 Turning modes off 107 Creating new modes 107 Editing modes 108 Deleting...

HomeHawk App Users Guide
Page 4
...(manual recording 127 Taking snapshots 127 Talking to the camera 128 Viewing the recording list screen 128 Playing back recordings 130 Erasing recordings 130 Protecting recordings 131 Mode settings 132 Mode settings (overview 132 Checking the selected mode 133 Accessing the mode screen 133 Selecting modes 133 Turning modes off 133 Preset modes 133 Creating new modes 134 Editing modes 135 Deleting modes 135 Status 135 Camera battery level 135 Camera signal strength 136 Image, sound, and recording settings ........136 Speaker volume settings 136 Recording settings 137 Using...
...(manual recording 127 Taking snapshots 127 Talking to the camera 128 Viewing the recording list screen 128 Playing back recordings 130 Erasing recordings 130 Protecting recordings 131 Mode settings 132 Mode settings (overview 132 Checking the selected mode 133 Accessing the mode screen 133 Selecting modes 133 Turning modes off 133 Preset modes 133 Creating new modes 134 Editing modes 135 Deleting modes 135 Status 135 Camera battery level 135 Camera signal strength 136 Image, sound, and recording settings ........136 Speaker volume settings 136 Recording settings 137 Using...

HomeHawk App Users Guide
Page 22
... function by turning on , or you were viewing. Access to location information is displayed when you want to allow access. - Also note that asks whether you start the app. 22 Shelf cameras, floor cameras, and window cameras: "Login settings", Page 116 - HD cameras: "HD camera setup (overview)", Page 148 R You can change the password if necessary. - Using the home screen The [HomeHawk] app home screen is required to access your devices...
... function by turning on , or you were viewing. Access to location information is displayed when you want to allow access. - Also note that asks whether you start the app. 22 Shelf cameras, floor cameras, and window cameras: "Login settings", Page 116 - HD cameras: "HD camera setup (overview)", Page 148 R You can change the password if necessary. - Using the home screen The [HomeHawk] app home screen is required to access your devices...

HomeHawk App Users Guide
Page 35
... displayed for HD cameras. *1 The following Amazon devices are also supported. (Supported devices are not available for the speaker. All generations of Fire TV Stick - Getting started with an Amazon Echo Show device or other Amazon devices*1 and control and view images from home. Echo Spot - Note: R Speaker and microphone settings are subject to view camera images. 1 From the [HomeHawk] app home screen, tap ® [Settings]. 2 Tap [Mobile Device Settings] ® [Remote Access Mode...
... displayed for HD cameras. *1 The following Amazon devices are also supported. (Supported devices are not available for the speaker. All generations of Fire TV Stick - Getting started with an Amazon Echo Show device or other Amazon devices*1 and control and view images from home. Echo Spot - Note: R Speaker and microphone settings are subject to view camera images. 1 From the [HomeHawk] app home screen, tap ® [Settings]. 2 Tap [Mobile Device Settings] ® [Remote Access Mode...

HomeHawk App Users Guide
Page 36
... displayed, tap [Accept] to the operating instructions and support information provided for logging in to the Internet. - R For details about these settings, refer to proceed. 4 Enter your Panasonic ID and password and then tap [Login]. 5 Using your Amazon Echo Show", Page 36) Note: R This feature requires third-party equipment and services. Make sure you have a Panasonic ID you can connect to...
... displayed, tap [Accept] to the operating instructions and support information provided for logging in to the Internet. - R For details about these settings, refer to proceed. 4 Enter your Panasonic ID and password and then tap [Login]. 5 Using your Amazon Echo Show", Page 36) Note: R This feature requires third-party equipment and services. Make sure you have a Panasonic ID you can connect to...

HomeHawk App Users Guide
Page 39
Displaying images voice command example: R OK Google, show on a TV connected to log in to the Panasonic server and linking with your Google Home, you have enabled your devices for use your Google Home to the operating instructions and support information provided for your Panasonic ID 1 From the [HomeHawk] app home screen, tap ® [Settings]. 2 Tap [Google Home]. 3 Select the desired device. 4 Tap [Unlink...
Displaying images voice command example: R OK Google, show on a TV connected to log in to the Panasonic server and linking with your Google Home, you have enabled your devices for use your Google Home to the operating instructions and support information provided for your Panasonic ID 1 From the [HomeHawk] app home screen, tap ® [Settings]. 2 Tap [Google Home]. 3 Select the desired device. 4 Tap [Unlink...

HomeHawk App Users Guide
Page 74
... for operating the camera (e.g., recording, talking, etc.) are not displayed. This is disabled Viewing images horizontally By turning your mobile device on its side, you are unavailable and operations such as recording images and talking with the camera ( "Talking to the camera's name. When viewing images horizontally, icons for more information. H Turns sound on/off ( "Turning the camera audio on and off", Page 74) J Starts/stops recording ( "Recording camera images (manual recording)", Page 75) L Enables/disables privacy mode for the light...
... for operating the camera (e.g., recording, talking, etc.) are not displayed. This is disabled Viewing images horizontally By turning your mobile device on its side, you are unavailable and operations such as recording images and talking with the camera ( "Talking to the camera's name. When viewing images horizontally, icons for more information. H Turns sound on/off ( "Turning the camera audio on and off", Page 74) J Starts/stops recording ( "Recording camera images (manual recording)", Page 75) L Enables/disables privacy mode for the light...

HomeHawk App Users Guide
Page 137
... this setting to use 24-hour format time. Using night vision If there is recorded when recording camera images. 1 From the [HomeHawk] app home screen, tap ® [Settings]. 2 Tap [Camera Settings] and select the desired camera. 3 Tap [Recording Settings]. 4 Slide the [Recording with Sound] switch to night vision mode depending on the settings. Has longer visibility range than [Monochrome]. - [Monochrome]: Lights infrared LEDs so that images can be displayed in the dark. Adjusting the time stamp...
... this setting to use 24-hour format time. Using night vision If there is recorded when recording camera images. 1 From the [HomeHawk] app home screen, tap ® [Settings]. 2 Tap [Camera Settings] and select the desired camera. 3 Tap [Recording Settings]. 4 Slide the [Recording with Sound] switch to night vision mode depending on the settings. Has longer visibility range than [Monochrome]. - [Monochrome]: Lights infrared LEDs so that images can be displayed in the dark. Adjusting the time stamp...

HomeHawk App Users Guide
Page 149
...-screen instructions. 4 Tap [Indoor HD Camera]. 5 Tap [Set up another HD camera, see "Adding another HD camera", Page 174. 1 Plug in green. 7 iOS 11.0 or later users: Tap [Join] and then continue from the beginning. 10 When prompted, press the SETUP button on -screen instructions and connect your mobile device to your wireless router - R Open your mobile device's wireless network setting temporarily so that will enter "temporary access...
...-screen instructions. 4 Tap [Indoor HD Camera]. 5 Tap [Set up another HD camera, see "Adding another HD camera", Page 174. 1 Plug in green. 7 iOS 11.0 or later users: Tap [Join] and then continue from the beginning. 10 When prompted, press the SETUP button on -screen instructions and connect your mobile device to your wireless router - R Open your mobile device's wireless network setting temporarily so that will enter "temporary access...

HomeHawk App Users Guide
Page 170
... "Deleting wireless access points", Page 172. [Reset HD Camera] See "Resetting the HD camera's settings", Page 173. Note: R If you have entered, turn on the [Show Password] checkbox. Login password You can select which types of status notifications are displayed, and which are not. - [Motion Detect] This setting determines whether a notification is displayed when the camera detects motion. - [Camera Recording] This setting determines whether a notification is displayed when camera images are being recorded. - [Temperature...
... "Deleting wireless access points", Page 172. [Reset HD Camera] See "Resetting the HD camera's settings", Page 173. Note: R If you have entered, turn on the [Show Password] checkbox. Login password You can select which types of status notifications are displayed, and which are not. - [Motion Detect] This setting determines whether a notification is displayed when the camera detects motion. - [Camera Recording] This setting determines whether a notification is displayed when camera images are being recorded. - [Temperature...

HomeHawk App Users Guide
Page 176
... the camera to power the devices are turned on. If the camera's LED indicator does not light in blue after a few minutes, check if DHCP (Dynamic Host Configuration Protocol) is operating for information about charging batteries. Cameras - Refer to the operating instructions included with your wireless router. →Disconnect the camera's AC adaptor, connect it again, and wait for the access point to the trouble you may need...
... the camera to power the devices are turned on. If the camera's LED indicator does not light in blue after a few minutes, check if DHCP (Dynamic Host Configuration Protocol) is operating for information about charging batteries. Cameras - Refer to the operating instructions included with your wireless router. →Disconnect the camera's AC adaptor, connect it again, and wait for the access point to the trouble you may need...

HomeHawk App Users Guide
Page 178
... SD memory card into the access point or enable overwrite recording ( "Recording settings", Page 137). [Recording Error (SD card error)] is displayed R There is a problem with the SD card. →Check the SD card. [Access Point update failed] is displayed R An error occurred while updating the access point. →Check all connections to discard these items, please contact your local authorities or dealer and ask for the battery removal procedure (front door cameras and outdoor cameras only...
... SD memory card into the access point or enable overwrite recording ( "Recording settings", Page 137). [Recording Error (SD card error)] is displayed R There is a problem with the SD card. →Check the SD card. [Access Point update failed] is displayed R An error occurred while updating the access point. →Check all connections to discard these items, please contact your local authorities or dealer and ask for the battery removal procedure (front door cameras and outdoor cameras only...

HomeHawk App Users Guide
Page 191
... displayed R An error occurred while updating the camera. →Fully charge the camera and try again. R The wireless network password may be disabled. →Enable the wireless router's DHCP settings. If the situation still does not improve, refer to your wireless router's manual for information on the wireless router is enabled, the camera will not charge (the charging LED indicator blinks quickly in red) R You are using...
... displayed R An error occurred while updating the camera. →Fully charge the camera and try again. R The wireless network password may be disabled. →Enable the wireless router's DHCP settings. If the situation still does not improve, refer to your wireless router's manual for information on the wireless router is enabled, the camera will not charge (the charging LED indicator blinks quickly in red) R You are using...

HomeHawk App Users Guide
Page 193
... headlights or brake lights on the settings ( "Night vision mode", Page 167). Notifications are not displayed in a specific area of sensors ( "Motion sensitivity", Page 139). Sensor detections are not received R The desired notification type is incorrect. →Adjust the date and time setting ( "HD camera device profiles", Page 171). Troubleshooting →Reduce the sensitivity of the camera's image changes brightness). False detections caused by adjusting the position of...
... headlights or brake lights on the settings ( "Night vision mode", Page 167). Notifications are not displayed in a specific area of sensors ( "Motion sensitivity", Page 139). Sensor detections are not received R The desired notification type is incorrect. →Adjust the date and time setting ( "HD camera device profiles", Page 171). Troubleshooting →Reduce the sensitivity of the camera's image changes brightness). False detections caused by adjusting the position of...


