
Home Photo Printer
Page 2
... can use when the printer is Camera Printer connected to a digital camera, etc. : Indicates the functions that the images of purchase Serial number (found on the used ink cassette. PC : Indicates the functions that you for purchasing a Panasonic Home Photo Printer. For your future reference Date of printed documents will help you can use when the printer is Printer connected to a TV. Thank you can use when the printer is Printer connected to...
... can use when the printer is Camera Printer connected to a digital camera, etc. : Indicates the functions that the images of purchase Serial number (found on the used ink cassette. PC : Indicates the functions that you for purchasing a Panasonic Home Photo Printer. For your future reference Date of printed documents will help you can use when the printer is Printer connected to a TV. Thank you can use when the printer is Printer connected to...
Home Photo Printer
Page 3
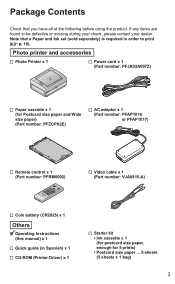
... ... 5 sheets (5 sheets x 1 bag) 3 Note that you have all of the following before using the product. Package Contents Check that a Paper and Ink set (sold separately) is required in Spanish) x 1 CD-ROM (Printer Driver) x 1 Starter kit • Ink cassette x 1 (for postcard size paper, enough for Postcard size paper and Wide size paper) (Part number: PFZCPX2E) AC adaptor x 1 (Part number: PFAP1016 or PFAP1017) Remote control x 1 (Part number: PFRM0002) Video cable x 1 (Part number: VJA0815-A) Coin battery (CR2025) x 1 Others Operating Instructions (this manual) x 1 Quick guide...
... ... 5 sheets (5 sheets x 1 bag) 3 Note that you have all of the following before using the product. Package Contents Check that a Paper and Ink set (sold separately) is required in Spanish) x 1 CD-ROM (Printer Driver) x 1 Starter kit • Ink cassette x 1 (for postcard size paper, enough for Postcard size paper and Wide size paper) (Part number: PFZCPX2E) AC adaptor x 1 (Part number: PFAP1016 or PFAP1017) Remote control x 1 (Part number: PFRM0002) Video cable x 1 (Part number: VJA0815-A) Coin battery (CR2025) x 1 Others Operating Instructions (this manual) x 1 Quick guide...
Home Photo Printer
Page 4
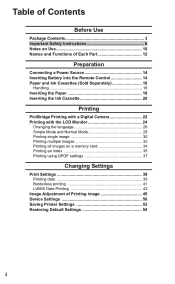
... 16 Inserting the Paper 18 Inserting the Ink Cassette 20 Printing PictBridge Printing with a Digital Camera 22 Printing with the LCD Monitor 24 Changing the language 26 Simple Mode and Normal Mode 28 Printing single image 30 Printing multiple images 32 Printing all images on a memory card 34 Printing an index 35 Printing using DPOF settings 37 Changing Settings Print Settings 39 Printing date 39 Borderless printing 41 LUMIX Date Printing 43 Image Adjustment of Printing image 45 Device Settings 50 Saving Printer Settings 53 Restoring Default Settings 54 4
... 16 Inserting the Paper 18 Inserting the Ink Cassette 20 Printing PictBridge Printing with a Digital Camera 22 Printing with the LCD Monitor 24 Changing the language 26 Simple Mode and Normal Mode 28 Printing single image 30 Printing multiple images 32 Printing all images on a memory card 34 Printing an index 35 Printing using DPOF settings 37 Changing Settings Print Settings 39 Printing date 39 Borderless printing 41 LUMIX Date Printing 43 Image Adjustment of Printing image 45 Device Settings 50 Saving Printer Settings 53 Restoring Default Settings 54 4
Home Photo Printer
Page 5
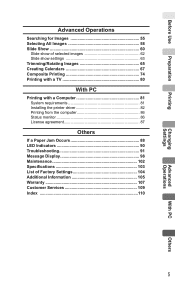
... settings 63 Trimming/Rotating Images 65 Creating Calendars 67 Composite Printing 74 Printing with a TV 80 With PC Printing with a Computer 81 System requirements 81 Installing the printer driver 82 Printing from the computer 86 Status monitor 86 License agreement 87 Others If a Paper Jam Occurs 88 LED Indicators 90 Troubleshooting 91 Message Display 98 Maintenance 102 Specifications 103 List of Factory Settings 104 Additional Information 105 Warranty 107 Customer Services...
... settings 63 Trimming/Rotating Images 65 Creating Calendars 67 Composite Printing 74 Printing with a TV 80 With PC Printing with a Computer 81 System requirements 81 Installing the printer driver 82 Printing from the computer 86 Status monitor 86 License agreement 87 Others If a Paper Jam Occurs 88 LED Indicators 90 Troubleshooting 91 Message Display 98 Maintenance 102 Specifications 103 List of Factory Settings 104 Additional Information 105 Warranty 107 Customer Services...

Home Photo Printer
Page 10
... of time. When ambient temperatures are low To maintain high quality image output, the printer does not begin printing until the internal temperature has warmed up, so it can be sure to tobacco smoke. To prevent the printer deformation and keep the internal temperature of the printer from the following locations: • Locations subject to malfunction. • Keep away from the rear panel...
... of time. When ambient temperatures are low To maintain high quality image output, the printer does not begin printing until the internal temperature has warmed up, so it can be sure to tobacco smoke. To prevent the printer deformation and keep the internal temperature of the printer from the following locations: • Locations subject to malfunction. • Keep away from the rear panel...

Home Photo Printer
Page 23
... PictBridge operations. Printing Follow the on-screen instructions on the printer side are controlled by the DPOF setting. • Settings on the printer driver ( p. 82 - 85) have no effect when printing directly from PictBridge compatible devices. • When printing from a PictBridge compatible devices, image adjustments made on the digital camera to proceed 5 the printing operation. Important • Connect only PictBridge compatible devices to the PictBridge terminal. • Do not connect a USB flash drive to be printed directly...
... PictBridge operations. Printing Follow the on-screen instructions on the printer side are controlled by the DPOF setting. • Settings on the printer driver ( p. 82 - 85) have no effect when printing directly from PictBridge compatible devices. • When printing from a PictBridge compatible devices, image adjustments made on the digital camera to proceed 5 the printing operation. Important • Connect only PictBridge compatible devices to the PictBridge terminal. • Do not connect a USB flash drive to be printed directly...

Home Photo Printer
Page 24
..., connected directly to the printer, insert the memory card into the device. Open the ink cassette compartment cover. miniSD Memory Card adaptor First insert the miniSD Memory Card into the memory card slot. • To remove the card, push the card in and release. For example, SD Memory Cards with more than 2 GB in this case. Otherwise, printing will be displayed in memory are not supported. • Image formats that can print images stored on page 103...
..., connected directly to the printer, insert the memory card into the device. Open the ink cassette compartment cover. miniSD Memory Card adaptor First insert the miniSD Memory Card into the memory card slot. • To remove the card, push the card in and release. For example, SD Memory Cards with more than 2 GB in this case. Otherwise, printing will be displayed in memory are not supported. • Image formats that can print images stored on page 103...

Home Photo Printer
Page 26
... used for the setting screen. 1 Press (MENU). • For "Normal Mode", refer to page 13.) • The direction buttons are represented in this manual as follows. Press Up, Down, Left or Right. Press to select [Language] and (OK). Press Left or Right. Press press 3 to select [Device Settings] and press 2 (OK). Printing with the LCD Monitor (continued) Printer • Printer Direction buttons PRINT RETURN OK MENU DISPLAY Same operations...
... used for the setting screen. 1 Press (MENU). • For "Normal Mode", refer to page 13.) • The direction buttons are represented in this manual as follows. Press Up, Down, Left or Right. Press to select [Language] and (OK). Press Left or Right. Press press 3 to select [Device Settings] and press 2 (OK). Printing with the LCD Monitor (continued) Printer • Printer Direction buttons PRINT RETURN OK MENU DISPLAY Same operations...

Home Photo Printer
Page 36
... stop print job midway • Press and hold (RETURN) ( p. 33). • You can also stop from the menu ( p. 33). • The printing for the paper currently being printed will return to Oldest] in the [Print Order] of copies for index. • If there are multiple folders in the memory card, the images may not be displayed by arranging in order with the LCD Monitor (continued) Check...
... stop print job midway • Press and hold (RETURN) ( p. 33). • You can also stop from the menu ( p. 33). • The printing for the paper currently being printed will return to Oldest] in the [Print Order] of copies for index. • If there are multiple folders in the memory card, the images may not be displayed by arranging in order with the LCD Monitor (continued) Check...

Home Photo Printer
Page 37
Switch to select [Print DPOF] and (OK). Before operation Insert the memory card containing images with DPOF settings into the printer, you have inserted a memory card containing DPOF settings into the printer ( p. 24). 1 Press (MENU). Press press 3 to "Normal mode" ( p. 29). Press to select [Yes] and press (OK). 4 • Printing begins. • Images are printed using the settings (number of copies to the setting. Continued on next page 37 Press to select [Printing Options] and...
Switch to select [Print DPOF] and (OK). Before operation Insert the memory card containing images with DPOF settings into the printer, you have inserted a memory card containing DPOF settings into the printer ( p. 24). 1 Press (MENU). Press press 3 to "Normal mode" ( p. 29). Press to select [Yes] and press (OK). 4 • Printing begins. • Images are printed using the settings (number of copies to the setting. Continued on next page 37 Press to select [Printing Options] and...

Home Photo Printer
Page 38
... stop print job midway • Press and hold (RETURN) ( p. 33). • You can also stop from the menu ( p. 33). • The printing for Digital Print Order Format. to images stored on memory cards by using digital video cameras and digital cameras and use that information in DPOF printing. • You cannot apply DPOF settings to images using this operation when the total number of copies to 10 copies per image can add print...
... stop print job midway • Press and hold (RETURN) ( p. 33). • You can also stop from the menu ( p. 33). • The printing for Digital Print Order Format. to images stored on memory cards by using digital video cameras and digital cameras and use that information in DPOF printing. • You cannot apply DPOF settings to images using this operation when the total number of copies to 10 copies per image can add print...

Home Photo Printer
Page 39
Print Settings Settings in the [Print Settings] are also possible using the remote control. (For the button names on the remote control, refer to page 13.) Printing date This function is available in "Normal mode" only. Printer p. 67 • Printer Direction buttons PRINT RETURN OK Same operations are not applied when printing a calendar ( - 73) and printing a composite image ( p. 74 - 79). Switch to select [ON] and press (OK). 3 Changing Settings Continued on next page 39 Press to...
Print Settings Settings in the [Print Settings] are also possible using the remote control. (For the button names on the remote control, refer to page 13.) Printing date This function is available in "Normal mode" only. Printer p. 67 • Printer Direction buttons PRINT RETURN OK Same operations are not applied when printing a calendar ( - 73) and printing a composite image ( p. 74 - 79). Switch to select [ON] and press (OK). 3 Changing Settings Continued on next page 39 Press to...

Home Photo Printer
Page 49
... adjusting image, printing uses the following conditions: (Effect: OFF, Auto Mode: Auto, Other Settings: OFF) • If you want to print all images using the same settings, select [Settings] → [Image Adjustment] on the "Menu" screen and change the desired items ( p. 53, "Saving Printer Settings"). • The image on the preview screen is not exact print image, just for your taste. (Density/Balance, Color Levels, White Balance) Item Density/Balance Color Levels White Balance Result Adjusts image brightness, color...
... adjusting image, printing uses the following conditions: (Effect: OFF, Auto Mode: Auto, Other Settings: OFF) • If you want to print all images using the same settings, select [Settings] → [Image Adjustment] on the "Menu" screen and change the desired items ( p. 53, "Saving Printer Settings"). • The image on the preview screen is not exact print image, just for your taste. (Density/Balance, Color Levels, White Balance) Item Density/Balance Color Levels White Balance Result Adjusts image brightness, color...

Home Photo Printer
Page 60
... Show display • Printer Direction buttons PRINT RETURN OK MENU DISPLAY Same operations are also possible using the remote control. (For the button names on the remote control, refer to page 13.) You can change the display time for a specified period of time each image in the [Slide Show Setting]. Press to select [Slide Show] and press (OK). 2 • In Simple Mode, the slide show starts. • For the Simple Mode...
... Show display • Printer Direction buttons PRINT RETURN OK MENU DISPLAY Same operations are also possible using the remote control. (For the button names on the remote control, refer to page 13.) You can change the display time for a specified period of time each image in the [Slide Show Setting]. Press to select [Slide Show] and press (OK). 2 • In Simple Mode, the slide show starts. • For the Simple Mode...

Home Photo Printer
Page 81
After installing the printer driver ( p. 82 - 85), perform print operations using image printing software. Doing so may emit loud sound resulting in damage to the speaker. • Do not connect more than 2 Panasonic home photo printers to a computer. 81 System requirements Computer CPU OS Memory Required Hard Disk Space Display Interface Disc Drive Other IBM® PC/AT® compatible Intel® Pentium® II processor or Celeron®...
After installing the printer driver ( p. 82 - 85), perform print operations using image printing software. Doing so may emit loud sound resulting in damage to the speaker. • Do not connect more than 2 Panasonic home photo printers to a computer. 81 System requirements Computer CPU OS Memory Required Hard Disk Space Display Interface Disc Drive Other IBM® PC/AT® compatible Intel® Pentium® II processor or Celeron®...
Home Photo Printer
Page 82
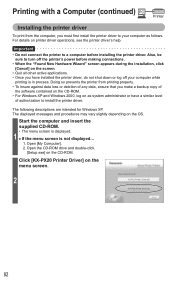
... your computer while printing is not displayed... 1. Open [My Computer]. 2. Click [KX-PX20 Printer Driver] on the CD-ROM. Also, be sure to turn off the printer's power before installing the printer driver. The following descriptions are intended for Windows XP. Open the CD-ROM drive and double-click [Setup.exe] on the menu screen. 2 82 The displayed messages and procedures may vary slightly depending on printer driver operations, see the printer driver's help. Start the...
... your computer while printing is not displayed... 1. Open [My Computer]. 2. Click [KX-PX20 Printer Driver] on the CD-ROM. Also, be sure to turn off the printer's power before installing the printer driver. The following descriptions are intended for Windows XP. Open the CD-ROM drive and double-click [Setup.exe] on the menu screen. 2 82 The displayed messages and procedures may vary slightly depending on printer driver operations, see the printer driver's help. Start the...
Home Photo Printer
Page 93
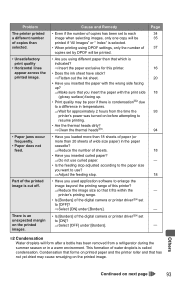
... heads dirty? ⇒Clean the thermal heads 3. • Have you used application software to use? ⇒ Adjust the feeding stop. • Have you loaded more than 18 sheets of paper (or more than selected. • Unsatisfactory print quality • Horizontal lines appear across the printed image. • Paper jams occur frequently. • Paper does not feed. Part of copies than 20 sheets of wide size paper) in a warm environment. This formation of the digital camera or printer driver 4 set...
... heads dirty? ⇒Clean the thermal heads 3. • Have you used application software to use? ⇒ Adjust the feeding stop. • Have you loaded more than 18 sheets of paper (or more than selected. • Unsatisfactory print quality • Horizontal lines appear across the printed image. • Paper jams occur frequently. • Paper does not feed. Part of copies than 20 sheets of wide size paper) in a warm environment. This formation of the digital camera or printer driver 4 set...

Home Photo Printer
Page 94
... RETURN button while the message is disappeared. This is not a malfunction. Printing Printer Printer Problem The display areas on the supplied CD-ROM. This is not a malfunction. Cannot stop printing • You cannot stop printing job by pressing and holding the RETURN after printing. • Disconnect the power cord and remove the ink cassette before cleaning the thermal heads. • Do not insert your - Troubleshooting (continued) 3 Cleaning thermal heads If photo images are...
... RETURN button while the message is disappeared. This is not a malfunction. Printing Printer Printer Problem The display areas on the supplied CD-ROM. This is not a malfunction. Cannot stop printing • You cannot stop printing job by pressing and holding the RETURN after printing. • Disconnect the power cord and remove the ink cassette before cleaning the thermal heads. • Do not insert your - Troubleshooting (continued) 3 Cleaning thermal heads If photo images are...

Home Photo Printer
Page 102
... off the ink sheet using a chemical cleaning cloth, follow the precautions outlined in kitchen detergent (neutral) diluted with a dry cloth. Maintenance • When the feed roller and/or paper support lever are dirty Clear prints may become impossible if the feed roller or paper support lever become dirty. When using a vacuum cleaner. 102 As dust builds up any dust with a soft dry cloth. If the printer is...
... off the ink sheet using a chemical cleaning cloth, follow the precautions outlined in kitchen detergent (neutral) diluted with a dry cloth. Maintenance • When the feed roller and/or paper support lever are dirty Clear prints may become impossible if the feed roller or paper support lever become dirty. When using a vacuum cleaner. 102 As dust builds up any dust with a soft dry cloth. If the printer is...
Home Photo Printer
Page 103
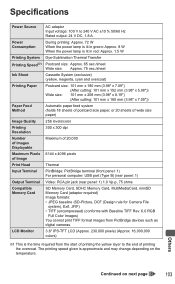
...;)) Paper Feed Method Automatic paper feed system (holds 18 sheets of postcard size paper, or 20 sheets of wide size paper) Image Quality 256 levels/color Printing Resolution 300 x 300 dpi Number of Images Displayable Maximum of 20,000 Maximum Pixels 6144 x 4096 pixels of Image Print Head Thermal Input Terminal PictBridge: PictBridge terminal (front panel: 1) For personal computer: USB port (Type B) (rear panel: 1) Output Terminal Video: RCA pin jack (rear panel: 1) 1.0 Vp-p, 75 ohms Compatible Memory Card SD Memory Card, SDHC Memory Card, MultiMediaCard, miniSD Memory Card...
...;)) Paper Feed Method Automatic paper feed system (holds 18 sheets of postcard size paper, or 20 sheets of wide size paper) Image Quality 256 levels/color Printing Resolution 300 x 300 dpi Number of Images Displayable Maximum of 20,000 Maximum Pixels 6144 x 4096 pixels of Image Print Head Thermal Input Terminal PictBridge: PictBridge terminal (front panel: 1) For personal computer: USB port (Type B) (rear panel: 1) Output Terminal Video: RCA pin jack (rear panel: 1) 1.0 Vp-p, 75 ohms Compatible Memory Card SD Memory Card, SDHC Memory Card, MultiMediaCard, miniSD Memory Card...