
2.4 Ghz Cordles Phon
Page 2
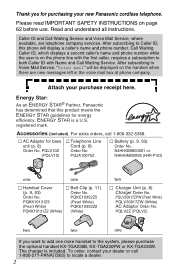
... meets the ENERGY STAR guidelines for base unit (p. 8) Order No. Call Waiting Caller ID, which displays a second caller's name and phone number while the user is on the phone line with Name and Call Waiting Service. AC Adaptor for energy efficiency. Energy Star: As an ENERGY STAR® Partner, Panasonic has determined that this phone will be displayed on page 62 before use. registered mark. PQLV10Z (PQLV10) Telephone Line Cord (p. 8) Order No. PQKE10352Z5 (Pearl...
... meets the ENERGY STAR guidelines for base unit (p. 8) Order No. Call Waiting Caller ID, which displays a second caller's name and phone number while the user is on the phone line with Name and Call Waiting Service. AC Adaptor for energy efficiency. Energy Star: As an ENERGY STAR® Partner, Panasonic has determined that this phone will be displayed on page 62 before use. registered mark. PQLV10Z (PQLV10) Telephone Line Cord (p. 8) Order No. PQKE10352Z5 (Pearl...
2.4 Ghz Cordles Phon
Page 4
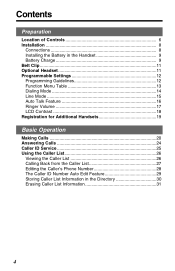
...6 Installation 8 Connections 8 Installing the Battery in the Handset 9 Battery Charge 9 Belt Clip 11 Optional Headset 11 Programmable Settings 12 Programming Guidelines 12 Function Menu Table 13 Dialing Mode 14 Line Mode 15 Auto Talk Feature 16 Ringer Volume 17 LCD Contrast 18 Registration for Additional Handsets 19 Basic Operation Making Calls 20 Answering Calls 24 Caller ID Service 25 Using the Caller List 26 Viewing the Caller List 26 Calling Back from the Caller List 27 Editing the Caller's Phone Number 28 The Caller ID Number Auto Edit Feature 29 Storing Caller List...
...6 Installation 8 Connections 8 Installing the Battery in the Handset 9 Battery Charge 9 Belt Clip 11 Optional Headset 11 Programmable Settings 12 Programming Guidelines 12 Function Menu Table 13 Dialing Mode 14 Line Mode 15 Auto Talk Feature 16 Ringer Volume 17 LCD Contrast 18 Registration for Additional Handsets 19 Basic Operation Making Calls 20 Answering Calls 24 Caller ID Service 25 Using the Caller List 26 Viewing the Caller List 26 Calling Back from the Caller List 27 Editing the Caller's Phone Number 28 The Caller ID Number Auto Edit Feature 29 Storing Caller List...
2.4 Ghz Cordles Phon
Page 5
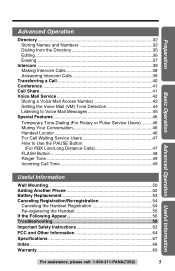
... Intercom 38 Making Intercom Calls 38 Answering Intercom Calls 39 Transferring a Call 40 Conference 41 Call Share 41 Voice Mail Service 42 Storing a Voice Mail Access Number 42 Setting the Voice Mail (VM) Tone Detection 44 Listening to Voice Mail Messages 45 Special Features 46 Temporary Tone Dialing (For Rotary or Pulse Service Users) ........46 Muting Your Conversation 46 Handset Locator 46 For Call Waiting Service Users 47 How to Use the PAUSE Button (For PBX Line/Long Distance Calls 47 FLASH Button 48 Ringer Tone 49 Incoming Call Tone 49 Useful Information Wall Mounting...
... Intercom 38 Making Intercom Calls 38 Answering Intercom Calls 39 Transferring a Call 40 Conference 41 Call Share 41 Voice Mail Service 42 Storing a Voice Mail Access Number 42 Setting the Voice Mail (VM) Tone Detection 44 Listening to Voice Mail Messages 45 Special Features 46 Temporary Tone Dialing (For Rotary or Pulse Service Users) ........46 Muting Your Conversation 46 Handset Locator 46 For Call Waiting Service Users 47 How to Use the PAUSE Button (For PBX Line/Long Distance Calls 47 FLASH Button 48 Ringer Tone 49 Incoming Call Tone 49 Useful Information Wall Mounting...

2.4 Ghz Cordles Phon
Page 12
..., it will be displayed. access 2. You can then select the desired setting by pressing Ö or Ñ. Ringer tone setting Ringer tone :1 GF H=Save You can scroll through the menu by pressing Ö or Ñ. 6. Navigator key has four active areas that are selected from the menu Make sure the unit is not being used and the handset is in the Operating Instructions. (OFF) (MUTE/FUNCTION) How to the...
..., it will be displayed. access 2. You can then select the desired setting by pressing Ö or Ñ. Ringer tone setting Ringer tone :1 GF H=Save You can scroll through the menu by pressing Ö or Ñ. 6. Navigator key has four active areas that are selected from the menu Make sure the unit is not being used and the handset is in the Operating Instructions. (OFF) (MUTE/FUNCTION) How to the...

2.4 Ghz Cordles Phon
Page 13
... assistance, please call p. 49 Initial set LCD contrast p. 18 Auto talk p. 16 Caller ID edit p. 29 Set tel line Voice mail HS register Set dial mode p. 14 Set flash time p. 48 Set line mode p. 15 VM tone detect p. 44 Save VM acces# p. 43 Registration p. 55 Deregistration p. 54 •If you program the dialing mode, the flash time, the line mode or the voice mail feature using the other handsets. Most items in the main menu. Main menu Save directory p. 33 Sub-menu I item. access p. 45 Ringer setting Ringer volume p. 17 Ringer tone p. 49 Incoming call : 1-800-211...
... assistance, please call p. 49 Initial set LCD contrast p. 18 Auto talk p. 16 Caller ID edit p. 29 Set tel line Voice mail HS register Set dial mode p. 14 Set flash time p. 48 Set line mode p. 15 VM tone detect p. 44 Save VM acces# p. 43 Registration p. 55 Deregistration p. 54 •If you program the dialing mode, the flash time, the line mode or the voice mail feature using the other handsets. Most items in the main menu. Main menu Save directory p. 33 Sub-menu I item. access p. 45 Ringer setting Ringer volume p. 17 Ringer tone p. 49 Incoming call : 1-800-211...

2.4 Ghz Cordles Phon
Page 14
...). 14 Make sure the unit is not being used , set to "Pulse". HSet dial mode Set flash time 6 Press á at "Set dial mode". •The current setting is lifted off the base unit. 1 Press (MUTE/FUNCTION). Your phone comes from the factory set to "Tone". Caller ID edit HSet tel line Voice mail 5 Press á. If rotary or pulse service is used and the handset is displayed. 7 Select "Pulse" or "Tone" by pressing Ö or Ñ. Set dial mode :Tone GF H=Save Set dial mode :Pulse...
...). 14 Make sure the unit is not being used , set to "Pulse". HSet dial mode Set flash time 6 Press á at "Set dial mode". •The current setting is lifted off the base unit. 1 Press (MUTE/FUNCTION). Your phone comes from the factory set to "Tone". Caller ID edit HSet tel line Voice mail 5 Press á. If rotary or pulse service is used and the handset is displayed. 7 Select "Pulse" or "Tone" by pressing Ö or Ñ. Set dial mode :Tone GF H=Save Set dial mode :Pulse...

2.4 Ghz Cordles Phon
Page 16
... programming mode any time by pressing (OFF). •In order to view Caller ID information after you want to use this feature, turn the feature ON by programming. Programmable Settings Auto Talk Feature The Auto Talk feature allows you to answer a call , leave the Auto Talk feature OFF. 16 Your phone comes from the factory set to OFF. HLCD contrast Auto talk LCD contrast HAuto talk Caller ID edit 5 Press á. •The current setting is lifted off the base unit...
... programming mode any time by pressing (OFF). •In order to view Caller ID information after you want to use this feature, turn the feature ON by programming. Programmable Settings Auto Talk Feature The Auto Talk feature allows you to answer a call , leave the Auto Talk feature OFF. 16 Your phone comes from the factory set to OFF. HLCD contrast Auto talk LCD contrast HAuto talk Caller ID edit 5 Press á. •The current setting is lifted off the base unit...

2.4 Ghz Cordles Phon
Page 17
... page 49. Make sure the unit is not being received. Preparation Ringer Volume You can change and ring. •To turn the ringer ON: Press Ñ in use . •If you have received new calls, "Ringer off " will be displayed for about 5 seconds after completing operations or lifting the handset from the factory set to OFF, the handset will not ring for external calls, and for internal calls it will change the ringer tone for...
... page 49. Make sure the unit is not being received. Preparation Ringer Volume You can change and ring. •To turn the ringer ON: Press Ñ in use . •If you have received new calls, "Ringer off " will be displayed for about 5 seconds after completing operations or lifting the handset from the factory set to OFF, the handset will not ring for external calls, and for internal calls it will change the ringer tone for...

2.4 Ghz Cordles Phon
Page 23
... hold Press (HOLD/INTERCOM/CLEAR) twice. For assistance, please call , leaving the programming mode or ending the intercom. Basic Operation To put a call on hold. •To transfer the call to another phone is connected on the display of the call. To adjust the receiver volume (HIGH, MEDIUM or LOW) or speaker volume (6 levels) while talking To increase, press Ñ. To decrease, press Ö. •Each time you press a button, lift the handset off the base unit...
... hold Press (HOLD/INTERCOM/CLEAR) twice. For assistance, please call , leaving the programming mode or ending the intercom. Basic Operation To put a call on hold. •To transfer the call to another phone is connected on the display of the call. To adjust the receiver volume (HIGH, MEDIUM or LOW) or speaker volume (6 levels) while talking To increase, press Ñ. To decrease, press Ö. •Each time you press a button, lift the handset off the base unit...

2.4 Ghz Cordles Phon
Page 24
... can answer a call " is displayed on the handset and the IN USE/HOLD indicator flashes quickly on the base unit. Answering Calls When a call is received, the unit rings and "Incoming call by pressing any dialing button (0) to a Caller ID service, the calling party information will be displayed after the first ring (p. 25). OR Press , and when the other party answers, talk into the microphone. 2 To hang up, press (OFF). (OFF) Auto Talk If you set the Auto Talk feature...
... can answer a call " is displayed on the handset and the IN USE/HOLD indicator flashes quickly on the base unit. Answering Calls When a call is received, the unit rings and "Incoming call by pressing any dialing button (0) to a Caller ID service, the calling party information will be displayed after the first ring (p. 25). OR Press , and when the other party answers, talk into the microphone. 2 To hang up, press (OFF). (OFF) Auto Talk If you set the Auto Talk feature...

2.4 Ghz Cordles Phon
Page 25
... talking, the new caller's name and phone number will show the length of times called, in some areas. The Caller List information is deleted. You can record information of up to display his/her information, the display will be recorded in the following cases: •-If the caller dialed from the Caller List into the directory. Using the list, you subscribe to the oldest call . For further information, please contact your unit is compatible with the base unit...
... talking, the new caller's name and phone number will show the length of times called, in some areas. The Caller List information is deleted. You can record information of up to display his/her information, the display will be recorded in the following cases: •-If the caller dialed from the Caller List into the directory. Using the list, you subscribe to the oldest call . For further information, please contact your unit is compatible with the base unit...

2.4 Ghz Cordles Phon
Page 28
...;, the number is lifted off the base unit. 1 Press Ö or Ñ to enter the Caller List. Phone no . Using the Caller List Editing the Caller's Phone Number You can continue with calling back or storing procedures. Make sure the unit is not being used and the handset is rearranged into the directory. Area code - To store the number in the directory, press Ö (Next key) and press á (Save key). (If the caller has...
...;, the number is lifted off the base unit. 1 Press Ö or Ñ to enter the Caller List. Phone no . Using the Caller List Editing the Caller's Phone Number You can continue with calling back or storing procedures. Make sure the unit is not being used and the handset is rearranged into the directory. Area code - To store the number in the directory, press Ö (Next key) and press á (Save key). (If the caller has...

2.4 Ghz Cordles Phon
Page 29
... á. Basic Operation The Caller ID Number Auto Edit Feature There are allowed for this feature for example) into one of phone number (a, b, and c on the handset automatically. Ringer setting HInitial set " by area codes. Auto edit :On GF H=Save •When the feature is lifted off the base unit. 1. For assistance, please call from Caller List (p. 27) with a number which has one pattern you dialed might have edited with considered area code, and that...
... á. Basic Operation The Caller ID Number Auto Edit Feature There are allowed for this feature for example) into one of phone number (a, b, and c on the handset automatically. Ringer setting HInitial set " by area codes. Auto edit :On GF H=Save •When the feature is lifted off the base unit. 1. For assistance, please call from Caller List (p. 27) with a number which has one pattern you dialed might have edited with considered area code, and that...

2.4 Ghz Cordles Phon
Page 41
...INTERCOM/CLEAR) on hold . press Ü on hold . •The IN USE/HOLD indicator flashes and the call , press (HOLD/INTERCOM/CLEAR). Conference While you are talking with an outside caller, you can make a conference call with your handset to make a conference call. •To leave the conference, press (OFF). Ex. Line on the handset. A conference call with Handset 1 and 2. 1 During a call Press handset# is engaged in an external call, another extension can join another handset, enter the extension number using the dialing button ((1) to (3)). Ex. Call Share This feature...
...INTERCOM/CLEAR) on hold . press Ü on hold . •The IN USE/HOLD indicator flashes and the call , press (HOLD/INTERCOM/CLEAR). Conference While you are talking with an outside caller, you can make a conference call with your handset to make a conference call. •To leave the conference, press (OFF). Ex. Line on the handset. A conference call with Handset 1 and 2. 1 During a call Press handset# is engaged in an external call, another extension can join another handset, enter the extension number using the dialing button ((1) to (3)). Ex. Call Share This feature...
2.4 Ghz Cordles Phon
Page 44
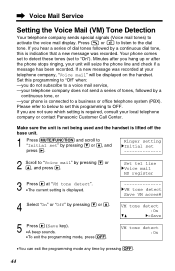
... after you hear a series of tones, followed by a continuous dial tone, this is indication that a new message was recorded at "VM tone detect". •The current setting is lifted off the base unit. 1 Press (MUTE/FUNCTION) and scroll to "Voice mail" by pressing Ö or Ñ, and press á. 3 Press á at your phone is required, consult your unit will be displayed on the handset. Ringer setting HInitial set 2 Scroll to "Initial set" by...
... after you hear a series of tones, followed by a continuous dial tone, this is indication that a new message was recorded at "VM tone detect". •The current setting is lifted off the base unit. 1 Press (MUTE/FUNCTION) and scroll to "Voice mail" by pressing Ö or Ñ, and press á. 3 Press á at your phone is required, consult your unit will be displayed on the handset. Ringer setting HInitial set 2 Scroll to "Initial set" by...

2.4 Ghz Cordles Phon
Page 48
...". Special Features FLASH Button Pressing (FLASH/CALL!WAIT) allows you to use special features of your host PBX such as transferring an extension call or accessing special telephone services (optional) such as call etc.) might not work correctly. Selecting the flash time The flash time depends on your PBX supplier for the correct setting. 48 You can exit the programming mode any time by pressing (OFF). •If the unit is connected via a PBX, PBX functions (transferring a call waiting. •Pressing (FLASH/CALL!WAIT) causes to "Set flash time...
...". Special Features FLASH Button Pressing (FLASH/CALL!WAIT) allows you to use special features of your host PBX such as transferring an extension call or accessing special telephone services (optional) such as call etc.) might not work correctly. Selecting the flash time The flash time depends on your PBX supplier for the correct setting. 48 You can exit the programming mode any time by pressing (OFF). •If the unit is connected via a PBX, PBX functions (transferring a call waiting. •Pressing (FLASH/CALL!WAIT) causes to "Set flash time...

2.4 Ghz Cordles Phon
Page 49
... programming mode, press (OFF). Incoming call : 1-800-211-PANA(7262) 49 GF •To exit the programming mode, press (OFF). Ringer Tone You can select the handset ringer tone out of 6 patterns for as long as the line rings. Your phone comes from the factory set to "1". V.M. Ringer tone :1 •Each time you set 2 Scroll to "Ringer tone" by pressing dialing buttons (1) to "2". When an external call is lifted off the base unit. 1 Press (MUTE/FUNCTION). 2 Scroll to "Ringer setting...
... programming mode, press (OFF). Incoming call : 1-800-211-PANA(7262) 49 GF •To exit the programming mode, press (OFF). Ringer Tone You can select the handset ringer tone out of 6 patterns for as long as the line rings. Your phone comes from the factory set to "1". V.M. Ringer tone :1 •Each time you set 2 Scroll to "Ringer tone" by pressing dialing buttons (1) to "2". When an external call is lifted off the base unit. 1 Press (MUTE/FUNCTION). 2 Scroll to "Ringer setting...
2.4 Ghz Cordles Phon
Page 56
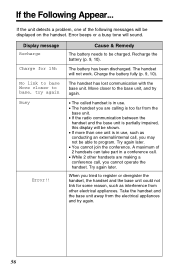
... to register or deregister the handset, the handset and the base unit could not link for 15h No link to base Move closer to base, try again Busy Error!! If the Following Appear... The handset will sound. Try again later. • You cannot join the conference. Move closer to program. Recharge the battery (p. 9, 10). Charge the battery fully (p. 9, 10). If the unit detects a problem, one unit is in a conference call. •...
... to register or deregister the handset, the handset and the base unit could not link for 15h No link to base Move closer to base, try again Busy Error!! If the Following Appear... The handset will sound. Try again later. • You cannot join the conference. Move closer to program. Recharge the battery (p. 9, 10). Charge the battery fully (p. 9, 10). If the unit detects a problem, one unit is in a conference call. •...

2.4 Ghz Cordles Phon
Page 58
...;Check the settings (p. 8-10). •Check whether the dialing mode setting is correct (p. 14). •Charge the battery fully (p. 9, 10). •Clean the charge contacts and charge again (p. 10). •Install the battery properly (p. 9). •Unplug the AC adaptor of the base unit. •Raise the base unit antenna. Instead users will hear incoming call , these handsets do not ring. "No link to base Move closer to the base unit. The handset does not ring. •The ringer volume...
...;Check the settings (p. 8-10). •Check whether the dialing mode setting is correct (p. 14). •Charge the battery fully (p. 9, 10). •Clean the charge contacts and charge again (p. 10). •Install the battery properly (p. 9). •Unplug the AC adaptor of the base unit. •Raise the base unit antenna. Instead users will hear incoming call , these handsets do not ring. "No link to base Move closer to the base unit. The handset does not ring. •The ringer volume...

2.4 Ghz Cordles Phon
Page 68
... 46 Headset, optional 11 Hold alarm 23 I Incoming Call Tone 49 Installation, AC Adaptor 8 Installation, Adding Another Phone... 52 Installation, Battery 9 Installation, Telephone Line Cord ....... 8 Intercom call 38, 39 Intercom paging 38, 39 L LCD Contrast 18 Lighted handset keypad 23 Line Mode 15 Location of Controls 6, 7 M Making Calls 20 Microphone 21 MUTE 46 N Noise 3 P PAUSE 47 Power failure 52 Pulse service 46 R Redial 22 Redial list 22 Registration 19, 55 Ringer Off 17 Ringer Tone 49 Ringer Volume 17 Rotary service, Tone dialing 46 S Safety Instructions 62...
... 46 Headset, optional 11 Hold alarm 23 I Incoming Call Tone 49 Installation, AC Adaptor 8 Installation, Adding Another Phone... 52 Installation, Battery 9 Installation, Telephone Line Cord ....... 8 Intercom call 38, 39 Intercom paging 38, 39 L LCD Contrast 18 Lighted handset keypad 23 Line Mode 15 Location of Controls 6, 7 M Making Calls 20 Microphone 21 MUTE 46 N Noise 3 P PAUSE 47 Power failure 52 Pulse service 46 R Redial 22 Redial list 22 Registration 19, 55 Ringer Off 17 Ringer Tone 49 Ringer Volume 17 Rotary service, Tone dialing 46 S Safety Instructions 62...

