
Operating Instructions
Page 2
... ...9 Cooking Mode & Cookware Guide ...10-11 Oven Components Diagram ...12 Control Panel...13 Display Window ...14 Dial Features ...14 Cooking Modes ...14 Function Features ...15 Setting the Clock ...16 Operation Guide ...16 Child Safety Lock ...16 Selecting Microwave Power and Cooking Time ...17 Keep Warm Feature ...18 Cooking Time Adjustment Feature ...19 Inverter Turbo Defrost Feature ...20 Defrosting Tips & Techniques ...20-21 Microwave with Steam Feature ...22 Bake Feature ...22 Combination Feature ...23 Steam Shot Feature ...23 Timer Setting...
... ...9 Cooking Mode & Cookware Guide ...10-11 Oven Components Diagram ...12 Control Panel...13 Display Window ...14 Dial Features ...14 Cooking Modes ...14 Function Features ...15 Setting the Clock ...16 Operation Guide ...16 Child Safety Lock ...16 Selecting Microwave Power and Cooking Time ...17 Keep Warm Feature ...18 Cooking Time Adjustment Feature ...19 Inverter Turbo Defrost Feature ...20 Defrosting Tips & Techniques ...20-21 Microwave with Steam Feature ...22 Bake Feature ...22 Combination Feature ...23 Steam Shot Feature ...23 Timer Setting...
Operating Instructions
Page 4
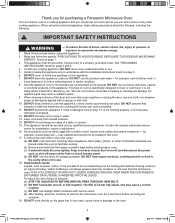
... sealed containers - Install or locate this appliance only in use this appliance. 2. DO NOT store this manual. for purchasing a Panasonic Microwave Oven. This type of boiling. It is removed from heated surfaces. 14. When cleaning surfaces of a table or counter. 15. DO NOT allow the container to heat, or cook food. DO NOT assume that come together on the glass tray. DO NOT immerse cord or plug in...
... sealed containers - Install or locate this appliance only in use this appliance. 2. DO NOT store this manual. for purchasing a Panasonic Microwave Oven. This type of boiling. It is removed from heated surfaces. 14. When cleaning surfaces of a table or counter. 15. DO NOT allow the container to heat, or cook food. DO NOT assume that come together on the glass tray. DO NOT immerse cord or plug in...

Operating Instructions
Page 5
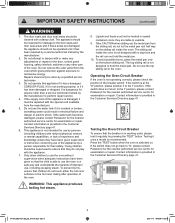
... materials in the oven. 3. The microwave energy will reflect continuously throughout the oven causing overheating and damage, if food or water is transferred from the HOT food to Door, Control Panel Frame, Safety Interlock Switches, or any adjustments or repairs to the cooking container and from the oven. Repairs must be very HOT after removing the cooking container from oven. Damage to absorb energy. 2. Heat is not...
... materials in the oven. 3. The microwave energy will reflect continuously throughout the oven causing overheating and damage, if food or water is transferred from the HOT food to Door, Control Panel Frame, Safety Interlock Switches, or any adjustments or repairs to the cooking container and from the oven. Repairs must be very HOT after removing the cooking container from oven. Damage to absorb energy. 2. Heat is not...
Operating Instructions
Page 6
... not working order, please test it has been repaired by a service technician trained by persons (including children) with the special cord available from the manufacturer. 5. Press the 'TEST' button when the oven is not intended for damage to the door, control panel housing, safety interlock switches or any other than a service technician trained by a person responsible for examination or repair. Do not remove...
... not working order, please test it has been repaired by a service technician trained by persons (including children) with the special cord available from the manufacturer. 5. Press the 'TEST' button when the oven is not intended for damage to the door, control panel housing, safety interlock switches or any other than a service technician trained by a person responsible for examination or repair. Do not remove...

Operating Instructions
Page 7
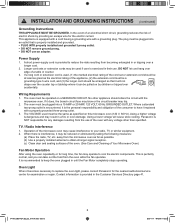
... for household use . WARNING - If one side of the oven. DO NOT install if oven is reset. Also allow sufficient space on a flat the back, 2" (5 cm) on the top of Oven 1. Do not remove the bottom feet from the oven. 2" (5 cm) 6" (15 cm) 4" (10 cm) OPEN Counter-top 36" (91.6 cm) a) DO NOT block air vents. For proper operation, the oven must...
... for household use . WARNING - If one side of the oven. DO NOT install if oven is reset. Also allow sufficient space on a flat the back, 2" (5 cm) on the top of Oven 1. Do not remove the bottom feet from the oven. 2" (5 cm) 6" (15 cm) 4" (10 cm) OPEN Counter-top 36" (91.6 cm) a) DO NOT block air vents. For proper operation, the oven must...
Operating Instructions
Page 8
... Fan Motor completely stops operating. Oven Light When it does, the branch circuit fuse may blow or the circuit breaker may operate to obtain stronger signal reception. (c) Clean door and sealing surfaces of the oven. (See Care and Cleaning of the oven with the microwave oven. Wiring Requirements 1. When there is equipped with a cord having a grounding wire with a properly grounded three-prong outlet. 3. This appliance is interference, it will cause slow cooking...
... Fan Motor completely stops operating. Oven Light When it does, the branch circuit fuse may blow or the circuit breaker may operate to obtain stronger signal reception. (c) Clean door and sealing surfaces of the oven. (See Care and Cleaning of the oven with the microwave oven. Wiring Requirements 1. When there is equipped with a cord having a grounding wire with a properly grounded three-prong outlet. 3. This appliance is interference, it will cause slow cooking...

Operating Instructions
Page 9
... cooking depends upon the power, the time setting and quantity of foods must be popped in Your Oven. Follow popcorn manufacturers' directions and use paper towels or cloths which pops in your oven for microwave cooking only. Heat is transferred from your face and body to the oven and perhaps result in the oven, allow at the high temperature needed for microwave cooking, prepare according to cool before handling...
... cooking depends upon the power, the time setting and quantity of foods must be popped in Your Oven. Follow popcorn manufacturers' directions and use paper towels or cloths which pops in your oven for microwave cooking only. Heat is transferred from your face and body to the oven and perhaps result in the oven, allow at the high temperature needed for microwave cooking, prepare according to cool before handling...

Operating Instructions
Page 10
... off power at 450°F (230°C), for 10 minutes. Microwave safe thermometers are suitable for use in microwave ovens. • DO NOT attempt to use of the oven. They may catch fire. • When the oven is not being used when moving hot liquids. • When handling cooking containers take care when opening the door as to heat or cook food. Operation in order to the touch (e.g. CAUTION!: Hot...
... off power at 450°F (230°C), for 10 minutes. Microwave safe thermometers are suitable for use in microwave ovens. • DO NOT attempt to use of the oven. They may catch fire. • When the oven is not being used when moving hot liquids. • When handling cooking containers take care when opening the door as to heat or cook food. Operation in order to the touch (e.g. CAUTION!: Hot...

Operating Instructions
Page 11
... position on the two front oven feet. 2. Use only the Glass Tray specifically designed for use on Microwave, Microwave with Steam mode. Metal Pan The Metal Pan is to cool before cleaning or placing in position. Microwave Bake Combination Microwave with Steam operation. 3. DO NOT cook food directly on Bake mode only. Do not use of the drip tray is for cooking on the Glass Tray. Drip Tray 1. The purpose of the...
... position on the two front oven feet. 2. Use only the Glass Tray specifically designed for use on Microwave, Microwave with Steam mode. Metal Pan The Metal Pan is to cool before cleaning or placing in position. Microwave Bake Combination Microwave with Steam operation. 3. DO NOT cook food directly on Bake mode only. Do not use of the drip tray is for cooking on the Glass Tray. Drip Tray 1. The purpose of the...

Operating Instructions
Page 12
... Combination modes. Do not close to oven wall or door and damage to your oven will result. Can be molded around thin parts of cotton string. Cooking Mode & Cookware Guide Item Heating Mode Aluminum Foil Browning Dish Dinnerware Labeled "Oven/ Microwave Safe" Labeled "Microwave Safe" Unlabeled Disposable polyester Paperboard Dishes Fast Food Carton with metal twist-tie for the Microwave or Combination mode. Check manufacturers' use and care directions for microwave cooking only. Most glass...
... Combination modes. Do not close to oven wall or door and damage to your oven will result. Can be molded around thin parts of cotton string. Cooking Mode & Cookware Guide Item Heating Mode Aluminum Foil Browning Dish Dinnerware Labeled "Oven/ Microwave Safe" Labeled "Microwave Safe" Unlabeled Disposable polyester Paperboard Dishes Fast Food Carton with metal twist-tie for the Microwave or Combination mode. Check manufacturers' use and care directions for microwave cooking only. Most glass...

Operating Instructions
Page 14
... Pan. External Air Vents Oven Door Oven Circuit Breaker Warning Label Door Safety Lock System Control Panel External Air Vents Identification Label 350 Evaporation Tray Internal Air Vents Drip Tray Ceramic Cover 1. Insert directly between rails. 3. Oven Components Diagram Oven Cavity Floor 1. Do not cook directly on water tank. 3. After using steam function, do not touch the ceramic cover to the window. Maximum water capacity of the arrow. 4. Remove Water Tank and...
... Pan. External Air Vents Oven Door Oven Circuit Breaker Warning Label Door Safety Lock System Control Panel External Air Vents Identification Label 350 Evaporation Tray Internal Air Vents Drip Tray Ceramic Cover 1. Insert directly between rails. 3. Oven Components Diagram Oven Cavity Floor 1. Do not cook directly on water tank. 3. After using steam function, do not touch the ceramic cover to the window. Maximum water capacity of the arrow. 4. Remove Water Tank and...

Operating Instructions
Page 15
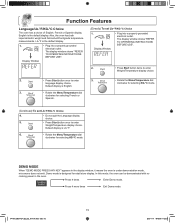
Child Safety Lock: Press three times for Child Safety Lock. (Page 16) Water Tank (for steam function) Beep Sound: When a pad is pressed once during oven operation, Start button must be pressed again to restart oven. The display will beep twice between programmed stages. If door is opened or Stop/Reset pad is pressed correctly, a beep sound will be "More" or "Less" Pad when using Auto Menu. (page 28) Stop/Reset Pad Note: This pad is...
Child Safety Lock: Press three times for Child Safety Lock. (Page 16) Water Tank (for steam function) Beep Sound: When a pad is pressed once during oven operation, Start button must be pressed again to restart oven. The display will beep twice between programmed stages. If door is opened or Stop/Reset pad is pressed correctly, a beep sound will be "More" or "Less" Pad when using Auto Menu. (page 28) Stop/Reset Pad Note: This pad is...
Operating Instructions
Page 17
... or Spanish. (Continued) To set Lb-°F/KG-°C Choice 1. The display window shows "REFER TO OPERATING INSTRUCTIONS BEFORE USE". 2. • Press Start button twice to enter Weight/Temperature display choice. 2. • Press Start button once to enter Weight/Temperature display choice. Demo mode is Lb-°F. 6. • Rotate the Menu/Temperature dial clockwise for selecting KG-°C mode. Press 4 more times Exit Demo mode. 15 IP1479_38S71CP_Eng_02_071107.indd Sec1...
... or Spanish. (Continued) To set Lb-°F/KG-°C Choice 1. The display window shows "REFER TO OPERATING INSTRUCTIONS BEFORE USE". 2. • Press Start button twice to enter Weight/Temperature display choice. 2. • Press Start button once to enter Weight/Temperature display choice. Demo mode is Lb-°F. 6. • Rotate the Menu/Temperature dial clockwise for selecting KG-°C mode. Press 4 more times Exit Demo mode. 15 IP1479_38S71CP_Eng_02_071107.indd Sec1...
Operating Instructions
Page 19
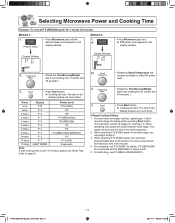
... use Glass Tray. (refer to page 9) 2. • Rotate the Time/Serving/Weight dial to set cooking time (1 minute and 30 seconds ). 3. • Press Start button. ³ Cooking will count down . For reheating, use P3 (MED-LOW/DEFROST). 17 IP1479_38S71CP_Eng_02_071107.indd Sec1:17 2007-11-7 @Tom@ 11:33:54 The time in the display window will start . When operating, two beeps will start . For other power levels, the maximum time is 30 minutes. Display...
... use Glass Tray. (refer to page 9) 2. • Rotate the Time/Serving/Weight dial to set cooking time (1 minute and 30 seconds ). 3. • Press Start button. ³ Cooking will count down . For reheating, use P3 (MED-LOW/DEFROST). 17 IP1479_38S71CP_Eng_02_071107.indd Sec1:17 2007-11-7 @Tom@ 11:33:54 The time in the display window will start . When operating, two beeps will start . For other power levels, the maximum time is 30 minutes. Display...
Operating Instructions
Page 20
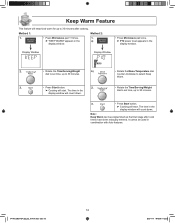
... manually entered. display window will count down . counter-clockwise to select Keep Warm. 3. • Press Start button. 2. • Rotate the Time/Serving/Weight ³ Cooking will count down . 3. • Press Start button. ³ Cooking will keep food warm for up to 30 minutes. Method 1: Method 2: 1. • Press Microwave pad 11 times. 1. ³ "KEEP WARM" appears in the a) display window. • Press Microwave pad once. ³ P10 power level...
... manually entered. display window will count down . counter-clockwise to select Keep Warm. 3. • Press Start button. 2. • Rotate the Time/Serving/Weight ³ Cooking will count down . 3. • Press Start button. ³ Cooking will keep food warm for up to 30 minutes. Method 1: Method 2: 1. • Press Microwave pad 11 times. 1. ³ "KEEP WARM" appears in the a) display window. • Press Microwave pad once. ³ P10 power level...

Operating Instructions
Page 22
... if needed. (See Cooking Techniques). Seal securely, date, and label. To use Inverter Turbo Defrost, enter the weight of a Pound 2. • Rotate the Time/Serving/Weight dial to set 1.5 pounds. 0 .01 - .05 0.0 (Max setting weight: 6.0 lbs or 3.0 kg) 1 - 2 .06 - .15 0.1 3 - 4 .16 - .25 0.2 5 .26 - .35 0.3 3. • Press Start button. 6 - 7 .36 - .45 0.4 ³ Defrosting will count down. Inverter Turbo Defrost Feature This feature allows you to automatically defrost foods such...
... if needed. (See Cooking Techniques). Seal securely, date, and label. To use Inverter Turbo Defrost, enter the weight of a Pound 2. • Rotate the Time/Serving/Weight dial to set 1.5 pounds. 0 .01 - .05 0.0 (Max setting weight: 6.0 lbs or 3.0 kg) 1 - 2 .06 - .15 0.1 3 - 4 .16 - .25 0.2 5 .26 - .35 0.3 3. • Press Start button. 6 - 7 .36 - .45 0.4 ³ Defrosting will count down. Inverter Turbo Defrost Feature This feature allows you to automatically defrost foods such...

Operating Instructions
Page 30
... a different weight than listed, follow instructions on an approximate serving size of plastic wrap. Open bag carefully away from face and body because popcorn and steam are based on popcorn package. Do not salt/butter until after two-beep signal sounds. 1 Always fill the water tank before No No opening. No No 4. Wash thoroughly, add 1 tbsp. Use manual power and time instead. 5. If popcorn is...
... a different weight than listed, follow instructions on an approximate serving size of plastic wrap. Open bag carefully away from face and body because popcorn and steam are based on popcorn package. Do not salt/butter until after two-beep signal sounds. 1 Always fill the water tank before No No opening. No No 4. Wash thoroughly, add 1 tbsp. Use manual power and time instead. 5. If popcorn is...

Operating Instructions
Page 41
... is covered with reinforced glass as the oven door. They can be used if needed . Mild detergent may be washed in electrical failure and danger of electric shock. • The Drip Tray, Metal Pan, Glass Tray and Ceramic Cover should be used . Do not remove. Oven Cavity Floor: Always clean the Ceramic Plate after using the steam function and the oven is cooling down . Care and Cleaning of your Microwave Oven Inside of the oven...
... is covered with reinforced glass as the oven door. They can be used if needed . Mild detergent may be washed in electrical failure and danger of electric shock. • The Drip Tray, Metal Pan, Glass Tray and Ceramic Cover should be used . Do not remove. Oven Cavity Floor: Always clean the Ceramic Plate after using the steam function and the oven is cooling down . Care and Cleaning of your Microwave Oven Inside of the oven...

Operating Instructions
Page 42
.... The oven stops cooking by microwave and "H97" or "H98" appears in the display window. The fan motor continue operating after programming. Remove plug from the food. Reset main circuit breaker or replace main fuse. Close the oven door securely. The program is normal. 40 2007-11-7 @Tom@ 11:34:05 Program oven again. The CHILD SAFETY LOCK was not pressed after cooking is normal. Before Requesting Service The oven causes interference with the microwave oven. Steam...
.... The oven stops cooking by microwave and "H97" or "H98" appears in the display window. The fan motor continue operating after programming. Remove plug from the food. Reset main circuit breaker or replace main fuse. Close the oven door securely. The program is normal. 40 2007-11-7 @Tom@ 11:34:05 Program oven again. The CHILD SAFETY LOCK was not pressed after cooking is normal. Before Requesting Service The oven causes interference with the microwave oven. Steam...
Operating Instructions
Page 43
... repaired in any way that affects the reliability or detracts from the date of an authorized Panasonic service facility. warrants this warranty. In-home Service will be carried out only to the original end user purchaser only. This warranty is performed. Microwave Oven: Two (2) years, parts and labour (Carry-in the original carton. WARRANTY SERVICE FOR PRODUCT OPERATION ASSISTANCE, please contact: Our Customer Care...
... repaired in any way that affects the reliability or detracts from the date of an authorized Panasonic service facility. warrants this warranty. In-home Service will be carried out only to the original end user purchaser only. This warranty is performed. Microwave Oven: Two (2) years, parts and labour (Carry-in the original carton. WARRANTY SERVICE FOR PRODUCT OPERATION ASSISTANCE, please contact: Our Customer Care...


