

NNH764 User Guide
Page 1
... Operation Precautions Inside cover Important Safety Instructions .........1-3 Installation and Grounding Instructions 3-4 Safety Precautions 5-6 Operation Control Panel 9 Starting to Use Your Oven 10 Setting the Clock 10 Function Features 10-11 Selecting Power & Cook Time 12 Quick Min Feature 12 Keep Warm Feature 12 Popcorn Feature 13 More/Less Feature 13 Beverages 13 Inverter Turbo Defrost Feature 14 Defrosting Tips & Techniques.........14-15 Sensor Reheat Feature 16 Sensor Cook Feature 16 Sensor Cook Chart 17 Microwave Recipes 18 Timer Feature (Kitchen Timer...
... Operation Precautions Inside cover Important Safety Instructions .........1-3 Installation and Grounding Instructions 3-4 Safety Precautions 5-6 Operation Control Panel 9 Starting to Use Your Oven 10 Setting the Clock 10 Function Features 10-11 Selecting Power & Cook Time 12 Quick Min Feature 12 Keep Warm Feature 12 Popcorn Feature 13 More/Less Feature 13 Beverages 13 Inverter Turbo Defrost Feature 14 Defrosting Tips & Techniques.........14-15 Sensor Reheat Feature 16 Sensor Cook Feature 16 Sensor Cook Chart 17 Microwave Recipes 18 Timer Feature (Kitchen Timer...

NNH764 User Guide
Page 3
... leave oven unattended while in use. 1 DO NOT operate this oven. 17. Install or locate this manual. When cleaning surfaces of a table or counter. 15. Keep cord away from paper or plastic bags before using this electric appliance, basic safety precautions should use this appliance. 2. To reduce the risk of corrosive chemicals in the oven cavity: (a) Do not overcook food. Your microwave oven is specifically designed to facilitate cooking. (b) Remove wire twist...
... leave oven unattended while in use. 1 DO NOT operate this oven. 17. Install or locate this manual. When cleaning surfaces of a table or counter. 15. Keep cord away from paper or plastic bags before using this electric appliance, basic safety precautions should use this appliance. 2. To reduce the risk of corrosive chemicals in the oven cavity: (a) Do not overcook food. Your microwave oven is specifically designed to facilitate cooking. (b) Remove wire twist...

NNH764 User Guide
Page 4
... and damage, if food or water is transferred from the HOT food to the cooking container and from oven. Damage to Door, Control Panel Frame, Safety Interlock Switches, or any other materials in the oven, or use of injury to stand in the oven. 3. TO REDUCE THE RISK OF EXPOSURE TO MICROWAVE ENERGY: DO NOT tamper with narrow necks. (d) After heating, allow the container...
... and damage, if food or water is transferred from the HOT food to the cooking container and from oven. Damage to Door, Control Panel Frame, Safety Interlock Switches, or any other materials in the oven, or use of injury to stand in the oven. 3. TO REDUCE THE RISK OF EXPOSURE TO MICROWAVE ENERGY: DO NOT tamper with narrow necks. (d) After heating, allow the container...

NNH764 User Guide
Page 5
... commercial use only. Use only the Glass Tray specifically designed for cooking along with the kit. 3 Always place food in a microwave safe dish, or on the Glass Tray touches oven walls, causing the tray to cool before cleaning or placing in water. 5. If the oven overheats, a thermal safety device will turn in place. 2. DO NOT operate the oven without the Roller Ring and the Glass Tray in either direction. 3. It is hot, allow to stop...
... commercial use only. Use only the Glass Tray specifically designed for cooking along with the kit. 3 Always place food in a microwave safe dish, or on the Glass Tray touches oven walls, causing the tray to cool before cleaning or placing in water. 5. If the oven overheats, a thermal safety device will turn in place. 2. DO NOT operate the oven without the Roller Ring and the Glass Tray in either direction. 3. It is hot, allow to stop...

NNH764 User Guide
Page 6
... a cord having a grounding wire with the microwave oven. TV / Radio Interference 1. Grounding Instructions THIS APPLIANCE MUST BE GROUNDED. In the event of an electrical short circuit, grounding reduces the risk of a table or counter. 3. A short power-supply cord is properly installed and grounded. • Plug into properly installed and grounded 3 prong outlet. • DO NOT remove ground prong. • DO NOT use only a three wire extension cord...
... a cord having a grounding wire with the microwave oven. TV / Radio Interference 1. Grounding Instructions THIS APPLIANCE MUST BE GROUNDED. In the event of an electrical short circuit, grounding reduces the risk of a table or counter. 3. A short power-supply cord is properly installed and grounded. • Plug into properly installed and grounded 3 prong outlet. • DO NOT remove ground prong. • DO NOT use only a three wire extension cord...

NNH764 User Guide
Page 8
... cut from cooking containers, to the container and the Glass Tray. Always follow instructions provided by the manufacturer. It should be extremely hot, while the surface remains warm to package directions. Microwave safe thermometers are available for microwave cooking, prepare according to the touch (ex. The glass jar or surface of food. 6 DO NOT preheat browning dish more than 6 minutes. • If an oven cooking...
... cut from cooking containers, to the container and the Glass Tray. Always follow instructions provided by the manufacturer. It should be extremely hot, while the surface remains warm to package directions. Microwave safe thermometers are available for microwave cooking, prepare according to the touch (ex. The glass jar or surface of food. 6 DO NOT preheat browning dish more than 6 minutes. • If an oven cooking...

NNH764 User Guide
Page 9
... short cooking times such as hot dogs. Use as a cover to be molded around thin parts of the dish, "Oven-Microwave Safe". Check manufacturers' use and care directions for use caution Yes No Yes Small strips of cotton string. Some frozen foods are not heat resistant. Do not close to oven wall or door and damage to your oven. Check manufacturers' directions for instructions and heating chart. Check package directions. Use to cover food during cooking...
... short cooking times such as hot dogs. Use as a cover to be molded around thin parts of the dish, "Oven-Microwave Safe". Check manufacturers' use and care directions for use caution Yes No Yes Small strips of cotton string. Some frozen foods are not heat resistant. Do not close to oven wall or door and damage to your oven. Check manufacturers' directions for instructions and heating chart. Check package directions. Use to cover food during cooking...

NNH764 User Guide
Page 12
.... 3. • Press Clock. ➤Colon stops flash- The clock will not operate while colon is supplied. 3. to Use Your Oven 1. • Plug into a properly grounded electrical outlet. 2. Starting to Press • Press selection by number pad (see chart on next page). 3. message scrolls across display window. message, a colon appears in and electricity is flashing. Oven will retain the time of your PANASONIC microwave oven allows you...
.... 3. • Press Clock. ➤Colon stops flash- The clock will not operate while colon is supplied. 3. to Use Your Oven 1. • Plug into a properly grounded electrical outlet. 2. Starting to Press • Press selection by number pad (see chart on next page). 3. message scrolls across display window. message, a colon appears in and electricity is flashing. Oven will retain the time of your PANASONIC microwave oven allows you...

NNH764 User Guide
Page 13
... oven displays the weight in imperial when you plug it in. *1 LB 2 KG ➻ Weight can be set in oz/lb, (Imperial). ➻ Weight can be set and operation will not be accepted. *2 OFF ➻ Child Lock has been cancelled. 6 BEEP ON/OFF If you wish to have the oven operate with no power in the oven. 1 ON *2 OFF ➻ The oven is in Demo mode. ➻ The oven...
... oven displays the weight in imperial when you plug it in. *1 LB 2 KG ➻ Weight can be set in oz/lb, (Imperial). ➻ Weight can be set and operation will not be accepted. *2 OFF ➻ Child Lock has been cancelled. 6 BEEP ON/OFF If you wish to have the oven operate with no power in the oven. 1 ON *2 OFF ➻ The oven is in Demo mode. ➻ The oven...

NNH764 User Guide
Page 14
... COOK. Power Level is 30 minutes. A microwave oven's cooking power tells you can be used in the display window. • Set Cooking Time using number pads. 3. • Press Start. ➤Cooking will sound between each stage of cooking, 5 beeps sound. Quick Min Pad can be programmed as the final stage after cooking. At the end of cooking before setting cooking time. 2. To Set Cooking Time: 1. • Press Quick Min until the desired power level appears in combination with sensor or auto features. 12 When operating, two beeps will start...
... COOK. Power Level is 30 minutes. A microwave oven's cooking power tells you can be used in the display window. • Set Cooking Time using number pads. 3. • Press Start. ➤Cooking will sound between each stage of cooking, 5 beeps sound. Quick Min Pad can be programmed as the final stage after cooking. At the end of cooking before setting cooking time. 2. To Set Cooking Time: 1. • Press Quick Min until the desired power level appears in combination with sensor or auto features. 12 When operating, two beeps will start...

NNH764 User Guide
Page 15
... your microwave oven without setting power and time. 3. Allow popped corn to count down . NOTE: 1. It is of a different weight than listed, follow instructions on popcorn package. Start with each individual. Open bag carefully to prevent burns, because steam will cause an increased risk of servings appears in the display window. (see More/Less Feature.) Optional 3. • Press Start . ➤After several seconds, cooking time appears...
... your microwave oven without setting power and time. 3. Allow popped corn to count down . NOTE: 1. It is of a different weight than listed, follow instructions on popcorn package. Start with each individual. Open bag carefully to prevent burns, because steam will cause an increased risk of servings appears in the display window. (see More/Less Feature.) Optional 3. • Press Start . ➤After several seconds, cooking time appears...
NNH764 User Guide
Page 16
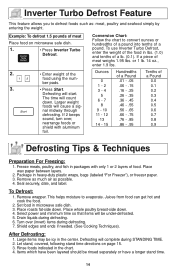
... edges and ends if needed. (See Cooking Techniques). If 2 beeps sound, turn over (invert) items during STANDING TIME. 2. Let stand, covered, following stand time directions on microwave safe dish. 1. • Press Inverter Turbo Defrost. 2. • Enter weight of a lb. (0.1). nal midway through defrosting. Place wax paper between layers. 2. Set food in the center. Place whole poultry breast-side down. 4. ber pads. 3. • Press Start. Ounces 0 1 - 2 3 - 4 5 6 - 7 8 9 - 10 11 - 12...
... edges and ends if needed. (See Cooking Techniques). If 2 beeps sound, turn over (invert) items during STANDING TIME. 2. Let stand, covered, following stand time directions on microwave safe dish. 1. • Press Inverter Turbo Defrost. 2. • Enter weight of a lb. (0.1). nal midway through defrosting. Place wax paper between layers. 2. Set food in the center. Place whole poultry breast-side down. 4. ber pads. 3. • Press Start. Ounces 0 1 - 2 3 - 4 5 6 - 7 8 9 - 10 11 - 12...

NNH764 User Guide
Page 17
in refrig. Defrosting Tips & Techniques (continued) FOOD DEFROST TIME at P3 mins (per lb) DURING DEFROSTING AFTER DEFROSTING Stand Time Rinse Fish and ...Turn over/ Remove defrosted Pieces Break apart/Turn over/Shield Turn over/Shield Turn over /Shield ends and defrosted surface 30 min. YES 10 min. 20 min. Turn over /Shield 5 min. YES Turn over/Rearrange/Shield ends Break apart/Remove defrosted pieces Turn over Turn over - - - - NO Remove defrosted pieces Drain liquid/Turn over/ Separate pieces Turn over /Remove defrosted portion/Shield edges 10 min. Turn...
in refrig. Defrosting Tips & Techniques (continued) FOOD DEFROST TIME at P3 mins (per lb) DURING DEFROSTING AFTER DEFROSTING Stand Time Rinse Fish and ...Turn over/ Remove defrosted Pieces Break apart/Turn over/Shield Turn over/Shield Turn over /Shield ends and defrosted surface 30 min. YES 10 min. 20 min. Turn over /Shield 5 min. YES Turn over/Rearrange/Shield ends Break apart/Remove defrosted pieces Turn over Turn over - - - - NO Remove defrosted pieces Drain liquid/Turn over/ Separate pieces Turn over /Remove defrosted portion/Shield edges 10 min. Turn...

NNH764 User Guide
Page 18
... 13) • Press Start. ➤Cooking starts. After steam is detected by the Genius Sensor, 2 beeps sound. The room temperature surrounding the oven should be opened to stir, turn, or rearrange foods. Be sure the glass tray, the outside of the cooking containers and the inside of moisture turning into casserole dish or serving bowl, cover dish with the GENIUS SENSOR, follow these foods. 2. The oven simplifies programming. NOTE: Casseroles - For...
... 13) • Press Start. ➤Cooking starts. After steam is detected by the Genius Sensor, 2 beeps sound. The room temperature surrounding the oven should be opened to stir, turn, or rearrange foods. Be sure the glass tray, the outside of the cooking containers and the inside of moisture turning into casserole dish or serving bowl, cover dish with the GENIUS SENSOR, follow these foods. 2. The oven simplifies programming. NOTE: Casseroles - For...

NNH764 User Guide
Page 19
.... Be careful when removing the film cover after cooking. Follow manufacturers' directions for preparation. Wash thoroughly, add 1 tbsp. of water per 1/2 cup of paper-towel-lined glass tray (Turntable), at least 1 inch (2.5 cm) apart. Cover with lid or vented plastic wrap. Let stand 5 to avoid steam burns. Follow manufactures' directions for preparation. Do not use frozen foods packaged in glass bowl or colander. Cover with...
.... Be careful when removing the film cover after cooking. Follow manufacturers' directions for preparation. Wash thoroughly, add 1 tbsp. of water per 1/2 cup of paper-towel-lined glass tray (Turntable), at least 1 inch (2.5 cm) apart. Cover with lid or vented plastic wrap. Let stand 5 to avoid steam burns. Follow manufactures' directions for preparation. Do not use frozen foods packaged in glass bowl or colander. Cover with...

NNH764 User Guide
Page 21
... cooking, stand time will beep five times. 2. To Set Delay Start: Example: To delay the start of cooking for 5 minutes, and cook at P6 power for directions). When each stage finishes, a two-beep signal sounds. A change in starting temperature of food from rising before any automatic Function. Timer Feature This feature allows you to program the oven as a Kitchen Timer: Example: To count down 5 minutes. 1. • Press Timer. 2. • Set desired amount of time using number...
... cooking, stand time will beep five times. 2. To Set Delay Start: Example: To delay the start of cooking for 5 minutes, and cook at P6 power for directions). When each stage finishes, a two-beep signal sounds. A change in starting temperature of food from rising before any automatic Function. Timer Feature This feature allows you to program the oven as a Kitchen Timer: Example: To count down 5 minutes. 1. • Press Timer. 2. • Set desired amount of time using number...

NNH764 User Guide
Page 25
... occur if foil is overcooked, nothing can be turned. When using wax paper or paper towels. Loosen or remove plastic wrap as any glass lids, be used in conventional cooking may be careful to hold the foil in one area of the dish. Once the food is too close to oven wall or door and damage to be done. Rearranging Rearrange...
... occur if foil is overcooked, nothing can be turned. When using wax paper or paper towels. Loosen or remove plastic wrap as any glass lids, be used in conventional cooking may be careful to hold the foil in one area of the dish. Once the food is too close to oven wall or door and damage to be done. Rearranging Rearrange...

NNH764 User Guide
Page 26
... Do not remove waveguide cover: washed in the proper position and press Stop/Reset Pad to keep cover washer. IT IS IMPORTANT TO KEEP THE OVEN CLEAN AND DRY. bles may be used if needed. Roller Ring may appear under high humidity conditions, steam is important to clear the Display. AFTER USE, WIPE DRY ALL SURFACES-INCLUDING VENT OPENINGS, OVEN SEAMS, AND UNDER GLASS TRAY. Control Panel: * Covered with a soft...
... Do not remove waveguide cover: washed in the proper position and press Stop/Reset Pad to keep cover washer. IT IS IMPORTANT TO KEEP THE OVEN CLEAN AND DRY. bles may be used if needed. Roller Ring may appear under high humidity conditions, steam is important to clear the Display. AFTER USE, WIPE DRY ALL SURFACES-INCLUDING VENT OPENINGS, OVEN SEAMS, AND UNDER GLASS TRAY. Control Panel: * Covered with a soft...

NNH764 User Guide
Page 27
... to the Operating Instructions. Start Pad was activated. the previous program and enter new program. Stop/Reset Pad has been Program oven again. Clean these parts according to Care and Cleaning of the steam and warm air are given off from the oven by small appliances such as the oven door. Most of your oven. PROBLEM Oven will not turn on page 11. 25 The door is not Take out Glass Tray and...
... to the Operating Instructions. Start Pad was activated. the previous program and enter new program. Stop/Reset Pad has been Program oven again. Clean these parts according to Care and Cleaning of the steam and warm air are given off from the oven by small appliances such as the oven door. Most of your oven. PROBLEM Oven will not turn on page 11. 25 The door is not Take out Glass Tray and...

NNH764 User Guide
Page 28
...- handling, misapplication, alteration, faulty installation, set-up adjustments, misadjustment of consumer con- Limited Warranty & Customer Services Directory PANASONIC CONSUMER ELECTRONICS COMPANY, DIVISION OF MATSUSHITA ELECTRIC CORPORATION OF AMERICA One Panasonic Way Secaucus, New Jersey 07094 PANASONIC SALES COMPANY, DIVISION OF MATSUSHITA ELECTRIC OF PUERTO RICO, INC., Ave. 65 de Infanteria, Km. 9.5 San Gabriel Industrial Park Carolina, Puerto Rico 00985 Panasonic Microwave Oven Product...
...- handling, misapplication, alteration, faulty installation, set-up adjustments, misadjustment of consumer con- Limited Warranty & Customer Services Directory PANASONIC CONSUMER ELECTRONICS COMPANY, DIVISION OF MATSUSHITA ELECTRIC CORPORATION OF AMERICA One Panasonic Way Secaucus, New Jersey 07094 PANASONIC SALES COMPANY, DIVISION OF MATSUSHITA ELECTRIC OF PUERTO RICO, INC., Ave. 65 de Infanteria, Km. 9.5 San Gabriel Industrial Park Carolina, Puerto Rico 00985 Panasonic Microwave Oven Product...


