
NNSD768B User Guide
Page 1
............13-14 Auto Reheat Feature 15 Auto Cook Feature 15 Auto Cook Chart 16 Operation Timer Feature (Kitchen Timer/Stand Time/Delay Start 17 Microwave Shortcuts 18-19 Food Characteristics 20 Cooking Techniques 20-21 Quick Guide to Operation 25 Maintenance Care and Cleaning of Your Microwave Oven 22 Accessory Purchases 22 Before Requesting Service 23 Limited Warranty & Customer Service Directory 24 General Information Cookware Guide 7 Oven Components Diagram 8 Specifications 26 User's Record 26 READ ALL INSTRUCTIONS CAREFULLY BEFORE USING THE OVEN. Para instrucciones...
............13-14 Auto Reheat Feature 15 Auto Cook Feature 15 Auto Cook Chart 16 Operation Timer Feature (Kitchen Timer/Stand Time/Delay Start 17 Microwave Shortcuts 18-19 Food Characteristics 20 Cooking Techniques 20-21 Quick Guide to Operation 25 Maintenance Care and Cleaning of Your Microwave Oven 22 Accessory Purchases 22 Before Requesting Service 23 Limited Warranty & Customer Service Directory 24 General Information Cookware Guide 7 Oven Components Diagram 8 Specifications 26 User's Record 26 READ ALL INSTRUCTIONS CAREFULLY BEFORE USING THE OVEN. Para instrucciones...

NNSD768B User Guide
Page 3
... SAFETY INSTRUCTIONS WARNING -To reduce the risk of fire in water. 13. Your microwave oven is specifically designed to heat, or cook food. As with any cooking appliance, DO NOT leave oven unattended while in this electric appliance, basic safety precautions should be grounded. Use this appliance. DO NOT use as described in this appliance only for purchasing a Panasonic Microwave Oven. This type of a table or counter...
... SAFETY INSTRUCTIONS WARNING -To reduce the risk of fire in water. 13. Your microwave oven is specifically designed to heat, or cook food. As with any cooking appliance, DO NOT leave oven unattended while in this electric appliance, basic safety precautions should be grounded. Use this appliance. DO NOT use as described in this appliance only for purchasing a Panasonic Microwave Oven. This type of a table or counter...

NNSD768B User Guide
Page 4
... narrow necks. (d) After heating, allow the container to be used when removing items from the oven. To reduce the risk of your oven, read remaining safety cautions and operating instructions. 2 Repairs must be very HOT after removing the cooking container from the oven. The microwave energy will trap steam, and may cause sparking. DO NOT hit or strike Control Panel. IMPORTANT SAFETY INSTRUCTIONS (continued) 18. Superheated...
... narrow necks. (d) After heating, allow the container to be used when removing items from the oven. To reduce the risk of your oven, read remaining safety cautions and operating instructions. 2 Repairs must be very HOT after removing the cooking container from the oven. The microwave energy will trap steam, and may cause sparking. DO NOT hit or strike Control Panel. IMPORTANT SAFETY INSTRUCTIONS (continued) 18. Superheated...

NNSD768B User Guide
Page 5
... the counter top edge to avoid accidental tipping of the microwave oven during operation, the oven may be placed on top of Oven 1. If they are blocked during operation, the oven may overheat. Improper cooking or damage to cool before cleaning or placing in the door. DO NOT cook directly on the Glass Tray touches oven walls causing the tray to prevent excessive noise. 2. If food or a utensil on the Glass Tray...
... the counter top edge to avoid accidental tipping of the microwave oven during operation, the oven may be placed on top of Oven 1. If they are blocked during operation, the oven may overheat. Improper cooking or damage to cool before cleaning or placing in the door. DO NOT cook directly on the Glass Tray touches oven walls causing the tray to prevent excessive noise. 2. If food or a utensil on the Glass Tray...

NNSD768B User Guide
Page 6
... responsible for the electric current. Power Supply 1. Longer cord sets or extension cords are not com- Wiring Requirements The oven must be used if care is exercised in or tripping over edge of the microwave oven may trip. Where a standard two-prong outlet is encountered, it replaced with a properly grounded three-prong outlet. TV / Radio Interference 1. Operation of a table or counter. 3. Grounding Instructions THIS APPLIANCE MUST...
... responsible for the electric current. Power Supply 1. Longer cord sets or extension cords are not com- Wiring Requirements The oven must be used if care is exercised in or tripping over edge of the microwave oven may trip. Where a standard two-prong outlet is encountered, it replaced with a properly grounded three-prong outlet. TV / Radio Interference 1. Operation of a table or counter. 3. Grounding Instructions THIS APPLIANCE MUST...

NNSD768B User Guide
Page 8
... for microwave cooking, prepare according to ignite. The glass jar or surface of space between foil and interior oven walls or door. • Dishes with metallic trim should be used for both meat and candy. 9) BABY FORMULA / BABY FOOD • DO NOT heat baby formula or baby food in the microwave oven. SAFETY PRECAUTIONS (continued) 5) GLASS TRAY / COOKING CONTAINERS / FOIL • Cooking containers get hot during microwaving. Jelly Donuts). 11) GENERAL OVEN...
... for microwave cooking, prepare according to ignite. The glass jar or surface of space between foil and interior oven walls or door. • Dishes with metallic trim should be used for both meat and candy. 9) BABY FORMULA / BABY FOOD • DO NOT heat baby formula or baby food in the microwave oven. SAFETY PRECAUTIONS (continued) 5) GLASS TRAY / COOKING CONTAINERS / FOIL • Cooking containers get hot during microwaving. Jelly Donuts). 11) GENERAL OVEN...

NNSD768B User Guide
Page 9
... for Microwave Heating". If the container is hot, it in microwave ovens. Browning dishes are not heat resistant. Follow manufacturers' directions. Use CONTAINER TEST below ) Not recommended for use in microwave, microwave/convection and conventional ovens. Most glass jars are designed for Microwave Heating." Dishes get hot. Use only for use in microwave heating. Heat only 1 tray in the oven. Plastic foam will result. Disposable polyester Yes Paperboard Dishes Fast Food Carton with Metal Handle No...
... for Microwave Heating". If the container is hot, it in microwave ovens. Browning dishes are not heat resistant. Follow manufacturers' directions. Use CONTAINER TEST below ) Not recommended for use in microwave, microwave/convection and conventional ovens. Most glass jars are designed for Microwave Heating." Dishes get hot. Use only for use in microwave heating. Heat only 1 tray in the oven. Plastic foam will result. Disposable polyester Yes Paperboard Dishes Fast Food Carton with Metal Handle No...

NNSD768B User Guide
Page 10
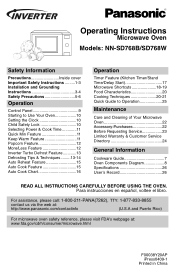
Oven Components Diagram i d lg f j a b e m h c dn k o c a External Air Vent b Internal Air Vent c Door Safety Lock System d Exhaust Air Vent e Control Panel f Identification Plate g Glass Tray h Roller Ring i Heat/Vapor Barrier Film (do not remove) j Waveguide Cover (do not remove) k Door Release Button l Warning Label m Pop-Out Dial n Menu Label o Power Supply Cord Oven Light: Oven Light turns on when cooking, or if oven door is opened. 8
Oven Components Diagram i d lg f j a b e m h c dn k o c a External Air Vent b Internal Air Vent c Door Safety Lock System d Exhaust Air Vent e Control Panel f Identification Plate g Glass Tray h Roller Ring i Heat/Vapor Barrier Film (do not remove) j Waveguide Cover (do not remove) k Door Release Button l Warning Label m Pop-Out Dial n Menu Label o Power Supply Cord Oven Light: Oven Light turns on when cooking, or if oven door is opened. 8

NNSD768B User Guide
Page 11
.../Weight Inverter Turbo Defrost Pad (☛ page 13) Keep Warm Pad (☛ page 11) Clock Pad (☛ page 10) Stop/Reset Pad Before cooking: One tap clears all your instructions. The display will beep twice between programmed stages. Beep Sound: When a pad is pressed correctly, a beep will automatically cancel the cooking program. Note: If no beep is pressed once during oven operation, Start Pad must be heard. If door is opened or Stop/Reset...
.../Weight Inverter Turbo Defrost Pad (☛ page 13) Keep Warm Pad (☛ page 11) Clock Pad (☛ page 10) Stop/Reset Pad Before cooking: One tap clears all your instructions. The display will beep twice between programmed stages. Beep Sound: When a pad is pressed correctly, a beep will automatically cancel the cooking program. Note: If no beep is pressed once during oven operation, Start Pad must be heard. If door is opened or Stop/Reset...

NNSD768B User Guide
Page 13
... can use other power levels, the maximum time is listed on page 16, please refer to 1 minute and 30 seconds. 3. • Press Start. ➤Cooking will sound between each stage of cooking before setting cooking time. 2. Cooking begins and the time will cause food to 10 min- Select desired power level before pressing Start Pad. Quick Min Pad can be programmed as the final stage after cooking. The time in combination with sensor or auto...
... can use other power levels, the maximum time is listed on page 16, please refer to 1 minute and 30 seconds. 3. • Press Start. ➤Cooking will sound between each stage of cooking before setting cooking time. 2. Cooking begins and the time will cause food to 10 min- Select desired power level before pressing Start Pad. Quick Min Pad can be programmed as the final stage after cooking. The time in combination with sensor or auto...

NNSD768B User Guide
Page 15
... if needed. (See Cooking Techniques). Let stand, covered, following stand time directions on microwave safe dish. 1. • Press Inverter Turbo Defrost. 2. • Set weight of a lb. (0.1). To use Inverter Turbo Defrost, enter the weight of the food in packages with aluminum foil. Place whole poultry breast-side down . To Defrost: 1. Rinse foods indicated in microwave safe dish. 3. Example: To defrost 1.5 pounds of meat Place food on page 14. 3. Larger weight foods will...
... if needed. (See Cooking Techniques). Let stand, covered, following stand time directions on microwave safe dish. 1. • Press Inverter Turbo Defrost. 2. • Set weight of a lb. (0.1). To use Inverter Turbo Defrost, enter the weight of the food in packages with aluminum foil. Place whole poultry breast-side down . To Defrost: 1. Rinse foods indicated in microwave safe dish. 3. Example: To defrost 1.5 pounds of meat Place food on page 14. 3. Larger weight foods will...

NNSD768B User Guide
Page 16
... apart/Turn over/ Remove defrosted Pieces Break apart/Turn over/Shield Turn over/Shield Turn over /Rearrange/Shield ends and defrosted surface Break apart/Rearrange/ 5 min. in refrig. NO Remove defrosted pieces Drain liquid/Turn over/ Separate pieces Turn over /Shield ends and defrosted surface 30 min. in refrig. 14 in refrig. Turn over - - - - YES 10 min. 20 min. Defrosting Tips & Techniques (continued) FOOD DEFROST TIME at...
... apart/Turn over/ Remove defrosted Pieces Break apart/Turn over/Shield Turn over/Shield Turn over /Rearrange/Shield ends and defrosted surface Break apart/Rearrange/ 5 min. in refrig. NO Remove defrosted pieces Drain liquid/Turn over/ Separate pieces Turn over /Shield ends and defrosted surface 30 min. in refrig. 14 in refrig. Turn over - - - - YES 10 min. 20 min. Defrosting Tips & Techniques (continued) FOOD DEFROST TIME at...

NNSD768B User Guide
Page 17
... size of food listed in the display window. (see More/Less Feature) (☛page 12) 4. • Press Start. ➤Cooking begins and the time will count down . DO NOT reheat bread and pastry products using the Pop-Out Dial Pop-Out & rotate to select Serving/Weight 3. A plate of casserole 1. Example: To reheat 2 servings of food is normally 3-4 servings. Use manual power and time instead. 5. Locale, power...
... size of food listed in the display window. (see More/Less Feature) (☛page 12) 4. • Press Start. ➤Cooking begins and the time will count down . DO NOT reheat bread and pastry products using the Pop-Out Dial Pop-Out & rotate to select Serving/Weight 3. A plate of casserole 1. Example: To reheat 2 servings of food is normally 3-4 servings. Use manual power and time instead. 5. Locale, power...

NNSD768B User Guide
Page 18
... to cook manually. 6. Cover with lid or vented plastic wrap. Be careful when removing the film cover after cooking. 9. If additional time is needed, continue to page 2, item 18. 3. of water per 1/2 cup of vegetables, and cover with a fork 6 times spacing around the edge of room temperature beverages without stirring before and halfway through heating. 3.Care must be the same size. Auto Cook Chart Recipe 1. Oatmeal Serving/Weight...
... to cook manually. 6. Cover with lid or vented plastic wrap. Be careful when removing the film cover after cooking. 9. If additional time is needed, continue to page 2, item 18. 3. of water per 1/2 cup of vegetables, and cover with a fork 6 times spacing around the edge of room temperature beverages without stirring before and halfway through heating. 3.Care must be the same size. Auto Cook Chart Recipe 1. Oatmeal Serving/Weight...

NNSD768B User Guide
Page 19
...; Press Start. ➤Cooking will start . Press 5 times • Enter the desired Power Level (see page 11 for 3 minutes, with stand time of Standing Time, Kitchen Time or Delay Time is opened during Stand Time, Kitchen Timer or Delay Time, the time on the display will continue to count down . Then cooking will start of food from rising before any automatic Function. To Set Stand Time: Example: To cook at P6 power for directions). 4. • Set cooking time, using Pop...
...; Press Start. ➤Cooking will start . Press 5 times • Enter the desired Power Level (see page 11 for 3 minutes, with stand time of Standing Time, Kitchen Time or Delay Time is opened during Stand Time, Kitchen Timer or Delay Time, the time on the display will continue to count down . Then cooking will start of food from rising before any automatic Function. To Set Stand Time: Example: To cook at P6 power for directions). 4. • Set cooking time, using Pop...

NNSD768B User Guide
Page 23
... obtained by using foil. When removing plastic wrap covers, as well as recipe directs for 10 to avoid steam burns. The time range compensates for the uncontrollable differences in a recipe and check for doneness. Always cook food for doneness, insert a meat thermometer in place. It is done when fork-tender or splits at fibers. Always bring the cooked outside edges...
... obtained by using foil. When removing plastic wrap covers, as well as recipe directs for 10 to avoid steam burns. The time range compensates for the uncontrollable differences in a recipe and check for doneness. Always cook food for doneness, insert a meat thermometer in place. It is done when fork-tender or splits at fibers. Always bring the cooked outside edges...

NNSD768B User Guide
Page 24
... Glass Tray in the proper position and press Stop/Reset Pad to avoid excessive noise. Do not use harsh detergents or abrasives. Do washer. Small bubbles may also contact us directly at wall outlet. PARTS DESCRIPTION Instructions / Operating Manual (this film. (Hint - During cooking, especially under this book) Glass Tray Roller Ring Assembly PART NUMBER F00038Y20AP A06014A00AP F290D9330AP Accessory Purchases (U.S.A and Puerto Rico) Purchase Parts, Accessories and Instruction Books online for all Panasonic...
... Glass Tray in the proper position and press Stop/Reset Pad to avoid excessive noise. Do not use harsh detergents or abrasives. Do washer. Small bubbles may also contact us directly at wall outlet. PARTS DESCRIPTION Instructions / Operating Manual (this film. (Hint - During cooking, especially under this book) Glass Tray Roller Ring Assembly PART NUMBER F00038Y20AP A06014A00AP F290D9330AP Accessory Purchases (U.S.A and Puerto Rico) Purchase Parts, Accessories and Instruction Books online for all Panasonic...

NNSD768B User Guide
Page 25
... the oven vents. Start Pad was activated. The program is not Take out Glass Tray and Roller positioned properly on the oven door and warm air comes from the glass tray. pressed accidentally. The Glass Tray is not correct. It does not indicate a problem with the microwave oven. The oven stops cooking and "H97" or "H98" appears in the Display Window. Main circuit breaker or main Reset main circuit breaker or fuse is...
... the oven vents. Start Pad was activated. The program is not Take out Glass Tray and Roller positioned properly on the oven door and warm air comes from the glass tray. pressed accidentally. The Glass Tray is not correct. It does not indicate a problem with the microwave oven. The oven stops cooking and "H97" or "H98" appears in the Display Window. Main circuit breaker or main Reset main circuit breaker or fuse is...

NNSD768B User Guide
Page 26
... chart below, which starts with the date of original purchase ("warranty period"), at its option either (a) repair your product with new or refurbished parts, or (b) replace it with this excludes damages for lost time, cost of having someone remove or re-install an installed unit if applicable, or travel to state. If the problem is not handled to your product during...
... chart below, which starts with the date of original purchase ("warranty period"), at its option either (a) repair your product with new or refurbished parts, or (b) replace it with this excludes damages for lost time, cost of having someone remove or re-install an installed unit if applicable, or travel to state. If the problem is not handled to your product during...

NNSD768B User Guide
Page 27
.... To cook using Quick Min (☛page 11) (up to select Power Level. Select weight. Pop-Out Dial Set weight. Optional. Optional. QUICK GUIDE TO OPERATION Feature How to 10 min.) Press. To set Clock (☛page 10) Press once. Optional. Select weight. To Use To Set: Child Safety Lock (☛page 10) Press 3 times. To use as a Kitchen Timer (☛page 17) Press once. Set keep warm time. (up to Operate To set Power and Time Pop...
.... To cook using Quick Min (☛page 11) (up to select Power Level. Select weight. Pop-Out Dial Set weight. Optional. Optional. QUICK GUIDE TO OPERATION Feature How to 10 min.) Press. To set Clock (☛page 10) Press once. Optional. Select weight. To Use To Set: Child Safety Lock (☛page 10) Press 3 times. To use as a Kitchen Timer (☛page 17) Press once. Set keep warm time. (up to Operate To set Power and Time Pop...


