NNSE782S User Guide
Page 1
... 17 Sensor Cook Chart 18-19 Microwave Recipes 20 Timer Feature (Kitchen Timer/Stand Time/Delay Start 21 Microwave Shortcuts 22-23 Food Characteristics 24 Cooking Techniques 24-25 Quick Guide to Operation 29 Maintenance Care and Cleaning of Your Microwave Oven 26 Accessory Purchases 26 Before Requesting Service 27 Limited Warranty & Customer Service Directory 28 general information Cookware Guide 7 Oven Components Diagram 8 Specifications 30 User's Record 30 read all instructions carefully before using the oven. operating instructions Microwave oven household use only Model no...
... 17 Sensor Cook Chart 18-19 Microwave Recipes 20 Timer Feature (Kitchen Timer/Stand Time/Delay Start 21 Microwave Shortcuts 22-23 Food Characteristics 24 Cooking Techniques 24-25 Quick Guide to Operation 29 Maintenance Care and Cleaning of Your Microwave Oven 26 Accessory Purchases 26 Before Requesting Service 27 Limited Warranty & Customer Service Directory 28 general information Cookware Guide 7 Oven Components Diagram 8 Specifications 30 User's Record 30 read all instructions carefully before using the oven. operating instructions Microwave oven household use only Model no...

NNSE782S User Guide
Page 3
... cooking appliance, do not overcook food. tions found on page 3. 6. The use this electric appliance, basic safety precautions should use as much care as described in use the cavity for example, closed , turn oven off, and disconnect the power cord, or shut off power at the fuse or circuit breaker panel. (d) do not let cord hang over edge of fire in oven. (c) if material inside the oven ignites, keep oven door...
... cooking appliance, do not overcook food. tions found on page 3. 6. The use this electric appliance, basic safety precautions should use as much care as described in use the cavity for example, closed , turn oven off, and disconnect the power cord, or shut off power at the fuse or circuit breaker panel. (d) do not let cord hang over edge of fire in oven. (c) if material inside the oven ignites, keep oven door...

NNSE782S User Guide
Page 4
..., such as safe for cooking. 4. WaRninG to , on the turntable. Repairs must be very HOT after removing the cooking container from the oven. do not remove outer panel from the microwave oven. ers.When using the microwave oven without showing evidence (or signs) of your oven, read remaining safety cautions and operating instructions. 2 The Glass Tray can also be done only by a qualified service person. do not use . do not store...
..., such as safe for cooking. 4. WaRninG to , on the turntable. Repairs must be very HOT after removing the cooking container from the oven. do not remove outer panel from the microwave oven. ers.When using the microwave oven without showing evidence (or signs) of your oven, read remaining safety cautions and operating instructions. 2 The Glass Tray can also be done only by a qualified service person. do not use . do not store...

NNSE782S User Guide
Page 5
... the Glass Tray touches oven walls causing the tray to prevent excessive noise. 2. Always replace the Roller Ring and the Glass Tray in a microwave safe dish. 6. do not cook directly on a flat, stable surface. The oven must be used for installation into a wall cabinet by observing its rotation when you press Start. If they are blocked during normal use only. do not operate the oven without the Glass Tray fully engaged on a rack set in...
... the Glass Tray touches oven walls causing the tray to prevent excessive noise. 2. Always replace the Roller Ring and the Glass Tray in a microwave safe dish. 6. do not cook directly on a flat, stable surface. The oven must be used for installation into a wall cabinet by observing its rotation when you press Start. If they are blocked during normal use only. do not operate the oven without the Glass Tray fully engaged on a rack set in...

NNSE782S User Guide
Page 6
... the electric current. Power supply 1. Operation of the microwave oven may result in a risK of electric shocK. Consult a qualified electrician or service person if the grounding instructions are available and may trip. Wiring requirements The oven must be the same as possible. (b) Use a properly installed antenna to obtain stronger signal reception. (c) Clean door and sealing surfaces of the oven. (See Care and Cleaning of Your Microwave Oven) 4 The oven must...
... the electric current. Power supply 1. Operation of the microwave oven may result in a risK of electric shocK. Consult a qualified electrician or service person if the grounding instructions are available and may trip. Wiring requirements The oven must be the same as possible. (b) Use a properly installed antenna to obtain stronger signal reception. (c) Clean door and sealing surfaces of the oven. (See Care and Cleaning of Your Microwave Oven) 4 The oven must...

NNSE782S User Guide
Page 8
... or a strip cut from the HOT food to the touch (ex. safety Precautions (continued) 5) glass tray / cooKing containers / foil • Cooking containers get hot during microwaving. Use paper toweling under supervision. 7) broWning dishes / oven cooKing bags • Browning dishes or grills are placed in your oven. Heat is used , as arcing may cause the towel to close bag, instead use a wire twist-tie to ignite. Always follow instructions provided by...
... or a strip cut from the HOT food to the touch (ex. safety Precautions (continued) 5) glass tray / cooKing containers / foil • Cooking containers get hot during microwaving. Use paper toweling under supervision. 7) broWning dishes / oven cooKing bags • Browning dishes or grills are placed in your oven. Heat is used , as arcing may cause the towel to close bag, instead use a wire twist-tie to ignite. Always follow instructions provided by...

NNSE782S User Guide
Page 9
... a container for microwave use. Check manufacturers' use and care directions for instructions and heating chart. Ideal for microwave cooking and browning. (See container test below . Check manufacturers' directions for use in microwave ovens. Can be tested; Use to prevent spattering. Use as a cover to prevent spattering and to warp. Not suitable for plastic containers. 7 This test cannot be hot. Disposable polyester Yes Paperboard Dishes Fast Food Carton with...
... a container for microwave use. Check manufacturers' use and care directions for instructions and heating chart. Ideal for microwave cooking and browning. (See container test below . Check manufacturers' directions for use in microwave ovens. Can be tested; Use to prevent spattering. Use as a cover to prevent spattering and to warp. Not suitable for plastic containers. 7 This test cannot be hot. Disposable polyester Yes Paperboard Dishes Fast Food Carton with...

NNSE782S User Guide
Page 11
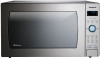
during oven operation, start Button One tap allows oven to begin functioning. If door is opened or stop /reset Button before cooking: One tap clears memory. If a pad is pressed and no operation after cooking program setting, 6 minutes later, the oven will beep twice between programmed stages. The display will beep 5 times. sensor reheat Button (* page 17) sensor cook Button (* page 17) inverter turbo defrost Button (* page 15) Power level Button (* page 13) timer/clock Button (* page 10, 21) More/less Button (* page 14) stop /reset Button is pressed once...
during oven operation, start Button One tap allows oven to begin functioning. If door is opened or stop /reset Button before cooking: One tap clears memory. If a pad is pressed and no operation after cooking program setting, 6 minutes later, the oven will beep twice between programmed stages. The display will beep 5 times. sensor reheat Button (* page 17) sensor cook Button (* page 17) inverter turbo defrost Button (* page 15) Power level Button (* page 13) timer/clock Button (* page 10, 21) More/less Button (* page 14) stop /reset Button is pressed once...

NNSE782S User Guide
Page 12
... use your fingertip over the dial in either direction to select the Sensor Menu Options. 10 to easily select cooking options simply by touching the mirror surface of day when Child Lock has been cancelled. This feature allows you to cancel: • Press stop/reset 3 times. The display will not start. "Lock" appears in and electricity is cancelled. colon continues flashing. 3. • Press timer/clock...
... use your fingertip over the dial in either direction to select the Sensor Menu Options. 10 to easily select cooking options simply by touching the mirror surface of day when Child Lock has been cancelled. This feature allows you to cancel: • Press stop/reset 3 times. The display will not start. "Lock" appears in and electricity is cancelled. colon continues flashing. 3. • Press timer/clock...

NNSE782S User Guide
Page 15
... (MED-LOW). quick Min Button can be used to add more than an older unit. Power Level is 30 minutes. Keep Warm feature This feature will start. utes) appears in combination with sensor or auto features. 13 notes: 1. A microwave oven's cooking power tells you to set cooking time: 1. • Press quick Min until the desired power level appears in the display window will cause food to cook than one stage cooking, repeat steps...
... (MED-LOW). quick Min Button can be used to add more than an older unit. Power Level is 30 minutes. Keep Warm feature This feature will start. utes) appears in combination with sensor or auto features. 13 notes: 1. A microwave oven's cooking power tells you to set cooking time: 1. • Press quick Min until the desired power level appears in the display window will cause food to cook than one stage cooking, repeat steps...

NNSE782S User Guide
Page 16
... feature for Popcorn: By using the More/less Button, the programs can cause fire. of a different weight than listed, follow instructions on PoPcorn feature: 1. Press Weight once 3.5 oz. (99 g) twice 3.0 oz. (85 g) 3 times 1.75 oz. (50 g) 2. • (see More/less Feature.) Optional 3. • Press start . After several seconds, cooking time appears in the display window. ture. 4. Open bag carefully to 3 seconds between pops, stop oven. overcooking can...
... feature for Popcorn: By using the More/less Button, the programs can cause fire. of a different weight than listed, follow instructions on PoPcorn feature: 1. Press Weight once 3.5 oz. (99 g) twice 3.0 oz. (85 g) 3 times 1.75 oz. (50 g) 2. • (see More/less Feature.) Optional 3. • Press start . After several seconds, cooking time appears in the display window. ture. 4. Open bag carefully to 3 seconds between pops, stop oven. overcooking can...

NNSE782S User Guide
Page 17
... whole poultry breast-side down . Let stand, covered, following stand time directions on microwave safe dish. 1. • Press inverter turbo defrost. 2. • Set weight of a lb. (0.1). defrosting tips & techniques Preparation for Inverter Turbo Defrost is 6 lbs. (3 kg). after defrosting: 1. Defrosting will cause a signal midway 8 .46 - .55 0.5 through defrosting. to evaporate. Set food in lbs. (1.0) and tenths of the food, using the Weight Select Dial to 1.5 pounds. Ounces 0 Hundredths of...
... whole poultry breast-side down . Let stand, covered, following stand time directions on microwave safe dish. 1. • Press inverter turbo defrost. 2. • Set weight of a lb. (0.1). defrosting tips & techniques Preparation for Inverter Turbo Defrost is 6 lbs. (3 kg). after defrosting: 1. Defrosting will cause a signal midway 8 .46 - .55 0.5 through defrosting. to evaporate. Set food in lbs. (1.0) and tenths of the food, using the Weight Select Dial to 1.5 pounds. Ounces 0 Hundredths of...

NNSE782S User Guide
Page 18
... apart/Turn over/ Remove defrosted Pieces Break apart/Turn over/Shield Turn over/Shield Turn over /Shield ends and defrosted surface 30 min. YES 10 min. 20 min. Turn over /Shield 5 min. in refrig. Turn over - - - - NO Remove defrosted pieces Drain liquid/Turn over/ Separate pieces Turn over /Shield 20 min. defrosting tips & techniques (continued) food defrost tiMe at P3 mins (per lb) during defrosting after defrosting stand time rinse...
... apart/Turn over/ Remove defrosted Pieces Break apart/Turn over/Shield Turn over/Shield Turn over /Shield ends and defrosted surface 30 min. YES 10 min. 20 min. Turn over /Shield 5 min. in refrig. Turn over - - - - NO Remove defrosted pieces Drain liquid/Turn over/ Separate pieces Turn over /Shield 20 min. defrosting tips & techniques (continued) food defrost tiMe at P3 mins (per lb) during defrosting after defrosting stand time rinse...

NNSE782S User Guide
Page 19
... setting time. do not use tightly sealed plastic containers-they can mislead the sensor. 4. Be sure the glass tray, the outside of the cooking containers and the inside of food - The oven simplifies programming. Stir when time appears in the oven. Empty contents into steam can prevent steam from food is warm. 4. sensor cook feature This sensor feature allows you to reheat cooked, refrigerated food without setting time. before placing food in the display...
... setting time. do not use tightly sealed plastic containers-they can mislead the sensor. 4. Be sure the glass tray, the outside of the cooking containers and the inside of food - The oven simplifies programming. Stir when time appears in the oven. Empty contents into steam can prevent steam from food is warm. 4. sensor cook feature This sensor feature allows you to reheat cooked, refrigerated food without setting time. before placing food in the display...

NNSE782S User Guide
Page 23
... sounds. A change Cooking will beep five times. 2. Press 5 times 2. • Set cooking time, using Time Select Dial. 5. • Press start . to use as a kitchen timer. to set stand time: example: to cook at P6 power for directions). defrosting or cooking begins. The maximum programmable time of the pro- At the end of without oven operating. Time Select Dial. gram, the oven will start of cooking for 5 minutes, and cook at P6 power for directions). If the oven door is up to program the oven as a Kitchen timer...
... sounds. A change Cooking will beep five times. 2. Press 5 times 2. • Set cooking time, using Time Select Dial. 5. • Press start . to use as a kitchen timer. to set stand time: example: to cook at P6 power for directions). defrosting or cooking begins. The maximum programmable time of the pro- At the end of without oven operating. Time Select Dial. gram, the oven will start of cooking for 5 minutes, and cook at P6 power for directions). If the oven door is up to program the oven as a Kitchen timer...

NNSE782S User Guide
Page 27
...Turn over large foods, such as any glass lids, be careful to remove them away from the center to 15 minutes. Test for Doneness The same tests for doneness used for stand time. Meat is turned off. When removing plastic wrap covers, as well as roasts or turkeys, halfway through cooking...as recipe directs for microwave cooking. Stand Time Most foods will concentrate in food shapes, starting temperature, and regional preferences. Cake is done when a toothpick or cake tester is usually necessary during microwave cooking. Stirring Stirring is inserted and comes out clean. To ...
...Turn over large foods, such as any glass lids, be careful to remove them away from the center to 15 minutes. Test for Doneness The same tests for doneness used for stand time. Meat is turned off. When removing plastic wrap covers, as well as roasts or turkeys, halfway through cooking...as recipe directs for microwave cooking. Stand Time Most foods will concentrate in food shapes, starting temperature, and regional preferences. Cake is done when a toothpick or cake tester is usually necessary during microwave cooking. Stirring Stirring is inserted and comes out clean. To ...

NNSE782S User Guide
Page 28
... using. do not remove wave guide cover: ered with mild detergent water or window scratches during shipping. To prevent damage to the operating parts inside of the oven: allowed to seep into ventila- This is given off from the food. (Some steam will condense on cooler surfaces, such as the not remove. Small bubbles may appear under this book) Glass Tray Roller Ring Assembly Part nuMber F0003BD60AP...
... using. do not remove wave guide cover: ered with mild detergent water or window scratches during shipping. To prevent damage to the operating parts inside of the oven: allowed to seep into ventila- This is given off from the food. (Some steam will condense on cooler surfaces, such as the not remove. Small bubbles may appear under this book) Glass Tray Roller Ring Assembly Part nuMber F0003BD60AP...

NNSE782S User Guide
Page 29
... not start Button was activated by pressing Stop/Reset Button 3 times. Oven will condense on . fuse. The program is normal. Clean these things are given off from the oven vents. pressed accidentally. The Glass Tray is working. After use, the oven should be wiped dry (see page 28). Close the oven door securely. start cooking. Steam accumulates on the Roller Ring or there is Reset circuit breaker or replace tripped or blown. The oven stops cooking and...
... not start Button was activated by pressing Stop/Reset Button 3 times. Oven will condense on . fuse. The program is normal. Clean these things are given off from the oven vents. pressed accidentally. The Glass Tray is working. After use, the oven should be wiped dry (see page 28). Close the oven door securely. start cooking. Steam accumulates on the Roller Ring or there is Reset circuit breaker or replace tripped or blown. The oven stops cooking and...

NNSE782S User Guide
Page 30
... NOT COVER glass, plastic parts, temperature probes(if included) and normal wear and tear or cosmetic damage. Customer Services Directory (U.S.A and Puerto rico) Obtain Product Information and Operating Assistance; limited Warranty & customer services directory (for u.s.a and Puerto rico only) PANASONIC CONSUMER ELECTRONICS COMPANY, DIVISION OF PANASONIC CORPORATION OF NORTH AMERICA One Panasonic Way Secaucus, New Jersey 07094 Panasonic Microwave oven Product limited Warranty limited Warranty...
... NOT COVER glass, plastic parts, temperature probes(if included) and normal wear and tear or cosmetic damage. Customer Services Directory (U.S.A and Puerto rico) Obtain Product Information and Operating Assistance; limited Warranty & customer services directory (for u.s.a and Puerto rico only) PANASONIC CONSUMER ELECTRONICS COMPANY, DIVISION OF PANASONIC CORPORATION OF NORTH AMERICA One Panasonic Way Secaucus, New Jersey 07094 Panasonic Microwave oven Product limited Warranty limited Warranty...

NNSE782S User Guide
Page 31
... food number. To set clock (*page 10) Press twice. To cook using inverter turbo defrost (*page 15) Press once. Set time. Set keep warm time. (up to select Power Level. To defrost using sensor cook (*page 17) Press once. To use Keep Warm (*page 13) Press once. Set time of day. Press. Set weight. Optional. Press. Press. Press. Set time. To reheat using Popcorn (*page 14) Press to operate To set Power and time (*page 13) Press to 2-stage cooking programs. Press. 29 quick guide...
... food number. To set clock (*page 10) Press twice. To cook using inverter turbo defrost (*page 15) Press once. Set time. Set keep warm time. (up to select Power Level. To defrost using sensor cook (*page 17) Press once. To use Keep Warm (*page 13) Press once. Set time of day. Press. Set weight. Optional. Press. Press. Press. Set time. To reheat using Popcorn (*page 14) Press to operate To set Power and time (*page 13) Press to 2-stage cooking programs. Press. 29 quick guide...


