
PT52LCX16 User Guide
Page 2
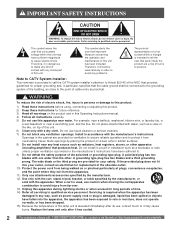
...your safety. Therefore, it has cooled. 2 For assistance, please call the CATV system installer's attention to Article 820-40 of cable entry as close to cause electric shock. Do not...power cord from tip-over. 13) Unplug this apparatus during lightning storms or when unused for long periods of time. 14) Refer all servicing to this product: 1) Read these instructions before using, connecting or adjusting this product. 2) Keep these instructions for proper grounding and, in this Operating Instructions manual. 4) Follow all warnings on or pinched particularly at : http://www.panasonic...
...your safety. Therefore, it has cooled. 2 For assistance, please call the CATV system installer's attention to Article 820-40 of cable entry as close to cause electric shock. Do not...power cord from tip-over. 13) Unplug this apparatus during lightning storms or when unused for long periods of time. 14) Refer all servicing to this product: 1) Read these instructions before using, connecting or adjusting this product. 2) Keep these instructions for proper grounding and, in this Operating Instructions manual. 4) Follow all warnings on or pinched particularly at : http://www.panasonic...

PT52LCX16 User Guide
Page 3
..., USA. • SVGA is required for over 24 hours, the number of times lit, the length of the Video Electronics Standard Association. License description: To view the license information for software used with -TV Noise Reduction for true MTS reproduction. -TV Noise Reduction is trademark of time between lightings, etc. It also contains lead in 4:3 mode. 3 Due to direct sunlight, extreme temperatures or moisture...
..., USA. • SVGA is required for over 24 hours, the number of times lit, the length of the Video Electronics Standard Association. License description: To view the license information for software used with -TV Noise Reduction for true MTS reproduction. -TV Noise Reduction is trademark of time between lightings, etc. It also contains lead in 4:3 mode. 3 Due to direct sunlight, extreme temperatures or moisture...
PT52LCX16 User Guide
Page 4
... new Projection Display. Any changes or modifications not expressly approved by one or more of these Instructions before making any interference received, including interference that to operate this equipment. Operation is subject to the following measures: • Reorient or relocate the receiving antenna. • Increase the separation between the equipment and receiver. • Connect the equipment into an outlet on , the user...
... new Projection Display. Any changes or modifications not expressly approved by one or more of these Instructions before making any interference received, including interference that to operate this equipment. Operation is subject to the following measures: • Reorient or relocate the receiving antenna. • Increase the separation between the equipment and receiver. • Connect the equipment into an outlet on , the user...
PT52LCX16 User Guide
Page 5
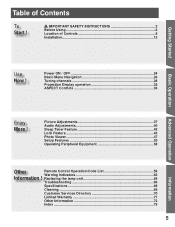
Replacing the lamp unit 64 Troubleshooting 66 Specifications 68 Cleaning 69 Customer Services Directory 70 Limited Warranty 71 Other Information 72 Index ...79 5 Information Power ON / OFF 24 Basic Menu Navigation 26 Tuning channels 28 Projection Display operation 32 ASPECT Controls 36 Enjoy More ! Table of Controls 9 Installation 12 Getting Started Basic Operation Advanced Operation Use Now ! IMPORTANT SAFETY INSTRUCTIONS 2 Before Using 6 Location of Contents To Start ! Picture Adjustments 37 Audio Adjustments 40 Sleep Timer Feature 42 Lock ...
Replacing the lamp unit 64 Troubleshooting 66 Specifications 68 Cleaning 69 Customer Services Directory 70 Limited Warranty 71 Other Information 72 Index ...79 5 Information Power ON / OFF 24 Basic Menu Navigation 26 Tuning channels 28 Projection Display operation 32 ASPECT Controls 36 Enjoy More ! Table of Controls 9 Installation 12 Getting Started Basic Operation Advanced Operation Use Now ! IMPORTANT SAFETY INSTRUCTIONS 2 Before Using 6 Location of Contents To Start ! Picture Adjustments 37 Audio Adjustments 40 Sleep Timer Feature 42 Lock ...
PT52LCX16 User Guide
Page 7
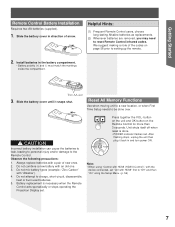
... "On" using the Setup Menu. (p. 56) 7 After flashing stops, unplug the unit then plug it snaps shut. Reset All Memory Functions Use when moving unit to a new location, or when First Time Setup needs to the Remote Control. Do not combine a new battery with HDMI" first to setting up the remote. 2. Unit shuts itself off when reset is necessary when the Remote Control acts sporadically or stops operating the Projection Display set "Ctrl with...
... "On" using the Setup Menu. (p. 56) 7 After flashing stops, unplug the unit then plug it snaps shut. Reset All Memory Functions Use when moving unit to a new location, or when First Time Setup needs to the Remote Control. Do not combine a new battery with HDMI" first to setting up the remote. 2. Unit shuts itself off when reset is necessary when the Remote Control acts sporadically or stops operating the Projection Display set "Ctrl with...

PT52LCX16 User Guide
Page 10
.../contactinfo Press to change channels and to navigate menus. Receives infrared signal from other component. (Video 3) Press to display Main Menu. 6 OK* 7 TV/VIDEO* 8 VOL >< 9 CH / ▼▲* 10 Remote Control Sensor Press to select menu and sub-menu items. Changes Input source. Location of Controls (continued) Controls and Terminals on the Projection Display Front View 1 2 34 1 POWER button 2 POWER indicator 3 TEMP indicator 4 LAMP indicator Press to turn ON and OFF. (p. 63, 66) Lights up green when power is ON...
.../contactinfo Press to change channels and to navigate menus. Receives infrared signal from other component. (Video 3) Press to display Main Menu. 6 OK* 7 TV/VIDEO* 8 VOL >< 9 CH / ▼▲* 10 Remote Control Sensor Press to select menu and sub-menu items. Changes Input source. Location of Controls (continued) Controls and Terminals on the Projection Display Front View 1 2 34 1 POWER button 2 POWER indicator 3 TEMP indicator 4 LAMP indicator Press to turn ON and OFF. (p. 63, 66) Lights up green when power is ON...
PT52LCX16 User Guide
Page 19
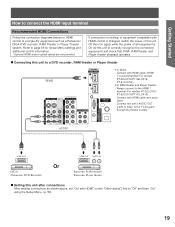
... input terminal Recommended HDMI Connections Follow the connection diagrams below for Setup Menu settings and additional control information. • Optional HDMI and/or optical cables are not provided. If connection (or setting) of equipment compatible with HDMI cable (HDMI 1 is changed, switch the power of this unit after connections After making connections as a Panasonic DIGA-DVD recorder, RAM Theater or Player Theater system. Connect with HDMI control is recommended (For models PT-52LCX16/PT-56LCX16/ PT-61LCX16)). • For RAM theater and Player theater: - AUDIO...
... input terminal Recommended HDMI Connections Follow the connection diagrams below for Setup Menu settings and additional control information. • Optional HDMI and/or optical cables are not provided. If connection (or setting) of equipment compatible with HDMI cable (HDMI 1 is changed, switch the power of this unit after connections After making connections as a Panasonic DIGA-DVD recorder, RAM Theater or Player Theater system. Connect with HDMI control is recommended (For models PT-52LCX16/PT-56LCX16/ PT-61LCX16)). • For RAM theater and Player theater: - AUDIO...

PT52LCX16 User Guide
Page 21
... Projection Display, high-definition pictures can be used , connect the audio cable to "Color corr." Please set top box or DVD player equipped with 1080i, 720p, 480p and 480i picture signals. • If there is included in " (PT-52LCX16/ PT-56LCX16/PT-61LCX16) on the signal, the picture may be displayed on the screen in their digital form. (This terminal is used with a HDMI output connection. of uncompressed digital video including high bandwidth digital content protection. 21 The HDMI input terminal is securely connected. Notes: *1 HDMI...
... Projection Display, high-definition pictures can be used , connect the audio cable to "Color corr." Please set top box or DVD player equipped with 1080i, 720p, 480p and 480i picture signals. • If there is included in " (PT-52LCX16/ PT-56LCX16/PT-61LCX16) on the signal, the picture may be displayed on the screen in their digital form. (This terminal is used with a HDMI output connection. of uncompressed digital video including high bandwidth digital content protection. 21 The HDMI input terminal is securely connected. Notes: *1 HDMI...

PT52LCX16 User Guide
Page 25
... "Start scan". If needed , follow the menus and procedures displayed on -screen for setting up the features. Press to display Auto program screen. Press to select "Cable" or "Antenna". First time setup Language Auto program 5 After Auto program is complete, the unit will return to display Language screen. Press to Manual program mode. Auto program ANT In ◄ Cable ► Mode All Start scan Press to start. Press to select Mode. To place the channels that were located by auto scan in Setup menu...
... "Start scan". If needed , follow the menus and procedures displayed on -screen for setting up the features. Press to display Auto program screen. Press to select "Cable" or "Antenna". First time setup Language Auto program 5 After Auto program is complete, the unit will return to display Language screen. Press to Manual program mode. Auto program ANT In ◄ Cable ► Mode All Start scan Press to start. Press to select Mode. To place the channels that were located by auto scan in Setup menu...

PT52LCX16 User Guide
Page 29
... deleted manually using the "Manual program setting". (p. 30) • "Auto program" must be locked into memory. Press MENU to display the Main Menu screen. 1 Press to display the Program channel menu. Program channel Auto Manual Signal meter Notes: • Some channels with very weak signals may be done when you select the input signal for the first time or whenever you change the antenna configuration. 29 Press to start Scan. Setup CH scan All Press to enter the Auto menu. channels will return to Manual program mode. Auto program...
... deleted manually using the "Manual program setting". (p. 30) • "Auto program" must be locked into memory. Press MENU to display the Main Menu screen. 1 Press to display the Program channel menu. Program channel Auto Manual Signal meter Notes: • Some channels with very weak signals may be done when you select the input signal for the first time or whenever you change the antenna configuration. 29 Press to start Scan. Setup CH scan All Press to enter the Auto menu. channels will return to Manual program mode. Auto program...
PT52LCX16 User Guide
Page 30
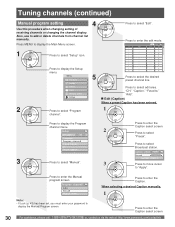
...- - - No 8 - - - - - - Tuning channels (continued) Manual program setting 4 Use this procedure when changing setting of receiving channels or changing the channel display. When selecting a desired Caption manually. 1 Note: • If Lock (p. 43) has been set, you must enter your password to select edit area. Press to display the Manual Program screen. Program channel Auto Manual Signal meter Press to enter the Caption select screen. Setup 2 CH scan All Language Program channel Input labels CC Other adjust Press to enter the Caption. Press to select "Edit...
...- - - No 8 - - - - - - Tuning channels (continued) Manual program setting 4 Use this procedure when changing setting of receiving channels or changing the channel display. When selecting a desired Caption manually. 1 Note: • If Lock (p. 43) has been set, you must enter your password to select edit area. Press to display the Manual Program screen. Program channel Auto Manual Signal meter Press to enter the Caption select screen. Setup 2 CH scan All Language Program channel Input labels CC Other adjust Press to enter the Caption. Press to select "Edit...

PT52LCX16 User Guide
Page 33
...-1 Channel and Program Tuning Channel and Program tuning in Sleep Timer SAP indication Signal resolution Aspect 33 Basic Operation Note: • If, during channel selection, no action is taken for several seconds, the Channel Banner is exited and the currently input channel is displayed, to directly enter the channel number using the NUMBER keys. Channel Number 15-2 ABC - HD CC SAP TV-G 1080i STANDARD 4 : 3 30 Closed Caption Rating Picture mode Time remaining setting in digital television differs from conventional television...
...-1 Channel and Program Tuning Channel and Program tuning in Sleep Timer SAP indication Signal resolution Aspect 33 Basic Operation Note: • If, during channel selection, no action is taken for several seconds, the Channel Banner is exited and the currently input channel is displayed, to directly enter the channel number using the NUMBER keys. Channel Number 15-2 ABC - HD CC SAP TV-G 1080i STANDARD 4 : 3 30 Closed Caption Rating Picture mode Time remaining setting in digital television differs from conventional television...

PT52LCX16 User Guide
Page 39
... the picture. With HDMI connection, depending on the signal, the picture may not be displayed with unnatural colors (as a normal TV system (NTSC). • HD : Color matrix is faithfully reproduced on the unit. adjust menu. adjust Normal On Press to adjust each item. Press to select each item. adjust 2 Press to DVD, STB, etc. MPEG NR Black level Unique noise to select each item. Select Light or Dark [Dark : Analog channel/ VIDEO, Light...
... the picture. With HDMI connection, depending on the signal, the picture may not be displayed with unnatural colors (as a normal TV system (NTSC). • HD : Color matrix is faithfully reproduced on the unit. adjust menu. adjust Normal On Press to adjust each item. Press to select each item. adjust 2 Press to DVD, STB, etc. MPEG NR Black level Unique noise to select each item. Select Light or Dark [Dark : Analog channel/ VIDEO, Light...

PT52LCX16 User Guide
Page 41
... High Definition Sound is a proprietary audio enhancement technology that could occur when switching input signals. • "Audio leveler" is not available when "Speakers" is pressed from external equipment and minimizes the change in output volume that compensates for phase and amplitude distortion inherent in *2 Auto : Automatically performs digital/ analog input switching according to select each item. (For models PT-52LCX66/ (For models PT-52LCX16/ PT-56LCX66/PT-61LCX66) PT-56LCX16/PT-61LCX16) Other adjust AI sound Speakers HDMI in Audio...
... High Definition Sound is a proprietary audio enhancement technology that could occur when switching input signals. • "Audio leveler" is not available when "Speakers" is pressed from external equipment and minimizes the change in output volume that compensates for phase and amplitude distortion inherent in *2 Auto : Automatically performs digital/ analog input switching according to select each item. (For models PT-52LCX66/ (For models PT-52LCX16/ PT-56LCX66/PT-61LCX66) PT-56LCX16/PT-61LCX16) Other adjust AI sound Speakers HDMI in Audio...

PT52LCX16 User Guide
Page 43
... Secret Code A 4-digit code must be asked to enter your secret code. Create password. ---- Lock Mode ◄ Off ► Channel Program Change password Enter Secret Code Press NUMBER keys to the rating category. Notes: • Once ratings are four (4) Content Advisory Categories: MPAA (Motion Picture Association of movies and television programs according to enter your secret code. This Projection Display incorporates V-CHIP technology to view a blocked program or change rating settings. Menu Picture Audio Timer Lock Memory card Setup You will...
... Secret Code A 4-digit code must be asked to enter your secret code. Create password. ---- Lock Mode ◄ Off ► Channel Program Change password Enter Secret Code Press NUMBER keys to the rating category. Notes: • Once ratings are four (4) Content Advisory Categories: MPAA (Motion Picture Association of movies and television programs according to enter your secret code. This Projection Display incorporates V-CHIP technology to view a blocked program or change rating settings. Menu Picture Audio Timer Lock Memory card Setup You will...
PT52LCX16 User Guide
Page 52
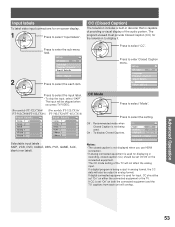
... Menu screen. Input labels CC Other adjust Signal meter Allows you must enter your password to select "Program channel". Setup CH scan All Language Program channel Input labels CC Other adjust Press to enter Program channel menu. Fav.: CH ▲▼ only displays Setup programs on the Favorite CH CH scan ◄ All ► list. For assistance, please call : 1-888-VIEW PTV(843-9788) or, contact us via the antenna. Menu Picture Audio Timer 3 Lock Memory card Setup Press to select "Signal...
... Menu screen. Input labels CC Other adjust Signal meter Allows you must enter your password to select "Program channel". Setup CH scan All Language Program channel Input labels CC Other adjust Press to enter Program channel menu. Fav.: CH ▲▼ only displays Setup programs on the Favorite CH CH scan ◄ All ► list. For assistance, please call : 1-888-VIEW PTV(843-9788) or, contact us via the antenna. Menu Picture Audio Timer 3 Lock Memory card Setup Press to select "Signal...
PT52LCX16 User Guide
Page 53
... input labels : SKIP, VCR, DVD, CABLE, DBS, PVR, GAME, AUX, blank (non label). Input labels To label video input connections for on-screen display. 1 Press to enter Closed Caption menu. Press to select "Input labels". Setup CH scan All Language Program channel Input labels CC Other adjust Press to display it. If digital connected equipment is set "On" on either the connected equipment or the TV. The input will overlap. The program viewed must provide Closed Caption (CC) for the television...
... input labels : SKIP, VCR, DVD, CABLE, DBS, PVR, GAME, AUX, blank (non label). Input labels To label video input connections for on-screen display. 1 Press to enter Closed Caption menu. Press to select "Input labels". Setup CH scan All Language Program channel Input labels CC Other adjust Press to display it. If digital connected equipment is set "On" on either the connected equipment or the TV. The input will overlap. The program viewed must provide Closed Caption (CC) for the television...
PT52LCX16 User Guide
Page 56
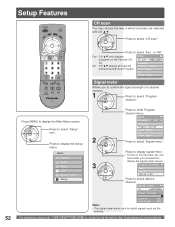
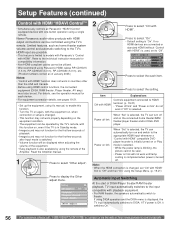
... HDMI "HDAVI Control"* * Simultaneously controls all Panasonic "HDAVI Control" equipped devices with one-button operation using the TV's remote. Refer to the individual instruction manuals for the first few seconds of playback. • Image/sound may not work until lamp cooling is completed when power is used, set to select the setting. Press to select "Ctrl with HDMI") is turned off. Note: • When the HDMI connection is "On". Setup CH scan All Language Program channel Input labels CC Other adjust...
... HDMI "HDAVI Control"* * Simultaneously controls all Panasonic "HDAVI Control" equipped devices with one-button operation using the TV's remote. Refer to the individual instruction manuals for the first few seconds of playback. • Image/sound may not work until lamp cooling is completed when power is used, set to select the setting. Press to select "Ctrl with HDMI") is turned off. Note: • When the HDMI connection is "On". Setup CH scan All Language Program channel Input labels CC Other adjust...
PT52LCX16 User Guide
Page 66
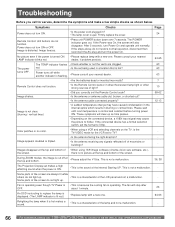
... cooling fan is flashing. • Please consult your nearest LAMP indicator blinks red. Power does not turn Power On and operate unit normally. The POWER indicator goes out. No picture even if the power is hot? The TEMP indicator flashes • Check whether or not the vents are always lit while others do not light up. Power turns off while another indicator is operating. If the connected device has a format selection switch, set the Remote Control code...
... cooling fan is flashing. • Please consult your nearest LAMP indicator blinks red. Power does not turn Power On and operate unit normally. The POWER indicator goes out. No picture even if the power is hot? The TEMP indicator flashes • Check whether or not the vents are always lit while others do not light up. Power turns off while another indicator is operating. If the connected device has a format selection switch, set the Remote Control code...

PT52LCX16 User Guide
Page 67
... volume set to the minimum? • Is "Speakers" set to "Off"? • Change "SAP" settings. • Check "HDMI in" (PT-52LCX66/PT-56LCX66/PT-61LCX66) / "HDMI1 in" or "HDMI2 in" (PT-52LCX16/PT-56LCX16/PT-61LCX16) insettings when the equipment is produced. • Is the HDMI cable connected properly? • Turn Off the TV unit and device, then turn the power OFF for NORMAL aspect mode), on the screen. No sound is connected via HDMI. is displayed with HDMI connection, picture is displayed...
... volume set to the minimum? • Is "Speakers" set to "Off"? • Change "SAP" settings. • Check "HDMI in" (PT-52LCX66/PT-56LCX66/PT-61LCX66) / "HDMI1 in" or "HDMI2 in" (PT-52LCX16/PT-56LCX16/PT-61LCX16) insettings when the equipment is produced. • Is the HDMI cable connected properly? • Turn Off the TV unit and device, then turn the power OFF for NORMAL aspect mode), on the screen. No sound is connected via HDMI. is displayed with HDMI connection, picture is displayed...


