Lcd Projector
Page 2
... power supplies up to 125 V, 7 A. You should be read these instructions completely and save this booklet with the projector as it provides details, which will enable you will need to use higher voltages or currents than this, you use of your Panasonic LCD projector. The exclamation point within the product's enclosure that contains mercury. Dispose may result. The serial number of projectors. Model number: PT-AE2000U Serial number: WARNING...
... power supplies up to 125 V, 7 A. You should be read these instructions completely and save this booklet with the projector as it provides details, which will enable you will need to use higher voltages or currents than this, you use of your Panasonic LCD projector. The exclamation point within the product's enclosure that contains mercury. Dispose may result. The serial number of projectors. Model number: PT-AE2000U Serial number: WARNING...

Lcd Projector
Page 3
... limits for a Class B digital device, pursuant to Part 15 of Electronic Computer/Data Processing Equipment, ANSI/NFPA 75. These limits are designed to radio communications. Consult the dealer or an experienced radio/TV technician for external control of Panasonic Marketing Europe GmbH Winsbergring 15, 22525 Hamburg, F.R. Germany WARNING: Not for use serial port to connect PC for help. Operation is no guarantee...
... limits for a Class B digital device, pursuant to Part 15 of Electronic Computer/Data Processing Equipment, ANSI/NFPA 75. These limits are designed to radio communications. Consult the dealer or an experienced radio/TV technician for external control of Panasonic Marketing Europe GmbH Winsbergring 15, 22525 Hamburg, F.R. Germany WARNING: Not for use serial port to connect PC for help. Operation is no guarantee...

Lcd Projector
Page 4
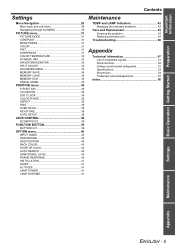
... focus and zoom 25 Switching the picture mode 25 Adjusting the image 25 Switching off the projector automatically 25 Setting your projector See "Setting up 14 Screen size and throw distance 14 Projection method 15 Front leg adjusters and throwing angle 15 Lens shift and positioning 16 Connections 18 Before connecting to the projector 18 Connecting to COMPONENT IN/VIDEO IN/S-VIDEO IN ....18 Connecting to safety 6 WARNINGS 6 CAUTIONS 8 Cautions when transporting 9 Cautions when installing 9 Cautions on use...
... focus and zoom 25 Switching the picture mode 25 Adjusting the image 25 Switching off the projector automatically 25 Setting your projector See "Setting up 14 Screen size and throw distance 14 Projection method 15 Front leg adjusters and throwing angle 15 Lens shift and positioning 16 Connections 18 Before connecting to the projector 18 Connecting to COMPONENT IN/VIDEO IN/S-VIDEO IN ....18 Connecting to safety 6 WARNINGS 6 CAUTIONS 8 Cautions when transporting 9 Cautions when installing 9 Cautions on use...
Lcd Projector
Page 5
... LENS CONTROL 39 ZOOM/FOCUS 39 FUNCTION BUTTON 39 BUTTON1/2/3 39 OPTION menu 40 INPUT GUIDE 40 OSD DESIGN 40 OSD POSITION 40 BACK COLOR 40 STARTUP LOGO 40 AUTO SEARCH 40 HDMI SIGNAL LEVEL 40 FRAME RESPONSE 40 INSTALLATION 41 SLEEP 41 ALTITUDE 41 LAMP POWER 41 LAMP RUNTIME 41 Contents Maintenance TEMP and LAMP Indicators 42 Managing the indicated problems 42 Care and Replacement 43 Cleaning the projector 43 Replacing the lamp unit 44 Troubleshooting...
... LENS CONTROL 39 ZOOM/FOCUS 39 FUNCTION BUTTON 39 BUTTON1/2/3 39 OPTION menu 40 INPUT GUIDE 40 OSD DESIGN 40 OSD POSITION 40 BACK COLOR 40 STARTUP LOGO 40 AUTO SEARCH 40 HDMI SIGNAL LEVEL 40 FRAME RESPONSE 40 INSTALLATION 41 SLEEP 41 ALTITUDE 41 LAMP POWER 41 LAMP RUNTIME 41 Contents Maintenance TEMP and LAMP Indicators 42 Managing the indicated problems 42 Care and Replacement 43 Cleaning the projector 43 Replacing the lamp unit 44 Troubleshooting...

Lcd Projector
Page 9
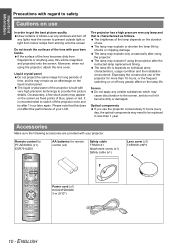
... Authorized Service Center to clean inside of the projector before the season for the safety cable installation. If dust is a good idea to purchase the separate installation kit (Model No. See "ALTITUDE" on page 42. Please discuss with the lens cover when transporting the projector. The projector lens need to clean the inside the projector at high elevations (above 1 400 m), set up in fire or problems with operation...
... Authorized Service Center to clean inside of the projector before the season for the safety cable installation. If dust is a good idea to purchase the separate installation kit (Model No. See "ALTITUDE" on page 42. Please discuss with the lens cover when transporting the projector. The projector lens need to clean the inside the projector at high elevations (above 1 400 m), set up in fire or problems with operation...
Lcd Projector
Page 10
... LCD. Remote control for PT-AE2000U (x1) EUR7914Z60 AA batteries for long periods of time, as this will be replaced in less than 10 hours, or the frequent switching on or off may greatly affect on individual lamp characteristics, usage condition and the installation environment. Liquid crystal panel Do not project the same image for remote control (x2) Safety cable TTRA0141 Attachment screw (x1) Safety cable (x1) Lens cover (x1) TXFKK01VKF5 Power cord...
... LCD. Remote control for PT-AE2000U (x1) EUR7914Z60 AA batteries for long periods of time, as this will be replaced in less than 10 hours, or the frequent switching on or off may greatly affect on individual lamp characteristics, usage condition and the installation environment. Liquid crystal panel Do not project the same image for remote control (x2) Safety cable TTRA0141 Attachment screw (x1) Safety cable (x1) Lens cover (x1) TXFKK01VKF5 Power cord...
Lcd Projector
Page 11
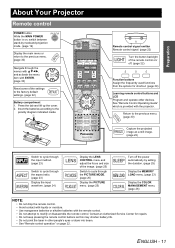
... the PICTURE MODE. (page 25) Display the PICTURE menu. (page 25) Turn off . (page 22) Function buttons Assign the frequently used functions from the options for repairs. • Do not keep pressing the remote control buttons as a still image. (page 22) Switch to cycle through the input method. (page 23) Switch to cycle through the aspect ratio. (page 23) Display the input waveform. (page 24) Display the LENS CONTROL menu and adjust the focus and size...
... the PICTURE MODE. (page 25) Display the PICTURE menu. (page 25) Turn off . (page 22) Function buttons Assign the frequently used functions from the options for repairs. • Do not keep pressing the remote control buttons as a still image. (page 22) Switch to cycle through the input method. (page 23) Switch to cycle through the aspect ratio. (page 23) Display the input waveform. (page 24) Display the LENS CONTROL menu and adjust the focus and size...

Lcd Projector
Page 19
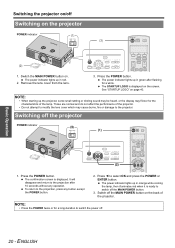
... a while. The POWER button is switched off and the projector is switched off or unplug the power cord. • The electric consumption in standby. Switching the projector on the side of the projector. NOTE: • Do not use other than the provided power cord. • Ensure all the way in use. Connect the power cord to project. POWER indicator POWER indicator Indicator status No illumination or flashing Red Lit Green Flashing Lit Orange Lit Flashing Status The MAIN POWER button is cooling the lamp. NOTE...
... a while. The POWER button is switched off and the projector is switched off or unplug the power cord. • The electric consumption in standby. Switching the projector on the side of the projector. NOTE: • Do not use other than the provided power cord. • Ensure all the way in use. Connect the power cord to project. POWER indicator POWER indicator Indicator status No illumination or flashing Red Lit Green Flashing Lit Orange Lit Flashing Status The MAIN POWER button is cooling the lamp. NOTE...
Lcd Projector
Page 20
... button except the POWER button. 2. NOTE: • When starting up in red. 2. The power indicator lights up the projector, some small rattling or tinkling sound may be heard, or the display may cause burns, fire or damage to the projection, press any operation. The power indicator lights up in orange while cooling the lamp, then illuminates red when it is displayed on the screen. To return to the projector. Switch off the MAIN POWER button...
... button except the POWER button. 2. NOTE: • When starting up in red. 2. The power indicator lights up the projector, some small rattling or tinkling sound may be heard, or the display may cause burns, fire or damage to the projection, press any operation. The power indicator lights up in orange while cooling the lamp, then illuminates red when it is displayed on the screen. To return to the projector. Switch off the MAIN POWER button...
Lcd Projector
Page 21
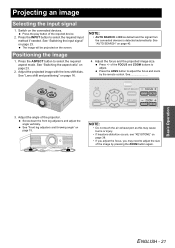
... "Lens shift and positioning" on page 23. See 3. See "Switching the input signal" on page 16. Press the ASPECT button to adjust the size of the FOCUS and ZOOM buttons to adjust the focus and zoom by pressing the ZOOM button again. Press +/- See "AUTO SEARCH" on the connected devices. Adjust the angle of the required device. 2. NOTE: • Do not touch the air exhaust port as default and the signal from...
... "Lens shift and positioning" on page 23. See 3. See "Switching the input signal" on page 16. Press the ASPECT button to adjust the size of the FOCUS and ZOOM buttons to adjust the focus and zoom by pressing the ZOOM button again. Press +/- See "AUTO SEARCH" on the connected devices. Adjust the angle of the required device. 2. NOTE: • Do not touch the air exhaust port as default and the signal from...
Lcd Projector
Page 25
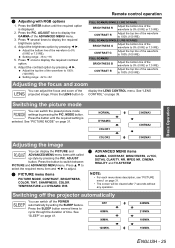
... or 7.5 IRE). Press G several times to cycle through the duration of the waveform to select the required menu item and I H. Setting range: -16 to display the required contrast option. 6. Press G once to +16 5. See "LENS projected image. MODE button. ADJUST button. Press F G to 100% (100 IRE) Adjusting the focus and zoom You can switch the preset picture mode settings by pressing the PIC. Setting range: -32 to +32 FULL...
... or 7.5 IRE). Press G several times to cycle through the duration of the waveform to select the required menu item and I H. Setting range: -16 to display the required contrast option. 6. Press G once to +16 5. See "LENS projected image. MODE button. ADJUST button. Press F G to 100% (100 IRE) Adjusting the focus and zoom You can switch the preset picture mode settings by pressing the PIC. Setting range: -32 to +32 FULL...
Lcd Projector
Page 26
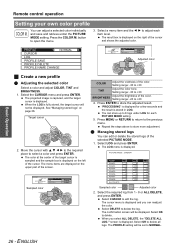
... NORMAL CURSOR LOG PROFILE SAVE PROFILE DELETE PROFILE NAME CHANGE CURSOR RETURN SELECT ENTER DEFAULT COLOR TINT BRIGHTNESS Adjusted color J Create a new profile Q Adjusting the selected color Select a color and adjust COLOR, TINT and BRIGHTNESS. 1. Move the cursor with F G I H to open the menu. 3. Setting range: -20 to the previous menu. Basic Operation Remote control operation Setting your own color profile You can readjust the color. button to adjust each PICTURE MODE setting. 5. Select LOG and press ENTER.
... NORMAL CURSOR LOG PROFILE SAVE PROFILE DELETE PROFILE NAME CHANGE CURSOR RETURN SELECT ENTER DEFAULT COLOR TINT BRIGHTNESS Adjusted color J Create a new profile Q Adjusting the selected color Select a color and adjust COLOR, TINT and BRIGHTNESS. 1. Move the cursor with F G I H to open the menu. 3. Setting range: -20 to the previous menu. Basic Operation Remote control operation Setting your own color profile You can readjust the color. button to adjust each PICTURE MODE setting. 5. Select LOG and press ENTER.
Lcd Projector
Page 27
... screen will be displayed. • If you switch the input signal before you save the profile, the setting will be adjusted at the same time. Basic Operation Q Saving a log setting as a profile Return to the COLOR MANAGEMENT menu and save the profile as USER1, USER2 and USER3. You can save the stored log as you finish the text line. Use F G I H to specify the location...
... screen will be displayed. • If you switch the input signal before you save the profile, the setting will be adjusted at the same time. Basic Operation Q Saving a log setting as a profile Return to the COLOR MANAGEMENT menu and save the profile as USER1, USER2 and USER3. You can save the stored log as you finish the text line. Use F G I H to specify the location...
Lcd Projector
Page 32
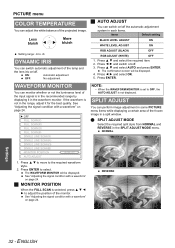
... the projected image. Q SPLIT ADJUST MODE Select the required split style from NORMAL and REVERSE in the range, adjust it in the waveform monitor. PICTURE menu COLOR TEMPERATURE You can adjust the white balance of the frozen image in a split window. The confirmation screen will be displayed. 4. NOTE: • When the WAVEFORM MONITOR is set to +6 DYNAMIC IRIS You can switch automatic adjustment of the lamp and the lens iris...
... the projected image. Q SPLIT ADJUST MODE Select the required split style from NORMAL and REVERSE in the range, adjust it in the waveform monitor. PICTURE menu COLOR TEMPERATURE You can adjust the white balance of the frozen image in a split window. The confirmation screen will be displayed. 4. NOTE: • When the WAVEFORM MONITOR is set to +6 DYNAMIC IRIS You can switch automatic adjustment of the lamp and the lens iris...
Lcd Projector
Page 34
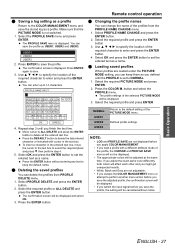
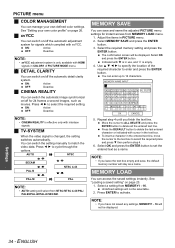
ON: Active OFF: Deactive NOTE: • xvYCC adjustment system is changed, the setting switches automatically. Press I H to specify the location of PICTURE MODE menu. Select OK and press the ENTER button. Use F G I H to 16 characters. Repeat step 4 until you leave the text box empty and save and name the adjusted PICTURE menu settings for instant access from MEMORY1 - 16. NOTE: • If you finish the...
ON: Active OFF: Deactive NOTE: • xvYCC adjustment system is changed, the setting switches automatically. Press I H to specify the location of PICTURE MODE menu. Select OK and press the ENTER button. Use F G I H to 16 characters. Repeat step 4 until you leave the text box empty and save and name the adjusted PICTURE menu settings for instant access from MEMORY1 - 16. NOTE: • If you finish the...

Lcd Projector
Page 42
.... Turn on again before the lamp unit is abnormally high. The MAIN POWER is too high. The lamp circuit failure, The lamp unit is poor. Reinstall the projector in the proper method. Replace the air filter in temperature controlled place. The projector is damaged. See page 41. J LAMP indicator Indicator Illuminating red Flashing red Problem Cause Remedy LAMP RUNTIME has reached 1 800 hours. The lamp circuit failure, abnormal function or lamp unit is located at high elevations (above 1 400 m). Remove...
.... Turn on again before the lamp unit is abnormally high. The MAIN POWER is too high. The lamp circuit failure, The lamp unit is poor. Reinstall the projector in the proper method. Replace the air filter in temperature controlled place. The projector is damaged. See page 41. J LAMP indicator Indicator Illuminating red Flashing red Problem Cause Remedy LAMP RUNTIME has reached 1 800 hours. The lamp circuit failure, abnormal function or lamp unit is located at high elevations (above 1 400 m). Remove...
Lcd Projector
Page 44
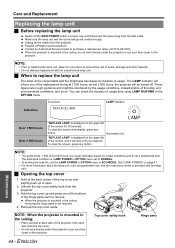
... mounted in the ceiling, removing the hinge parts is : LAMP POWER in OPTION menu set to NORMAL. • To prolong the lamp life, set the LAMP POWER in OPTION menu to the projector. Remove the top cover aside. You can check the duration of the projector, then open . 2. On screen LAMP indicator Indication REPLACE LAMP Maintenance Over 1 800 hours Over 2 000 hours "REPLACE LAMP" is displayed on page 41. • For more information about the lamp unit, such as guaranteed time, see the instructions...
... mounted in the ceiling, removing the hinge parts is : LAMP POWER in OPTION menu set to NORMAL. • To prolong the lamp life, set the LAMP POWER in OPTION menu to the projector. Remove the top cover aside. You can check the duration of the projector, then open . 2. On screen LAMP indicator Indication REPLACE LAMP Maintenance Over 1 800 hours Over 2 000 hours "REPLACE LAMP" is displayed on page 41. • For more information about the lamp unit, such as guaranteed time, see the instructions...

Lcd Projector
Page 45
... hours (when LAMP POWER has been set to operate so that the direction of operation. The resetting procedure should thus be turned on . Connect the power cord to reset the duration 5. Hold the handle of the LAMP RUNTIME. 9. J Attaching the top cover Press here Press here 1. If they are sharpened and may cause the protection circuit to NORMAL), the projector will be displayed and 3. Switch off the POWER button...
... hours (when LAMP POWER has been set to operate so that the direction of operation. The resetting procedure should thus be turned on . Connect the power cord to reset the duration 5. Hold the handle of the LAMP RUNTIME. 9. J Attaching the top cover Press here Press here 1. If they are sharpened and may cause the protection circuit to NORMAL), the projector will be displayed and 3. Switch off the POWER button...
Lcd Projector
Page 46
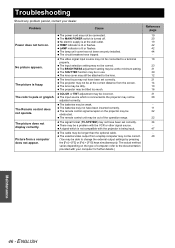
... or flashes. The circuit breakers have been set correctly. The lens focus may be a problem with your dealer. The batteries may not be weak. The remote control signal receptor on . Problem Cause Power does not turn on the projector may not have been set correctly. TEMP indicator is turned off. LAMP indicator is at the minimum setting. The lamp unit cover has not been securely installed. The video signal input source may be connected to the projector may...
... or flashes. The circuit breakers have been set correctly. The lens focus may be a problem with your dealer. The batteries may not be weak. The remote control signal receptor on . Problem Cause Power does not turn on the projector may not have been set correctly. TEMP indicator is turned off. LAMP indicator is at the minimum setting. The lamp unit cover has not been securely installed. The video signal input source may be connected to the projector may...
Lcd Projector
Page 57
... Remote control button 11 Remote control function 25 Specifications 52 SPLIT ADJUST 32 STARTUP LOGO 40 S-VIDEO IN Connection 18 Terminal 13 T Technical Information 47 TEMP Indicator 12 Indicator status 42 Throw distance 14 Throwing angle 15 TINT 31 Top cover 13, 44 Troubleshooting 46 TV-SYSTEM 34 V VIDEO IN Connection 18 Terminal 13 V-POSITION 36 W WAVEFORM Remote control button 11 Remote control function 24 WAVEFORM MONITOR 32 WSS 38 X xvYCC 34 Z ZOOM Control panel button 12 LENS CONTROL menu...
... Remote control button 11 Remote control function 25 Specifications 52 SPLIT ADJUST 32 STARTUP LOGO 40 S-VIDEO IN Connection 18 Terminal 13 T Technical Information 47 TEMP Indicator 12 Indicator status 42 Throw distance 14 Throwing angle 15 TINT 31 Top cover 13, 44 Troubleshooting 46 TV-SYSTEM 34 V VIDEO IN Connection 18 Terminal 13 V-POSITION 36 W WAVEFORM Remote control button 11 Remote control function 24 WAVEFORM MONITOR 32 WSS 38 X xvYCC 34 Z ZOOM Control panel button 12 LENS CONTROL menu...


