

Operating Instructions
Page 1
PT-DZ6710U PT-DZ6700U PT-DW6300U PT-D6000U STANDBY(RED)/ ON(GREEN) LAMP TEMP FILTER Before operating this product, please read the instructions carefully and save this manual for future use with multiple models of DZ6710 series, DZ6700 series, DW6300 series and D6000 series. The information of these instructions are shared use . TQBJ0295 ENGLISH Operating Instructions DLP™Based Projector Commercial Use Model No.
PT-DZ6710U PT-DZ6700U PT-DW6300U PT-D6000U STANDBY(RED)/ ON(GREEN) LAMP TEMP FILTER Before operating this product, please read the instructions carefully and save this manual for future use with multiple models of DZ6710 series, DZ6700 series, DW6300 series and D6000 series. The information of these instructions are shared use . TQBJ0295 ENGLISH Operating Instructions DLP™Based Projector Commercial Use Model No.

Operating Instructions
Page 3
...devices. ENGLISH - 3 Important Information Important Safety Notice NOTICE: A This product has a High Intensity Discharge (HID) lamp that interference will not occur in the building installation wiring. Connect the equipment into an outlet on , the user is...Declaration of Conformity Model Number: PT-DZ6710U/PT-DZ6700U/PT-DW6300U/PT-D6000U Trade Name: Panasonic Responsible party: Panasonic Corporation of North America Address: One Panasonic Way, Secaucus, New Jersey 07094 Telephone number: (888) 411 - 1996 E-mail: projectorsupport@us.panasonic.com This device complies with ...
...devices. ENGLISH - 3 Important Information Important Safety Notice NOTICE: A This product has a High Intensity Discharge (HID) lamp that interference will not occur in the building installation wiring. Connect the equipment into an outlet on , the user is...Declaration of Conformity Model Number: PT-DZ6710U/PT-DZ6700U/PT-DW6300U/PT-D6000U Trade Name: Panasonic Responsible party: Panasonic Corporation of North America Address: One Panasonic Way, Secaucus, New Jersey 07094 Telephone number: (888) 411 - 1996 E-mail: projectorsupport@us.panasonic.com This device complies with ...

Operating Instructions
Page 5
... control See "Remote control" on page 19. Important Information Important Safety Notice 2 Precautions with the projector. 3. Start projecting See "Projecting" on page 14. Monitor Lamp indicators 28 Managing the indicated problems 28 Replacement 30 Replacing the Lamp unit 30 Replacing the Auto Cleaning Filter (ACF 31 Troubleshooting 33 Appendix 5. Adjust the image See...
... control See "Remote control" on page 19. Important Information Important Safety Notice 2 Precautions with the projector. 3. Start projecting See "Projecting" on page 14. Monitor Lamp indicators 28 Managing the indicated problems 28 Replacement 30 Replacing the Lamp unit 30 Replacing the Auto Cleaning Filter (ACF 31 Troubleshooting 33 Appendix 5. Adjust the image See...

Operating Instructions
Page 7
...deterioration may cause the falling down . If you look into the lens while the projector is being used . During a thunderstorm, do not touch the projector or the cable. Do not place your skin. Before replacing the lamp, be carried out by suffocation if swallowed. If you get the leaked liquid ... may occur. If you touch the leaked liquid, it may result. After removing the battery from the projector's lens. The battery can result. Heated air comes out of the lamp should be sure to disconnect the power plug from falling down of each other batteries, it can cause ...
...deterioration may cause the falling down . If you look into the lens while the projector is being used . During a thunderstorm, do not touch the projector or the cable. Do not place your skin. Before replacing the lamp, be carried out by suffocation if swallowed. If you get the leaked liquid ... may occur. If you touch the leaked liquid, it may result. After removing the battery from the projector's lens. The battery can result. Heated air comes out of the lamp should be sure to disconnect the power plug from falling down of each other batteries, it can cause ...

Operating Instructions
Page 8
...plug from the wall outlet and remove the batteries from the remote control promptly. The lamp section may result. Do not put your face close to the broken pieces. Be especially careful not to clean the projector when required. Electric shocks can result if this may result in the remote control ... the season for an extended period of the battery compartment and surrounding area may result. Do not use the old lamp unit. Do not set up the projector in a high temperature environment, such as near a heater or in damage or injury. Do not place any cleaning. If dust builds up on ...
...plug from the wall outlet and remove the batteries from the remote control promptly. The lamp section may result. Do not put your face close to the broken pieces. Be especially careful not to clean the projector when required. Electric shocks can result if this may result in the remote control ... the season for an extended period of the battery compartment and surrounding area may result. Do not use the old lamp unit. Do not set up the projector in a high temperature environment, such as near a heater or in damage or injury. Do not place any cleaning. If dust builds up on ...

Operating Instructions
Page 9
...equipment in malfunctions or the life of the lamp or the other nearby equipment. Failure to electromagnetic interference. Failure to prevent outside light or light from indoor lamps from fingerprints or anything else, this may damage the projector. Cautions on page 28. If the surface...surfaces of the lens or the front glass with your dealer or a recycling company. The life of the lamp may be turned off . If installing the projector to the ceiling, ask a qualified technician to vibration or shocks. Important Information Precautions with regard to always remove...
...equipment in malfunctions or the life of the lamp or the other nearby equipment. Failure to electromagnetic interference. Failure to prevent outside light or light from indoor lamps from fingerprints or anything else, this may damage the projector. Cautions on page 28. If the surface...surfaces of the lens or the front glass with your dealer or a recycling company. The life of the lamp may be turned off . If installing the projector to the ceiling, ask a qualified technician to vibration or shocks. Important Information Precautions with regard to always remove...

Operating Instructions
Page 10
.... The Authorized Service Center will never ask you use . The lamp may explode or shorten the lamp life by firewall or others. DLP chips The DLP chips are made using the projector after using the projector. Important Information Precautions with anyone else from using the projector by an untrusted third party. Optical components If you for disposal...
.... The Authorized Service Center will never ask you use . The lamp may explode or shorten the lamp life by firewall or others. DLP chips The DLP chips are made using the projector after using the projector. Important Information Precautions with anyone else from using the projector by an untrusted third party. Optical components If you for disposal...

Operating Instructions
Page 12
...Projector Projector body J Top, front and bottom view Indicators Power indicator Lamp1 (LAMP1) indicator (page 28) Lamp2 (LAMP2) indicator (page 28) Temperature (TEMP) indicator (page 28) Filter (FILTER) indicator (page 29) STANDBY(RED)/ ON(GREEN) LAMP TEMP FILTER Lamp unit compartment (page 30) Air exhaust port STANDBY(RED)/ ON(GREEN) LAMP... attached to protect the lens. Input select buttons These buttons select the RGB1, RGB2, DVI-D, VIDEO, S-VIDEO and SDI (PT-DZ6710U only) terminals. (page 19) MENU button Displays and clears the main menu, and returns to the previous menu when the...
...Projector Projector body J Top, front and bottom view Indicators Power indicator Lamp1 (LAMP1) indicator (page 28) Lamp2 (LAMP2) indicator (page 28) Temperature (TEMP) indicator (page 28) Filter (FILTER) indicator (page 29) STANDBY(RED)/ ON(GREEN) LAMP TEMP FILTER Lamp unit compartment (page 30) Air exhaust port STANDBY(RED)/ ON(GREEN) LAMP... attached to protect the lens. Input select buttons These buttons select the RGB1, RGB2, DVI-D, VIDEO, S-VIDEO and SDI (PT-DZ6710U only) terminals. (page 19) MENU button Displays and clears the main menu, and returns to the previous menu when the...

Operating Instructions
Page 19
...be displayed with the front leg adjusters. 5. The power indicator lamp on the screen. POWER ON button J Making adjustment and selection It is low and warm-up for 3 seconds or more than 5 minutes, the projector will judge that a problem has occurred and the power will enter... AC IN terminal 4. INPUT SELECT buttons Basic Operation . When the warm-up is completed, the temperature monitor (TEMP) lamp turns off and the image is projected on that the projector be turned off automatically. Press F G I H to start projection. After a short period, the indicator will illuminate ...
...be displayed with the front leg adjusters. 5. The power indicator lamp on the screen. POWER ON button J Making adjustment and selection It is low and warm-up for 3 seconds or more than 5 minutes, the projector will judge that a problem has occurred and the power will enter... AC IN terminal 4. INPUT SELECT buttons Basic Operation . When the warm-up is completed, the temperature monitor (TEMP) lamp turns off and the image is projected on that the projector be turned off automatically. Press F G I H to start projection. After a short period, the indicator will illuminate ...

Operating Instructions
Page 20
...; While the cooling fan is operating, do not place the projector inside a box or bag. NOTE: • The home position for the lamp to adjust the projection position in the ranges shown in the focus. Q PT-DZ6710U/PT-DZ6700U/PT-D6000U Standard projection position NOTE: • In the cooling state... after the power is turned on the projector or SHIFT button of the screen. Failure ...
...; While the cooling fan is operating, do not place the projector inside a box or bag. NOTE: • The home position for the lamp to adjust the projection position in the ranges shown in the focus. Q PT-DZ6710U/PT-DZ6700U/PT-D6000U Standard projection position NOTE: • In the cooling state... after the power is turned on the projector or SHIFT button of the screen. Failure ...

Operating Instructions
Page 25
...COLOR BLACK LOGO1 BLUE LOGO2 STARTUP LOGO LOGO2 LOGO1 NONE FREEZE SIDE BY SIDE VIDEO RGB1 DVI-D OFF S-VIDEO RGB2 SDI PROJECTOR SETUP PROJECTOR ID ALL 1 - 64 Menu Navigation INSTALLATION FRONT/FLOOR FRONT/CEILING REAR/FLOOR REAR/CEILING HIGH ALTITUDE MODE OFF ON COOLING... CONDITION FLOOR SETTING VERTICAL DOWN SETTING CEILING SETTING VERTICAL UP SETTING LAMP SELECT DUAL LAMP1 LAMP RELAY SINGLE LAMP2 OFF LAMP POWER 00:00 - ...
...COLOR BLACK LOGO1 BLUE LOGO2 STARTUP LOGO LOGO2 LOGO1 NONE FREEZE SIDE BY SIDE VIDEO RGB1 DVI-D OFF S-VIDEO RGB2 SDI PROJECTOR SETUP PROJECTOR ID ALL 1 - 64 Menu Navigation INSTALLATION FRONT/FLOOR FRONT/CEILING REAR/FLOOR REAR/CEILING HIGH ALTITUDE MODE OFF ON COOLING... CONDITION FLOOR SETTING VERTICAL DOWN SETTING CEILING SETTING VERTICAL UP SETTING LAMP SELECT DUAL LAMP1 LAMP RELAY SINGLE LAMP2 OFF LAMP POWER 00:00 - ...

Operating Instructions
Page 28
... Lamp2 (LAMP2) indicator Temperature (TEMP) indicator Filter (FILTER) indicator STANDBY(RED)/ ON(GREEN) LAMP TEMP FILTER STANDBY(RED)/ ON(GREEN) LAMP TEMP FILTER If a problem should occur with the projector, the indicators will inform you turn on the power when • Wait about 5 minutes in... Was the temperature warning 20 % to replace the lamp unit. Maintenance ENGLISH - 28 power supply? • Check the lamp unit • Install the lamp unit. indication displayed? • Turn off the POWER switch of the projector in the correct way and confirm the indicator is ...
... Lamp2 (LAMP2) indicator Temperature (TEMP) indicator Filter (FILTER) indicator STANDBY(RED)/ ON(GREEN) LAMP TEMP FILTER STANDBY(RED)/ ON(GREEN) LAMP TEMP FILTER If a problem should occur with the projector, the indicators will inform you turn on the power when • Wait about 5 minutes in... Was the temperature warning 20 % to replace the lamp unit. Maintenance ENGLISH - 28 power supply? • Check the lamp unit • Install the lamp unit. indication displayed? • Turn off the POWER switch of the projector in the correct way and confirm the indicator is ...
Operating Instructions
Page 29
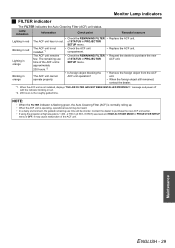
...Remove the foreign object from the ACF unit. • When the foreign object still remained, contact the dealer. *1. Maintenance ENGLISH - 29 Monitor Lamp indicators J FILTER indicator The FILTER indicates the Auto Cleaning Filter (ACF) unit status. The ACF unit has run out. message and power off ...• Request the dealer to purchase the new ACF unit earlier. • If using the projector at high elevations 1 400 - 2 700 m (4 593 - 8 858 ft) sea level and HIGH ALTITUDE MODE in PROJECTOR SETUP menu. NOTE: • When the FILTER indicator is flashing green, the Auto Cleaning Filter...
...Remove the foreign object from the ACF unit. • When the foreign object still remained, contact the dealer. *1. Maintenance ENGLISH - 29 Monitor Lamp indicators J FILTER indicator The FILTER indicates the Auto Cleaning Filter (ACF) unit status. The ACF unit has run out. message and power off ...• Request the dealer to purchase the new ACF unit earlier. • If using the projector at high elevations 1 400 - 2 700 m (4 593 - 8 858 ft) sea level and HIGH ALTITUDE MODE in PROJECTOR SETUP menu. NOTE: • When the FILTER indicator is flashing green, the Auto Cleaning Filter...

Operating Instructions
Page 30
...If you respond. NOTE: • The guide times, 1 800 and 2 000 hours, are rough estimates based on . When the projector is displayed on the upper left of the lamp unit, environmental conditions, and so on certain conditions and are not a guaranteed time. • For more than 1 hour and make sure... which is displayed on the ceiling, do not work directly under the projector or put your face closer to replacing the lamp unit, allow it cause the damage of usage. NOTE: • Prior to the projector. "REPLACE LAMP" is mounted on the upper left Lights in red of the replacement...
...If you respond. NOTE: • The guide times, 1 800 and 2 000 hours, are rough estimates based on . When the projector is displayed on the upper left of the lamp unit, environmental conditions, and so on certain conditions and are not a guaranteed time. • For more than 1 hour and make sure... which is displayed on the ceiling, do not work directly under the projector or put your face closer to replacing the lamp unit, allow it cause the damage of usage. NOTE: • Prior to the projector. "REPLACE LAMP" is mounted on the upper left Lights in red of the replacement...

Operating Instructions
Page 31
...Make sure the fan electric power connector of the replacement timing. Disconnect the power cord from the projector. Lamp unit cover fixing screw Replacement 4. Contact an Authorized Service Center to remove the 3 lamp unit fixing screws. 3. J When to attach securely. Hold the handle of STATUS in correct direction... product and effects on the back of the projector until it in PROJECTOR SETUP menu. Hold the handles of the projector in to replace the ACF The ACF unit is installed securely. 6. Lamp unit screws Handle 7. Slide the lamp unit cover to the buttons and pull to...
...Make sure the fan electric power connector of the replacement timing. Disconnect the power cord from the projector. Lamp unit cover fixing screw Replacement 4. Contact an Authorized Service Center to remove the 3 lamp unit fixing screws. 3. J When to attach securely. Hold the handle of STATUS in correct direction... product and effects on the back of the projector until it in PROJECTOR SETUP menu. Hold the handles of the projector in to replace the ACF The ACF unit is installed securely. 6. Lamp unit screws Handle 7. Slide the lamp unit cover to the buttons and pull to...

Operating Instructions
Page 33
... may have been set correctly. The input source which is being input. The input source which is not compatible with the projector is connected to the projector may not be incorrect setting. The picture does not display correctly. Reference page*1 18 20 20 28 28 31 - Maintenance... ENGLISH - 33 The lamp unit cover has not been securely installed. The lens focus may be longer than the optional cable. COLOR...
... may have been set correctly. The input source which is being input. The input source which is not compatible with the projector is connected to the projector may not be incorrect setting. The picture does not display correctly. Reference page*1 18 20 20 28 28 31 - Maintenance... ENGLISH - 33 The lamp unit cover has not been securely installed. The lens focus may be longer than the optional cable. COLOR...

Operating Instructions
Page 36
...PT-DZ6710U/PT-DZ6700U: 820 W • PT-DW6300U/PT-D6000U: 780 W During standby (when fan is stopped): Approx. 8 W*1 • PT-DZ6710U/PT-DZ6700U: 8 A • PT-DW6300U/PT-D6000U: 7.2 A • PT-DZ6710U/PT-DZ6700U: 0.67 type • PT-DW6300U: 0.65 type • PT-D6000U: 0.7 type • PT-DZ6710U/PT-DZ6700U/PT-DW6300U: 16 : 10 • PT-D6000U: 4:3 1 unit DLP™ chip, DLP™ type • PT-DZ6710U/PT... optional for the projectors that "L" follows in model number. UHM lamp (300 W) x 2 • PT-DZ6710U/PT-DZ6700U/ PT-DW6300U:6 000 lm (ANSI) • PT-D6000U: 6 500...
...PT-DZ6710U/PT-DZ6700U: 820 W • PT-DW6300U/PT-D6000U: 780 W During standby (when fan is stopped): Approx. 8 W*1 • PT-DZ6710U/PT-DZ6700U: 8 A • PT-DW6300U/PT-D6000U: 7.2 A • PT-DZ6710U/PT-DZ6700U: 0.67 type • PT-DW6300U: 0.65 type • PT-D6000U: 0.7 type • PT-DZ6710U/PT-DZ6700U/PT-DW6300U: 16 : 10 • PT-D6000U: 4:3 1 unit DLP™ chip, DLP™ type • PT-DZ6710U/PT... optional for the projectors that "L" follows in model number. UHM lamp (300 W) x 2 • PT-DZ6710U/PT-DZ6700U/ PT-DW6300U:6 000 lm (ANSI) • PT-D6000U: 6 500...

Operating Instructions
Page 37
...(6 - 29/32") 22.7 mm (-7/8") (not including surface projection parts) ET-PKD56H (High ceiling), ET-PKD55S (Low ceiling) Options Projection lens Lamp unit ET-DLE150, ET-DLE250, ET-DLE350, ET-DLE450, ET-DLE055 ET-LAD60 (1 bulb), ET-LAD60W (2 bulbs) ACF unit ET-ACF100 *1.... set , Mini DIN 4p Y: 1.0 V [p-p], C: 0.286 V [p-p], 75 Ω, compatible with ISO21118 international standards. *3. Each product has an individual variable in PROJECTOR SETUP menu is NORMAL: Approx. 8 W When STANDBY MODE in weight. Technical Information S-VIDEO IN VIDEO IN RGB 1 IN Terminals RGB 2 IN DVI-D IN 1...
...(6 - 29/32") 22.7 mm (-7/8") (not including surface projection parts) ET-PKD56H (High ceiling), ET-PKD55S (Low ceiling) Options Projection lens Lamp unit ET-DLE150, ET-DLE250, ET-DLE350, ET-DLE450, ET-DLE055 ET-LAD60 (1 bulb), ET-LAD60W (2 bulbs) ACF unit ET-ACF100 *1.... set , Mini DIN 4p Y: 1.0 V [p-p], C: 0.286 V [p-p], 75 Ω, compatible with ISO21118 international standards. *3. Each product has an individual variable in PROJECTOR SETUP menu is NORMAL: Approx. 8 W When STANDBY MODE in weight. Technical Information S-VIDEO IN VIDEO IN RGB 1 IN Terminals RGB 2 IN DVI-D IN 1...
Operating Instructions
Page 39
...buttons 14 Remote control function 22 INSTALLATION Projection method 16 L LAMP Indicator status 28 Lamp unit compartment 12 LAMP1/LAMP2 indicators 12 Replacing 30 LAN Terminal 13 LENS Control panel button 12 Projection lens 12 Projector lens cover 11 Remote control button 14 Lens home position ...Control panel button 12 Remote control button 14 Switching on/off 19 POWER STANDBY Control panel button 12 Remote control button 14 Projector lens cover Accessories 11 R Remote control 14 Accessories 11 Signal receptor 12 Wired connection 15 REMOTE1 Terminal 13 Wired connection ...
...buttons 14 Remote control function 22 INSTALLATION Projection method 16 L LAMP Indicator status 28 Lamp unit compartment 12 LAMP1/LAMP2 indicators 12 Replacing 30 LAN Terminal 13 LENS Control panel button 12 Projection lens 12 Projector lens cover 11 Remote control button 14 Lens home position ...Control panel button 12 Remote control button 14 Switching on/off 19 POWER STANDBY Control panel button 12 Remote control button 14 Projector lens cover Accessories 11 R Remote control 14 Accessories 11 Signal receptor 12 Wired connection 15 REMOTE1 Terminal 13 Wired connection ...


