User Manual
Page 4
... 51 PASSWORD 51 PASSWORD CHANGE 51 DISPLAY SETTING 51 TEXT CHANGE 51 CONTROL DEVICE SETUP 51 Using the serial terminals 52 Examples of connection 52 Pin assignments and signal names 52 Communication conditions 52 Basic format 52 Control commands 53 Cable specifications 53 Using the Remote 2 terminal 53 Indication of lamp monitor 54 Cleaning and replacement of air filter 55 Procedure of cleaning 55 Replacing the lamp unit 56 When to replace the Lamp unit 56 Lamp unit replacement steps 57 Ceiling Mount...
... 51 PASSWORD 51 PASSWORD CHANGE 51 DISPLAY SETTING 51 TEXT CHANGE 51 CONTROL DEVICE SETUP 51 Using the serial terminals 52 Examples of connection 52 Pin assignments and signal names 52 Communication conditions 52 Basic format 52 Control commands 53 Cable specifications 53 Using the Remote 2 terminal 53 Indication of lamp monitor 54 Cleaning and replacement of air filter 55 Procedure of cleaning 55 Replacing the lamp unit 56 When to replace the Lamp unit 56 Lamp unit replacement steps 57 Ceiling Mount...

User Manual
Page 5
... supplied power cord with equipment other than the projector. • Failure to observe this light, it near any inspection, adjustment and repair work (such as ceiling suspension) should only be dangerous. Pull the power cord plug out from the wall outlet and wipe it with a dry cloth. • If not using too many adapters), overheating may occur and fire may result. • Ask an Authorized Service...
... supplied power cord with equipment other than the projector. • Failure to observe this light, it near any inspection, adjustment and repair work (such as ceiling suspension) should only be dangerous. Pull the power cord plug out from the wall outlet and wipe it with a dry cloth. • If not using too many adapters), overheating may occur and fire may result. • Ask an Authorized Service...

User Manual
Page 7
... Power cord Battery for an extended period of the accessories shown below have been included with the Authorized Service Center regarding cleaning costs. Do not touch or bring your face close to the broken pieces. • Failure to direct sunlight or near stoves. If not using the projector for remote [N2QAYB000164 x 1] [K2CG3FZ00008 x 1] control unit (AA) [R6DW/2ST] Lens cover [TKKL5244-1 x 1] Wire cable...
... Power cord Battery for an extended period of the accessories shown below have been included with the Authorized Service Center regarding cleaning costs. Do not touch or bring your face close to the broken pieces. • Failure to direct sunlight or near stoves. If not using the projector for remote [N2QAYB000164 x 1] [K2CG3FZ00008 x 1] control unit (AA) [R6DW/2ST] Lens cover [TKKL5244-1 x 1] Wire cable...
User Manual
Page 8
... the air filter intake port, the internal temperature of the projector may burst with a dry cloth. Lamp deterioration due to the individual difference or conditions of use can cause a shimmering effect on the screen. Please call the dealer or a specialized dealer. Install the projector so that the lens cap is used , follow its instructions. Do not touch the surface of the projection lens with high internal...
... the air filter intake port, the internal temperature of the projector may burst with a dry cloth. Lamp deterioration due to the individual difference or conditions of use can cause a shimmering effect on the screen. Please call the dealer or a specialized dealer. Install the projector so that the lens cap is used , follow its instructions. Do not touch the surface of the projection lens with high internal...

User Manual
Page 9
... screen when the menu is active, a message "AUTO SETUP" appears on the menu screen, change setting and adjust the level. Input selector (RGB1, RGB2, DVI-D, VIDEO, S-VIDEO) button Use to display projector information. ASPECT button (page 31) Switches the image aspect ratio. 9 STATUS button (page 27) Press this button while projecting an image automatically corrects the picture positioning on the screen. Name and function of parts Remote control Remote control operation indicator lamp The lamp flashes when any remote control button is being used to black out the image...
... screen when the menu is active, a message "AUTO SETUP" appears on the menu screen, change setting and adjust the level. Input selector (RGB1, RGB2, DVI-D, VIDEO, S-VIDEO) button Use to display projector information. ASPECT button (page 31) Switches the image aspect ratio. 9 STATUS button (page 27) Press this button while projecting an image automatically corrects the picture positioning on the screen. Name and function of parts Remote control Remote control operation indicator lamp The lamp flashes when any remote control button is being used to black out the image...

User Manual
Page 11
... adjusted.) Lens release button (page 26) Press this lock port. LAMP1 monitor (page 54) This lamp lights up when the time to replace lamp unit 2 is turned to replace lamp unit 1 is left unused. LAMP2 monitor (page 54) This lamp lights up when the time to "l" (on the screen. Front and side of the projector Side-mounted connection terminals (page 13) Status LED lights (Refer to the right. Clasp for projecting images on ). Powered focus adjustment is pressed. Focus...
... adjusted.) Lens release button (page 26) Press this lock port. LAMP1 monitor (page 54) This lamp lights up when the time to replace lamp unit 2 is turned to replace lamp unit 1 is left unused. LAMP2 monitor (page 54) This lamp lights up when the time to "l" (on the screen. Front and side of the projector Side-mounted connection terminals (page 13) Status LED lights (Refer to the right. Clasp for projecting images on ). Powered focus adjustment is pressed. Focus...

User Manual
Page 12
... ( ) buttons (page 29) Use to S-VIDEO input. Lamp unit cover The lamp unit is displayed. The on the menu screen, change setting and adjust the level. Remote control receiver window (rear) (page 14) This also receives the signal beam coming from the remote control. RGB1 button (page 24) Switches to RGB2 input. RGB2 button (page 24) Switches to RGB1 input. VIDEO button (page 24) Switches to run function. SHUTTER button (page 27) Press this button while projecting an image automatically corrects the picture...
... ( ) buttons (page 29) Use to S-VIDEO input. Lamp unit cover The lamp unit is displayed. The on the menu screen, change setting and adjust the level. Remote control receiver window (rear) (page 14) This also receives the signal beam coming from the remote control. RGB1 button (page 24) Switches to RGB2 input. RGB2 button (page 24) Switches to RGB1 input. VIDEO button (page 24) Switches to run function. SHUTTER button (page 27) Press this button while projecting an image automatically corrects the picture...
User Manual
Page 22
... your video/audio equipment to the projector, carefully read the owners manual supplied with the equipment once again. • All cable connections should be used to connect to a DVI equipment, but note that the image will relieve this problem. • The projector only accepts composite-video, S-Video, analog-RGB (with TTL sync. S data 0+ T. level) and digital signal. • Some PC models are not compatible with DVI-D output terminal on the screen...
... your video/audio equipment to the projector, carefully read the owners manual supplied with the equipment once again. • All cable connections should be used to connect to a DVI equipment, but note that the image will relieve this problem. • The projector only accepts composite-video, S-Video, analog-RGB (with TTL sync. S data 0+ T. level) and digital signal. • Some PC models are not compatible with DVI-D output terminal on the screen...

User Manual
Page 24
... the focus. Connect the supplied power cord. (120 V AC, 50 Hz/60 Hz) Press the " I " button. [on the main unit or the remote control] The power indicator illuminates in "INSTALLATION" setting. (page 38) Select the input signal by pressing the input selector button to start projection. The temperature monitor (TEMP) lights during the warm-up period. If this happens, raise the surrounding temperature to turn the power "on the power. Use the lens left/right adjustment dial to adjust...
... the focus. Connect the supplied power cord. (120 V AC, 50 Hz/60 Hz) Press the " I " button. [on the main unit or the remote control] The power indicator illuminates in "INSTALLATION" setting. (page 38) Select the input signal by pressing the input selector button to start projection. The temperature monitor (TEMP) lights during the warm-up period. If this happens, raise the surrounding temperature to turn the power "on the power. Use the lens left/right adjustment dial to adjust...

User Manual
Page 27
.... How to adjust the lens position to the left or right When the lens left/right adjustment dial is recommended to supply images with a bright white frame at the outermost periphery containing characters etc. In this case, manually adjust the items of more than 150 MHz are supplied.) When DVI signals are clear in automatic adjustment mode. STATUS INPUT PROJECTOR RUNTIME LAMP1 LAMP2 INTAKE-AIR TEMP. It can...
.... How to adjust the lens position to the left or right When the lens left/right adjustment dial is recommended to supply images with a bright white frame at the outermost periphery containing characters etc. In this case, manually adjust the items of more than 150 MHz are supplied.) When DVI signals are clear in automatic adjustment mode. STATUS INPUT PROJECTOR RUNTIME LAMP1 LAMP2 INTAKE-AIR TEMP. It can...
User Manual
Page 31
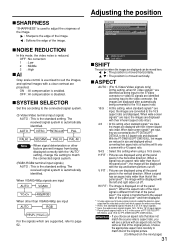
... the source video's aspect ratio, you will be displayed with the left and right sides cut off . OFF : No correction 1 : Low 2 : Middle 3 : High AI Gray scale control is 4:3 in size and displayed without converting their aspect ratio so that of PT-D5700U/PT- When wide-screen signals*3 are input, the images are displayed with their inherent aspect ratio intact. When VGA60/480p signals are input AUTO VGA60...
... the source video's aspect ratio, you will be displayed with the left and right sides cut off . OFF : No correction 1 : Low 2 : Middle 3 : High AI Gray scale control is 4:3 in size and displayed without converting their aspect ratio so that of PT-D5700U/PT- When wide-screen signals*3 are input, the images are displayed with their inherent aspect ratio intact. When VGA60/480p signals are input AUTO VGA60...

User Manual
Page 32
...; When projecting signals whose dot clock frequency is 150 MHz or higher, the noise may not disappear even when the clock phase is adjusted. • Clock phase adjustment is applied. How to use ADVANCED MENU ADVANCED MENU DIGITAL CINEMA REALITY BLANKING INPUT RESOLUTION CLAMP POSITION EDGE BLENDING RASTER POSITION XGA MODE SXGA MODE AUTO 1 OFF XGA SXGA MENU SELECT CHANGE DIGITAL CINEMA REALITY Increase the vertical resolution when the S-Video/ Video signal input or...
...; When projecting signals whose dot clock frequency is 150 MHz or higher, the noise may not disappear even when the clock phase is adjusted. • Clock phase adjustment is applied. How to use ADVANCED MENU ADVANCED MENU DIGITAL CINEMA REALITY BLANKING INPUT RESOLUTION CLAMP POSITION EDGE BLENDING RASTER POSITION XGA MODE SXGA MODE AUTO 1 OFF XGA SXGA MENU SELECT CHANGE DIGITAL CINEMA REALITY Increase the vertical resolution when the S-Video/ Video signal input or...

User Manual
Page 36
... projected. LOGO2 : The Panasonic logo is projected. The Panasonic logo is projected. CONTRAST MODE There are made, discrepancies sometimes occur in the color coordinates of the images being used at a conference. COLOR CORRECTION OFF : This is displayed. ON : Auto setup is outside the color range of the projector, the colors will not be projected. OFF : The input auto setup function is set the colors of image adjustment data (PICTURE, POSITION, ADVANCED MENU adjustment values) for each time signals are input when signals...
... projected. LOGO2 : The Panasonic logo is projected. The Panasonic logo is projected. CONTRAST MODE There are made, discrepancies sometimes occur in the color coordinates of the images being used at a conference. COLOR CORRECTION OFF : This is displayed. ON : Auto setup is outside the color range of the projector, the colors will not be projected. OFF : The input auto setup function is set the colors of image adjustment data (PICTURE, POSITION, ADVANCED MENU adjustment values) for each time signals are input when signals...
User Manual
Page 37
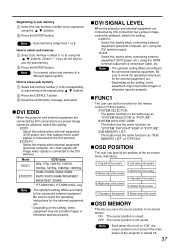
... power of a different signal system. OSD POSITION The user can set to check the operating instructions for the external equipment, etc. • Depending on the setting, some equipment may not provide images or otherwise operate properly. Press the ENTER button. Read the confirmation message and select. SUB MEMORY LIST: This button has the same functions as "SYSTEM DAYLIGHT VIEW" of "PICTURE". Note • The optimum setting...
... power of a different signal system. OSD POSITION The user can set to check the operating instructions for the external equipment, etc. • Depending on the setting, some equipment may not provide images or otherwise operate properly. Press the ENTER button. Read the confirmation message and select. SUB MEMORY LIST: This button has the same functions as "SYSTEM DAYLIGHT VIEW" of "PICTURE". Note • The optimum setting...

User Manual
Page 39
... lamp exceeds 2 000 hours of the items indicate the status. LAMP SELECT "LAMP SELECT" is selected. For details on the serial terminals, refer to "LOW", it will enter the standby mode. • The colors of cumulative operating time (when "HIGH" is repeatedly used to light) Red Lamp that was lighted until the set time. • When "SINGLE" is selected as the "LAMP POWER" setting) are exceeded, the projector will take effect after the set time will light...
... lamp exceeds 2 000 hours of the items indicate the status. LAMP SELECT "LAMP SELECT" is selected. For details on the serial terminals, refer to "LOW", it will enter the standby mode. • The colors of cumulative operating time (when "HIGH" is repeatedly used to light) Red Lamp that was lighted until the set time. • When "SINGLE" is selected as the "LAMP POWER" setting) are exceeded, the projector will take effect after the set time will light...

User Manual
Page 41
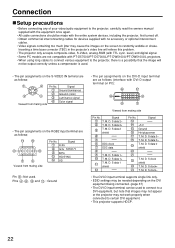
..., make sure the DHCP server is not used . The "NETWORK" screen will be displayed. Press the ENTER button. Connection example Projector Personal computer R/PR G/Y B/PB SYNC/HD VD VIDEO IN S-VIDEO IN REMOTE 1 IN OUT RGB 1 IN REMOTE 2 IN RGB 2 IN IN SERIAL OUT DVI-D IN LAN 10BASE-T or 100BASE-TX LAN cable (straight) LAN cable (straight) Hub Attention • Touching the LAN terminal with your hand (or body...
..., make sure the DHCP server is not used . The "NETWORK" screen will be displayed. Press the ENTER button. Connection example Projector Personal computer R/PR G/Y B/PB SYNC/HD VD VIDEO IN S-VIDEO IN REMOTE 1 IN OUT RGB 1 IN REMOTE 2 IN RGB 2 IN IN SERIAL OUT DVI-D IN LAN 10BASE-T or 100BASE-TX LAN cable (straight) LAN cable (straight) Hub Attention • Touching the LAN terminal with your hand (or body...

User Manual
Page 45
... POWER switch using the procedure on page 25 and clean the air filter (refer to page 55). Wait a short while for an item Parameter MAIN CPU BUS FAN OPTICS MODULE TEMPERATURE INPUT AIR TEMPERATURE AROUND LAMP TEMPERATURE LAMP REMAIN TIME LAMP STATUS SHUTTER AIR FILTER OPTICS MODULE TEMP.SENSOR INPUT AIR TEMP.SENSOR AROUND LAMP TEMP. Consult your dealer. Enter the IP address or server name of temperature warning mail. The user can enter the location of, for example, the installed projector...
... POWER switch using the procedure on page 25 and clean the air filter (refer to page 55). Wait a short while for an item Parameter MAIN CPU BUS FAN OPTICS MODULE TEMPERATURE INPUT AIR TEMPERATURE AROUND LAMP TEMPERATURE LAMP REMAIN TIME LAMP STATUS SHUTTER AIR FILTER OPTICS MODULE TEMP.SENSOR INPUT AIR TEMP.SENSOR AROUND LAMP TEMP. Consult your dealer. Enter the IP address or server name of temperature warning mail. The user can enter the location of, for example, the installed projector...
User Manual
Page 51
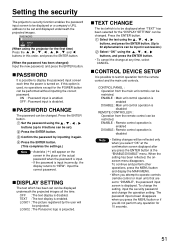
... be displayed underneath the projected images all the time. PASSWORD INPUT SET (When using the , , , buttons (up to display the password input screen each time the power is disabled Note • Setting changes will appear on . Set the password using the projector for the "DISPLAY SETTING" can be changed . To change the setting, input the security password and change at the "ENABLE/DISABLE" menu. PASSWORD It is possible to 8 buttons can be set and displayed underneath the projected images. Press the ENTER button. CONTROL PANEL : Operation from the remote control can...
... be displayed underneath the projected images all the time. PASSWORD INPUT SET (When using the , , , buttons (up to display the password input screen each time the power is disabled Note • Setting changes will appear on . Set the password using the projector for the "DISPLAY SETTING" can be changed . To change the setting, input the security password and change at the "ENABLE/DISABLE" menu. PASSWORD It is possible to 8 buttons can be set and displayed underneath the projected images. Press the ENTER button. CONTROL PANEL : Operation from the remote control can...

User Manual
Page 54
... red Blinking in the lamp • Turn off and follow the steps below. (Power indicator) Lamp 2 monitor (LAMP 2) Lamp 1 monitor (LAMP 1) Temperature monitor (TEMP) Name of lamp monitor This projector is equipped with dust? switch using the procedure on • Check for replacing the lamp unit. Please consult your dealer. • If the power indicator flashes red (once), the lamp unit cover is blocked. • Is the room air temperature too high? • Is the air filter clogged with 3 indicators to indicate a problem. installed...
... red Blinking in the lamp • Turn off and follow the steps below. (Power indicator) Lamp 2 monitor (LAMP 2) Lamp 1 monitor (LAMP 1) Temperature monitor (TEMP) Name of lamp monitor This projector is equipped with dust? switch using the procedure on • Check for replacing the lamp unit. Please consult your dealer. • If the power indicator flashes red (once), the lamp unit cover is blocked. • Is the room air temperature too high? • Is the air filter clogged with 3 indicators to indicate a problem. installed...

User Manual
Page 56
... the LAMP POWER "LOW" setting, the operating time is not possible to "LOW", the cumulative operating time from LAMP POWER "HIGH" to slip your hand when using a screwdriver. On-screen indication Lamp monitor REPLACE THE LAMP LAMP After 1 800 hours*2 After 2 000 hours*1 The indication appears for 30 seconds or until any control button is the operating time if the lamp has only been used lamps, request an industrial waste disposal contractor. The lamp monitor lights up red even in standby mode...
... the LAMP POWER "LOW" setting, the operating time is not possible to "LOW", the cumulative operating time from LAMP POWER "HIGH" to slip your hand when using a screwdriver. On-screen indication Lamp monitor REPLACE THE LAMP LAMP After 1 800 hours*2 After 2 000 hours*1 The indication appears for 30 seconds or until any control button is the operating time if the lamp has only been used lamps, request an industrial waste disposal contractor. The lamp monitor lights up red even in standby mode...


