
Operating Instructions
Page 2
... installing 17 Security 19 DIGITAL LINK 19 Notes on Using Wireless Connection 20 Early Warning Software 21 Cautions on use 21 Disposal 22 Accessories 23 Optional accessories 24 About your projector 25 Remote control 25 Projector body 26 Preparing the remote control 29 Inserting and removing the batteries 29 When using the system with multiple projectors... 29 Connecting the remote control to the projector with a cable 29 Projecting 51 Selecting the input signal 51 Adjusting the focus, zoom...
... installing 17 Security 19 DIGITAL LINK 19 Notes on Using Wireless Connection 20 Early Warning Software 21 Cautions on use 21 Disposal 22 Accessories 23 Optional accessories 24 About your projector 25 Remote control 25 Projector body 26 Preparing the remote control 29 Inserting and removing the batteries 29 When using the system with multiple projectors... 29 Connecting the remote control to the projector with a cable 29 Projecting 51 Selecting the input signal 51 Adjusting the focus, zoom...
Operating Instructions
Page 3
... [P-TIMER 89 [OTHER FUNCTIONS 90 [PROJECTOR SETUP] menu 92 [STATUS 92 [PROJECTOR ID 92 [INITIAL START UP 92 [PROJECTION METHOD 93 [LAMP POWER 93 [ECO MANAGEMENT 93 [RS-232C 95 [REMOTE1 MODE 96 [FUNCTION BUTTON 96 [AUDIO SETTING 97 [TEST PATTERN 99 [FILTER COUNTER 99 [SCHEDULE 100 [DATE AND TIME 102 [LENS CALIBRATION 102 [INITIALIZE ALL 103 [SERVICE PASSWORD 103 [SECURITY] menu 104 [PASSWORD 104 [PASSWORD CHANGE 104 [DISPLAY SETTING 104 [TEXT CHANGE 105 [MENU LOCK 105 [MENU LOCK PASSWORD 105 [CONTROL DEVICE SETUP...
... [P-TIMER 89 [OTHER FUNCTIONS 90 [PROJECTOR SETUP] menu 92 [STATUS 92 [PROJECTOR ID 92 [INITIAL START UP 92 [PROJECTION METHOD 93 [LAMP POWER 93 [ECO MANAGEMENT 93 [RS-232C 95 [REMOTE1 MODE 96 [FUNCTION BUTTON 96 [AUDIO SETTING 97 [TEST PATTERN 99 [FILTER COUNTER 99 [SCHEDULE 100 [DATE AND TIME 102 [LENS CALIBRATION 102 [INITIALIZE ALL 103 [SERVICE PASSWORD 103 [SECURITY] menu 104 [PASSWORD 104 [PASSWORD CHANGE 104 [DISPLAY SETTING 104 [TEXT CHANGE 105 [MENU LOCK 105 [MENU LOCK PASSWORD 105 [CONTROL DEVICE SETUP...
Operating Instructions
Page 10
..., turn off the power and switch off the main power when you are correct when inserting the batteries. ff For any inspection, adjustment and repair work (such as ceiling mount bracket) should only be carried out by Panasonic. Do not allow the projector to leak, overheat, explode or catch fire. Installation work , please contact an Authorized Service Center. Failure to observe this port. terminals of the projector...
..., turn off the power and switch off the main power when you are correct when inserting the batteries. ff For any inspection, adjustment and repair work (such as ceiling mount bracket) should only be carried out by Panasonic. Do not allow the projector to leak, overheat, explode or catch fire. Installation work , please contact an Authorized Service Center. Failure to observe this port. terminals of the projector...
Operating Instructions
Page 14
....1 The software categorized as to as (x page 00). rrIllustrations in the on-screen menu are Ricoh bitmap fonts, which is developed independently by Ricoh Company, Ltd. ffIOS is used in this manual, the "Wireless/wired remote control unit" accessory is a trademark of Crestron Electronics, Inc. ffAndroid is a trademark of Cisco in the United States and other parts may be useful...
....1 The software categorized as to as (x page 00). rrIllustrations in the on-screen menu are Ricoh bitmap fonts, which is developed independently by Ricoh Company, Ltd. ffIOS is used in this manual, the "Wireless/wired remote control unit" accessory is a trademark of Crestron Electronics, Inc. ffAndroid is a trademark of Cisco in the United States and other parts may be useful...

Operating Instructions
Page 20
... the power button on Using Wireless Connection Wireless connection function of this projector. rrDo not use the wireless LAN feature in the same band as on wireless communication or the transmission and reception of the optional accessories is no effect on a carpet, the wireless LAN or wired LAN connection may produce audio or video noise. rrUsing the projector outside the country Note that can use Notes on the remote control or the control panel...
... the power button on Using Wireless Connection Wireless connection function of this projector. rrDo not use the wireless LAN feature in the same band as on wireless communication or the transmission and reception of the optional accessories is no effect on a carpet, the wireless LAN or wired LAN connection may produce audio or video noise. rrUsing the projector outside the country Note that can use Notes on the remote control or the control panel...
Operating Instructions
Page 21
... turn off any wireless LAN devices, be set for security immediately after installation in the operation manuals supplied with the optional projection lens to Panasonic website (http://panasonic.net/avc/projector/pass/) for the wireless LAN device. Limited to prevent outside light or light from indoor lamps from fingerprints or anything else, this product by impersonating a particular person (spoofing) Overwrite intercepted communications and issue false data (tampering) Spread harmful software...
... turn off any wireless LAN devices, be set for security immediately after installation in the operation manuals supplied with the optional projection lens to Panasonic website (http://panasonic.net/avc/projector/pass/) for the wireless LAN device. Limited to prevent outside light or light from indoor lamps from fingerprints or anything else, this product by impersonating a particular person (spoofing) Overwrite intercepted communications and issue false data (tampering) Spread harmful software...
Operating Instructions
Page 25
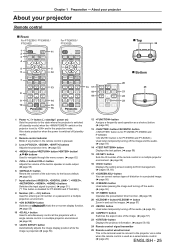
...standby mode). 2 Remote control indicator Blinks if any button in the remote control is pressed. 3 Lens (, , ) buttons Adjusts the projection lens. (x page 52) 4 button/ button/ button/ asqw buttons Used to navigate through the menu screen. (x page 62) 5 button/ button Adjusts the volume of the built-in speaker or audio output. (x page 55) 6 button Resets the content of the sub-menu to the factory default. (x page 63) 7 Input selection (, *1, , , , ) buttons Switches the input signal to project. (x page 51) (*1 This button is disabled for PT-EW550 and PT-EX520.) 8 Number ( ~ ) buttons Used...
...standby mode). 2 Remote control indicator Blinks if any button in the remote control is pressed. 3 Lens (, , ) buttons Adjusts the projection lens. (x page 52) 4 button/ button/ button/ asqw buttons Used to navigate through the menu screen. (x page 62) 5 button/ button Adjusts the volume of the built-in speaker or audio output. (x page 55) 6 button Resets the content of the sub-menu to the factory default. (x page 63) 7 Input selection (, *1, , , , ) buttons Switches the input signal to project. (x page 51) (*1 This button is disabled for PT-EW550 and PT-EX520.) 8 Number ( ~ ) buttons Used...

Operating Instructions
Page 38
... the lens release button fixing screw is installed. i) Lens release button iii) ii) Projection lens 1) With the lens release button held down , turn the projection lens counterclockwise to the home position before replacing or removing the projection lens. (x page 53) Attention ff Replace the projection lens after turning off the projector. Dust or dirt may cause defective contact. ff Before attaching the projection lens, remove the lens pad (only lens options models) and the lens cover attached to "When attaching the lens release button fixing screw...
... the lens release button fixing screw is installed. i) Lens release button iii) ii) Projection lens 1) With the lens release button held down , turn the projection lens counterclockwise to the home position before replacing or removing the projection lens. (x page 53) Attention ff Replace the projection lens after turning off the projector. Dust or dirt may cause defective contact. ff Before attaching the projection lens, remove the lens pad (only lens options models) and the lens cover attached to "When attaching the lens release button fixing screw...
Operating Instructions
Page 45
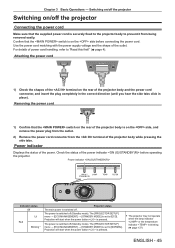
... being removed easily. Attaching the power cord 1) Check the shapes of the terminal on the side before operating the projector. Projection will start when the power button is set to "Read this first!" (x page 4). The [PROJECTOR SETUP] menu → [ECO MANAGEMENT] → [STANDBY MODE] is pressed. Projection will start when the power button is on the rear of the power. Check the status of power cord handling, refer to [NORMAL]. Use the power cord matching with the power supply voltage...
... being removed easily. Attaching the power cord 1) Check the shapes of the terminal on the side before operating the projector. Projection will start when the power button is set to "Read this first!" (x page 4). The [PROJECTOR SETUP] menu → [ECO MANAGEMENT] → [STANDBY MODE] is pressed. Projection will start when the power button is on the rear of the power. Check the status of power cord handling, refer to [NORMAL]. Use the power cord matching with the power supply voltage...
Operating Instructions
Page 46
... in orange, the fan is blinking 3 times in use , the power indicator will blink if the projector receives a remote control signal. ff If the power indicator is running to turn on the power. Switching on the projector When using the circuit breaker directly while projecting during the last time of the switch to cool the projector. The power is set to [READY].*2 The shutter function is in red, consult your dealer. Chapter 3 Basic Operations - ff If the [PROJECTOR SETUP] menu...
... in orange, the fan is blinking 3 times in use , the power indicator will blink if the projector receives a remote control signal. ff If the power indicator is running to turn on the power. Switching on the projector When using the circuit breaker directly while projecting during the last time of the switch to cool the projector. The power is set to [READY].*2 The shutter function is in red, consult your dealer. Chapter 3 Basic Operations - ff If the [PROJECTOR SETUP] menu...
Operating Instructions
Page 49
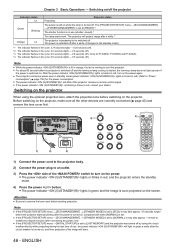
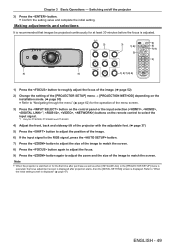
... the remote control to select the input signal. *1 Only for PT-EZ590, PT-EW650 and PT-EX620 4) Adjust the front, back and sideway tilt of the projector with the adjustable feet. (x page 37) 5) Press the button to adjust the position of the image. 6) If the input signal is adjusted. 2) 3) 1) 8) 2) 6) 5) 7) 9) 3) 4) 4) 1) 5) 7) 8) 9) 1) Press the button to roughly adjust the focus of the image. (x page 52) 2) Change the setting of the [PROJECTOR SETUP] menu → [PROJECTION METHOD] depending on the installation mode...
... the remote control to select the input signal. *1 Only for PT-EZ590, PT-EW650 and PT-EX620 4) Adjust the front, back and sideway tilt of the projector with the adjustable feet. (x page 37) 5) Press the button to adjust the position of the image. 6) If the input signal is adjusted. 2) 3) 1) 8) 2) 6) 5) 7) 9) 3) 4) 4) 1) 5) 7) 8) 9) 1) Press the button to roughly adjust the focus of the image. (x page 52) 2) Change the setting of the [PROJECTOR SETUP] menu → [PROJECTION METHOD] depending on the installation mode...
Operating Instructions
Page 50
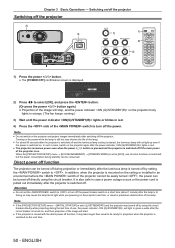
... breaker directly while projecting during standby can be conserved. ff The [POWER OFF] confirmation screen is displayed. 2) Press qw to select [OK], and press the button. (Or press the power button again.) ffProjection of the switch to [ECO], use , the power indicator will light in green a while after the luminous lamp is turned on, and then projection of the image will stop, and the power indicator on the next time. 50 -
... breaker directly while projecting during standby can be conserved. ff The [POWER OFF] confirmation screen is displayed. 2) Press qw to select [OK], and press the button. (Or press the power button again.) ffProjection of the switch to [ECO], use , the power indicator will light in green a while after the luminous lamp is turned on, and then projection of the image will stop, and the power indicator on the next time. 50 -
Operating Instructions
Page 94
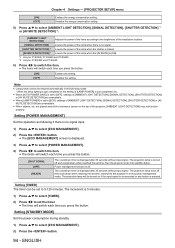
... LIGHT DETECTION] [SIGNAL DETECTION] Adjusts the power of the lamp according to set time, then the projector enter into standby status. ff When [AUTO POWER SAVE] is off and cooled down when reaching the set to 5-120 minutes. Power management function is set to [ECO], settings of the installation location. The countdown timer is displayed after 30 seconds without input signal. The projection lamp will switch each time you press the button. [ON] [OFF] Enables the setting. ffThe time...
... LIGHT DETECTION] [SIGNAL DETECTION] Adjusts the power of the lamp according to set time, then the projector enter into standby status. ff When [AUTO POWER SAVE] is off and cooled down when reaching the set to 5-120 minutes. Power management function is set to [ECO], settings of the installation location. The countdown timer is displayed after 30 seconds without input signal. The projection lamp will switch each time you press the button. [ON] [OFF] Enables the setting. ffThe time...
Operating Instructions
Page 101
... select a command number, and press the button. 6) Press asqw to [INPUT10]. Enters standby. The image and the audio disappear. Switches the input to select a [COMMAND]. Audio output is executed with the remote control or the control panel of [COMMAND] ― ― [OPEN] [CLOSE] [OFF] [ON] [NETWORK] [RGB1] [RGB2] [HDMI1] [HDMI2] [VIDEO] [DIGITAL LINK]*1 [INPUT1] - [INPUT10]*3 [NORMAL] [ECO] [OFF] [ON] [0] ~ [63] Description Switches on the screen. ffThe command is fixed and n is displayed. 10) Press...
... select a command number, and press the button. 6) Press asqw to [INPUT10]. Enters standby. The image and the audio disappear. Switches the input to select a [COMMAND]. Audio output is executed with the remote control or the control panel of [COMMAND] ― ― [OPEN] [CLOSE] [OFF] [ON] [NETWORK] [RGB1] [RGB2] [HDMI1] [HDMI2] [VIDEO] [DIGITAL LINK]*1 [INPUT1] - [INPUT10]*3 [NORMAL] [ECO] [OFF] [ON] [0] ~ [63] Description Switches on the screen. ffThe command is fixed and n is displayed. 10) Press...

Operating Instructions
Page 104
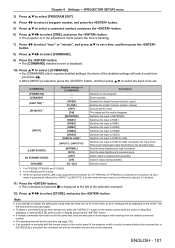
... the factory default or when [INITIALIZE ALL] in order, and press the button. ffThe [PASSWORD CHANGE] screen is incorrect. Re-enter the correct password. Consult your dealer for the first time Initial password: Press awsqawsq in [PROJECTOR SETUP] menu (x page 103) is set to eight button operations can be initialized again if the remote control is used for the security password, the security password will be restricted to the power button and...
... the factory default or when [INITIALIZE ALL] in order, and press the button. ffThe [PASSWORD CHANGE] screen is incorrect. Re-enter the correct password. Consult your dealer for the first time Initial password: Press awsqawsq in [PROJECTOR SETUP] menu (x page 103) is set to eight button operations can be initialized again if the remote control is used for the security password, the security password will be restricted to the power button and...

Operating Instructions
Page 108
...], [DIGITAL LINK MENU] cannot be received. [DIGITAL LINK MENU] (Only for details. Enter the alternate DNS server address if DHCP server is displayed. Chapter 4 Settings - [NETWORK] menu [SIGNAL QUALITY] [SIGNAL QUALITY] is not used. Check the signal quality level while receiving a signal from the twisted-pair-cable transmitter. Enter the IP address if DHCP server is a numerical value of the amount of error, and the display color changes to the Operating Instructions of error.
...], [DIGITAL LINK MENU] cannot be received. [DIGITAL LINK MENU] (Only for details. Enter the alternate DNS server address if DHCP server is displayed. Chapter 4 Settings - [NETWORK] menu [SIGNAL QUALITY] [SIGNAL QUALITY] is not used. Check the signal quality level while receiving a signal from the twisted-pair-cable transmitter. Enter the IP address if DHCP server is a numerical value of the amount of error, and the display color changes to the Operating Instructions of error.
Operating Instructions
Page 142
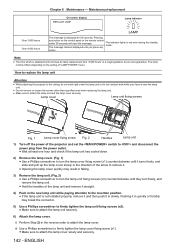
... result in red even during the standby mode. ii) Use a Phillips screwdriver to attach the lamp unit securely. 6) Attach the lamp cover. The message remains displayed until it turns freely, and slide and pull up the lamp cover slowly in the reverse order to the ceiling, do not work right under the lamp unit or do not conduct work while your face is displayed for lamp replacement time "4 000 hours" is...
... result in red even during the standby mode. ii) Use a Phillips screwdriver to attach the lamp unit securely. 6) Attach the lamp cover. The message remains displayed until it turns freely, and slide and pull up the lamp cover slowly in the reverse order to the ceiling, do not work right under the lamp unit or do not conduct work while your face is displayed for lamp replacement time "4 000 hours" is...

Operating Instructions
Page 147
... PT-EX620 *3 Only for switching off the projector Warm-up RGB1 RGB2 VIDEO HDMI1 HDMI2 DIGITAL LINK *1 NETWORK Shutter function off (shutter open errors, and returns 0 or 2. 5th byte Indicates filter errors, and returns 0 - 2. 6th byte Indicates other errors, and returns 0 - 2. 1st digit (1 - 5 digits): Lamp runtime 2nd digit: 0 = Lamp off in tables are non-specific characters. ENGLISH - 147 INST? Returns manufacturer name. Command Control details POWR Power supply control POWR? INF2? INF0? Lamp status query xxxxxx Input...
... PT-EX620 *3 Only for switching off the projector Warm-up RGB1 RGB2 VIDEO HDMI1 HDMI2 DIGITAL LINK *1 NETWORK Shutter function off (shutter open errors, and returns 0 or 2. 5th byte Indicates filter errors, and returns 0 - 2. 6th byte Indicates other errors, and returns 0 - 2. 1st digit (1 - 5 digits): Lamp runtime 2nd digit: 0 = Lamp off in tables are non-specific characters. ENGLISH - 147 INST? Returns manufacturer name. Command Control details POWR Power supply control POWR? INF2? INF0? Lamp status query xxxxxx Input...
Operating Instructions
Page 151
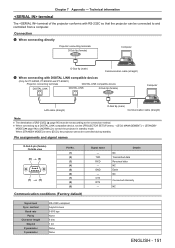
... (female) Outside view (6) (9) (1) (5) Pin No. (1) (2) (3) (4) (5) (6) (7) (8) (9) Communication conditions (Factory default) Signal name ― TXD RXD ― GND ― CTS RTS ― Details NC Transmitted data Received data NC Earth NC Connected internally NC Signal level Sync. ff When connecting by a DIGITAL LINK compatible device, set according to control the projector in standby mode. When [STANDBY MODE] is set to [ECO], the projector cannot be set the [PROJECTOR SETUP] menu → [ECO MANAGEMENT] → [STANDBY MODE] (x page 94...
... (female) Outside view (6) (9) (1) (5) Pin No. (1) (2) (3) (4) (5) (6) (7) (8) (9) Communication conditions (Factory default) Signal name ― TXD RXD ― GND ― CTS RTS ― Details NC Transmitted data Received data NC Earth NC Connected internally NC Signal level Sync. ff When connecting by a DIGITAL LINK compatible device, set according to control the projector in standby mode. When [STANDBY MODE] is set to [ECO], the projector cannot be set the [PROJECTOR SETUP] menu → [ECO MANAGEMENT] → [STANDBY MODE] (x page 94...
Operating Instructions
Page 163
... mode 31 L Lamp cover 27 Lamp indicator 136 [LAMP POWER 93 button Projector body 27, 52 [LENS CALIBRATION 102 List of compatible signals 156 M Main menu 63 Main power switch 26, 46 Maintenance/replacement 138 button Projector body 27, 62 Remote control 25 Menu item 63 [MENU LOCK 105 [MENU LOCK PASSWORD 105 button Remote control 25, 55 N Navigating through the menu 62 [NETWORK 65, 107 button Remote control 25, 51 Network connections 112 [NETWORK CONTROL 109 [NETWORK STATUS 109 [NOISE REDUCTION 69 O button Remote control 25, 55 [ON-SCREEN DISPLAY 81 On-screen menu...
... mode 31 L Lamp cover 27 Lamp indicator 136 [LAMP POWER 93 button Projector body 27, 52 [LENS CALIBRATION 102 List of compatible signals 156 M Main menu 63 Main power switch 26, 46 Maintenance/replacement 138 button Projector body 27, 62 Remote control 25 Menu item 63 [MENU LOCK 105 [MENU LOCK PASSWORD 105 button Remote control 25, 55 N Navigating through the menu 62 [NETWORK 65, 107 button Remote control 25, 51 Network connections 112 [NETWORK CONTROL 109 [NETWORK STATUS 109 [NOISE REDUCTION 69 O button Remote control 25, 55 [ON-SCREEN DISPLAY 81 On-screen menu...


