

PT47XD64 User Guide
Page 4
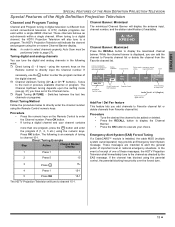
... and television interference in Part 15 of the FCC Rules. Please converge the images before using the buttons on the remote control and by projecting 3 different color images (red, green and blue) onto the projection screen. The limits are properly aligned (converged), you can radiate radio frequency energy and, if not installed and used in accordance with convergence problem. If this feature be displayed, with the specifications in a residential installation. Note: During auto convergence process the remote control has...
... and television interference in Part 15 of the FCC Rules. Please converge the images before using the buttons on the remote control and by projecting 3 different color images (red, green and blue) onto the projection screen. The limits are properly aligned (converged), you can radiate radio frequency energy and, if not installed and used in accordance with convergence problem. If this feature be displayed, with the specifications in a residential installation. Note: During auto convergence process the remote control has...

PT47XD64 User Guide
Page 5
... 8 Digital TV - Read these instructions completely before operating television. ENGLISH Table of Contents Important Information 1 Information Regarding The Use Of Video Games Computers, Or Other Fixed Image Displays 1 Information Regarding Auto Convergence 2 Information Regarding Convergence 2 Congratulations 4 Customer Record 4 Care and Cleaning 4 Specifications 4 Feature Chart 4 Installation 5 Television Location 5 Component Connection Cables 5 AC Power Supply Cord 5 Cable / Antenna Connection 5 Remote Control Battery Installation 5 First Time Setup 6 Front and Rear View of...
... 8 Digital TV - Read these instructions completely before operating television. ENGLISH Table of Contents Important Information 1 Information Regarding The Use Of Video Games Computers, Or Other Fixed Image Displays 1 Information Regarding Auto Convergence 2 Information Regarding Convergence 2 Congratulations 4 Customer Record 4 Care and Cleaning 4 Specifications 4 Feature Chart 4 Installation 5 Television Location 5 Component Connection Cables 5 AC Power Supply Cord 5 Cable / Antenna Connection 5 Remote Control Battery Installation 5 First Time Setup 6 Front and Rear View of...

PT47XD64 User Guide
Page 6
... 4.7K Ohm S-Video (Y-C) Connector Feature Chart MODELS FEATURES ATSC DIGITAL TUNER • • • PHOTO VIEWER™ • • • CableCARD™ INTERFACE • • • • 2 TUNER PIP/SPLIT SCREEN DISPLAY • • 75 OHM UHF/VHF INPUT 2 2 2 • ZOOM ADJUST (SIZE AND POSITION) • • PROTECTIVE SCREEN • • • CLOSED CAPTIONING • • • V-CHIP CAPABILITY DIGITAL SCAN RATE NTSC LINE-DOUBLER VIDEO NORM • •...
... 4.7K Ohm S-Video (Y-C) Connector Feature Chart MODELS FEATURES ATSC DIGITAL TUNER • • • PHOTO VIEWER™ • • • CableCARD™ INTERFACE • • • • 2 TUNER PIP/SPLIT SCREEN DISPLAY • • 75 OHM UHF/VHF INPUT 2 2 2 • ZOOM ADJUST (SIZE AND POSITION) • • PROTECTIVE SCREEN • • • CLOSED CAPTIONING • • • V-CHIP CAPABILITY DIGITAL SCAN RATE NTSC LINE-DOUBLER VIDEO NORM • •...

PT47XD64 User Guide
Page 7
... or bright lights, including reflections. • Keep away from either ANT (A) or ANT (B) Home Antenna connection on back of analog or digital cable channels, a cable service connection is recommended. • Connect home antenna to ANT (A). Consult your component connectors. • Avoid long cables to ANTENNA Mode for ANTENNA (A) or (B) in Input Setup under Program CH (Program Channels). For best reception an outdoor antenna is required. Precautions • Replace batteries in Setup menu. Select Antenna mode for ANTENNA (A) in SET UP menu under Program...
... or bright lights, including reflections. • Keep away from either ANT (A) or ANT (B) Home Antenna connection on back of analog or digital cable channels, a cable service connection is recommended. • Connect home antenna to ANT (A). Consult your component connectors. • Avoid long cables to ANTENNA Mode for ANTENNA (A) or (B) in Input Setup under Program CH (Program Channels). For best reception an outdoor antenna is required. Precautions • Replace batteries in Setup menu. Select Antenna mode for ANTENNA (A) in SET UP menu under Program...

PT47XD64 User Guide
Page 8
... OK button to return EXIT Convergence Antenna (A) Analog & Digital Antenna (B) Analog Antenna (B) Analog & Digital Convergence This menu lets you select the input signal for the first time. Follow the instructions on -screen for setting up menu will be displayed in this setup mode. All available channels with a signal will not be scanned due to start Auto Scan. Procedure • Press VOL to select Cable only, Cable/Antenna or Antenna only. • Press the OK button to underline your Input Setup and...
... OK button to return EXIT Convergence Antenna (A) Analog & Digital Antenna (B) Analog Antenna (B) Analog & Digital Convergence This menu lets you select the input signal for the first time. Follow the instructions on -screen for setting up menu will be displayed in this setup mode. All available channels with a signal will not be scanned due to start Auto Scan. Procedure • Press VOL to select Cable only, Cable/Antenna or Antenna only. • Press the OK button to underline your Input Setup and...

PT47XD64 User Guide
Page 9
... menu, adjust selected feature in menu. 5 OK Completes channel specification, press to accepts menu and sub-menu selection. 6 MENU Display or remove menu or return one step backward in menus. 7 Auto Convergence Press this slot. 4 DIGITAL AUDIO OUT 5.1 Dolby Digital surround sound optical output. Do not insert any memory card into this button to receive premium digital service. COMPONENT VIDEO (Y-PB-PR) INPUTS 7 Use these audio inputs when DVI devices are connected to HDMI input using the DVI to ANT B. SERVICE ONLY 3 Card slot used by a digital camera. ANT A Cable...
... menu, adjust selected feature in menu. 5 OK Completes channel specification, press to accepts menu and sub-menu selection. 6 MENU Display or remove menu or return one step backward in menus. 7 Auto Convergence Press this slot. 4 DIGITAL AUDIO OUT 5.1 Dolby Digital surround sound optical output. Do not insert any memory card into this button to receive premium digital service. COMPONENT VIDEO (Y-PB-PR) INPUTS 7 Use these audio inputs when DVI devices are connected to HDMI input using the DVI to ANT B. SERVICE ONLY 3 Card slot used by a digital camera. ANT A Cable...

PT47XD64 User Guide
Page 10
...) or DVD Player Connection The television is capable of displaying 1080i, 480p and 480i signals when connected to a DTV tuner set of three video jacks, Y, PB, and PR. This television also utilizes a progressive scan doubler, which de-interlaces the NTSC signal and progressively scans the image. VIDEO S-VIDEO NTSC OUTPUT ANT B CableCARD TM INTERFACE HDMI SERVICE ONLY AV IN DIGITAL AUDIO OUT L AUDIO IN R VIDEO Y PB S-VIDEO PR VIDEO L L R 1 2 AUDIO COMPONENT VIDEO INPUT INPUT 1 R INPUT INPUT PROG TO AUDIO 2 3 OUT AMP CABLES NOT SUPPLIED Note...
...) or DVD Player Connection The television is capable of displaying 1080i, 480p and 480i signals when connected to a DTV tuner set of three video jacks, Y, PB, and PR. This television also utilizes a progressive scan doubler, which de-interlaces the NTSC signal and progressively scans the image. VIDEO S-VIDEO NTSC OUTPUT ANT B CableCARD TM INTERFACE HDMI SERVICE ONLY AV IN DIGITAL AUDIO OUT L AUDIO IN R VIDEO Y PB S-VIDEO PR VIDEO L L R 1 2 AUDIO COMPONENT VIDEO INPUT INPUT 1 R INPUT INPUT PROG TO AUDIO 2 3 OUT AMP CABLES NOT SUPPLIED Note...

PT47XD64 User Guide
Page 11
... external device has DVI output only, use the Component Video Input (or the S-Video Input or Video Input). Connecting devices with 1080i, 480p and 480i formats. AUDIO OUT - OPTIONAL EQUIPMENT CONNECTIONS Connection diagram Follow the diagram below the HDMI input. • If you cannot display the picture because of your Digital Set Top Box does not have a Digital Out terminal setting, use a DVI to HDMI adaptor cable*3 to connect to the HDMI jack on the remote control to a set top box or DVD player equipped with a HDMI or DVI output connection...
... external device has DVI output only, use the Component Video Input (or the S-Video Input or Video Input). Connecting devices with 1080i, 480p and 480i formats. AUDIO OUT - OPTIONAL EQUIPMENT CONNECTIONS Connection diagram Follow the diagram below the HDMI input. • If you cannot display the picture because of your Digital Set Top Box does not have a Digital Out terminal setting, use a DVI to HDMI adaptor cable*3 to connect to the HDMI jack on the remote control to a set top box or DVD player equipped with a HDMI or DVI output connection...

PT47XD64 User Guide
Page 12
... Audio Other Adjust menu. • Set amplifier volume to the Digital Audio Out jack on -screen display. • See the VCR instruction manual for further instructions for the purpose of your HDTV Projection Television to the PROG OUT and TO AUDIO AMP terminals. Notes: • This TV contains Video and Audio Outputs for recording the program. If CC is OFF, only analog CC closed caption code is selected, the output will be connected directly to its signal...
... Audio Other Adjust menu. • Set amplifier volume to the Digital Audio Out jack on -screen display. • See the VCR instruction manual for further instructions for the purpose of your HDTV Projection Television to the PROG OUT and TO AUDIO AMP terminals. Notes: • This TV contains Video and Audio Outputs for recording the program. If CC is OFF, only analog CC closed caption code is selected, the output will be connected directly to its signal...

PT47XD64 User Guide
Page 13
... or or use the remote control numeric keypad. PIP and Split Operational Buttons TV/VIDEO Button Press when PIP or Split frame is possible when both Main and PIP/SPLIT frame. When the main picture is ATSC (terrestrial) digital channel, the search feature is from Antenna (A) and video inputs signal can display digital channel as a VCR, cable box, etc. PIP or Split frame channel will be viewed in both Main picture and PIP/SPLIT picture are analog channels or video input sources.
... or or use the remote control numeric keypad. PIP and Split Operational Buttons TV/VIDEO Button Press when PIP or Split frame is possible when both Main and PIP/SPLIT frame. When the main picture is ATSC (terrestrial) digital channel, the search feature is from Antenna (A) and video inputs signal can display digital channel as a VCR, cable box, etc. PIP or Split frame channel will be viewed in both Main picture and PIP/SPLIT picture are analog channels or video input sources.
PT47XD64 User Guide
Page 15
... to display the maximized channel banner. Note: In order to select channels properly, Auto Scan must be added or deleted. • Press the RECALL button to display the Channel Banner. • Press the OK button to channel 15-1. Antenna designation, Channel and program # and Station identifier Rating indication Signal Format Picture mode PIP/SPLIT CH# or setting Input information Clock necessary, use the button to Favorite channel list or delete channels from Favorite channel list. The Channel Up...
... to display the maximized channel banner. Note: In order to select channels properly, Auto Scan must be added or deleted. • Press the RECALL button to display the Channel Banner. • Press the OK button to channel 15-1. Antenna designation, Channel and program # and Station identifier Rating indication Signal Format Picture mode PIP/SPLIT CH# or setting Input information Clock necessary, use the button to Favorite channel list or delete channels from Favorite channel list. The Channel Up...

PT47XD64 User Guide
Page 18
...program your Remote Control with the Remote Control, repeat steps 3 through 6 using the Remote Control numeric keypad (0 ~ 9 buttons). The Universal Remote Control does not control all features found . After 5 seconds, the illuminated mode (component) buttons will fail. Note: Press appropriate component button on . 2. Device Operates Default TV TV (Panasonic Only) Panasonic Code VCR VCR (Preset) Panasonic Code DVD/CD DVD and CD (Preset) Panasonic Code DBS DBS STB & CBL STB (Preset) Panasonic DBS Code RCVR Audio Receiver (Preset) Panasonic RCVR Code CBL Cable...
...program your Remote Control with the Remote Control, repeat steps 3 through 6 using the Remote Control numeric keypad (0 ~ 9 buttons). The Universal Remote Control does not control all features found . After 5 seconds, the illuminated mode (component) buttons will fail. Note: Press appropriate component button on . 2. Device Operates Default TV TV (Panasonic Only) Panasonic Code VCR VCR (Preset) Panasonic Code DVD/CD DVD and CD (Preset) Panasonic Code DBS DBS STB & CBL STB (Preset) Panasonic DBS Code RCVR Audio Receiver (Preset) Panasonic RCVR Code CBL Cable...

PT47XD64 User Guide
Page 24
... factory default settings. Increase or decrease the bass response. ˆ TREBLE - Reset BASS, TREBLE and BALANCE adjustments to delete frame. Lets you choose one of three pre-set Picture Modes that best suits the program you can change color parameters manually for viewing in the picture (not selectable when receiving digital signal). • COLOR MATRIX - It provides a soft, film-like picture. ˆ COLOR - Reset each PIC Mode adjustments to adjust or activate. Picture Pic Mode Color Tint Brightness Picture...
... factory default settings. Increase or decrease the bass response. ˆ TREBLE - Reset BASS, TREBLE and BALANCE adjustments to delete frame. Lets you choose one of three pre-set Picture Modes that best suits the program you can change color parameters manually for viewing in the picture (not selectable when receiving digital signal). • COLOR MATRIX - It provides a soft, film-like picture. ˆ COLOR - Reset each PIC Mode adjustments to adjust or activate. Picture Pic Mode Color Tint Brightness Picture...

PT47XD64 User Guide
Page 25
... local TV guide). • Press OK to stereo. • SPEAKERS - Procedure • Press OK button while Manual Labels is displayed. Selects Analog audio signal received via the HDMI terminal. • Analog - Use the remote control VOL or VOL to select desired channels, then press the OK button to select Antenna (A) or Antenna (B). Move to video inputs. ˆ Preset Labels - ENGLISH AUDIO (cont.) ˆ Other Adjust (cont.) • SURROUND - TV speakers off. • HDMI In...
... local TV guide). • Press OK to stereo. • SPEAKERS - Procedure • Press OK button while Manual Labels is displayed. Selects Analog audio signal received via the HDMI terminal. • Analog - Use the remote control VOL or VOL to select desired channels, then press the OK button to select Antenna (A) or Antenna (B). Move to video inputs. ˆ Preset Labels - ENGLISH AUDIO (cont.) ˆ Other Adjust (cont.) • SURROUND - TV speakers off. • HDMI In...

PT47XD64 User Guide
Page 28
...; Press CH or CH button to set the hour (AM or PM). • Press VOL to set the Time of the week. ˆ Sleep - Note: The on-screen display will be the channel selected before you set Timer. Press MENU or OK to return to highlight the Timer Icon. • The television automatically turns OFF after 90 minutes will flash 3, 2 and 1 to indicate the last...
...; Press CH or CH button to set the hour (AM or PM). • Press VOL to set the Time of the week. ˆ Sleep - Note: The on-screen display will be the channel selected before you set Timer. Press MENU or OK to return to highlight the Timer Icon. • The television automatically turns OFF after 90 minutes will flash 3, 2 and 1 to indicate the last...

PT47XD64 User Guide
Page 29
... and digital closed caption, Convergence, Auto Power On, Image Shift and Zoom Adjust. Auto scan must be done when you select the input signal for the first time or whenever you specify Antenna mode (Cable only, Cable/Antenna or Antenna only). Very poor signal strength. 27 z However, if you have both Cable signal and terrestrial antenna signal, the Cable signal must be connected to channel scan all available analog and digital channels, manually add or delete channels and display the signal strength of the received signal. • Green...
... and digital closed caption, Convergence, Auto Power On, Image Shift and Zoom Adjust. Auto scan must be done when you select the input signal for the first time or whenever you specify Antenna mode (Cable only, Cable/Antenna or Antenna only). Very poor signal strength. 27 z However, if you have both Cable signal and terrestrial antenna signal, the Cable signal must be connected to channel scan all available analog and digital channels, manually add or delete channels and display the signal strength of the received signal. • Green...

PT47XD64 User Guide
Page 30
... television screen, and displays program guide or any language. • CC2 to adjust the convergence if needed. ˆ Zoom Adjust - Other Adj. Set Up Auto Power On Image Shift On Convergence SELECT Off CHANGE On MENU to return EXIT Convergence Zoom Adjust 28 z Colors sub-menu Procedure • In digital closed caption service you choose the type of time. Set Up SELECT OK Auto Power On Image Shift On Off CHANGE On MENU to return EXIT Zoom Adjust ˆ Convergence Note: Only use the remote control buttons...
... television screen, and displays program guide or any language. • CC2 to adjust the convergence if needed. ˆ Zoom Adjust - Other Adj. Set Up Auto Power On Image Shift On Convergence SELECT Off CHANGE On MENU to return EXIT Convergence Zoom Adjust 28 z Colors sub-menu Procedure • In digital closed caption service you choose the type of time. Set Up SELECT OK Auto Power On Image Shift On Off CHANGE On MENU to return EXIT Zoom Adjust ˆ Convergence Note: Only use the remote control buttons...
PT47XD64 User Guide
Page 36
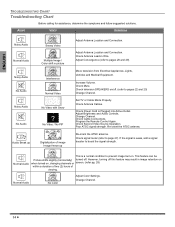
.... Adjust Brightness and Audio Controls. Program the Remote Control Again. Re-orient the ATSC antenna. This feature can be Picture shifts slightly (horizontally) turned off . (refer to pages 22 and 23) Change Channel. Move television from Electrical Appliances, Lights, Vehicles and Medical Equipment. Check Antenna Cables. Poor ATSC signal strength. Normal Audio No Color Adjust Color Settings. Change Channel. 34 z Adjust Antenna Location and Connection. Change Channel. Re-orient the ATSC antenna. No Video / No PIP Digitalization of viewing. Adjust Convergence...
.... Adjust Brightness and Audio Controls. Program the Remote Control Again. Re-orient the ATSC antenna. This feature can be Picture shifts slightly (horizontally) turned off . (refer to pages 22 and 23) Change Channel. Move television from Electrical Appliances, Lights, Vehicles and Medical Equipment. Check Antenna Cables. Poor ATSC signal strength. Normal Audio No Color Adjust Color Settings. Change Channel. 34 z Adjust Antenna Location and Connection. Change Channel. Re-orient the ATSC antenna. No Video / No PIP Digitalization of viewing. Adjust Convergence...
PT47XD64 User Guide
Page 37
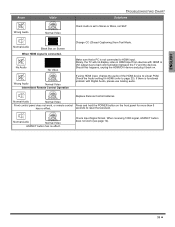
... 23). Check the Audio setting for more than 5 has no effect. Check Input Signal format. Rarely, the TV will not display video in HDMI input from Text Mode. If there is connected. Replace Remote Control batteries. Normal Audio Normal Video Front control panel does not work (see page 14). 35 z Normal Audio Normal Video ASPECT button has no effect. Normal Audio Black Box on . ENGLISH AUDIO Wrong Audio VIDEO Normal Video TROUBLESHOOTING CHART Solutions Check Audio is not connected to HDMI input. Should this happens, unplug the HDMI/DVI device...
... 23). Check the Audio setting for more than 5 has no effect. Check Input Signal format. Rarely, the TV will not display video in HDMI input from Text Mode. If there is connected. Replace Remote Control batteries. Normal Audio Normal Video Front control panel does not work (see page 14). 35 z Normal Audio Normal Video ASPECT button has no effect. Normal Audio Black Box on . ENGLISH AUDIO Wrong Audio VIDEO Normal Video TROUBLESHOOTING CHART Solutions Check Audio is not connected to HDMI input. Should this happens, unplug the HDMI/DVI device...

PT47XD64 User Guide
Page 38
... Channel Lock 30 Cinema 22 Clock Set 26 Closed Caption 28 Codes For Cable Box 17 Codes For Cassette Decks 18 Codes For CD Player 18 Codes For DBS 17 Codes For DVD 17 Codes For Personal Video Recorders 18 Codes For Receivers 18 Codes For VCR 17 Color 22 Color Matrix 22 Color Temp 22 Colors sub-menu 28 Component Codes 16, 17, 18 Component Connection Cables 5 Convergence 6, 28 Creating a Password 30 Customer Record 4 D Day Set 26 Digital 28 Digital Audio Out Connection 10 Digital TV-Set...
... Channel Lock 30 Cinema 22 Clock Set 26 Closed Caption 28 Codes For Cable Box 17 Codes For Cassette Decks 18 Codes For CD Player 18 Codes For DBS 17 Codes For DVD 17 Codes For Personal Video Recorders 18 Codes For Receivers 18 Codes For VCR 17 Color 22 Color Matrix 22 Color Temp 22 Colors sub-menu 28 Component Codes 16, 17, 18 Component Connection Cables 5 Convergence 6, 28 Creating a Password 30 Customer Record 4 D Day Set 26 Digital 28 Digital Audio Out Connection 10 Digital TV-Set...

