
PTD6000U User Guide
Page 2
... the user to the presence of uninsulated "dangerous voltage" within an equilateral triangle, is required. If you need to get the most out of important operating and maintenance (servicing) instructions in a manner which is equipped with your product may be found on the power plug. Do not defeat the purpose of your Panasonic DLP™Based Projector. Model number: PT...
... the user to the presence of uninsulated "dangerous voltage" within an equilateral triangle, is required. If you need to get the most out of important operating and maintenance (servicing) instructions in a manner which is equipped with your product may be found on the power plug. Do not defeat the purpose of your Panasonic DLP™Based Projector. Model number: PT...

PTD6000U User Guide
Page 5
... 12 Remote control 14 Maintenance Appendix ENGLISH - 5 Connect with other devices See the functional instructions in the CD-ROM that is provided with regard to the factory default 23 Menu Navigation 24 Main menu and Sub-menu 24 Navigating through the menu 27 Maintenance 4. Monitor Lamp indicators 28 Managing the indicated problems 28 Replacement 30 Replacing the Lamp unit 30 Replacing the Auto Cleaning Filter (ACF 31 Troubleshooting 33...
... 12 Remote control 14 Maintenance Appendix ENGLISH - 5 Connect with other devices See the functional instructions in the CD-ROM that is provided with regard to the factory default 23 Menu Navigation 24 Main menu and Sub-menu 24 Navigating through the menu 27 Maintenance 4. Monitor Lamp indicators 28 Managing the indicated problems 28 Replacement 30 Replacing the Lamp unit 30 Replacing the Auto Cleaning Filter (ACF 31 Troubleshooting 33...

PTD6000U User Guide
Page 6
... (for repairs. If the power cord is not strong enough to take the full weight of the batteries to observe this can be carried out by using the projector for repairs. Failure to come into water or let it from the wall. Contact an Authorized Service Center for example, by a qualified technician. ENGLISH - 6 The wall outlet shall be installed near...
... (for repairs. If the power cord is not strong enough to take the full weight of the batteries to observe this can be carried out by using the projector for repairs. Failure to come into water or let it from the wall. Contact an Authorized Service Center for example, by a qualified technician. ENGLISH - 6 The wall outlet shall be installed near...

PTD6000U User Guide
Page 8
...Service Center regarding cleaning costs. Use only the specified batteries. Electric shocks can result if this projector. Do not touch or bring your nearest Authorized Service Center to clean the projector when required. Please discuss with cables still attached can result in the remote control for indoor use... immediately. ENGLISH - 8 When disconnecting the power cord, hold the plug, not the cord. Remove the used batteries in fire or problems with operation. If you have absorbed the gas or that you leave used batteries from the remote control. If not using the projector...
...Service Center regarding cleaning costs. Use only the specified batteries. Electric shocks can result if this projector. Do not touch or bring your nearest Authorized Service Center to clean the projector when required. Please discuss with cables still attached can result in the remote control for indoor use... immediately. ENGLISH - 8 When disconnecting the power cord, hold the plug, not the cord. Remove the used batteries in fire or problems with operation. If you have absorbed the gas or that you leave used batteries from the remote control. If not using the projector...

PTD6000U User Guide
Page 9
... on use In order to get the best picture quality Draw curtains or blinds over any windows and turn off any lights near motors. If using the projector, close the front panel cover. If installing the projector to the ceiling, ask a qualified technician to carry out all installation work . Important Information Precautions with regard to safety Do not reach for the openings beside...
... on use In order to get the best picture quality Draw curtains or blinds over any windows and turn off any lights near motors. If using the projector, close the front panel cover. If installing the projector to the ceiling, ask a qualified technician to carry out all installation work . Important Information Precautions with regard to safety Do not reach for the openings beside...

PTD6000U User Guide
Page 10
... not use the power cord supplied with the corresponding device and a commercially available shielded interface cable. When the lamp exploded, it emits internal smoke-like gas. Note that should cover the following envisioned incidents. Password the projector and restrict access to confirm the correct procedure for more than 1 year. ENGLISH - 10 Change your password with the adjustable feet or projection lens cover removed...
... not use the power cord supplied with the corresponding device and a commercially available shielded interface cable. When the lamp exploded, it emits internal smoke-like gas. Note that should cover the following envisioned incidents. Password the projector and restrict access to confirm the correct procedure for more than 1 year. ENGLISH - 10 Change your password with the adjustable feet or projection lens cover removed...

PTD6000U User Guide
Page 12
... port STANDBY(RED)/ ON(GREEN) LAMP TEMP FILTER Projection lens Focus ring Remote control signal receptor (page 21) Front leg adjusters Screw up/down to adjust focus, zoom and shift by the projection lens. (page 19) Navigation and ENTER buttons Navigate through the menu items with F G I H, and activate them as this button while projecting an image automatically corrects the picture positioning on the screen. While the auto setup...
... port STANDBY(RED)/ ON(GREEN) LAMP TEMP FILTER Projection lens Focus ring Remote control signal receptor (page 21) Front leg adjusters Screw up/down to adjust focus, zoom and shift by the projection lens. (page 19) Navigation and ENTER buttons Navigate through the menu items with F G I H, and activate them as this button while projecting an image automatically corrects the picture positioning on the screen. While the auto setup...

PTD6000U User Guide
Page 13
... Projector RGB 1 IN Connect an RGB or YPBPR signals. (3, 4 or 5 wire BNC) RGB 2 IN Connect an RGB or YPBPR signals. (D-SUB 15 pin female) DVI-D IN Connect a single link DVI-D signals. Compatible with the Kensington MicroSaver Security System. Air intake port Air intake port POWER button Switch the projector on the POWER button of the projector body that is located near the terminals before using the control buttons. • Do not cover the ventilation openings...
... Projector RGB 1 IN Connect an RGB or YPBPR signals. (3, 4 or 5 wire BNC) RGB 2 IN Connect an RGB or YPBPR signals. (D-SUB 15 pin female) DVI-D IN Connect a single link DVI-D signals. Compatible with the Kensington MicroSaver Security System. Air intake port Air intake port POWER button Switch the projector on the POWER button of the projector body that is located near the terminals before using the control buttons. • Do not cover the ventilation openings...

PTD6000U User Guide
Page 14
ENGLISH - 14 Contact an Authorized Service Center for shortcut. (page 23) DEFAULT button Restores the default factory setting. (page 23) ID buttons ALL: Makes the remote control available to control any buttons. (page 21) AUTO SETUP Pressing this button while projecting an image automatically corrects the picture positioning on the screen. (page 21) SHUTTER button Pressing this may shorten battery life. • See "Remote control operation" on the POWER button of the remote control. (page 15) B Top view Remote control signal emitters...
ENGLISH - 14 Contact an Authorized Service Center for shortcut. (page 23) DEFAULT button Restores the default factory setting. (page 23) ID buttons ALL: Makes the remote control available to control any buttons. (page 21) AUTO SETUP Pressing this button while projecting an image automatically corrects the picture positioning on the screen. (page 21) SHUTTER button Pressing this may shorten battery life. • See "Remote control operation" on the POWER button of the remote control. (page 15) B Top view Remote control signal emitters...

PTD6000U User Guide
Page 15
... be erased if the batteries of the remote control are connected as part of the required projector by pressing the numeric buttons. The default setting of the projector in the light path or where devices are replaced, set before the ID SET button was set the same ID number again. ID number range: 01 - 64 About Your Projector J Using a wired remote control When multiple projectors are left exhausted. When...
... be erased if the batteries of the remote control are connected as part of the required projector by pressing the numeric buttons. The default setting of the projector in the light path or where devices are replaced, set before the ID SET button was set the same ID number again. ID number range: 01 - 64 About Your Projector J Using a wired remote control When multiple projectors are left exhausted. When...

PTD6000U User Guide
Page 16
... may cause damage or injury. ENGLISH - 16 Getting Started Setting up Projection method You can use a projector on the functional instructions in the CD that is required for rear projection. • See more detailed setting up instructions, INSTALLATION and COOLING CONDITION in PROJECTOR SETUP menu on top of another projector. • Do not cover the ventilation openings or place anything within 50...
... may cause damage or injury. ENGLISH - 16 Getting Started Setting up Projection method You can use a projector on the functional instructions in the CD that is required for rear projection. • See more detailed setting up instructions, INSTALLATION and COOLING CONDITION in PROJECTOR SETUP menu on top of another projector. • Do not cover the ventilation openings or place anything within 50...

PTD6000U User Guide
Page 19
... the image. 6. Readjust the zoom so that a problem has occurred and the power will flash in PROJECTOR SETUP menu. 3. POWER switch AC IN terminal 4. Adjust the shift position of INSTALLATION setting in red. NOTE: • The setup screen will be displayed with the front leg adjusters. 5. Press FOCUS, ZOOM or SHIFT button Remote control buttons to catch your fingers between the lens and shroud when shifting the lens. ENGLISH - 19 Connect the supplied power cord (220...
... the image. 6. Readjust the zoom so that a problem has occurred and the power will flash in PROJECTOR SETUP menu. 3. POWER switch AC IN terminal 4. Adjust the shift position of INSTALLATION setting in red. NOTE: • The setup screen will be displayed with the front leg adjusters. 5. Press FOCUS, ZOOM or SHIFT button Remote control buttons to catch your fingers between the lens and shroud when shifting the lens. ENGLISH - 19 Connect the supplied power cord (220...

PTD6000U User Guide
Page 21
... and SHIFT in POSITION menu. • For specific signals and landscape signals such as photographs and computer graphics. • The clock phase adjustment may malfunction under strong light such as computer signals are being input, or to operate. Input an analogue RGB image signal. 2. Remote control operation Shutter button Auto setup button Input select buttons On screen button Test pattern button Status button Function button Aspect button Operating range You can operate the projector with a bright white frame at the...
... and SHIFT in POSITION menu. • For specific signals and landscape signals such as photographs and computer graphics. • The clock phase adjustment may malfunction under strong light such as computer signals are being input, or to operate. Input an analogue RGB image signal. 2. Remote control operation Shutter button Auto setup button Input select buttons On screen button Test pattern button Status button Function button Aspect button Operating range You can operate the projector with a bright white frame at the...
PTD6000U User Guide
Page 23
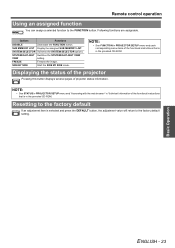
... DISABLE Deactivate the FUNCTION button. FREEZE Freezes the image. Remote control operation Using an assigned function You can assign a selected function to the factory default setting. Following functions are assignable. NOTE: • See FUNCTION in the provided CD-ROM. Basic Operation ENGLISH - 23 SUB MEMORY LIST Display the assigned SUB MEMORY LIST. SYSTEM DAYLIGHT Switches the SYSTEM DAYLIGHT VIEW VIEW setting. Resetting to the factory default If an adjustment...
... DISABLE Deactivate the FUNCTION button. FREEZE Freezes the image. Remote control operation Using an assigned function You can assign a selected function to the factory default setting. Following functions are assignable. NOTE: • See FUNCTION in the provided CD-ROM. Basic Operation ENGLISH - 23 SUB MEMORY LIST Display the assigned SUB MEMORY LIST. SYSTEM DAYLIGHT Switches the SYSTEM DAYLIGHT VIEW VIEW setting. Resetting to the factory default If an adjustment...

PTD6000U User Guide
Page 25
...INITIALIZE SERVICE PASSWORD TEST PATTERN TEST PATTERN SIGNAL LIST REGISTERED SIGNAL STATUS SUB MEMORY LIST ENGLISH - 25 Settings DISPLAY OPTION COLOR MATCHING OFF 3 COLORS 7 COLORS MEASURED COLOR CORRECTION OFF USER CONTRAST MODE NORMAL HIGH SCREEN SETTING SCREEN FORMAT 16:10 16:9 4:3 SCREEN POSITION AUTO SIGNAL ON AUTO SETUP DEFAULT USER DVI-D IN OFF WIDE DVI EDID EDID3 EDID1 EDID2(PC) DVI SIGNAL LEVEL 0-255:PC 16-235 SDI IN 64-940 4-1019 ON-SCREEN DISPLAY OSD POSITION 1 2 3 4 5 6 7 8 9 OSD DESIGN 1 2 3 4 5 6 OSD MEMORY ON OFF INPUT GUIDE...
...INITIALIZE SERVICE PASSWORD TEST PATTERN TEST PATTERN SIGNAL LIST REGISTERED SIGNAL STATUS SUB MEMORY LIST ENGLISH - 25 Settings DISPLAY OPTION COLOR MATCHING OFF 3 COLORS 7 COLORS MEASURED COLOR CORRECTION OFF USER CONTRAST MODE NORMAL HIGH SCREEN SETTING SCREEN FORMAT 16:10 16:9 4:3 SCREEN POSITION AUTO SIGNAL ON AUTO SETUP DEFAULT USER DVI-D IN OFF WIDE DVI EDID EDID3 EDID1 EDID2(PC) DVI SIGNAL LEVEL 0-255:PC 16-235 SDI IN 64-940 4-1019 ON-SCREEN DISPLAY OSD POSITION 1 2 3 4 5 6 7 8 9 OSD DESIGN 1 2 3 4 5 6 OSD MEMORY ON OFF INPUT GUIDE...
PTD6000U User Guide
Page 29
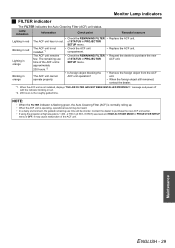
... operate properly. • Check the ACF unit compartment. • Replace the ACF unit. • Check the REMAINING FILTER • Request the dealer to purchase the new of STATUS in red. *2. 200 hours is not installed, displays "THE AIR FILTER HAS NOT BEEN INSTALLED PROPERLY." message and power off with the indicator blinking in PROJECTOR SETUP menu. Maintenance ENGLISH - 29 of STATUS in...
... operate properly. • Check the ACF unit compartment. • Replace the ACF unit. • Check the REMAINING FILTER • Request the dealer to purchase the new of STATUS in red. *2. 200 hours is not installed, displays "THE AIR FILTER HAS NOT BEEN INSTALLED PROPERLY." message and power off with the indicator blinking in PROJECTOR SETUP menu. Maintenance ENGLISH - 29 of STATUS in...

PTD6000U User Guide
Page 33
... or flashes. The control buttons of computer; The POWER switch is disabled. The video signal input source may not have a problem. The input source which is not compatible with pressing the ENTER button. The lens focus may not be at the wall outlet. COLOR or TINT adjustment may have been set correctly. The input source which is disabled. CONTROL PANEL of CONTROL DEVICE SETUP in DISPLAY OPTION menu of the computer needs to a terminal properly. REMOTE CONTROLLER of the operation range. The...
... or flashes. The control buttons of computer; The POWER switch is disabled. The video signal input source may not have a problem. The input source which is not compatible with pressing the ENTER button. The lens focus may not be at the wall outlet. COLOR or TINT adjustment may have been set correctly. The input source which is disabled. CONTROL PANEL of CONTROL DEVICE SETUP in DISPLAY OPTION menu of the computer needs to a terminal properly. REMOTE CONTROLLER of the operation range. The...

PTD6000U User Guide
Page 36
..., 1 080/24p, 1 080/23.98p Displayable resolution: VGA - Average value of the lens that is optional for the projectors that "L" follows in model number. Technical Information Specifications Power supply Power consumption Amps DLP™ chip Panel size (diagonal) Aspect ratio Display method Pixels Lens Motorized zoom Motorized focus Lamp Luminosity*2 Operating environment VIDEO/S-VIDEO RGB Scanning frequency*3 DVI-D YPBPR Color system Projection size Screen aspect ratio Installation Contrast ratio AC 120 V 60 Hz...
..., 1 080/24p, 1 080/23.98p Displayable resolution: VGA - Average value of the lens that is optional for the projectors that "L" follows in model number. Technical Information Specifications Power supply Power consumption Amps DLP™ chip Panel size (diagonal) Aspect ratio Display method Pixels Lens Motorized zoom Motorized focus Lamp Luminosity*2 Operating environment VIDEO/S-VIDEO RGB Scanning frequency*3 DVI-D YPBPR Color system Projection size Screen aspect ratio Installation Contrast ratio AC 120 V 60 Hz...

PTD6000U User Guide
Page 37
... link), DVI 1.0 compatible, HDCP compatible SERIAL 1 set, D-sub 9-pin (female), RS-232C compatible, computer control use REMOTE1 1 set, M3 pin jack, wired remote control use, multiple connection use Cabinet REMOTE2 LAN SDI 1 set, D-sub 9-pin, external control use 1 set, RJ-45, network connection use, PJLink™ compatible, 10 Base-T/100Base-TX 1 set , Mini DIN 4p Y: 1.0 V [p-p], C: 0.286 V [p-p], 75 Ω, compatible with ISO21118 international standards. *3. Appendix ENGLISH - 37 Technical Information S-VIDEO IN VIDEO IN RGB 1 IN Terminals RGB 2 IN DVI-D IN 1 set , BNC...
... link), DVI 1.0 compatible, HDCP compatible SERIAL 1 set, D-sub 9-pin (female), RS-232C compatible, computer control use REMOTE1 1 set, M3 pin jack, wired remote control use, multiple connection use Cabinet REMOTE2 LAN SDI 1 set, D-sub 9-pin, external control use 1 set, RJ-45, network connection use, PJLink™ compatible, 10 Base-T/100Base-TX 1 set , Mini DIN 4p Y: 1.0 V [p-p], C: 0.286 V [p-p], 75 Ω, compatible with ISO21118 international standards. *3. Appendix ENGLISH - 37 Technical Information S-VIDEO IN VIDEO IN RGB 1 IN Terminals RGB 2 IN DVI-D IN 1 set , BNC...

PTD6000U User Guide
Page 39
... 11 Air exhaust port 12 Air intake port 13 ASPECT Remote control button 14 Remote control function 22 Auto Cleaning Filter (ACF 13 AUTO SETUP Control panel button 12 Remote control button 14 Remote control function 21 B Battery 11 Compartment 14 Burglar hook port 12 C CD-ROM 11 Accessories 11 Menu 24 D DEFAULT Remote control button 14 Remote control function 23 Dimensions 38 Direct power off 20 DISPLAY LANGUAGE 24 DVI-D Control panel button 12 Remote control button 14 Terminal 13 E ENTER Control panel button 12 Menu navigation 27 Remote control button 14 F FILTER...
... 11 Air exhaust port 12 Air intake port 13 ASPECT Remote control button 14 Remote control function 22 Auto Cleaning Filter (ACF 13 AUTO SETUP Control panel button 12 Remote control button 14 Remote control function 21 B Battery 11 Compartment 14 Burglar hook port 12 C CD-ROM 11 Accessories 11 Menu 24 D DEFAULT Remote control button 14 Remote control function 23 Dimensions 38 Direct power off 20 DISPLAY LANGUAGE 24 DVI-D Control panel button 12 Remote control button 14 Terminal 13 E ENTER Control panel button 12 Menu navigation 27 Remote control button 14 F FILTER...


