
User Manual
Page 1
Before using your projector, be sure to read "Precautions with regard to safety" (pages 5 to 9). „„ For network operation, please read the instructions carefully, and save this product, please read the Network Operation Manual. WIN. DIGITAL ZOOM VOLUME Thank you for purchasing a Panasonic Projector. „„ Before operating this manual for future use. PT-LB2U PT-LB1U AUTO SETUP MENU RETURN FREEZE ENTER AV MUTE COMPUTER VIDEO DEFAULT FUNCTION INDEX- TQBJ0322-1 ENGLISH Operating Instructions Basic Manual LCD Projector Commercial Use Model No.
Before using your projector, be sure to read "Precautions with regard to safety" (pages 5 to 9). „„ For network operation, please read the instructions carefully, and save this product, please read the Network Operation Manual. WIN. DIGITAL ZOOM VOLUME Thank you for purchasing a Panasonic Projector. „„ Before operating this manual for future use. PT-LB2U PT-LB1U AUTO SETUP MENU RETURN FREEZE ENTER AV MUTE COMPUTER VIDEO DEFAULT FUNCTION INDEX- TQBJ0322-1 ENGLISH Operating Instructions Basic Manual LCD Projector Commercial Use Model No.
User Manual
Page 12
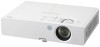
...; S-VIDEO IN AUDIO OUT ⑦ LAN SERIAL COMPUTER 1 IN 1 2 COMPUTER 2 IN VIDEO IN AUDIO IN ⑤ ⑥ ① Connect to a network cable. (See "Network Operation Manual".) ② Connect to a computer to control the projector's operation. ( page 17, 51) ③ Connect to a computer or YPBPR signal cable. ( page 17) ④...
...; S-VIDEO IN AUDIO OUT ⑦ LAN SERIAL COMPUTER 1 IN 1 2 COMPUTER 2 IN VIDEO IN AUDIO IN ⑤ ⑥ ① Connect to a network cable. (See "Network Operation Manual".) ② Connect to a computer to control the projector's operation. ( page 17, 51) ③ Connect to a computer or YPBPR signal cable. ( page 17) ④...
User Manual
Page 16
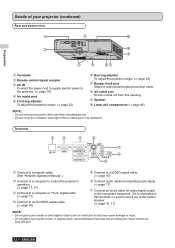
... VIDEO IN AUDIO IN To audio input To video output or audio output DVD player or To S-VIDEO output NOTE: • Switch the audio connection manually for more than one AV equipment connections.
... VIDEO IN AUDIO IN To audio input To video output or audio output DVD player or To S-VIDEO output NOTE: • Switch the audio connection manually for more than one AV equipment connections.
User Manual
Page 17
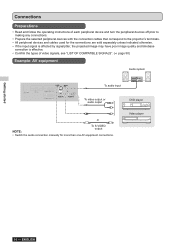
... signal cable, tighten the fixing screws on the D-Sub (15-pin) connector. • For the network connection between the projector and computers, see "Network Operation Manual" in the CD-ROM provided. • Only the RGB signal cable (1 piece) is attached. If any other cables are necessary, purchase them from the market...
... signal cable, tighten the fixing screws on the D-Sub (15-pin) connector. • For the network connection between the projector and computers, see "Network Operation Manual" in the CD-ROM provided. • Only the RGB signal cable (1 piece) is attached. If any other cables are necessary, purchase them from the market...
User Manual
Page 26
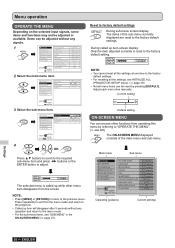
... the menu mode and return to the factory default setting. Press repeatedly to exit from operating this menu by pressing [DEFAULT]. Adjust each menu item manually. KEYSTONE NOTE: • You cannot reset all the settings at one time to the factory default settings. • For resetting all the settings, see INITIALIZE...
... the menu mode and return to the factory default setting. Press repeatedly to exit from operating this menu by pressing [DEFAULT]. Adjust each menu item manually. KEYSTONE NOTE: • You cannot reset all the settings at one time to the factory default settings. • For resetting all the settings, see INITIALIZE...
User Manual
Page 28
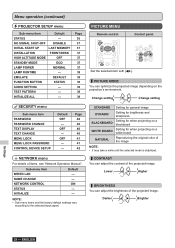
... NOTE: • It may take a while until the selected mode is stabilized. ▌▌CONTRAST You can adjust the brightness of items, see "Network Operation Manual". Change Cssehetatttniinnggge CsCehhtatainnngggee setting STANDARD DYNAMIC BLACKBOARD WHITE BOARD NATURAL Setting for general image Setting for brightness and sharpness Setting for when projecting on a blackboard...
... NOTE: • It may take a while until the selected mode is stabilized. ▌▌CONTRAST You can adjust the brightness of items, see "Network Operation Manual". Change Cssehetatttniinnggge CsCehhtatainnngggee setting STANDARD DYNAMIC BLACKBOARD WHITE BOARD NATURAL Setting for general image Setting for brightness and sharpness Setting for when projecting on a blackboard...

User Manual
Page 29
... ▌▌SHARPNESS You can adjust the white balance of the projected image. If so, set to OFF. ▌▌TV-SYSTEM Switch the setting manually to match the video data. (For S-VIDEO/VIDEO input signal only) ChangeCssheeattttniinnggge CsCehhtatainnngggee setting ▌▌COLOR TEMPERATURE You can adjust the sharpness of the...
... ▌▌SHARPNESS You can adjust the white balance of the projected image. If so, set to OFF. ▌▌TV-SYSTEM Switch the setting manually to match the video data. (For S-VIDEO/VIDEO input signal only) ChangeCssheeattttniinnggge CsCehhtatainnngggee setting ▌▌COLOR TEMPERATURE You can adjust the sharpness of the...
User Manual
Page 30
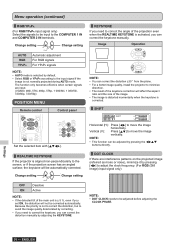
...but to avoid the image quality deteriorated by correcting. • If you need to correct the keystone, you can correct the distortion manually by adjusting the KEYSTONE. ▌▌KEYSTONE If you need to correct the angle of the projection even when the REALTIME KEYSTONE is... SHIFT H0 V0 Horizontal (H): Press [] to move the image vertically. Image Operation ENTER ENTER NOTE: • You can correct the keystone manually. NOTE: • This function can be adjusted by pressing the buttons directly. ▌▌DOT CLOCK If there are input: (VGA60, 480i,...
...but to avoid the image quality deteriorated by correcting. • If you need to correct the keystone, you can correct the distortion manually by adjusting the KEYSTONE. ▌▌KEYSTONE If you need to correct the angle of the projection even when the REALTIME KEYSTONE is... SHIFT H0 V0 Horizontal (H): Press [] to move the image vertically. Image Operation ENTER ENTER NOTE: • You can correct the keystone manually. NOTE: • This function can be adjusted by pressing the buttons directly. ▌▌DOT CLOCK If there are input: (VGA60, 480i,...
User Manual
Page 31
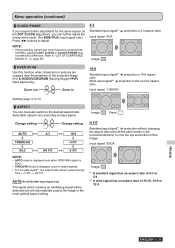
... OF COMPATIBLE SIGNALS". ( page 50) 4:3 Standard input signal*1 projection is displayed only for the same reason as the DOT CLOCK adjustment, you can manually switch to the desired aspect ratio. Image: Panel: H FIT Standard input signal*1 projection without changing the aspect ratio uses all the panel pixels in...
... OF COMPATIBLE SIGNALS". ( page 50) 4:3 Standard input signal*1 projection is displayed only for the same reason as the DOT CLOCK adjustment, you can manually switch to the desired aspect ratio. Image: Panel: H FIT Standard input signal*1 projection without changing the aspect ratio uses all the panel pixels in...

User Manual
Page 42
...;]. Menu operation (continued) ▌▌CONTROL DEVICE SETUP You can enable/disable the button operations of the PJ Link and network, see "Network Operation Manual".
...;]. Menu operation (continued) ▌▌CONTROL DEVICE SETUP You can enable/disable the button operations of the PJ Link and network, see "Network Operation Manual".

User Manual
Page 47
... promptly. • Ensure to use a torque driver and do not use an electrical screwdriver or an impact screwdriver. • For details, see the work instruction manual packed together with the ceiling mount bracket. • The model Nos. Disconnect the power plug. LAMP RUNTIME LAMP RUNTIME RESET. To select LAMP RUNTIME. 10...
... promptly. • Ensure to use a torque driver and do not use an electrical screwdriver or an impact screwdriver. • For details, see the work instruction manual packed together with the ceiling mount bracket. • The model Nos. Disconnect the power plug. LAMP RUNTIME LAMP RUNTIME RESET. To select LAMP RUNTIME. 10...
User Manual
Page 53
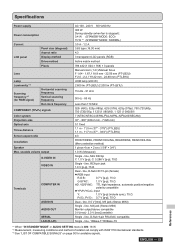
...: ECO) 15 W *1 (STANDBY MODE: NORMAL) 3.5 A - 1.2 A 0.63 type (16.00 mm) 4:3 3 transparent LCD panels (RGB) Active matrix method 786 432 (1 024 × 768) × 3 panels Manual zoom (1.2×)/Manual focus F 1.64 - 1.87, f 18.8 mm - 22.56 mm (PT-LB2U) F 2.0 - 2.2, f 19.22 mm - 22.68 mm (PT-LB1U) UHM lamp (220 W) 2 600 lm (PT...
...: ECO) 15 W *1 (STANDBY MODE: NORMAL) 3.5 A - 1.2 A 0.63 type (16.00 mm) 4:3 3 transparent LCD panels (RGB) Active matrix method 786 432 (1 024 × 768) × 3 panels Manual zoom (1.2×)/Manual focus F 1.64 - 1.87, f 18.8 mm - 22.56 mm (PT-LB2U) F 2.0 - 2.2, f 19.22 mm - 22.68 mm (PT-LB1U) UHM lamp (220 W) 2 600 lm (PT...

Brochure
Page 6
...180; (0.30 m) 1.25´ (0.38 m) 1.67 (´0.51 m) 2.10´ (0.64 m) 2.49´ (0.76 m) For more information about Panasonic projectors http://panasonic.net/avc/projector Weights and dimensions shown are the property of July 2010. fV 60 Hz 576i(625i): fH 15.63 kHz; Projection images..., 4:3 aspect ratio Display method Transparent LCD panel (x 3, R/G/B) Drive method Active matrix Pixels 786,432 pixels (1,024 x 768) x 3 panels Lens Manual zoom (1:1-1:1.2), manual focus, F 1.64-1.87, f 18.80-22.56 mm Lamp 220 W UHM lamp Screen size (diagonal) 33-300 inches (0.84-7.62 m) (4:3...
...180; (0.30 m) 1.25´ (0.38 m) 1.67 (´0.51 m) 2.10´ (0.64 m) 2.49´ (0.76 m) For more information about Panasonic projectors http://panasonic.net/avc/projector Weights and dimensions shown are the property of July 2010. fV 60 Hz 576i(625i): fH 15.63 kHz; Projection images..., 4:3 aspect ratio Display method Transparent LCD panel (x 3, R/G/B) Drive method Active matrix Pixels 786,432 pixels (1,024 x 768) x 3 panels Lens Manual zoom (1:1-1:1.2), manual focus, F 1.64-1.87, f 18.80-22.56 mm Lamp 220 W UHM lamp Screen size (diagonal) 33-300 inches (0.84-7.62 m) (4:3...


