

User Manual
Page 7
... the provided carrying bag with the lens cover on it. • Face the lens of the projector. ACCESSORIES Do not use only. • Avoid setting up time of high-voltage electrical power lines or power sources. • Do not install the projector at least 30 minutes before moving the projector. See "TEMP INDICATOR" on this will result in malfunctions or the lamp life will result. • Be especially...
... the provided carrying bag with the lens cover on it. • Face the lens of the projector. ACCESSORIES Do not use only. • Avoid setting up time of high-voltage electrical power lines or power sources. • Do not install the projector at least 30 minutes before moving the projector. See "TEMP INDICATOR" on this will result in malfunctions or the lamp life will result. • Be especially...
User Manual
Page 8
... when the lamp is used beyond the replacement time. • If the lamp bursts, gas inside the lamp is used, air exhaust vents or the warm air from air conditioning. See "TEST PATTERN" on the liquid crystal panel. CONNECTION TO EXTERNAL DEVICE When connecting the projector to a computer or external device, use the power cord supplied with the general public. • Set a password, and place restrictions on the users who can...
... when the lamp is used beyond the replacement time. • If the lamp bursts, gas inside the lamp is used, air exhaust vents or the warm air from air conditioning. See "TEST PATTERN" on the liquid crystal panel. CONNECTION TO EXTERNAL DEVICE When connecting the projector to a computer or external device, use the power cord supplied with the general public. • Set a password, and place restrictions on the users who can...

User Manual
Page 13
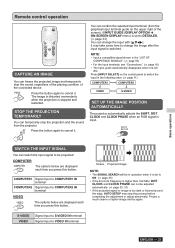
...; page 26) ④ Capture the projected image as a frozen picture. ( page 23) ⑤ Switch the required input signal button to select. ( page 23) ⑥ Reset some of your projector (continued) PROJECTOR'S REMOTE CONTROL Top and rear view Remote control signal emitters Installing/removing batteries Press the tab and lift up the cover. Preparation Details of the settings to the factory default settings. ( page 24) ⑦ Control the zoom size. ( page 25) ⑧...
...; page 26) ④ Capture the projected image as a frozen picture. ( page 23) ⑤ Switch the required input signal button to select. ( page 23) ⑥ Reset some of your projector (continued) PROJECTOR'S REMOTE CONTROL Top and rear view Remote control signal emitters Installing/removing batteries Press the tab and lift up the cover. Preparation Details of the settings to the factory default settings. ( page 24) ⑦ Control the zoom size. ( page 25) ⑧...
User Manual
Page 21
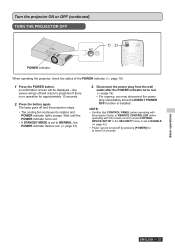
... the POWER indicator turns red. • If STANDBY MODE is installed. Turn the projector ON or OFF (continued) TURN THE PROJECTOR OFF POWER indicator STANDBY (R) ON(G) 1) 2) MENU AUTO SETUP RETURN FREEZE ENTER AV MUTE When operating the projector, check the status of the POWER indicator. ( page 19) 1 Press the POWER button. NOTE: • Confirm that CONTROL PANEL (when operating with the projector body) or REMOTE CONTROLLER (when operating with the remote control) under CONTROL DEVICE SETUP in the SECURITY menu is set to NORMAL, the POWER indicator flashes red. (...
... the POWER indicator turns red. • If STANDBY MODE is installed. Turn the projector ON or OFF (continued) TURN THE PROJECTOR OFF POWER indicator STANDBY (R) ON(G) 1) 2) MENU AUTO SETUP RETURN FREEZE ENTER AV MUTE When operating the projector, check the status of the POWER indicator. ( page 19) 1 Press the POWER button. NOTE: • Confirm that CONTROL PANEL (when operating with the projector body) or REMOTE CONTROLLER (when operating with the remote control) under CONTROL DEVICE SETUP in the SECURITY menu is set to NORMAL, the POWER indicator flashes red. (...
User Manual
Page 22
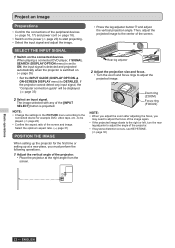
...; Turn the zoom and focus rings to be displayed. ( page 33) 2 Select an input signal. Basic operations 22 ENGLISH NOTE: • Change the settings in the PICTURE menu according to the connected device for the first time or setting up the projector for example DVD, video tape, etc., to adjust the projected image. Project an image Preparations • Confirm the connections of the peripheral devices ( page 16, 17) and power cord...
...; Turn the zoom and focus rings to be displayed. ( page 33) 2 Select an input signal. Basic operations 22 ENGLISH NOTE: • Change the settings in the PICTURE menu according to the connected device for the first time or setting up the projector for example DVD, video tape, etc., to adjust the projected image. Project an image Preparations • Confirm the connections of the peripheral devices ( page 16, 17) and power cord...
User Manual
Page 23
... before completing the adjustment or adjust abnormally. The image is distorted momentarily when the projection is left idle. AUTO SETUP SWITCH THE INPUT SIGNAL You can not be projected. Press [INPUT SELECT] on the upper right of the screen), if INPUT GUIDE (DISPLAY OPTION ON-SCREEN DISPLAY menu) is switched. Basic operations Remote control operation AUTO SETUP FREEZE AV MUTE COMPUTER VIDEO DEFAULT FUNCTION INDEX- DIGITAL ZOOM VOLUME CAPTURE AN IMAGE You can change the image after the input signal is set to ON...
... before completing the adjustment or adjust abnormally. The image is distorted momentarily when the projection is left idle. AUTO SETUP SWITCH THE INPUT SIGNAL You can not be projected. Press [INPUT SELECT] on the upper right of the screen), if INPUT GUIDE (DISPLAY OPTION ON-SCREEN DISPLAY menu) is switched. Basic operations Remote control operation AUTO SETUP FREEZE AV MUTE COMPUTER VIDEO DEFAULT FUNCTION INDEX- DIGITAL ZOOM VOLUME CAPTURE AN IMAGE You can change the image after the input signal is set to ON...
User Manual
Page 26
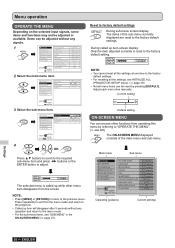
... PROJECTOR SETUP SECURITY NETWORK SELECT RETURN ENTER FUNCTION PICTURE MODE CONTRAST BRIGHTNESS COLOR TINT SHARPNESS COLOR TEMPERATURE DAYLIGHT VIEW NOISE REDUCTION TV-SYSTEM STANDARD DEFAULT AUTO OFF AUTO Operating guidance Current settings Settings 26 ENGLISH Default setting ENTER PICTURE POSITION LANGUAGE DISPLAY OPTION PROJECTOR SETUP SECURITY NETWORK KEYSTONE SHIFT OVER SCAN ASPECT SELECT DEFAULT RETURN ENTER FUNCTION ON-SCREEN MENU You can be adjusted or available. Settings Menu operation OPERATE THE MENU Depending on the selected input signals...
... PROJECTOR SETUP SECURITY NETWORK SELECT RETURN ENTER FUNCTION PICTURE MODE CONTRAST BRIGHTNESS COLOR TINT SHARPNESS COLOR TEMPERATURE DAYLIGHT VIEW NOISE REDUCTION TV-SYSTEM STANDARD DEFAULT AUTO OFF AUTO Operating guidance Current settings Settings 26 ENGLISH Default setting ENTER PICTURE POSITION LANGUAGE DISPLAY OPTION PROJECTOR SETUP SECURITY NETWORK KEYSTONE SHIFT OVER SCAN ASPECT SELECT DEFAULT RETURN ENTER FUNCTION ON-SCREEN MENU You can be adjusted or available. Settings Menu operation OPERATE THE MENU Depending on the selected input signals...
User Manual
Page 27
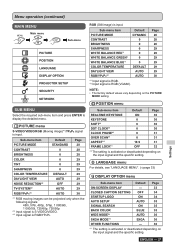
... the specific setting. Sub-menu item Default PICTURE MODE DYNAMIC CONTRAST 0 BRIGHTNESS 0 SHARPNESS 0 WHITE BALANCE RED*1 0 WHITE BALANCE GREEN*1 0 WHITE BALANCE BLUE*1 0 COLOR TEMPERATURE DEFAULT DAYLIGHT VIEW AUTO RGB/YPBPR*2 AUTO *1 Input signal is RGB. *2 Input signal is activated or deactivated depending on the input signal and the specific setting. LANGUAGE menu For details, see "LANGUAGE MENU". (page 33) DISPLAY OPTION menu Sub-menu item Default Page ON-SCREEN DISPLAY - 33 CLOSED CAPTION SETTING OFF 34 STARTUP LOGO AUTO SETUP SIGNAL...
... the specific setting. Sub-menu item Default PICTURE MODE DYNAMIC CONTRAST 0 BRIGHTNESS 0 SHARPNESS 0 WHITE BALANCE RED*1 0 WHITE BALANCE GREEN*1 0 WHITE BALANCE BLUE*1 0 COLOR TEMPERATURE DEFAULT DAYLIGHT VIEW AUTO RGB/YPBPR*2 AUTO *1 Input signal is RGB. *2 Input signal is activated or deactivated depending on the input signal and the specific setting. LANGUAGE menu For details, see "LANGUAGE MENU". (page 33) DISPLAY OPTION menu Sub-menu item Default Page ON-SCREEN DISPLAY - 33 CLOSED CAPTION SETTING OFF 34 STARTUP LOGO AUTO SETUP SIGNAL...

User Manual
Page 29
... the ambient light sources cannot be controlled. Change Cssheetatttniinnggge CsCehhtatainnngggee setting DEFAULT HIGH LOW Balanced white More bluish More reddish AUTO NTSC NTSC4.43 SECAM PAL-N PAL-M PAL NOTE: • AUTO mode is selected by default. • When the projector is not available when INSTALLATION in 3-color temperature. (For RGB (Still image) input signal only) Csheattni-ng1ge Cs+eh1tatinngge Advanced menu item Default WHITE BALANCE RED 0 WHITE BALANCE GREEN 0 WHITE BALANCE BLUE 0 AUTO ON OFF Automatic adjustment Active Deactive...
... the ambient light sources cannot be controlled. Change Cssheetatttniinnggge CsCehhtatainnngggee setting DEFAULT HIGH LOW Balanced white More bluish More reddish AUTO NTSC NTSC4.43 SECAM PAL-N PAL-M PAL NOTE: • AUTO mode is selected by default. • When the projector is not available when INSTALLATION in 3-color temperature. (For RGB (Still image) input signal only) Csheattni-ng1ge Cs+eh1tatinngge Advanced menu item Default WHITE BALANCE RED 0 WHITE BALANCE GREEN 0 WHITE BALANCE BLUE 0 AUTO ON OFF Automatic adjustment Active Deactive...

User Manual
Page 36
...(G) LAMP ENTER ENTER TEMP MENUTEMP MENFUUNCTION FUNCTION AUTO SETUP For details, see "INDEX-WINDOW display". ( page 24) DIGITAL ZOOM [] button: zoom in [] button: zoom out DIGITAL ZOOM 1.5 Press [ENTER] to escape. While the image is zoomed. SIGNAL NAME Name of input signal FREQUENCY Scanning frequency of the remote control button operations from the sub-menu. The image is distorted momentarily when the image is frozen, the audio sound through the projector will stop projection and audio sound...
...(G) LAMP ENTER ENTER TEMP MENUTEMP MENFUUNCTION FUNCTION AUTO SETUP For details, see "INDEX-WINDOW display". ( page 24) DIGITAL ZOOM [] button: zoom in [] button: zoom out DIGITAL ZOOM 1.5 Press [ENTER] to escape. While the image is zoomed. SIGNAL NAME Name of input signal FREQUENCY Scanning frequency of the remote control button operations from the sub-menu. The image is distorted momentarily when the image is frozen, the audio sound through the projector will stop projection and audio sound...
User Manual
Page 39
... password is reset to adjust the focus of the image. ENTER To display the test pattern. Change Cpsahetatttenirngnge CsCehhtaatinnngggee pattern Press [MENU] or [RETURN] to return to the PROJECTOR SETUP menu, or press repeatedly to COMPUTER 1 IN or COMPUTER 2 IN. Select OK and turn ON or OFF the audio output in standby mode. NOTE: • The initial screen is an all of the customized settings in MENU...
... password is reset to adjust the focus of the image. ENTER To display the test pattern. Change Cpsahetatttenirngnge CsCehhtaatinnngggee pattern Press [MENU] or [RETURN] to return to the PROJECTOR SETUP menu, or press repeatedly to COMPUTER 1 IN or COMPUTER 2 IN. Select OK and turn ON or OFF the audio output in standby mode. NOTE: • The initial screen is an all of the customized settings in MENU...

User Manual
Page 42
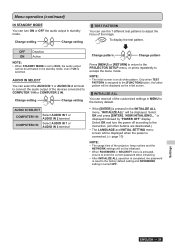
.... NETWORK MENU Remote control Control panel MENU MENU RETURN RETURN FREEZE ENTER FREEZE ENTER AV MUTE AV MUTE COMPUTER COMPUTER VIDEO VIDEO DEFAULT DFUENFCATUIOLNT INFUDNECX-TWIOINN. NOTE: • These items are disabled and you will be required to clear DISABLE: During the standby mode or projection, press and hold [ENTER] and [MENU] for network connection with []. NAME CHANGE You can reset the settings of the network to DISABLE, the password screen...
.... NETWORK MENU Remote control Control panel MENU MENU RETURN RETURN FREEZE ENTER FREEZE ENTER AV MUTE AV MUTE COMPUTER COMPUTER VIDEO VIDEO DEFAULT DFUENFCATUIOLNT INFUDNECX-TWIOINN. NOTE: • These items are disabled and you will be required to clear DISABLE: During the standby mode or projection, press and hold [ENTER] and [MENU] for network connection with []. NAME CHANGE You can reset the settings of the network to DISABLE, the password screen...

User Manual
Page 43
... temperature in the projector rises, the fan speed increases and the sound becomes louder. turned on the projector*1 and set the HIGH ALTITUDE MODE to ON. ( page 37) *1 The projector will operate for 2 minutes with the POWER indicator. ( page 19) Manage the problem as follows: LAMP INDICATOR TEMP indicator LAMP indicator FOCUS ZOOM STANDBY (R) ON(G) LAMP TEMP MENU INPUT SELECT ENTER FUNCTION Indicator Problem Cause Remedy • Illuminating red • Flashing red LAMP RUNTIME has reached 3 800 hours. dirty and the ventilation covered...
... temperature in the projector rises, the fan speed increases and the sound becomes louder. turned on the projector*1 and set the HIGH ALTITUDE MODE to ON. ( page 37) *1 The projector will operate for 2 minutes with the POWER indicator. ( page 19) Manage the problem as follows: LAMP INDICATOR TEMP indicator LAMP indicator FOCUS ZOOM STANDBY (R) ON(G) LAMP TEMP MENU INPUT SELECT ENTER FUNCTION Indicator Problem Cause Remedy • Illuminating red • Flashing red LAMP RUNTIME has reached 3 800 hours. dirty and the ventilation covered...
User Manual
Page 45
... mounted in the ceiling, do not work directly under the projector or put your local authorities or dealer and ask for the air filter (TXFKN01VKN5). of the screen, and it will stay until you respond. NOTE: • The guide time, 4 000 hours, is turned off automatically in explosion of the lamp unit or environmental conditions. Maintenance ENGLISH 45 ON-SCREEN DISPLAY REPLACE LAMP LAMP indicator 3 800 hours 5 000 hours Display "REPLACE LAMP...
... mounted in the ceiling, do not work directly under the projector or put your local authorities or dealer and ask for the air filter (TXFKN01VKN5). of the screen, and it will stay until you respond. NOTE: • The guide time, 4 000 hours, is turned off automatically in explosion of the lamp unit or environmental conditions. Maintenance ENGLISH 45 ON-SCREEN DISPLAY REPLACE LAMP LAMP indicator 3 800 hours 5 000 hours Display "REPLACE LAMP...
User Manual
Page 48
... operate. zz The lamp unit cover has not been securely installed. No sound can be heard from a laptop computer may not be correct. (You may be able to the projector may be controlled through serial terminal. zz The remote control unit may not be at the minimum setting. zz CONTROL PANEL in the PROJECTOR SETUP menu is lit or flashes. zz The lens focus may not be obstructed. zz The input...
... operate. zz The lamp unit cover has not been securely installed. No sound can be heard from a laptop computer may not be correct. (You may be able to the projector may be controlled through serial terminal. zz The remote control unit may not be at the minimum setting. zz CONTROL PANEL in the PROJECTOR SETUP menu is lit or flashes. zz The lens focus may not be obstructed. zz The input...
User Manual
Page 55
... SCAN 31 P PASSWORD 40 PASSWORD CHANGE 40 PICTURE MENU 28 PICTURE MODE 28 POSITION MENU 30 POSITION THE IMAGE 22 POWER CORD 18 POWER indicator status 19 PROJECTION METHOD 15 PROJECTOR SETUP MENU 36 PROJECTOR'S MAIN UNIT 11 PROJECTOR'S REMOTE CONTROL 13 R REALTIME KEYSTONE 30 Remote control operation 23 REPLACE THE LAMP UNIT 45 RGB/YPBPR 30 S SCREEN SIZE AND THROW DISTANCE 14 SECURITY 8 SECURITY MENU 40 SELECT THE INPUT SIGNAL........... 22 SERIAL TERMINAL 51 SHARPNESS 29 SHIFT 30 SIGNAL SEARCH 35 Specifications 53 STANDBY MODE 37 STARTUP LOGO...
... SCAN 31 P PASSWORD 40 PASSWORD CHANGE 40 PICTURE MENU 28 PICTURE MODE 28 POSITION MENU 30 POSITION THE IMAGE 22 POWER CORD 18 POWER indicator status 19 PROJECTION METHOD 15 PROJECTOR SETUP MENU 36 PROJECTOR'S MAIN UNIT 11 PROJECTOR'S REMOTE CONTROL 13 R REALTIME KEYSTONE 30 Remote control operation 23 REPLACE THE LAMP UNIT 45 RGB/YPBPR 30 S SCREEN SIZE AND THROW DISTANCE 14 SECURITY 8 SECURITY MENU 40 SELECT THE INPUT SIGNAL........... 22 SERIAL TERMINAL 51 SHARPNESS 29 SHIFT 30 SIGNAL SEARCH 35 Specifications 53 STANDBY MODE 37 STARTUP LOGO...

Brochure
Page 2
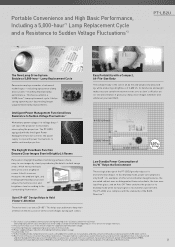
... longer intervals. 1 *2 Standby mode : Normal Enhanced Basic Performance Installation Flexibility Easy Operation A 5,000-hour*1 lamp replacement cycle saves operating costs. Its Intelligent Power Management function allows resistance to features like Speed Start, which brings up the image quickly*2, and simple, single-leg adjustment of Uses - A network function reduces management tasks with a wired LAN connection, and allows flexible system upgrading. Balanced Quality and Performance Setup is turned on for a Wide...
... longer intervals. 1 *2 Standby mode : Normal Enhanced Basic Performance Installation Flexibility Easy Operation A 5,000-hour*1 lamp replacement cycle saves operating costs. Its Intelligent Power Management function allows resistance to features like Speed Start, which brings up the image quickly*2, and simple, single-leg adjustment of Uses - A network function reduces management tasks with a wired LAN connection, and allows flexible system upgrading. Balanced Quality and Performance Setup is turned on for a Wide...
Brochure
Page 3
... lens uses lead-free glass, and an Auto Off Timer switches the projector to a client's office for a preset time. Its handy size and weight make it is received for an on the screen images during several tens of the European RoHS Directive. 2 The specified toxic substances used in Brightly Lit Rooms Panasonic's Daylight View Basic technology achieves sharp, easy-to carry from RS-232C control...
... lens uses lead-free glass, and an Auto Off Timer switches the projector to a client's office for a preset time. Its handy size and weight make it is received for an on the screen images during several tens of the European RoHS Directive. 2 The specified toxic substances used in Brightly Lit Rooms Panasonic's Daylight View Basic technology achieves sharp, easy-to carry from RS-232C control...

Brochure
Page 5
... the input signal is displayed on the screen to help prevent connection errors. •A Compact, Easy-to-Use Wireless Remote Control •Selectable 17-language on . *12 Uploadable still images are convenient when projecting in Versatile Functions for easy recycling. ɾDaylight View Basic function makes the screen seem brighter without increasing power consumption. ɾLead-free glass is carefully designed by a VGA cable, this function displays the output setting method...
... the input signal is displayed on the screen to help prevent connection errors. •A Compact, Easy-to-Use Wireless Remote Control •Selectable 17-language on . *12 Uploadable still images are convenient when projecting in Versatile Functions for easy recycling. ɾDaylight View Basic function makes the screen seem brighter without increasing power consumption. ɾLead-free glass is carefully designed by a VGA cable, this function displays the output setting method...

Brochure
Page 6
... ambient temperature exceeds 95°F /35°C (85°F /30°C in normal standby mode when set to audio monitor out and with ISO 21118 international standards. *3: Input signals that exceed this resolution will be received from the edge of screen to center of Systems Business Group have received ISO14001:2004 - Specifications are the property of their respective trademark owners. Projection images simulated...
... ambient temperature exceeds 95°F /35°C (85°F /30°C in normal standby mode when set to audio monitor out and with ISO 21118 international standards. *3: Input signals that exceed this resolution will be received from the edge of screen to center of Systems Business Group have received ISO14001:2004 - Specifications are the property of their respective trademark owners. Projection images simulated...


