PVL552H User Guide
Page 3
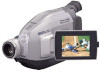
... tested and found to operate. You can be installed near maritime safety communications equipment or other critical navigation or communication equipment operating between 0.45-30 MHz. 3 This symbol alerts the user that important literature concerning the operation and maintenance of the FCC Rules. It is designed to record and play a Compact VHS Camcorder recording on your VHS VCR using the supplied VHS PlayPak. If necessary, consult...
... tested and found to operate. You can be installed near maritime safety communications equipment or other critical navigation or communication equipment operating between 0.45-30 MHz. 3 This symbol alerts the user that important literature concerning the operation and maintenance of the FCC Rules. It is designed to record and play a Compact VHS Camcorder recording on your VHS VCR using the supplied VHS PlayPak. If necessary, consult...
PVL552H User Guide
Page 4
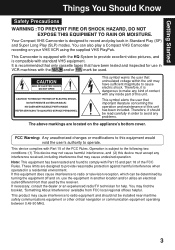
...) or send e-mail to replace your obsolete outlet. This is a safety feature. Do not defeat the safety purpose of the polarized plug. Power-Cord Protection - For added protection of the National Electrical Code, provides information with care. Read Instructions - Retain Instructions - Follow Instructions - All operating and maintenance instructions should be hazardous. 7. Do not use a mounting accessory recommended by the video product manufacturer as they...
...) or send e-mail to replace your obsolete outlet. This is a safety feature. Do not defeat the safety purpose of the polarized plug. Power-Cord Protection - For added protection of the National Electrical Code, provides information with care. Read Instructions - Retain Instructions - Follow Instructions - All operating and maintenance instructions should be hazardous. 7. Do not use a mounting accessory recommended by the video product manufacturer as they...
PVL552H User Guide
Page 5
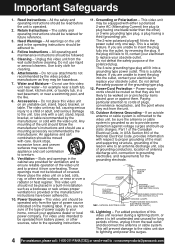
... extensive work by improper handling or storage. this indicates a need for outdoor use strong or abrasive detergents when cleaning your Camcorder from a pool or even a cup of any kind onto the video unit. 18. Your Camcorder and power supply should not be taken to qualified service personnel under the following the operating instructions. Do not connect the power supply or operate your Camcorder. There are free from...
... extensive work by improper handling or storage. this indicates a need for outdoor use strong or abrasive detergents when cleaning your Camcorder from a pool or even a cup of any kind onto the video unit. 18. Your Camcorder and power supply should not be taken to qualified service personnel under the following the operating instructions. Do not connect the power supply or operate your Camcorder. There are free from...

PVL552H User Guide
Page 6
... 12 Using MENU Mode ...13 Setting the Clock (Time Zone, Auto Daylight Saving Time 14~15 Built-in Auto Light (Using the Light, Replacing the Bulb 16 Camera Recording (Basic, Stand-by, Programmed Recording 17~19 Playing Back Recordings (Basic Playback, Visual Search, Still Picture, Tracking, TV/VCR Playback 20~21 Copying your Tapes (dubbing 22 Four-Speed Power Zoom 23 Backlight ...23 Focus (Auto/Manual Focus 24 High Speed Shutter (Auto/Manual Shutter 25 Auto Fade ...26 Color Digital Fade 27 Digital Zoom ...28 Digital...
... 12 Using MENU Mode ...13 Setting the Clock (Time Zone, Auto Daylight Saving Time 14~15 Built-in Auto Light (Using the Light, Replacing the Bulb 16 Camera Recording (Basic, Stand-by, Programmed Recording 17~19 Playing Back Recordings (Basic Playback, Visual Search, Still Picture, Tracking, TV/VCR Playback 20~21 Copying your Tapes (dubbing 22 Four-Speed Power Zoom 23 Backlight ...23 Focus (Auto/Manual Focus 24 High Speed Shutter (Auto/Manual Shutter 25 Auto Fade ...26 Color Digital Fade 27 Digital Zoom ...28 Digital...
PVL552H User Guide
Page 8
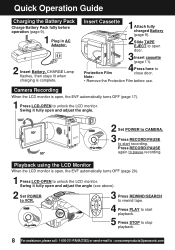
... Battery. Camera Recording When the LCD monitor is open and adjust the angle. 2 Set POWER to CAMERA. 3 Press RECORD/PAUSE to start playback. 5 Press STOP to stop playback. 8 For assistance, please call : 1-800-211-PANA(7262) or send e-mail to pause recording. Playback using the LCD Monitor When the LCD monitor is open door. 3Insert cassette (page 11). 4Press here to unlock the LCD monitor. Quick Operation Guide Charging the Battery Pack Charge Battery Pack fully before use...
... Battery. Camera Recording When the LCD monitor is open and adjust the angle. 2 Set POWER to CAMERA. 3 Press RECORD/PAUSE to start playback. 5 Press STOP to stop playback. 8 For assistance, please call : 1-800-211-PANA(7262) or send e-mail to pause recording. Playback using the LCD Monitor When the LCD monitor is open door. 3Insert cassette (page 11). 4Press here to unlock the LCD monitor. Quick Operation Guide Charging the Battery Pack Charge Battery Pack fully before use...
PVL552H User Guide
Page 10
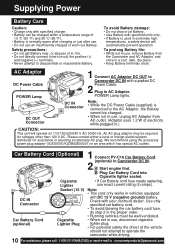
... : consumerproducts@panasonic.com AC Adaptor DC Power Cable POWER Lamp 1 Connect AC Adaptor DC OUT to disassemble or reassemble Battery. An AC plug adaptor may be well ventilated. Socket (12 V) Note: • This cord only works in vehicles equipped with supplied DC Power Cable. 2 Plug in AC Adaptor. POWER Lamp lights. DC IN Connector Car Battery Cord (optional) Cigarette Lighter • If Car Battery cord fuse needs replacing, use...
... : consumerproducts@panasonic.com AC Adaptor DC Power Cable POWER Lamp 1 Connect AC Adaptor DC OUT to disassemble or reassemble Battery. An AC plug adaptor may be well ventilated. Socket (12 V) Note: • This cord only works in vehicles equipped with supplied DC Power Cable. 2 Plug in AC Adaptor. POWER Lamp lights. DC IN Connector Car Battery Cord (optional) Cigarette Lighter • If Car Battery cord fuse needs replacing, use...
PVL552H User Guide
Page 11
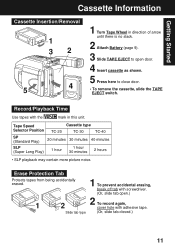
Getting Started Cassette Information Cassette Insertion/Removal 1 32 5 4 1 Turn Tape Wheel in this unit. Record/Playback Time Use tapes with adhesive tape. (Or, slide tab closed.) 11 Erase Protection Tab Protects tapes from being accidentally erased. 1 2 Slide tab type 1 To prevent accidental erasing, break off tab with screwdriver. (Or, slide tab open.) 2 To record again, cover hole with the mark in direction of arrow until there is...
Getting Started Cassette Information Cassette Insertion/Removal 1 32 5 4 1 Turn Tape Wheel in this unit. Record/Playback Time Use tapes with adhesive tape. (Or, slide tab closed.) 11 Erase Protection Tab Protects tapes from being accidentally erased. 1 2 Slide tab type 1 To prevent accidental erasing, break off tab with screwdriver. (Or, slide tab open.) 2 To record again, cover hole with the mark in direction of arrow until there is...
PVL552H User Guide
Page 13
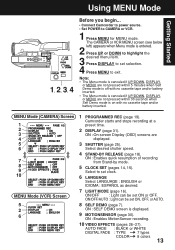
... no cassette tape and/or battery inserted. • The Menu mode is canceled if UP/DOWN, DISPLAY, or MENU are displayed. 3 SHUTTER (page 25). MENU Mode (CAMERA) Screen 1 2 3 4 5 6 7 8 9 10 MENU Mode (VCR) Screen 5 2 6 1 PROGRAMMED REC (page 19). Using MENU Mode Getting Started 1, 2, 3, 4 Before you begin... • Connect Camcorder to power source. • Set POWER to set clock. 6 LANGUAGE Select LANGUAGE : ENGLISH or IDIOMA : ESPAÑOL as desired. 7 LIGHT MODE (page 16). ON/OFF/AUTO : Light can be set ON or OFF. AUTO FADE...
... no cassette tape and/or battery inserted. • The Menu mode is canceled if UP/DOWN, DISPLAY, or MENU are displayed. 3 SHUTTER (page 25). MENU Mode (CAMERA) Screen 1 2 3 4 5 6 7 8 9 10 MENU Mode (VCR) Screen 5 2 6 1 PROGRAMMED REC (page 19). Using MENU Mode Getting Started 1, 2, 3, 4 Before you begin... • Connect Camcorder to power source. • Set POWER to set clock. 6 LANGUAGE Select LANGUAGE : ENGLISH or IDIOMA : ESPAÑOL as desired. 7 LIGHT MODE (page 16). ON/OFF/AUTO : Light can be set ON or OFF. AUTO FADE...
PVL552H User Guide
Page 15
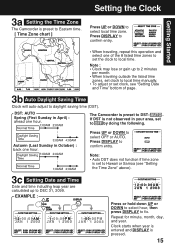
... Camcorder is set to Hawaii or Samoa (see "Setting the Time Zone" above). 3c Setting Date and Time Date and time including leap year are calculated up to 2 minutes per month. • When traveling outside the listed time zones, set clock to local time manually. • To adjust or set clock, see "Setting Date and Time" bottom of the 8 listed time zones to set to daylight saving time (DST). Repeat for minute, month, day, and year. DST: AUTO Spring...
... Camcorder is set to Hawaii or Samoa (see "Setting the Time Zone" above). 3c Setting Date and Time Date and time including leap year are calculated up to 2 minutes per month. • When traveling outside the listed time zones, set clock to local time manually. • To adjust or set clock, see "Setting Date and Time" bottom of the 8 listed time zones to set to daylight saving time (DST). Repeat for minute, month, day, and year. DST: AUTO Spring...
PVL552H User Guide
Page 16
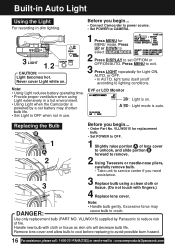
... power source. • Set POWER to lighting conditions. Never cover Light while on /off according to CAMERA. 3 LIGHT 1 2, CAUTION: Light becomes hot. Press UP or DOWN to select LIGHT MODE . 2 Press DISPLAY to : consumerproducts@panasonic.com Excessive force may shorten bulb life. • Set Light to service center if you need assistance. 3 Replace bulb using Light extensively in dim lighting. Handle new bulb with fingers.) 4 Replace lens cover. Note: • Using Light reduces battery operating time...
... power source. • Set POWER to lighting conditions. Never cover Light while on /off according to CAMERA. 3 LIGHT 1 2, CAUTION: Light becomes hot. Press UP or DOWN to select LIGHT MODE . 2 Press DISPLAY to : consumerproducts@panasonic.com Excessive force may shorten bulb life. • Set Light to service center if you need assistance. 3 Replace bulb using Light extensively in dim lighting. Handle new bulb with fingers.) 4 Replace lens cover. Note: • Using Light reduces battery operating time...
PVL552H User Guide
Page 17
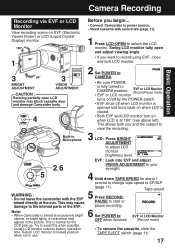
... ADJUSTMENT 3 VISION ADJUSTMENT CAUTION : Rotating partially open LCD monitor may cause Press RECORD/ PAUSE to start or damage to avoid this when possible. • Using LCD monitor reduces battery operation time. This allows both you want to record using EVF, close and lock LCD monitor. 2 Set POWER to view the recording. Before you begin... • Connect Camcorder to EVF or LCD Monitor OFF when finished. (Record mode) • To remove the cassette, slide the TAPE EJECT switch...
... ADJUSTMENT 3 VISION ADJUSTMENT CAUTION : Rotating partially open LCD monitor may cause Press RECORD/ PAUSE to start or damage to avoid this when possible. • Using LCD monitor reduces battery operation time. This allows both you want to record using EVF, close and lock LCD monitor. 2 Set POWER to view the recording. Before you begin... • Connect Camcorder to EVF or LCD Monitor OFF when finished. (Record mode) • To remove the cassette, slide the TAPE EJECT switch...

PVL552H User Guide
Page 18
...-BY RELEASE . 3 Press DISPLAY to CAMERA. a, d, D 1, b, c, A, C OFF : From Stand-by pressing RECORD/PAUSE two times. c To resume recording, set to review recording. Note: • Use Manual Easy Edit (left in Camcorder. Camera Recording Before you begin... • Connect Camcorder to : consumerproducts@panasonic.com Stand-by mode, press RECORD/PAUSE two times to continue recording. Manual Easy Editing For proper continuity when taping from Stop mode or after attaching a new Battery. b Press PLAY to OFF at...
...-BY RELEASE . 3 Press DISPLAY to CAMERA. a, d, D 1, b, c, A, C OFF : From Stand-by pressing RECORD/PAUSE two times. c To resume recording, set to review recording. Note: • Use Manual Easy Edit (left in Camcorder. Camera Recording Before you begin... • Connect Camcorder to : consumerproducts@panasonic.com Stand-by mode, press RECORD/PAUSE two times to continue recording. Manual Easy Editing For proper continuity when taping from Stop mode or after attaching a new Battery. b Press PLAY to OFF at...

PVL552H User Guide
Page 19
...-by 30 minutes. 3 Press DOWN to select REC TIME . Recording will be done as scheduled. Press DISPLAY repeatedly to select one of DISPLAY increases start and stop time. Before you begin... • Connect Camcorder to CAMERA. 1, 2, 3 4 REC TIME : 1 Press MENU for longer recordings. • Insert cassette with record tab (page 11). • Set POWER to power source. Basic Operation Camera Recording Programmed Recording Set a recording start time by mode. *1 Record 5 seconds each minute. *2 Record 10 seconds each minute.
...-by 30 minutes. 3 Press DOWN to select REC TIME . Recording will be done as scheduled. Press DISPLAY repeatedly to select one of DISPLAY increases start and stop time. Before you begin... • Connect Camcorder to CAMERA. 1, 2, 3 4 REC TIME : 1 Press MENU for longer recordings. • Insert cassette with record tab (page 11). • Set POWER to power source. Basic Operation Camera Recording Programmed Recording Set a recording start time by mode. *1 Record 5 seconds each minute. *2 Record 10 seconds each minute.
PVL552H User Guide
Page 20
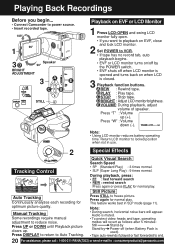
...@panasonic.com C STOP : Stop tape. D BRIGHT : Adjust LCD monitor brightness. Press "W" : Volume down (-). Press again for normal play . Press UP or DOWN until Playback picture clears up (+). Press STILL to locked position when not in SLP mode (page 11). Audio is muted. • To protect video heads and tape, operating modes will appear. This feature works best in use. 2 Special Effects Quick Visual Search Tracking Control Search Speed • SP (Standard Play) : 3 times normal...
...@panasonic.com C STOP : Stop tape. D BRIGHT : Adjust LCD monitor brightness. Press "W" : Volume down (-). Press again for normal play . Press UP or DOWN until Playback picture clears up (+). Press STILL to locked position when not in SLP mode (page 11). Audio is muted. • To protect video heads and tape, operating modes will appear. This feature works best in use. 2 Special Effects Quick Visual Search Tracking Control Search Speed • SP (Standard Play) : 3 times normal...

PVL552H User Guide
Page 21
Playing Back Recordings TV Playback or Viewing Connect Camcorder to a TV to LINE INPUT. See TV owner's manual. 3 Begin playback or recording. Basic Operation VCR Playback using in PlayPak Remove Battery lid and insert AA battery. • Do not reverse polarity. • Replace battery when tape loading/unloading takes longer than usual. CAMERA © view picture as it is recorded. 2 Turn TV ON and set to view playback or recordings in progress. Insert Remove 1 Cassette in PlayPak 1 Turn cassette Tape Wheel in bottom of 1 arrow to take up and on...
Playing Back Recordings TV Playback or Viewing Connect Camcorder to a TV to LINE INPUT. See TV owner's manual. 3 Begin playback or recording. Basic Operation VCR Playback using in PlayPak Remove Battery lid and insert AA battery. • Do not reverse polarity. • Replace battery when tape loading/unloading takes longer than usual. CAMERA © view picture as it is recorded. 2 Turn TV ON and set to view playback or recordings in progress. Insert Remove 1 Cassette in PlayPak 1 Turn cassette Tape Wheel in bottom of 1 arrow to take up and on...
PVL552H User Guide
Page 25
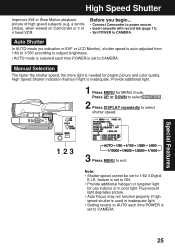
... DISPLAY repeatedly to exit. High Speed Shutter Improves Still or Slow Motion playback picture of high speed subjects (e.g. Special Features 1, 2, 3 3 Press MENU to select shutter speed. Fluorescent light degrades picture. • Auto Focus may not function properly if high speed shutter is used in poor light. Before you begin... • Connect Camcorder to power source. • Insert cassette with record tab (page 11). • Set POWER to 1/60 if Digital E.I.S. feature is set to CAMERA. High Speed...
... DISPLAY repeatedly to exit. High Speed Shutter Improves Still or Slow Motion playback picture of high speed subjects (e.g. Special Features 1, 2, 3 3 Press MENU to select shutter speed. Fluorescent light degrades picture. • Auto Focus may not function properly if high speed shutter is used in poor light. Before you begin... • Connect Camcorder to power source. • Insert cassette with record tab (page 11). • Set POWER to 1/60 if Digital E.I.S. feature is set to CAMERA. High Speed...
PVL552H User Guide
Page 30
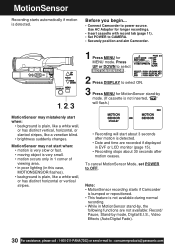
... DISPLAY to select ON. 3 Press MENU for MotionSensor stand-by mode, Digital E.I.S., Video Effects (Auto/Digital Fade). 30 For assistance, please call : 1-800-211-PANA(7262) or send e-mail to CAMERA. • Securely position and aim Camcorder. 1, 2, 3 1 Press MENU for longer recordings. • Insert cassette with record tab (page 11). • Set POWER to : consumerproducts@panasonic.com MotionSensor Recording starts automatically if motion is detected. • Date and time...
... DISPLAY to select ON. 3 Press MENU for MotionSensor stand-by mode, Digital E.I.S., Video Effects (Auto/Digital Fade). 30 For assistance, please call : 1-800-211-PANA(7262) or send e-mail to CAMERA. • Securely position and aim Camcorder. 1, 2, 3 1 Press MENU for longer recordings. • Insert cassette with record tab (page 11). • Set POWER to : consumerproducts@panasonic.com MotionSensor Recording starts automatically if motion is detected. • Date and time...
PVL552H User Guide
Page 38
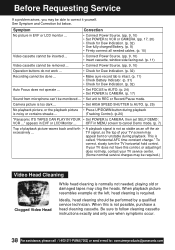
... streaks ... (Tracking Control). (p.20) "Panasonic ITS TAPES CAN PLAY IN YOUR • Set POWER to AUTO. (p. 25) No playback picture, or the playback picture • Press UP/DOWN button during playback. appears in EVF or LCD monitor ... • Connect Power Source. (pp. 9, 10) • Set POWER to VCR or CAMERA. (pp. 17, 20) • Check for Dew Indication. (p. 32) • Use fully charged Battery. (p. 9) • Firmly connect all needed , playing old or damaged tapes may clog the heads. This...
... streaks ... (Tracking Control). (p.20) "Panasonic ITS TAPES CAN PLAY IN YOUR • Set POWER to AUTO. (p. 25) No playback picture, or the playback picture • Press UP/DOWN button during playback. appears in EVF or LCD monitor ... • Connect Power Source. (pp. 9, 10) • Set POWER to VCR or CAMERA. (pp. 17, 20) • Check for Dew Indication. (p. 32) • Use fully charged Battery. (p. 9) • Firmly connect all needed , playing old or damaged tapes may clog the heads. This...
PVL552H User Guide
Page 40
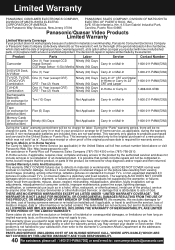
...-211-PANA(7262) TV/VCR, TV/DVD, One (1) Year (except CRT) TV/DVD/VCR Combination CRT - During the "Parts" warranty period, there will be no charge for parts. Carry-In, Mail-in or In-Home Service For Carry-In, Mail-In or In-Home Service (as applicable) in the United States call toll free contact number listed above or visit Panasonic Web Site: http://www...
...-211-PANA(7262) TV/VCR, TV/DVD, One (1) Year (except CRT) TV/DVD/VCR Combination CRT - During the "Parts" warranty period, there will be no charge for parts. Carry-In, Mail-in or In-Home Service For Carry-In, Mail-In or In-Home Service (as applicable) in the United States call toll free contact number listed above or visit Panasonic Web Site: http://www...
PVL552H User Guide
Page 42
... Button ..... 17 Record/Playback Time ......... 11 Replacing Clock Battery ....... 34 Request for Service Notice .. 39 REWIND/SEARCH Button ... 20 S Safety Precautions 3 Self Demo Mode 7 Shoulder Strap 12 Speaker 20 Special Effects 20 Specifications 37 STILL Button 20 Still Picture 20 STOP Button 20 T Tab 11 TAPE EJECT Switch ...... 11, 17 TAPE SPEED Button 17 Tracking Control 20 Tripod Mounting Hole 34 U UP (FAR) / DOWN (NEAR) Button 13, 20, 24 V VHF Connecting Cable ........ 22 Video Cassettes (tapes) ....... 11 Video Head Cleaning...
... Button ..... 17 Record/Playback Time ......... 11 Replacing Clock Battery ....... 34 Request for Service Notice .. 39 REWIND/SEARCH Button ... 20 S Safety Precautions 3 Self Demo Mode 7 Shoulder Strap 12 Speaker 20 Special Effects 20 Specifications 37 STILL Button 20 Still Picture 20 STOP Button 20 T Tab 11 TAPE EJECT Switch ...... 11, 17 TAPE SPEED Button 17 Tracking Control 20 Tripod Mounting Hole 34 U UP (FAR) / DOWN (NEAR) Button 13, 20, 24 V VHF Connecting Cable ........ 22 Video Cassettes (tapes) ....... 11 Video Head Cleaning...


