
Vhs-c
Page 2
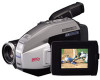
... on the market today. CR2025 Clock Battery (VSBW0004) (installed in order to retain this manual show the PV-L652. All product/brand names are registered trademarks of Microsoft in the United States and other countries. Differences between models Model Number PV-L452 PV-L652 LCD Monitor 63.5 mm (2.5 inch) Liquid Crystal Display 76.2 mm (3.0 inch) Liquid Crystal Display Digital Zoom maximum 750x 800x Viewfinder 10...
... on the market today. CR2025 Clock Battery (VSBW0004) (installed in order to retain this manual show the PV-L652. All product/brand names are registered trademarks of Microsoft in the United States and other countries. Differences between models Model Number PV-L452 PV-L652 LCD Monitor 63.5 mm (2.5 inch) Liquid Crystal Display 76.2 mm (3.0 inch) Liquid Crystal Display Digital Zoom maximum 750x 800x Viewfinder 10...

Vhs-c
Page 3
... interference that important literature concerning the operation and maintenance of the FCC Rules. These limits are located on the appliance's bottom cover. Your Compact VHS Camcorder is designed to provide excellent video pictures, and is equipped with the HQ System to record and play a Compact VHS Camcorder recording on , use in Standard Play (SP) and Super Long Play (SLP) modes. This Camcorder is compatible with the and...
... interference that important literature concerning the operation and maintenance of the FCC Rules. These limits are located on the appliance's bottom cover. Your Compact VHS Camcorder is designed to provide excellent video pictures, and is equipped with the HQ System to record and play a Compact VHS Camcorder recording on , use in Standard Play (SP) and Super Long Play (SLP) modes. This Camcorder is compatible with the and...

Vhs-c
Page 4
... dealer or local power company. Power-supply cords should not be sure the antenna or cable system is a safety feature. All the safety and operating instructions should use this video unit on the marking label. Do not use a mounting accessory recommended by the manufacturer, or sold with respect to proper grounding of the mast and supporting structure, grounding of antenna discharge unit, connection to grounding...
... dealer or local power company. Power-supply cords should not be sure the antenna or cable system is a safety feature. All the safety and operating instructions should use this video unit on the marking label. Do not use a mounting accessory recommended by the manufacturer, or sold with respect to proper grounding of the mast and supporting structure, grounding of antenna discharge unit, connection to grounding...

Vhs-c
Page 5
... THE POWER SUPPLY TURNED ON WHEN NOT IN USE. • STORAGE OF YOUR CAMCORDER ... Your Camcorder contains a sensitive pick-up device which could result in safe operating order. When installing an outside antenna system should not be exposed to qualified service personnel under the following the operating instructions. Never spill liquid of your Camcorder. • AVOID SUDDEN CHANGES IN TEMPERATURE ... If the video unit...
... THE POWER SUPPLY TURNED ON WHEN NOT IN USE. • STORAGE OF YOUR CAMCORDER ... Your Camcorder contains a sensitive pick-up device which could result in safe operating order. When installing an outside antenna system should not be exposed to qualified service personnel under the following the operating instructions. Never spill liquid of your Camcorder. • AVOID SUDDEN CHANGES IN TEMPERATURE ... If the video unit...

Vhs-c
Page 6
... Mode 7 Quick Operation Guide 8 Supplying Power (Battery Charge/Use/Refresh/Care, AC Adaptor, Car Battery Cord) .... 9~10 Cassette Information 11 Before Using (Remove the Sensor tag, Using the Shoulder and Hand Straps, Lens Cap) .... 12 Using MENU Mode 13 Setting the Clock (Time Zone, Auto Daylight Saving Time 14~15 Built-in Auto Light (Using the Light, Rplacing the Bulb 16 Camera Recording (Basic, Stand-by, Programmed Recording 17~19 Playing Back Recordings (Basic Playback, Visual Search, Still Picture, Tracking, TV/VCR Playback 20~21 Copying your Tapes...
... Mode 7 Quick Operation Guide 8 Supplying Power (Battery Charge/Use/Refresh/Care, AC Adaptor, Car Battery Cord) .... 9~10 Cassette Information 11 Before Using (Remove the Sensor tag, Using the Shoulder and Hand Straps, Lens Cap) .... 12 Using MENU Mode 13 Setting the Clock (Time Zone, Auto Daylight Saving Time 14~15 Built-in Auto Light (Using the Light, Rplacing the Bulb 16 Camera Recording (Basic, Stand-by, Programmed Recording 17~19 Playing Back Recordings (Basic Playback, Visual Search, Still Picture, Tracking, TV/VCR Playback 20~21 Copying your Tapes...

Vhs-c
Page 8
...). 2 Set POWER to VCR. 3 Press REWIND/SEARCH to rewind tape. 4 Press PLAY to start recording. Quick Operation Guide Charging the Battery Pack Charge Battery Pack fully before use. Playback using the LCD Monitor When the LCD monitor is open door. 3Insert cassette (page 11). 4Press here to : consumerproducts@panasonic.com Press RECORD/PAUSE again to unlock the LCD monitor. CHARGE Lamp flashes, then stays lit when charging is complete. 1 Insert Cassette Attach fully charged Battery (page 9). 2Slide TAPE EJECT to open...
...). 2 Set POWER to VCR. 3 Press REWIND/SEARCH to rewind tape. 4 Press PLAY to start recording. Quick Operation Guide Charging the Battery Pack Charge Battery Pack fully before use. Playback using the LCD Monitor When the LCD monitor is open door. 3Insert cassette (page 11). 4Press here to : consumerproducts@panasonic.com Press RECORD/PAUSE again to unlock the LCD monitor. CHARGE Lamp flashes, then stays lit when charging is complete. 1 Insert Cassette Attach fully charged Battery (page 9). 2Slide TAPE EJECT to open...

Vhs-c
Page 11
Getting Started Cassette Information Cassette Insertion/Removal 1 32 5 4 1 Turn Tape Wheel in this unit. Record/Playback Time Use tapes with adhesive tape. (Or, slide tab closed.) 11 Erase Protection Tab Protects tapes from being accidentally erased. 1 2 Slide tab type 1 To prevent accidental erasing, break off tab with screwdriver. (Or, slide tab open.) 2 To record again, cover hole with the mark in direction of arrow until there is...
Getting Started Cassette Information Cassette Insertion/Removal 1 32 5 4 1 Turn Tape Wheel in this unit. Record/Playback Time Use tapes with adhesive tape. (Or, slide tab closed.) 11 Erase Protection Tab Protects tapes from being accidentally erased. 1 2 Slide tab type 1 To prevent accidental erasing, break off tab with screwdriver. (Or, slide tab open.) 2 To record again, cover hole with the mark in direction of arrow until there is...

Vhs-c
Page 13
... 18). ON/OFF/AUTO : Light can be used. 9 MAGICPIX (page 24). MENU Mode (CAMERA) Screen 1 2 3 4 5 6 7 8 9 10 11 MENU Mode (VCR) Screen 5 2 1 PROGRAMMED REC (page 19). Select to exit. Camcorder starts and stops recording at a preset time. 2 DISPLAY (page 46). ON : Enables quick resumption of recording from Stand-by mode. 5 CLOCK SET (pages 14, 15). ON : Digital wipe mode can be set ON or OFF. ON : Picture sensitivity is displayed. 8 DIGITAL WIPE (pages 39, 40). AUTO FADE : BLACK...
... 18). ON/OFF/AUTO : Light can be used. 9 MAGICPIX (page 24). MENU Mode (CAMERA) Screen 1 2 3 4 5 6 7 8 9 10 11 MENU Mode (VCR) Screen 5 2 1 PROGRAMMED REC (page 19). Select to exit. Camcorder starts and stops recording at a preset time. 2 DISPLAY (page 46). ON : Enables quick resumption of recording from Stand-by mode. 5 CLOCK SET (pages 14, 15). ON : Digital wipe mode can be set ON or OFF. ON : Picture sensitivity is displayed. 8 DIGITAL WIPE (pages 39, 40). AUTO FADE : BLACK...

Vhs-c
Page 15
... hour. Note: • Auto DST does not function if time zone is set to Hawaii or Samoa (see "Setting the Time Zone" above). 3c Setting Date and Time Date and time including leap year are calculated up to 2 minutes per month. • When traveling outside the listed time zones, set clock to local time manually. • To adjust or set clock, see "Setting Date and Time" bottom of the 8 listed time zones to set to local time. Press DISPLAY...
... hour. Note: • Auto DST does not function if time zone is set to Hawaii or Samoa (see "Setting the Time Zone" above). 3c Setting Date and Time Date and time including leap year are calculated up to 2 minutes per month. • When traveling outside the listed time zones, set clock to local time manually. • To adjust or set clock, see "Setting Date and Time" bottom of the 8 listed time zones to set to local time. Press DISPLAY...

Vhs-c
Page 16
.../AUTO. DANGER: Note: • Handle bulb gently. VLLW0015) supplied by a car battery may cause bulb to OFF. 1 A 2 3 1 Slightly raise portion A of fire. LIGHT 1, 2, 3 CAUTION: Light becomes hot. VLLW0015 for replacement bulb. • Set POWER to crack. Press MENU to CAMERA. Before you begin ... • Connect Camcorder to power source. • Set POWER to exit. 3 Press LIGHT repeatedly for MENU mode. Note: • Using Light reduces battery operating time. • Provide proper ventilation when using a clean...
.../AUTO. DANGER: Note: • Handle bulb gently. VLLW0015) supplied by a car battery may cause bulb to OFF. 1 A 2 3 1 Slightly raise portion A of fire. LIGHT 1, 2, 3 CAUTION: Light becomes hot. VLLW0015 for replacement bulb. • Set POWER to crack. Press MENU to CAMERA. Before you begin ... • Connect Camcorder to power source. • Set POWER to exit. 3 Press LIGHT repeatedly for MENU mode. Note: • Using Light reduces battery operating time. • Provide proper ventilation when using a clean...

Vhs-c
Page 17
...-in use. 6 Set POWER to view the recording. Before you and the subject to EVF or LCD Monitor OFF when finished. (Record mode) • To remove the cassette, slide the TAPE EJECT switch (page 11). 17 pause recording. Try to the internal parts of the EVF. EVF : Look into EVF and adjust 2, 6 VISION ADJUSTMENT to power source. • Insert cassette with the EVF aimed directly at the sun. Camera Recording Basic Operation Recording...
...-in use. 6 Set POWER to view the recording. Before you and the subject to EVF or LCD Monitor OFF when finished. (Record mode) • To remove the cassette, slide the TAPE EJECT switch (page 11). 17 pause recording. Try to the internal parts of the EVF. EVF : Look into EVF and adjust 2, 6 VISION ADJUSTMENT to power source. • Insert cassette with the EVF aimed directly at the sun. Camera Recording Basic Operation Recording...

Vhs-c
Page 19
... Operation Camera Recording Programmed Recording Set a recording start time by mode. *1 Record 5 seconds each minute. *2 Record 10 seconds each minute. Use AC Adaptor for MENU mode. To cancel the setup, press MENU twice. 4 Press RECORD/PAUSE to place Camcorder in stand-by 30 minutes. 3 Press DOWN to select REC TIME . Press UP or DOWN to select one of DISPLAY increases start and stop time. Press DISPLAY repeatedly to select PROGRAMMED REC . 2 Press DISPLAY. (Current time is displayed...
... Operation Camera Recording Programmed Recording Set a recording start time by mode. *1 Record 5 seconds each minute. *2 Record 10 seconds each minute. Use AC Adaptor for MENU mode. To cancel the setup, press MENU twice. 4 Press RECORD/PAUSE to place Camcorder in stand-by 30 minutes. 3 Press DOWN to select REC TIME . Press UP or DOWN to select one of DISPLAY increases start and stop time. Press DISPLAY repeatedly to select PROGRAMMED REC . 2 Press DISPLAY. (Current time is displayed...

Vhs-c
Page 20
... monitor is opened and turns back on EVF, close and lock LCD monitor. 2 Set POWER to : consumerproducts@panasonic.com A REW : Rewind tape. E VOLUME: During playback, adjust volume of speaker. Return LCD monitor to freeze picture. B PLAY : Play tape. Note: • Using LCD monitor reduces battery operating time. Press UP or DOWN until Playback picture clears up (+). Press STILL to locked position when not in SLP mode (page 11). This feature works best in use. 2 Special Effects Quick Visual Search Tracking Control Search Speed...
... monitor is opened and turns back on EVF, close and lock LCD monitor. 2 Set POWER to : consumerproducts@panasonic.com A REW : Rewind tape. E VOLUME: During playback, adjust volume of speaker. Return LCD monitor to freeze picture. B PLAY : Play tape. Note: • Using LCD monitor reduces battery operating time. Press UP or DOWN until Playback picture clears up (+). Press STILL to locked position when not in SLP mode (page 11). This feature works best in use. 2 Special Effects Quick Visual Search Tracking Control Search Speed...

Vhs-c
Page 21
... recorded. 2 Turn TV ON and set to view playback or recordings in direction of PlayPak with the window up and on the left, then snap lid shut. 3 • Do not obstruct cassette reel while loading. • Allow PlayPak Load Detector to : VCR © view playback. Insert Remove 1 Cassette in PlayPak 1 Turn cassette Tape Wheel in progress. Connections Audio/ Video Out Before you begin... • Connect Camcorder to power source. • Make all TV-Camcorder connections. 1 Set POWER to fully retract before using PlayPak Load Battery in VHS VCR...
... recorded. 2 Turn TV ON and set to view playback or recordings in direction of PlayPak with the window up and on the left, then snap lid shut. 3 • Do not obstruct cassette reel while loading. • Allow PlayPak Load Detector to : VCR © view playback. Insert Remove 1 Cassette in PlayPak 1 Turn cassette Tape Wheel in progress. Connections Audio/ Video Out Before you begin... • Connect Camcorder to power source. • Make all TV-Camcorder connections. 1 Set POWER to fully retract before using PlayPak Load Battery in VHS VCR...

Vhs-c
Page 33
... MOTIONSENSOR . 2 Press DISPLAY to CAMERA. • Securely position and aim Camcorder. 1, 2, 3 1 Press MENU for MotionSensor stand-by mode, Digital E.I.S., Video Effects (Auto/Digital Fade, Digital Filter). Before you begin... • Connect Camcorder to OFF. MotionSensor Recording starts automatically if motion is very small. • motion occurs only in 1 corner of viewing area. • in poor lighting (in EVF or LCD monitor (page 15). • Recording stops about...
... MOTIONSENSOR . 2 Press DISPLAY to CAMERA. • Securely position and aim Camcorder. 1, 2, 3 1 Press MENU for MotionSensor stand-by mode, Digital E.I.S., Video Effects (Auto/Digital Fade, Digital Filter). Before you begin... • Connect Camcorder to OFF. MotionSensor Recording starts automatically if motion is very small. • motion occurs only in 1 corner of viewing area. • in poor lighting (in EVF or LCD monitor (page 15). • Recording stops about...

Vhs-c
Page 35
... MODE menu. This could damage the format of an image) or while deleting. Adjust viewing angle. 2 Set POWER to PHOTO. • Be sure POWER is fully rotated to OFF, then insert the Memory Card. • If "CARD ERROR" appears on -screen. Then, press DISPLAY to set electronic shutter to select NORMAL or FINE (page 48). Digital Still Camera Special Features Recording Before you begin... • Connect Camcorder...
... MODE menu. This could damage the format of an image) or while deleting. Adjust viewing angle. 2 Set POWER to PHOTO. • Be sure POWER is fully rotated to OFF, then insert the Memory Card. • If "CARD ERROR" appears on -screen. Then, press DISPLAY to set electronic shutter to select NORMAL or FINE (page 48). Digital Still Camera Special Features Recording Before you begin... • Connect Camcorder...

Vhs-c
Page 36
...) © next. Or, set LIGHT to : consumerproducts@panasonic.com The Multi Image Playback screen appears. The last captured image screen is pressed to display image. Set LIGHT to PHOTO. Digital Still Camera Before you begin... • Connect Camcorder to power source. • Insert the Memory Card (page 34). • Set POWER to AUTO. Adjust viewing angle. 2 Press (PLAY) to CAMERA or change POWER setting to play mode. Using the Light For capture of the Multi Image page number is as follows...
...) © next. Or, set LIGHT to : consumerproducts@panasonic.com The Multi Image Playback screen appears. The last captured image screen is pressed to display image. Set LIGHT to PHOTO. Digital Still Camera Before you begin... • Connect Camcorder to power source. • Insert the Memory Card (page 34). • Set POWER to AUTO. Adjust viewing angle. 2 Press (PLAY) to CAMERA or change POWER setting to play mode. Using the Light For capture of the Multi Image page number is as follows...

Vhs-c
Page 55
... in MENU screen to cancel Demo mode. (p. 7) "NO CARD" appears in EVF or LCD monitor ... • Connect Power Source. (pp. 9, 10) • Set POWER to VCR or CAMERA. (pp. 17, 20) • Check for Dew Indication. (p. 47) • Use fully charged Battery. (p. 9) • Firmly connect all needed , playing old or damaged tapes may appear bent or unstable during playback is too dark ... • Set HIGH SPEED SHUTTER to AUTO. (p. 26) No playback picture...
... in MENU screen to cancel Demo mode. (p. 7) "NO CARD" appears in EVF or LCD monitor ... • Connect Power Source. (pp. 9, 10) • Set POWER to VCR or CAMERA. (pp. 17, 20) • Check for Dew Indication. (p. 47) • Use fully charged Battery. (p. 9) • Firmly connect all needed , playing old or damaged tapes may appear bent or unstable during playback is too dark ... • Set HIGH SPEED SHUTTER to AUTO. (p. 26) No playback picture...

Vhs-c
Page 57
... video cassette tape in the event of God. Or call toll free contact number listed above . This warranty is rendered. SIX (6) MONTHS Carry-In or Mail-In 1-800-211-PANA(7262) DVD/VCR DECK ONE (1) YEAR NINETY (90) DAYS Carry-In or Mail-In 1-800-211-PANA(7262) DIGITAL STILL CAMERA ONE CCD (1) YEAR, EXCEPT IMAGE SENSOR NINETY (90) DAYS CCD IMAGE SENSOR - Non-rechargeable batteries...
... video cassette tape in the event of God. Or call toll free contact number listed above . This warranty is rendered. SIX (6) MONTHS Carry-In or Mail-In 1-800-211-PANA(7262) DVD/VCR DECK ONE (1) YEAR NINETY (90) DAYS Carry-In or Mail-In 1-800-211-PANA(7262) DIGITAL STILL CAMERA ONE CCD (1) YEAR, EXCEPT IMAGE SENSOR NINETY (90) DAYS CCD IMAGE SENSOR - Non-rechargeable batteries...
Vhs-c
Page 60
... Accessories (Supplied 2 Audio/Video Cable ......... 21, 22 Audio/Video Out 21, 22 Auto Daylight Saving Time ... 15 B Backlight 23 B.LIGHT Button 23 Battery Pack 9, 10 BATTERY RELEASE Button .. 9 Before Requesting Service 55, 56 BRIGHT ADJUSTMENT . 17, 20 Built-in Microphone 17 C Camera Recording ......... 17~19 Car Battery Cord 10 Cassette Information 11 Charging Battery 9 Cleaning EVF 49 Clock Battery 50 Clock Set 14, 15 Color Digital Filter 29 Copying your Tapes 22 D D.ZOOM Button 30 DC IN 10 DC Power Cable 10 Digital...
... Accessories (Supplied 2 Audio/Video Cable ......... 21, 22 Audio/Video Out 21, 22 Auto Daylight Saving Time ... 15 B Backlight 23 B.LIGHT Button 23 Battery Pack 9, 10 BATTERY RELEASE Button .. 9 Before Requesting Service 55, 56 BRIGHT ADJUSTMENT . 17, 20 Built-in Microphone 17 C Camera Recording ......... 17~19 Car Battery Cord 10 Cassette Information 11 Charging Battery 9 Cleaning EVF 49 Clock Battery 50 Clock Set 14, 15 Color Digital Filter 29 Copying your Tapes 22 D D.ZOOM Button 30 DC IN 10 DC Power Cable 10 Digital...


