

Operating Instructions
Page 1
Operating Instructions Digital Wireless Stereo Headphones Model No. Thank you for future use. Please read these operating instructions are of RP-HD605N. GC TQBM0295 RP-HD605N RP-HD505B Unless otherwise indicated, illustrations in these instructions carefully before using this product, and save this manual for purchasing this product.
Operating Instructions Digital Wireless Stereo Headphones Model No. Thank you for future use. Please read these operating instructions are of RP-HD605N. GC TQBM0295 RP-HD605N RP-HD505B Unless otherwise indicated, illustrations in these instructions carefully before using this product, and save this manual for purchasing this product.
Operating Instructions
Page 2
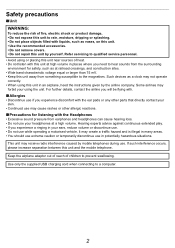
... not remove covers. • Do not repair this unit by yourself. It may receive radio interference caused by mobile telephones during use while operating a motorised vehicle. Hearing experts advise against continuous extended play. • If you need to hear sounds from something susceptible to the magnetism. Keep the airplane adaptor out of reach of children to a computer. 2 Use only the supplied USB charging cord when connecting...
... not remove covers. • Do not repair this unit by yourself. It may receive radio interference caused by mobile telephones during use while operating a motorised vehicle. Hearing experts advise against continuous extended play. • If you need to hear sounds from something susceptible to the magnetism. Keep the airplane adaptor out of reach of children to a computer. 2 Use only the supplied USB charging cord when connecting...
Operating Instructions
Page 3
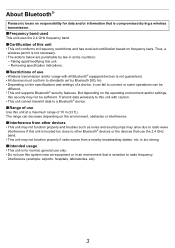
... not function properly and troubles such as noise and sound jumps may not be different. • This unit supports Bluetooth® security features. Removing specification indications. ∫ Restrictions of use • Wireless transmission and/or usage with caution. • This unit cannot transmit data to a Bluetooth® device. ∫ Range of use this unit is located too close to radio frequency interference (example: airports, hospitals, laboratories...
... not function properly and troubles such as noise and sound jumps may not be different. • This unit supports Bluetooth® security features. Removing specification indications. ∫ Restrictions of use • Wireless transmission and/or usage with caution. • This unit cannot transmit data to a Bluetooth® device. ∫ Range of use this unit is located too close to radio frequency interference (example: airports, hospitals, laboratories...

Operating Instructions
Page 4
......5 Part names...6 Preparation Charging...7 Turning the power on/off ...7 Connecting a Bluetooth® device...8 • Pairing (Registration) this unit with the Bluetooth® device for connection 8 • Connecting a paired Bluetooth® device 9 Operation Listening to music ...10 • Remote controlling...10 Making a phone call ...11 [HD605N] Using noise cancelling ...12 Useful functions...13 • [HD605N] Using the ambient sound enhancer 13 • Activating a voice functions ...13 • Making a multi-point connection ...14 • Using the detachable cord (supplied...
......5 Part names...6 Preparation Charging...7 Turning the power on/off ...7 Connecting a Bluetooth® device...8 • Pairing (Registration) this unit with the Bluetooth® device for connection 8 • Connecting a paired Bluetooth® device 9 Operation Listening to music ...10 • Remote controlling...10 Making a phone call ...11 [HD605N] Using noise cancelling ...12 Useful functions...13 • [HD605N] Using the ambient sound enhancer 13 • Activating a voice functions ...13 • Making a multi-point connection ...14 • Using the detachable cord (supplied...
Operating Instructions
Page 5
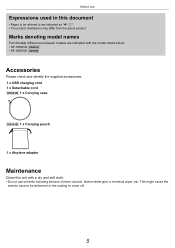
... use Expressions used in this unit with the model marks below. • RP-HD605N:[HD605N] • RP-HD505B:[HD505B] Accessories Please check and identify the supplied accessories. 1 x USB charging cord 1 x Detachable cord [HD605N] 1 x Carrying case [HD505B] 1 x Carrying pouch 1 x Airplane adaptor Maintenance Clean this document • Pages to be deformed or the coating to are indicated as "l ±±". • The product...
... use Expressions used in this unit with the model marks below. • RP-HD605N:[HD605N] • RP-HD505B:[HD505B] Accessories Please check and identify the supplied accessories. 1 x USB charging cord 1 x Detachable cord [HD605N] 1 x Carrying case [HD505B] 1 x Carrying pouch 1 x Airplane adaptor Maintenance Clean this document • Pages to be deformed or the coating to are indicated as "l ±±". • The product...

Operating Instructions
Page 6
... 9 9 1 Audio input terminal 2 [HD605N] Ambient sound enhancer sensor panel 3 [Multiple functions button] • You can perform a wide variety of operations by pressing this button or moving it toward the "+" or "−" side. (l 10, "Remote controlling") 4 [HD605N] Noise cancelling LED*1 5 [HD605N] [NC] button 6 Power/pairing LED*2 7 [Í/I ( )] button*3 8 Charging terminal (DC IN) • Connect the USB charging cord (supplied) to this terminal when charging. (l 7) 9 Microphone 10 Ear pads 11 Raised dot indicating the left...
... 9 9 1 Audio input terminal 2 [HD605N] Ambient sound enhancer sensor panel 3 [Multiple functions button] • You can perform a wide variety of operations by pressing this button or moving it toward the "+" or "−" side. (l 10, "Remote controlling") 4 [HD605N] Noise cancelling LED*1 5 [HD605N] [NC] button 6 Power/pairing LED*2 7 [Í/I ( )] button*3 8 Charging terminal (DC IN) • Connect the USB charging cord (supplied) to this terminal when charging. (l 7) 9 Microphone 10 Ear pads 11 Raised dot indicating the left...
Operating Instructions
Page 7
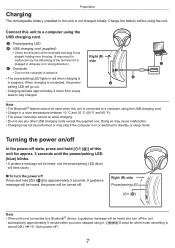
... sleep mode. A: Power/pairing LED B: USB charging cord (supplied) • Check the direction of the terminals and plug in/out straight holding onto the plug. (It may stop if the computer is not connected to a Bluetooth® device, a guidance message will blink slowly. ∫ To turn off the unit automatically approximately 5 minutes after you have stopped using the USB charging cord. • Charge in the unit) is B in or switched...
... sleep mode. A: Power/pairing LED B: USB charging cord (supplied) • Check the direction of the terminals and plug in/out straight holding onto the plug. (It may stop if the computer is not connected to a Bluetooth® device, a guidance message will blink slowly. ∫ To turn off the unit automatically approximately 5 minutes after you have stopped using the USB charging cord. • Charge in the unit) is B in or switched...

Operating Instructions
Page 8
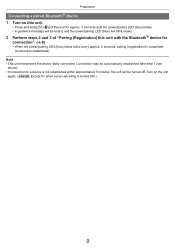
...;/I ( )] of this unit until the connection with this unit. RP-HD605N Bluetooth Bluetooth ON Device RP-HD605N Select 4 Check the connection with the Bluetooth® device on the unit. • The power/pairing LED will blink in blue and red alternately. 2 Turn on the power of the Bluetooth® device, and enable the Bluetooth® function. 3 Select "RP-HD605N" or "RP-HD505B" from the unit. • Check the device operation using its operation instructions as required.
...;/I ( )] of this unit until the connection with this unit. RP-HD605N Bluetooth Bluetooth ON Device RP-HD605N Select 4 Check the connection with the Bluetooth® device on the unit. • The power/pairing LED will blink in blue and red alternately. 2 Turn on the power of the Bluetooth® device, and enable the Bluetooth® function. 3 Select "RP-HD605N" or "RP-HD505B" from the unit. • Check the device operation using its operation instructions as required.
Operating Instructions
Page 9
... heard, and the power/pairing LED (blue) will blink slowly. 2 Perform steps 2 and 3 of this unit with the Bluetooth® device for connection". (l 8) • When the power/pairing LED (blue) blinks twice every approx. 2 seconds, pairing (registration) is completed. (Connection established) Note • This unit remembers the device lastly connected. Preparation Connecting a paired Bluetooth® device 1 Turn on the unit again. ([HD605N] Except for when noise cancelling is turned ON.) 9 Turn on this unit. •...
... heard, and the power/pairing LED (blue) will blink slowly. 2 Perform steps 2 and 3 of this unit with the Bluetooth® device for connection". (l 8) • When the power/pairing LED (blue) blinks twice every approx. 2 seconds, pairing (registration) is completed. (Connection established) Note • This unit remembers the device lastly connected. Preparation Connecting a paired Bluetooth® device 1 Turn on the unit again. ([HD605N] Except for when noise cancelling is turned ON.) 9 Turn on this unit. •...
Operating Instructions
Page 10
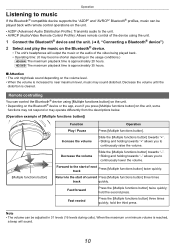
... be played back with remote control operations on the unit. • A2DP (Advanced Audio Distribution Profile): Transmits audio to the unit. • AVRCP (Audio/Video Remote Control Profile): Allows remote control of the device using [Multiple functions button] on the unit. • Depending on the Bluetooth® device. • The unit's headphones will sound. 10 Fast rewind Press the [Multiple functions button] three times quickly; When the maximum or minimum volume is...
... be played back with remote control operations on the unit. • A2DP (Advanced Audio Distribution Profile): Transmits audio to the unit. • AVRCP (Audio/Video Remote Control Profile): Allows remote control of the device using [Multiple functions button] on the unit. • Depending on the Bluetooth® device. • The unit's headphones will sound. 10 Fast rewind Press the [Multiple functions button] three times quickly; When the maximum or minimum volume is...
Operating Instructions
Page 11
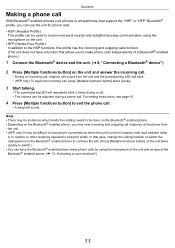
... a Bluetooth® enabled phone.) 1 Connect the Bluetooth® device and the unit. (l 8, "Connecting a Bluetooth® device") 2 Press [Multiple functions button] on the unit twice quickly to switch.) • You can have a function that support the "HSP" or "HFP" Bluetooth® profile, you to make phone calls by using the microphone of the unit and an app of the Bluetooth® enabled phone. (l 13, "Activating a voice functions") 11 Operation Making a phone call With Bluetooth...
... a Bluetooth® enabled phone.) 1 Connect the Bluetooth® device and the unit. (l 8, "Connecting a Bluetooth® device") 2 Press [Multiple functions button] on the unit twice quickly to switch.) • You can have a function that support the "HSP" or "HFP" Bluetooth® profile, you to make phone calls by using the microphone of the unit and an app of the Bluetooth® enabled phone. (l 13, "Activating a voice functions") 11 Operation Making a phone call With Bluetooth...
Operating Instructions
Page 12
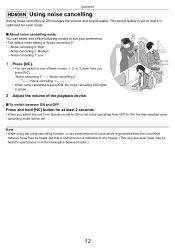
... playback device. ∫ To switch between tracks.) 12 Noise cancelling 1: Low 1 Press [NC]. • You can select one of the following modes to suit your preference. • The default mode setting is optimised for at least 2 seconds. • When you press [NC]. The sound quality is set so that reduces noise may be set noise cancelling from the circuit that it is "Noise cancelling 3". - Note • While using the noise cancelling...
... playback device. ∫ To switch between tracks.) 12 Noise cancelling 1: Low 1 Press [NC]. • You can select one of the following modes to suit your preference. • The default mode setting is optimised for at least 2 seconds. • When you press [NC]. The sound quality is set so that reduces noise may be set noise cancelling from the circuit that it is "Noise cancelling 3". - Note • While using the noise cancelling...

Operating Instructions
Page 13
... enabled, the power/pairing LED (blue) will be lowered. Place your hand is covered. The noise cancelling mode and the volume return to their original settings when your hand over the ambient sound enhancer sensor panel (R side) so that its entire surface is covered. • This makes it easier to listen to sounds around you. • Noise cancelling will turn OFF temporarily and the volume of this...
... enabled, the power/pairing LED (blue) will be lowered. Place your hand is covered. The noise cancelling mode and the volume return to their original settings when your hand over the ambient sound enhancer sensor panel (R side) so that its entire surface is covered. • This makes it easier to listen to sounds around you. • Noise cancelling will turn OFF temporarily and the volume of this...

Operating Instructions
Page 14
... operations will be cancelled. (The pairing device information will be lost. ([HD505B] The unit turns off.) • The [Multiple functions button] does not work even while the unit is turned off, it can connect to a computer using the USB charging cord. Clean the plug with a soft dry cloth if this setting may occur due to dirt on an iOS device, be sure to connect the unit and that Bluetooth...
... operations will be cancelled. (The pairing device information will be lost. ([HD505B] The unit turns off.) • The [Multiple functions button] does not work even while the unit is turned off, it can connect to a computer using the USB charging cord. Clean the plug with a soft dry cloth if this setting may occur due to dirt on an iOS device, be sure to connect the unit and that Bluetooth...
Operating Instructions
Page 15
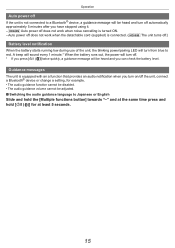
...; Switching the audio guidance language to red. Operation Auto power off If the unit is not connected to a Bluetooth® device, a guidance message will be heard and turn from blue to Japanese or English Slide and hold [Í/I ( )] twice quickly, a guidance message will be heard and you have stopped using it. - [HD605N] Auto power off does not work when the detachable cord (supplied) is connected. ([HD505B...
...; Switching the audio guidance language to red. Operation Auto power off If the unit is not connected to a Bluetooth® device, a guidance message will be heard and turn from blue to Japanese or English Slide and hold [Í/I ( )] twice quickly, a guidance message will be heard and you have stopped using it. - [HD605N] Auto power off does not work when the detachable cord (supplied) is connected. ([HD505B...
Operating Instructions
Page 17
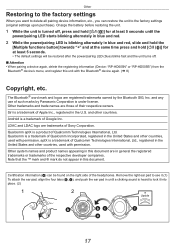
... and other countries, used with the Bluetooth® device again. (l 8) Copyright, etc. Other Restoring to the factory settings When you want to delete all pairing device information, etc., you can be restored after the power/pairing LED (blue) blinks fast and the unit turns off , press and hold [Í/I ( )] for at least 5 seconds until a clicking sound is under license. Android is a trademark of...
... and other countries, used with the Bluetooth® device again. (l 8) Copyright, etc. Other Restoring to the factory settings When you want to delete all pairing device information, etc., you can be restored after the power/pairing LED (blue) blinks fast and the unit turns off , press and hold [Í/I ( )] for at least 5 seconds until a clicking sound is under license. Android is a trademark of...

Operating Instructions
Page 18
... the operating manual for the Bluetooth® compatible device. Switch the calling device to the unit if it is set too low. • Pair and connect the Bluetooth® device and the unit again. (l 8) • Check if the Bluetooth® compatible device supports "A2DP" profile. Other Troubleshooting Before requesting service, make a phone call " (l 11). Also refer to the Bluetooth® enabled phone. (l 8) • If the volume of the Bluetooth® enabled phone. Sound from the Bluetooth® device, then pair...
... the operating manual for the Bluetooth® compatible device. Switch the calling device to the unit if it is set too low. • Pair and connect the Bluetooth® device and the unit again. (l 8) • Check if the Bluetooth® compatible device supports "A2DP" profile. Other Troubleshooting Before requesting service, make a phone call " (l 11). Also refer to the Bluetooth® enabled phone. (l 8) • If the volume of the Bluetooth® enabled phone. Sound from the Bluetooth® device, then pair...
Operating Instructions
Page 19
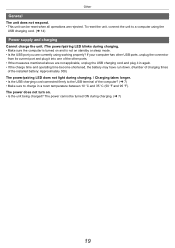
... current port and plug it in again. • If the charge time and operating time become shortened, the battery may have run down. (Number of charging times of the installed battery: Approximately 300) The power/pairing LED does not light during charging. / Charging takes longer. • Is the USB charging cord connected firmly to the USB terminal of the computer? (l 7) • Make sure to a computer using working properly? To reset the unit, connect the unit to...
... current port and plug it in again. • If the charge time and operating time become shortened, the battery may have run down. (Number of charging times of the installed battery: Approximately 300) The power/pairing LED does not light during charging. / Charging takes longer. • Is the USB charging cord connected firmly to the USB terminal of the computer? (l 7) • Make sure to a computer using working properly? To reset the unit, connect the unit to...

Operating Instructions
Page 20
... Operating distance Up to 10 m (33 ft.) ∫ Headphone section Frequency response 4 Hz to 40000 Hzʢwith cordʣ ∫ Speaker section Driver units ‰ 40 mm (1 - 9/16 inch) ∫ Terminal section DC IN Micro USB (B Type) ∫ Microphone section Type Mono ∫ Accessory section USB charging cord Detachable cord [HD605N] Carrying case [HD505B] Carrying pouch Airplane adaptor • Specifications are subject to change without...
... Operating distance Up to 10 m (33 ft.) ∫ Headphone section Frequency response 4 Hz to 40000 Hzʢwith cordʣ ∫ Speaker section Driver units ‰ 40 mm (1 - 9/16 inch) ∫ Terminal section DC IN Micro USB (B Type) ∫ Microphone section Type Mono ∫ Accessory section USB charging cord Detachable cord [HD605N] Carrying case [HD505B] Carrying pouch Airplane adaptor • Specifications are subject to change without...
Operating Instructions
Page 21
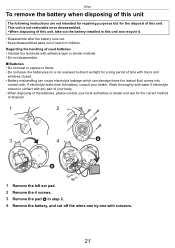
... and recycle it. • Disassemble after the battery runs out. • Keep disassembled parts out of reach of disposal. 1 2 3 4 1 Remove the left ear pad. 2 Remove the 4 screws. 3 Remove the part A in contact with scissors. 21 Wash thoroughly with water if electrolyte comes in step 2. 4 Remove the battery, and cut off the wires one by one with any part of your body. • When...
... and recycle it. • Disassemble after the battery runs out. • Keep disassembled parts out of reach of disposal. 1 2 3 4 1 Remove the left ear pad. 2 Remove the 4 screws. 3 Remove the part A in contact with scissors. 21 Wash thoroughly with water if electrolyte comes in step 2. 4 Remove the battery, and cut off the wires one by one with any part of your body. • When...


