
SAHT692 User Guide
Page 3
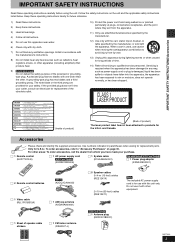
...that produce heat. 9) \U.S.A.\and\Canada] Do not defeat the safety purpose of speaker-cable stickers ∏ 1 FM indoor antenna (RSA0007-J) ∏ 5 Speaker cables 3k4-m (13-foot) cables (REE1247A) 2k10-m (33-foot) cables (REE1247C) [Note] The included AC power supply cord is used, use with ...∏ 1 Remote control (EUR7722X40) ∏ 1 AC power supply cord \U.S.A.\and\Canada] (K2CB2CB00006) ∏ 1 System cable (K1HA25HA0001) [For\areas\except\U.S.A.\and\Canada] ∏ 1 Power plug adaptor (K2DA42E00001) ∏ 2 Remote control batteries \Others] (K2CQ2CA00002) ∏ 1...
...that produce heat. 9) \U.S.A.\and\Canada] Do not defeat the safety purpose of speaker-cable stickers ∏ 1 FM indoor antenna (RSA0007-J) ∏ 5 Speaker cables 3k4-m (13-foot) cables (REE1247A) 2k10-m (33-foot) cables (REE1247C) [Note] The included AC power supply cord is used, use with ...∏ 1 Remote control (EUR7722X40) ∏ 1 AC power supply cord \U.S.A.\and\Canada] (K2CB2CB00006) ∏ 1 System cable (K1HA25HA0001) [For\areas\except\U.S.A.\and\Canada] ∏ 1 Power plug adaptor (K2DA42E00001) ∏ 2 Remote control batteries \Others] (K2CQ2CA00002) ∏ 1...

SAHT692 User Guide
Page 5
...) Wall or pillar Center speaker Other speaker setup options So that the speaker fits up against the wall squarely, be sure to press the speaker cable down into a wall. 2 Fit the speaker securely onto the screw(s) with the hole(s). ≥The wall or pillar on which the speakers are to be...
...) Wall or pillar Center speaker Other speaker setup options So that the speaker fits up against the wall squarely, be sure to press the speaker cable down into a wall. 2 Fit the speaker securely onto the screw(s) with the hole(s). ≥The wall or pillar on which the speakers are to be...

SAHT692 User Guide
Page 6
RQT7433 6 Connecting speakers with the subwoofer 2 STEP Connecting speakers with the subwoofer ≥Attach the speaker-cable stickers to negative (j) terminals. Copper Silver [Note] ≥Never short-circuit positive (i) and negative (j) speaker wires....to connect only positive (copper) wires to positive (i) terminals and negative (silver) wires to make connection easier. ≥The terminals of speaker-cable stickers SUBWOOFER Speaker-cable sticker 2 FRONT (R) 1 FRONT (L) 4 SURROUND (R) 3 SURROUND (L) 5 CENTER Insert the wire fully. Carefully connect the speaker wires. ...
RQT7433 6 Connecting speakers with the subwoofer 2 STEP Connecting speakers with the subwoofer ≥Attach the speaker-cable stickers to negative (j) terminals. Copper Silver [Note] ≥Never short-circuit positive (i) and negative (j) speaker wires....to connect only positive (copper) wires to positive (i) terminals and negative (silver) wires to make connection easier. ≥The terminals of speaker-cable stickers SUBWOOFER Speaker-cable sticker 2 FRONT (R) 1 FRONT (L) 4 SURROUND (R) 3 SURROUND (L) 5 CENTER Insert the wire fully. Carefully connect the speaker wires. ...

SAHT692 User Guide
Page 7
To enjoy progressive video ≥Connect to an incompatible television.) ≥All Panasonic televisions that have another brand of television. Y/PB/PR, Y/B-Y/R-Y, Y/CB/CR). Connect to terminals of the same color. ≥After making this connection, ...Level Control" in reproducing colors. ≥The description of the COMPONENT VIDEO OUT main unit (480P/480I) PB Y S-VIDEO OUT PR VIDEO OUT S-video cable (not included) S-VIDEO OUT terminal The S-VIDEO OUT terminal achieves a more vivid picture than the S-VIDEO OUT terminal. Connection using these terminals outputs the ...
To enjoy progressive video ≥Connect to an incompatible television.) ≥All Panasonic televisions that have another brand of television. Y/PB/PR, Y/B-Y/R-Y, Y/CB/CR). Connect to terminals of the same color. ≥After making this connection, ...Level Control" in reproducing colors. ≥The description of the COMPONENT VIDEO OUT main unit (480P/480I) PB Y S-VIDEO OUT PR VIDEO OUT S-video cable (not included) S-VIDEO OUT terminal The S-VIDEO OUT terminal achieves a more vivid picture than the S-VIDEO OUT terminal. Connection using these terminals outputs the ...

SAHT692 User Guide
Page 8
...to the appropriate position for the area in your AC outlet Use the power plug adaptor (included). If it from other wires and cables. Keep loose antenna cable away from the household AC outlet. AC power supply cord To household AC outlet Catch up To disconnect Press the catch and pull out.... 2 System cable To disconnect Press the catch and pull out. R6/LR6, AA, UM-3 1 ≥Do not use batteries if the covering has been peeled off (For ...
...to the appropriate position for the area in your AC outlet Use the power plug adaptor (included). If it from other wires and cables. Keep loose antenna cable away from the household AC outlet. AC power supply cord To household AC outlet Catch up To disconnect Press the catch and pull out.... 2 System cable To disconnect Press the catch and pull out. R6/LR6, AA, UM-3 1 ≥Do not use batteries if the covering has been peeled off (For ...
SAHT692 User Guide
Page 23
...select "FM" or "AM". 2 Press [TUNE MODE] to select "MANUAL". 3 Press [X TUNING] or [TUNING W] to remove the cover. 2 3 Install the coaxial cable. Continue to hold [X TUNING] or [TUNING W] until the frequency starts scrolling to the original step, repeat the above ). 2 Press [ENTER]. 3 While "PGM" is .... Leave the loop antenna connected. Presetting the channel one by one 1 Tune to 0.2 MHz, but you can change it to receive broadcasts allocated in use. ≥Do not use the outdoor antenna during an electrical storm. Optional antenna connections Use outdoor antennas if ...
...select "FM" or "AM". 2 Press [TUNE MODE] to select "MANUAL". 3 Press [X TUNING] or [TUNING W] to remove the cover. 2 3 Install the coaxial cable. Continue to hold [X TUNING] or [TUNING W] until the frequency starts scrolling to the original step, repeat the above ). 2 Press [ENTER]. 3 While "PGM" is .... Leave the loop antenna connected. Presetting the channel one by one 1 Tune to 0.2 MHz, but you can change it to receive broadcasts allocated in use. ≥Do not use the outdoor antenna during an electrical storm. Optional antenna connections Use outdoor antennas if ...
SAHT692 User Guide
Page 28
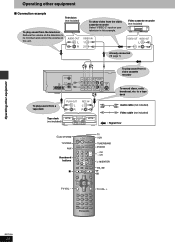
... other equipment ∫ Connection example Television (not included) To play sound from a tape deck PLAY OUT L R REC IN L R Tape deck (not included) Audio cable (not included) Video cable (not included) : Signal flow AV SYSTEM TV/VIDEO AUX Numbered buttons AV SYSTEM TV VCR TV/VIDEO AUX TUNER/BAND DVD/CD DISC 1 DISC...
... other equipment ∫ Connection example Television (not included) To play sound from a tape deck PLAY OUT L R REC IN L R Tape deck (not included) Audio cable (not included) Video cable (not included) : Signal flow AV SYSTEM TV/VIDEO AUX Numbered buttons AV SYSTEM TV VCR TV/VIDEO AUX TUNER/BAND DVD/CD DISC 1 DISC...

SAHT692 User Guide
Page 32
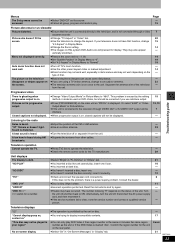
... if you cannot add markers. - Turn the unit off and then back to the standby mode. ≥Insert the AC power supply cord and system cable securely. ≥The Sleep timer activated. of the check points, or if the remedies indicated in the U.S.A., or refer to 2 hours for Video CDs. - A-B repeat... audio effects do not work if you have changed . [DVD-A] Subtitle Subtitle position is normal on . Humming heard during ≥This is on DVD-Audio. - cables away from the subwoofer.
... if you cannot add markers. - Turn the unit off and then back to the standby mode. ≥Insert the AC power supply cord and system cable securely. ≥The Sleep timer activated. of the check points, or if the remedies indicated in the U.S.A., or refer to 2 hours for Video CDs. - A-B repeat... audio effects do not work if you have changed . [DVD-A] Subtitle Subtitle position is normal on . Humming heard during ≥This is on DVD-Audio. - cables away from the subwoofer.
SAHT692 User Guide
Page 33
... Menu. ≥If the unit is connected to "480I". A beat sound is heard. ≥Turn the television off TV's zoom function. - ≥Use the other cables. - Turn - person. Menus The Setup menu cannot be accessed. ≥Select "DVD/CD" as the unit or if the DVD-Video is marked "ALL". vertically...
... Menu. ≥If the unit is connected to "480I". A beat sound is heard. ≥Turn the television off TV's zoom function. - ≥Use the other cables. - Turn - person. Menus The Setup menu cannot be accessed. ≥Select "DVD/CD" as the unit or if the DVD-Video is marked "ALL". vertically...


