

Owners Manual
Page 1
Please keep this manual for purchasing this product. SC-UA7 Thank you have any questions, visit: www.panasonic.ca/english/support PC RQT0B31-C Owner's Manual Wireless Speaker System Model No. For optimum performance and safety, please read these instructions carefully. If you for future reference.
Please keep this manual for purchasing this product. SC-UA7 Thank you have any questions, visit: www.panasonic.ca/english/support PC RQT0B31-C Owner's Manual Wireless Speaker System Model No. For optimum performance and safety, please read these instructions carefully. If you for future reference.

Owners Manual
Page 2
... such as power-supply cord or plug is damaged, liquid has been spilled or objects have fallen into your safety. Unplug this apparatus during lightning storms or when unused for replacement of controls 6 Preparing media 8 Media playback 9 Radio 10 Sound effects 11 Illumination 11 DJ jukebox 12 Karaoke jukebox 12 Using a microphone 13 Clock and timers 13 External equipment 14 Others 15 Troubleshooting 16 Specifications 18...
... such as power-supply cord or plug is damaged, liquid has been spilled or objects have fallen into your safety. Unplug this apparatus during lightning storms or when unused for replacement of controls 6 Preparing media 8 Media playback 9 Radio 10 Sound effects 11 Illumination 11 DJ jukebox 12 Karaoke jukebox 12 Using a microphone 13 Clock and timers 13 External equipment 14 Others 15 Troubleshooting 16 Specifications 18...

Owners Manual
Page 3
..., on this unit's ventilation openings with doors and windows closed. • Do not break open or short-circuit the battery. • Do not charge the alkaline or manganese battery. • Do not use the remote control for a long period of important operating and maintenance (servicing) instructions in a cool, dark area. Do not repair this unit is intended to alert the user to the presence...
..., on this unit's ventilation openings with doors and windows closed. • Do not break open or short-circuit the battery. • Do not charge the alkaline or manganese battery. • Do not use the remote control for a long period of important operating and maintenance (servicing) instructions in a cool, dark area. Do not repair this unit is intended to alert the user to the presence...

Owners Manual
Page 4
... is sensitive to other devices • This system may not function properly and troubles such as noise and sound jumps may not function properly if radio waves from a nearby broadcasting station, etc. References About Bluetooth® Panasonic bears no responsibility for normal, general use only. • Do not use this system near an equipment or in the remote control. Other trademarks and...
... is sensitive to other devices • This system may not function properly and troubles such as noise and sound jumps may not function properly if radio waves from a nearby broadcasting station, etc. References About Bluetooth® Panasonic bears no responsibility for normal, general use only. • Do not use this system near an equipment or in the remote control. Other trademarks and...

Owners Manual
Page 5
...) 2 Connect the AC power supply cord. RQT0B31 5 CAUTION! • Improper handling or transportation manner may cause the unit to fall, etc., resulting in damage and/or personal injury. • Do not transport the unit by holding the lighting plate as this may decrease the sound quality. • The subwoofer is in these conditions to the speakers. • Lower the volume in standby mode.
...) 2 Connect the AC power supply cord. RQT0B31 5 CAUTION! • Improper handling or transportation manner may cause the unit to fall, etc., resulting in damage and/or personal injury. • Do not transport the unit by holding the lighting plate as this may decrease the sound quality. • The subwoofer is in these conditions to the speakers. • Lower the volume in standby mode.

Owners Manual
Page 6
... function does not work when you are also turned off. N Adjust the volume level O Mute the sound To cancel, press the button again. "MUTE" is connected. You can also use it for approximately 20 minutes. F Basic playback control G Select DJ jukebox or Karaoke jukebox H Select the sound effects I Turn on the unit B View the content information C Numeric buttons To select a 2-digit number Example: 16: [ 10]=[1]=[6] D Auto preset the radio station E Select the audio...
... function does not work when you are also turned off. N Adjust the volume level O Mute the sound To cancel, press the button again. "MUTE" is connected. You can also use it for approximately 20 minutes. F Basic playback control G Select DJ jukebox or Karaoke jukebox H Select the sound effects I Turn on the unit B View the content information C Numeric buttons To select a 2-digit number Example: 16: [ 10]=[1]=[6] D Auto preset the radio station E Select the audio...

Owners Manual
Page 7
... (refer to the illustration above for the touch area). • To avoid operating these touch keys unintentionally, do not put any object on them. RQT0B31 7 Top panel ENGLISH : Touch area T USB status indicator U Display panel V DJ jukebox or Karaoke jukebox status indicator W Microphone jack X USB port ( ) Y AUX IN 2 jack Z Remote control sensor Distance: Within approximately 7 m (23 ft) Angle: Approximately 20° up...
... (refer to the illustration above for the touch area). • To avoid operating these touch keys unintentionally, do not put any object on them. RQT0B31 7 Top panel ENGLISH : Touch area T USB status indicator U Display panel V DJ jukebox or Karaoke jukebox status indicator W Microphone jack X USB port ( ) Y AUX IN 2 jack Z Remote control sensor Distance: Within approximately 7 m (23 ft) Angle: Approximately 20° up...

Owners Manual
Page 8
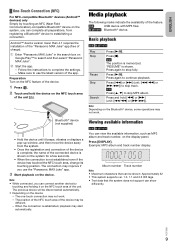
... can connect and play an audio device wirelessly through a cable. Preparation • Turn on the device. If prompted for a few seconds. 3 Start playback on the Bluetooth® feature of the device and put the device near the system. • Read the operating instructions of the device for the longest time will automatically try to connect to the last connected device. ("LINKING" is shown. 2 Select "SC-UA7" from the Bluetooth® menu of the device...
... can connect and play an audio device wirelessly through a cable. Preparation • Turn on the device. If prompted for a few seconds. 3 Start playback on the Bluetooth® feature of the device and put the device near the system. • Read the operating instructions of the device for the longest time will automatically try to connect to the last connected device. ("LINKING" is shown. 2 Select "SC-UA7" from the Bluetooth® menu of the device...
Owners Manual
Page 9
... MP3 album. USB Press [R, T] to stop fully. The connection may improve if you use the latest version of charge). Follow the instructions to skip track. Media playback The following marks indicate the availability of the device may not work . - USB The position is shown. Skip Search Press [2] or [6] (unit: [2/3] or [5/6]) to complete the settings. - The previous device will be shown: Approximately 32 • This system supports ver...
... MP3 album. USB Press [R, T] to stop fully. The connection may improve if you use the latest version of charge). Follow the instructions to skip track. Media playback The following marks indicate the availability of the device may not work . - USB The position is shown. Skip Search Press [2] or [6] (unit: [2/3] or [5/6]) to complete the settings. - The previous device will be shown: Approximately 32 • This system supports ver...
Owners Manual
Page 10
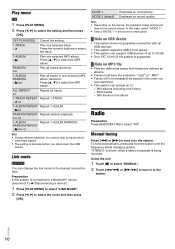
... the setting. Repeat all tracks randomly. MODE 2 (default) Emphasis on connectivity. Play all tracks. 1-TRACK REPEAT Repeat 1-TRACK. 1 1-ALBUM REPEAT Repeat 1-ALBUM. 1 RANDOM REPEAT Repeat random playback. To tune automatically, press and hold the button until the frequency starts changing quickly. Play one selected MP3 album. Press [R, T] to select the track. Note: • Depending on the device, the playback image and sound may not be played in the order you recorded...
... the setting. Repeat all tracks randomly. MODE 2 (default) Emphasis on connectivity. Play all tracks. 1-TRACK REPEAT Repeat 1-TRACK. 1 1-ALBUM REPEAT Repeat 1-ALBUM. 1 RANDOM REPEAT Repeat random playback. To tune automatically, press and hold the button until the frequency starts changing quickly. Play one selected MP3 album. Press [R, T] to select the track. Note: • Depending on the device, the playback image and sound may not be played in the order you recorded...

Owners Manual
Page 11
... desired preset EQ setting. To cancel, select "OFF". The tuner presets all the stations it can turn on or turn off the illumination on the system. The new station replaces any station that occupies the same preset number. █ Selecting a preset station Press the numeric buttons, [2] or [6] to a station. To cancel, select "STEREO". The system is selected as if they are erased after you change the setting. The FM signal is...
... desired preset EQ setting. To cancel, select "OFF". The tuner presets all the stations it can turn on or turn off the illumination on the system. The new station replaces any station that occupies the same preset number. █ Selecting a preset station Press the numeric buttons, [2] or [6] to a station. To cancel, select "STEREO". The system is selected as if they are erased after you change the setting. The FM signal is...
Owners Manual
Page 12
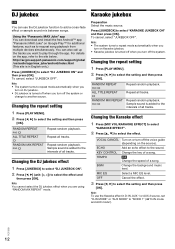
... jukebox function to select "DJ JUKEBOX ON" and then press [OK]. Changing the repeat setting 1 Press [PLAY MENU]. 2 Press [Y, U] to "MODE 1" (Z"D-IN mode and AUX mode"). Changing the DJ jukebox effect 1 Press [JUKEBOX] to select "DJ JUKEBOX ON". 2 Press [Y, U] (unit: []) to the intervals of all tracks. RANDOM REPEAT RND ALL TITLE REPEAT Repeat random playback. VOCAL CANCEL Turn on or turn off the voice guide (depending...
... jukebox function to select "DJ JUKEBOX ON" and then press [OK]. Changing the repeat setting 1 Press [PLAY MENU]. 2 Press [Y, U] to "MODE 1" (Z"D-IN mode and AUX mode"). Changing the DJ jukebox effect 1 Press [JUKEBOX] to select "DJ JUKEBOX ON". 2 Press [Y, U] (unit: []) to the intervals of all tracks. RANDOM REPEAT RND ALL TITLE REPEAT Repeat random playback. VOCAL CANCEL Turn on or turn off the voice guide (depending...
Owners Manual
Page 13
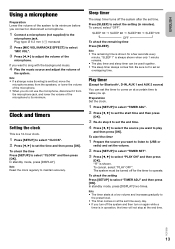
.... "#" is always shown when only 1 minute remains. • The play and then press [OK]. In standby mode, press [DISPLAY] two times. Note: • The timer starts at a low volume and increases gradually to the preset level. • The timer comes on at the set the volume. 2 Press [SETUP] to select "TIMER SET". 3 Press [Y, U] to play timer and sleep timer can set the time and then press [OK].
.... "#" is always shown when only 1 minute remains. • The play and then press [OK]. In standby mode, press [DISPLAY] two times. Note: • The timer starts at a low volume and increases gradually to the preset level. • The timer comes on at the set the volume. 2 Press [SETUP] to select "TIMER SET". 3 Press [Y, U] to play timer and sleep timer can set the time and then press [OK].

Owners Manual
Page 14
... use an adapter. Plug type: Ø 3.5 mm (1/8″) stereo 2 Press [RADIO/EXT-IN] to select "D-IN". 3 Play the external equipment. Connecting a portable audio equipment You can occur when you want to connect equipment other than those mentioned, refer to the audio dealer. • Sound distortion can play music from the TV's speakers, lower the volume of the TV to its minimum. • Read the operating instructions of this unit Audio cable (not supplied) 1 Connect...
... use an adapter. Plug type: Ø 3.5 mm (1/8″) stereo 2 Press [RADIO/EXT-IN] to select "D-IN". 3 Play the external equipment. Connecting a portable audio equipment You can occur when you want to connect equipment other than those mentioned, refer to the audio dealer. • Sound distortion can play music from the TV's speakers, lower the volume of the TV to its minimum. • Read the operating instructions of this unit Audio cable (not supplied) 1 Connect...

Owners Manual
Page 15
.... RQT0B31 15 ENGLISH To adjust the input level 1 Press [PLAY MENU] to select "INPUT LEVEL". 2 Press [Y, U] to use it for approximately 20 minutes. MODE 1 MODE 2 (default) Select this system from your Bluetooth® device again. Others Auto off This system automatically turns off the system, wait for a minimum of an additional SC-UA7 unit Audio cable (not supplied) 1 Connect the additional SC-UA7 unit. 2 On the additional SC-UA7 unit: Press [RADIO/EXT-IN] to an additional SC-UA7 unit. If...
.... RQT0B31 15 ENGLISH To adjust the input level 1 Press [PLAY MENU] to select "INPUT LEVEL". 2 Press [Y, U] to use it for approximately 20 minutes. MODE 1 MODE 2 (default) Select this system from your Bluetooth® device again. Others Auto off This system automatically turns off the system, wait for a minimum of an additional SC-UA7 unit Audio cable (not supplied) 1 Connect the additional SC-UA7 unit. 2 On the additional SC-UA7 unit: Press [RADIO/EXT-IN] to an additional SC-UA7 unit. If...
Owners Manual
Page 16
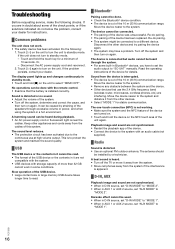
... device to standby mode. This is near the cables. The antenna should be heard during playback. • An AC power supply cord or fluorescent light is to turn on the unit to the system. The display panel lights up and changes continuously in Bluetooth® devices, you are not compatible with the system. • USB devices with the remote control. • Examine that use at high volume output. Move the device nearer to "SC-UA7" manually. A humming sound...
... device to standby mode. This is near the cables. The antenna should be heard during playback. • An AC power supply cord or fluorescent light is to turn on the unit to the system. The display panel lights up and changes continuously in Bluetooth® devices, you are not compatible with the system. • USB devices with the remote control. • Examine that use at high volume output. Move the device nearer to "SC-UA7" manually. A humming sound...

Owners Manual
Page 17
... set the code to "REMOTE 2" 1 Touch and hold [SELECT] on the unit and [2] on again. Change the digital audio output setting on the unit, touch [SELECT]. You can only play timer. The system will turn on the remote control until "REMOTE 2" is shown. 2 Press and hold [OK] and [1] for variable bit rate (VBR) tracks. Disconnect the USB device, turn off automatically. After is shown, the unit will skip that track and play time...
... set the code to "REMOTE 2" 1 Touch and hold [SELECT] on the unit and [2] on again. Change the digital audio output setting on the unit, touch [SELECT]. You can only play timer. The system will turn on the remote control until "REMOTE 2" is shown. 2 Press and hold [OK] and [1] for variable bit rate (VBR) tracks. Disconnect the USB device, turn off automatically. After is shown, the unit will skip that track and play time...
Owners Manual
Page 18
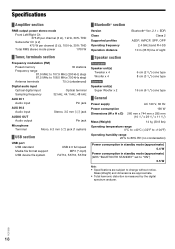
... step) Antenna terminals 75 Ω (unbalanced) Digital audio input Optical digital input Sampling frequency Optical terminal 32 kHz, 44.1 kHz, 48 kHz AUX IN 1 Audio input Pin jack AUX IN 2 Audio input AUDIO OUT Audio output Stereo, 3.5 mm (1/8″) jack Pin jack Microphone Terminal Mono, 6.3 mm (1/4″) jack (1 system) █ USB section USB port USB standard Media file format support USB device file system USB 2.0 full speed MP3 (*.mp3) FAT12, FAT16, FAT32 █ Bluetooth® section Version Class Supported profiles Operating frequency Operation distance...
... step) Antenna terminals 75 Ω (unbalanced) Digital audio input Optical digital input Sampling frequency Optical terminal 32 kHz, 44.1 kHz, 48 kHz AUX IN 1 Audio input Pin jack AUX IN 2 Audio input AUDIO OUT Audio output Stereo, 3.5 mm (1/8″) jack Pin jack Microphone Terminal Mono, 6.3 mm (1/4″) jack (1 system) █ USB section USB port USB standard Media file format support USB device file system USB 2.0 full speed MP3 (*.mp3) FAT12, FAT16, FAT32 █ Bluetooth® section Version Class Supported profiles Operating frequency Operation distance...

Owners Manual
Page 19
.... WARRANTY SERVICE For product operation, repairs and information assistance, please visit our Support page: www.panasonic.ca/english/support IF YOU SHIP THE PRODUCT TO A SERVICENTRE Carefully pack and send prepaid, adequately insured and preferably in materials or workmanship, and DOES NOT COVER normal wear and tear or cosmetic damage. MODEL NUMBER SC-UA7 SERIAL NUMBER User memo: DATE OF PURCHASE DEALER NAME DEALER ADDRESS TELEPHONE NUMBER RQT0B31 19...
.... WARRANTY SERVICE For product operation, repairs and information assistance, please visit our Support page: www.panasonic.ca/english/support IF YOU SHIP THE PRODUCT TO A SERVICENTRE Carefully pack and send prepaid, adequately insured and preferably in materials or workmanship, and DOES NOT COVER normal wear and tear or cosmetic damage. MODEL NUMBER SC-UA7 SERIAL NUMBER User memo: DATE OF PURCHASE DEALER NAME DEALER ADDRESS TELEPHONE NUMBER RQT0B31 19...


