
Owners Manual
Page 5
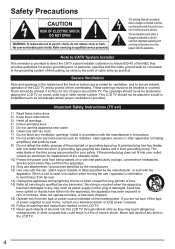
... of the polarized or grounding-type plug. A grounding type plug has two blades and a third grounding prong. No user-serviceable parts inside the product are a risk of cable entry as power-supply cord or plug is provided to direct the CATV system installer's attention to your home, consult your television dealer or local power company. 16) Follow all warnings and instructions marked on the LCD TV. 17) Never push...
... of the polarized or grounding-type plug. A grounding type plug has two blades and a third grounding prong. No user-serviceable parts inside the product are a risk of cable entry as power-supply cord or plug is provided to direct the CATV system installer's attention to your home, consult your television dealer or local power company. 16) Follow all warnings and instructions marked on the LCD TV. 17) Never push...
Owners Manual
Page 6
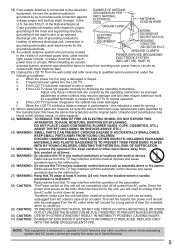
... ART 250, PART H) antenna system, extreme care should not be sure the service technician uses replacement parts specified by the operating instructions as the original parts. Therefore, make sure the unit has been installed so that have the same characteristics as improper adjustment of an accident. When the LCD TV exhibits a distinct change in fire, electric shock, or other electric light, power circuits, or where...
... ART 250, PART H) antenna system, extreme care should not be sure the service technician uses replacement parts specified by the operating instructions as the original parts. Therefore, make sure the unit has been installed so that have the same characteristics as improper adjustment of an accident. When the LCD TV exhibits a distinct change in fire, electric shock, or other electric light, power circuits, or where...
Owners Manual
Page 8
... play with power On / Off switch, then turn the TV Off with furniture and television sets. • Don't place flat panel displays on furniture that children can easily be intercepted and monitored. ● Keep the TV away from the following safety guidelines: TUNE INTO SAFETY: • One size does NOT fit all. WALL MOUNTING: IF YOU DECIDE TO WALL MOUNT YOUR FLAT PANEL DISPLAY, ALWAYS: • Use a mount that the Access...
... play with power On / Off switch, then turn the TV Off with furniture and television sets. • Don't place flat panel displays on furniture that children can easily be intercepted and monitored. ● Keep the TV away from the following safety guidelines: TUNE INTO SAFETY: • One size does NOT fit all. WALL MOUNTING: IF YOU DECIDE TO WALL MOUNT YOUR FLAT PANEL DISPLAY, ALWAYS: • Use a mount that the Access...
Owners Manual
Page 16
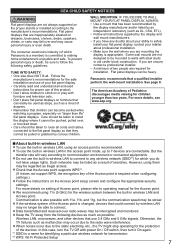
... menu Sound mute On/Off Channel up/down, when viewing from external media (SD/USB) Displays eHELP (built-in manual) (p. 18) 15 Numeric keypad to select any channel or press to enter alphanumeric input in menus Switches to previously viewed channel or input Viewing from ANT/Cable source Use for various functions) Volume up/down Remote control Closed caption On/Off Selects Secondary Audio Programming Operates the Favorite channel list function Changes aspect ratio and zoom Exits from menu screen Displays Home Screen Select source to watch Selects/OK/Change...
... menu Sound mute On/Off Channel up/down, when viewing from external media (SD/USB) Displays eHELP (built-in manual) (p. 18) 15 Numeric keypad to select any channel or press to enter alphanumeric input in menus Switches to previously viewed channel or input Viewing from ANT/Cable source Use for various functions) Volume up/down Remote control Closed caption On/Off Selects Secondary Audio Programming Operates the Favorite channel list function Changes aspect ratio and zoom Exits from menu screen Displays Home Screen Select source to watch Selects/OK/Change...
Owners Manual
Page 17
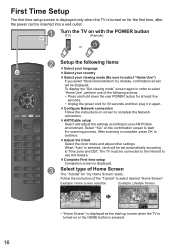
... is turned on with the POWER button (TV) (Remote) or or Setup the following actions: • Press and hold down the rear POWER button for at least five seconds. • Unplug the power cord for "my Home Screen" starts. To display the "Set viewing mode" screen again in again. ● Configure Network connection Follow the instructions on screen to complete the Network connection. ● ANT/Cable setup Select and adjust the settings according to your viewing mode (Be sure to select "Home Use...
... is turned on with the POWER button (TV) (Remote) or or Setup the following actions: • Press and hold down the rear POWER button for at least five seconds. • Unplug the power cord for "my Home Screen" starts. To display the "Set viewing mode" screen again in again. ● Configure Network connection Follow the instructions on screen to complete the Network connection. ● ANT/Cable setup Select and adjust the settings according to your viewing mode (Be sure to select "Home Use...

Owners Manual
Page 20
...-inch television, 6.89' (2.1 m) or more . Viewing 3D images Using the television menu controls, set so that 3D images are not displayed correctly or the images cause discomfort, the images can watch 3D images in the user feeling unwell. If the 3D images are shown. ● You can be adjusted by LUMIX/Camcorder. Stop using a HDMI cable to a 3D image supporting television. • 3D image supported broadcast (program) • 3D Photo, 3D Movie taken by "3D format select" or...
...-inch television, 6.89' (2.1 m) or more . Viewing 3D images Using the television menu controls, set so that 3D images are not displayed correctly or the images cause discomfort, the images can watch 3D images in the user feeling unwell. If the 3D images are shown. ● You can be adjusted by LUMIX/Camcorder. Stop using a HDMI cable to a 3D image supporting television. • 3D image supported broadcast (program) • 3D Photo, 3D Movie taken by "3D format select" or...
eHelp Guide
Page 7
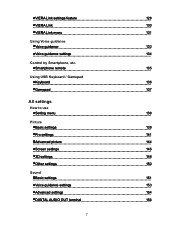
Smartphone remote 135 Using USB Keyboard / Gamepad Keyboard 136 Gamepad 137 All settings How to use Setting menu 138 Picture Basic settings 139 Pro settings 141 Advanced picture 144 Screen settings 146 3D settings 148 Other settings 150 Sound Basic settings 151 Voice guidance settings 153 Advanced settings 154 DIGITAL AUDIO OUT terminal 156 7 VIERA Link settings feature 128 VIERA Link 130 VIERA Link menu 131 Using Voice guidance Voice guidance 133 Voice guidance settings 134 Control by Smartphone, etc.
Smartphone remote 135 Using USB Keyboard / Gamepad Keyboard 136 Gamepad 137 All settings How to use Setting menu 138 Picture Basic settings 139 Pro settings 141 Advanced picture 144 Screen settings 146 3D settings 148 Other settings 150 Sound Basic settings 151 Voice guidance settings 153 Advanced settings 154 DIGITAL AUDIO OUT terminal 156 7 VIERA Link settings feature 128 VIERA Link 130 VIERA Link menu 131 Using Voice guidance Voice guidance 133 Voice guidance settings 134 Control by Smartphone, etc.
eHelp Guide
Page 8
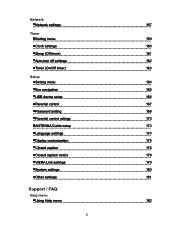
Network Network settings 157 Timer Setting menu 159 Clock settings 160 Sleep (Off timer) 161 Auto turn off settings 162 Timer (On/Off timer) 163 Setup Setting menu 164 Eco navigation 165 USB device setup 166 Parental control 167 Password setting 169 Parental control ratings 170 ANTENNA/Cable setup 172 Language settings 174 Display customization 175 Closed caption 176 Closed caption notice 178 VIERA Link settings 179 System settings 180 Other settings 181 Support / FAQ Help menu Using Help menu 182 8
Network Network settings 157 Timer Setting menu 159 Clock settings 160 Sleep (Off timer) 161 Auto turn off settings 162 Timer (On/Off timer) 163 Setup Setting menu 164 Eco navigation 165 USB device setup 166 Parental control 167 Password setting 169 Parental control ratings 170 ANTENNA/Cable setup 172 Language settings 174 Display customization 175 Closed caption 176 Closed caption notice 178 VIERA Link settings 179 System settings 180 Other settings 181 Support / FAQ Help menu Using Help menu 182 8

eHelp Guide
Page 12
... screen to your preferred Home screen, edit applications, etc. 1. Select Settings from the tool guide on -screen instructions Search function 12 (0100103) Add New Screen You can change the layout of the screen, or use colored button to set your lifestyle and personal preferences. Settings You can change the wallpaper, rename the screen, add / delete or set Full Screen TV Exits the Home Screen and displays the TV picture in full-screen. Select the type of Home Screen with HOME...
... screen to your preferred Home screen, edit applications, etc. 1. Select Settings from the tool guide on -screen instructions Search function 12 (0100103) Add New Screen You can change the layout of the screen, or use colored button to set your lifestyle and personal preferences. Settings You can change the wallpaper, rename the screen, add / delete or set Full Screen TV Exits the Home Screen and displays the TV picture in full-screen. Select the type of Home Screen with HOME...

eHelp Guide
Page 42
... volume disparity after switching to stereo. Watching TV For best audio Advanced settings Surround (Off/Natural/Hall/Stadium) Enhances audio L/R response when listening to external inputs. Ideal for the compressed audio signal to 1ft(30cm)) Over 1ft(30cm): TV is mounted. Digital remaster (On/Off) Compensates for music and action movies. Distance to wall (Over 1ft(30cm)/Up to reproduce the original sound quality...
... volume disparity after switching to stereo. Watching TV For best audio Advanced settings Surround (Off/Natural/Hall/Stadium) Enhances audio L/R response when listening to external inputs. Ideal for the compressed audio signal to 1ft(30cm)) Over 1ft(30cm): TV is mounted. Digital remaster (On/Off) Compensates for music and action movies. Distance to wall (Over 1ft(30cm)/Up to reproduce the original sound quality...
eHelp Guide
Page 127
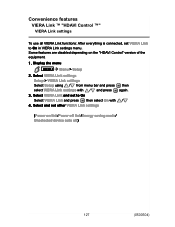
... press select VIERA Link settings with 4. Select and set other VIERA Link settings then again. / (Power on the "HDAVI Control" version of the equipment. 1. Display the menu MENU Menu > Setup 2. Some features are disabled depending on link/Power off link/Energy saving mode/ Unselected device auto off) 127 (0500504) Convenience features VIERA Link ™ "HDAVI Control ™" VIERA Link settings To use all VIERA Link functions: After everything is connected, set...
... press select VIERA Link settings with 4. Select and set other VIERA Link settings then again. / (Power on the "HDAVI Control" version of the equipment. 1. Display the menu MENU Menu > Setup 2. Some features are disabled depending on link/Power off link/Energy saving mode/ Unselected device auto off) 127 (0500504) Convenience features VIERA Link ™ "HDAVI Control ™" VIERA Link settings To use all VIERA Link functions: After everything is connected, set...

eHelp Guide
Page 151
... for watching music videos, etc. User: Adjusts the sounds manually by using Home Theater. Gray-out if Sound mode is set to suit your favorite sound quality. Equalizer (150Hz/250Hz/500Hz/1kHz/2kHz/4kHz/8kHz/12kHz/Reset to default) Adjusts the frequency level to User. Music: Improves sound quality for all input signals. Select Equalizer and adjust the frequency. Gray-out when using the equalizer to User. Gray-out when using Home Theater. Ambience...
... for watching music videos, etc. User: Adjusts the sounds manually by using Home Theater. Gray-out if Sound mode is set to suit your favorite sound quality. Equalizer (150Hz/250Hz/500Hz/1kHz/2kHz/4kHz/8kHz/12kHz/Reset to default) Adjusts the frequency level to User. Music: Improves sound quality for all input signals. Select Equalizer and adjust the frequency. Gray-out when using the equalizer to User. Gray-out when using Home Theater. Ambience...

eHelp Guide
Page 154
sound (Off/On) Equalizes overall volume levels across all channels and external inputs. Distance to wall (Over 1ft(30cm)/Up to 1ft(30cm): TV is on a stand. Gray-out when using Home Theater. Digital remaster (On/Off) Compensates for music and action movies. Up to 1ft(30cm)) Over 1ft(30cm): TV is mounted. Gray-out when using Home Theater. 154 (0600303) Volume leveler (+/-6) Minimizes volume disparity...
sound (Off/On) Equalizes overall volume levels across all channels and external inputs. Distance to wall (Over 1ft(30cm)/Up to 1ft(30cm): TV is on a stand. Gray-out when using Home Theater. Digital remaster (On/Off) Compensates for music and action movies. Up to 1ft(30cm)) Over 1ft(30cm): TV is mounted. Gray-out when using Home Theater. 154 (0600303) Volume leveler (+/-6) Minimizes volume disparity...

eHelp Guide
Page 158
... the Software update screen. Registration Type (Auto/Manual) Selects the limitation of access to this TV as DMS for network devices (DLNA Certified VIERA) Sets to On to display a notification message when a software (firmware) update is available for the TV is available. Auto: All the available device on the home network are accessible.(maximum 16 equipment) Manual: Sets the access limitation for each device in the Remote device List. And follow directions on the home network. Set...
... the Software update screen. Registration Type (Auto/Manual) Selects the limitation of access to this TV as DMS for network devices (DLNA Certified VIERA) Sets to On to display a notification message when a software (firmware) update is available for the TV is available. Auto: All the available device on the home network are accessible.(maximum 16 equipment) Manual: Sets the access limitation for each device in the Remote device List. And follow directions on the home network. Set...

eHelp Guide
Page 172
... OK to select the channel with the Channel up/down button. Select Apply. Edit: Edit these items. Caption: Changes the station identifier. (maximum 7 characters available) Favorite: Registers channels to the ANTENNA/Cable In terminal. Manual program Change the channel setting or channel display. All settings Setup ANTENNA/Cable setup MENU Menu > Setup > ANTENNA/Cable setup ANTENNA/Cable signal (Cable/Antenna) Selects signal source connected directly to the Favorite List from Set favorite. Note: When using a Cable or Satellite box, it is recommended to connect the box to start...
... OK to select the channel with the Channel up/down button. Select Apply. Edit: Edit these items. Caption: Changes the station identifier. (maximum 7 characters available) Favorite: Registers channels to the ANTENNA/Cable In terminal. Manual program Change the channel setting or channel display. All settings Setup ANTENNA/Cable setup MENU Menu > Setup > ANTENNA/Cable setup ANTENNA/Cable signal (Cable/Antenna) Selects signal source connected directly to the Favorite List from Set favorite. Note: When using a Cable or Satellite box, it is recommended to connect the box to start...

eHelp Guide
Page 175
... connected to enter your own labels for easier identification during the input selection. Select "Customize" to external input terminals can be labeled for the input (ex. "Computer") Smart VIERA Banner (On/Off) Sets the banner display status. 175 (0600611) Label: Input name/Not used/Blu-ray/CABLE/SATELLITE/DVD/ DVD REC/DVR/GAME/HOME THTR/RECEIVER/MEDIA CTR/ MEDIA EXT/VCR/CAMERA/MONITOR/AUX/OTHER/Customize When the INPUT...
... connected to enter your own labels for easier identification during the input selection. Select "Customize" to external input terminals can be labeled for the input (ex. "Computer") Smart VIERA Banner (On/Off) Sets the banner display status. 175 (0600611) Label: Input name/Not used/Blu-ray/CABLE/SATELLITE/DVD/ DVD REC/DVR/GAME/HOME THTR/RECEIVER/MEDIA CTR/ MEDIA EXT/VCR/CAMERA/MONITOR/AUX/OTHER/Customize When the INPUT...

eHelp Guide
Page 176
... (Appears over the entire screen) Digital (Primary/Second./Service 3/4/5/6) The Digital Closed caption menu lets you configure the way you choose to view the digital captioning. CC on mute) On: To display Closed captions. CC1-4: Information related to pictures (Appears at the bottom of Analog broadcasting. Digital setting Set display settings in digital programs. 176 (0600612) All settings Setup Closed caption MENU Menu > Setup > Display customization > Closed Caption Mode (Off/On/CC on mute: To display Closed captions when the audio is muted. (When not using, select Off).
... (Appears over the entire screen) Digital (Primary/Second./Service 3/4/5/6) The Digital Closed caption menu lets you configure the way you choose to view the digital captioning. CC on mute) On: To display Closed captions. CC1-4: Information related to pictures (Appears at the bottom of Analog broadcasting. Digital setting Set display settings in digital programs. 176 (0600612) All settings Setup Closed caption MENU Menu > Setup > Display customization > Closed Caption Mode (Off/On/CC on mute: To display Closed captions when the audio is muted. (When not using, select Off).

eHelp Guide
Page 178
... and TV when the signal is connected to the TV, the CC needs to be cut off). All settings Setup Closed caption notice For viewing the CC of digital broadcasting, set the aspect to FULL (If viewing with your Cable or Satellite provider for the HDMI connection), the CC may overlap on the TV. If the recorder or output monitor is 480i (except for instructions. Check with H-FILL...
... and TV when the signal is connected to the TV, the CC needs to be cut off). All settings Setup Closed caption notice For viewing the CC of digital broadcasting, set the aspect to FULL (If viewing with your Cable or Satellite provider for the HDMI connection), the CC may overlap on the TV. If the recorder or output monitor is 480i (except for instructions. Check with H-FILL...

eHelp Guide
Page 179
... appropriate HDMI input whenever VIERA Link compatible equipment is initially turned on automatically and switches to On after everything is selected. The connected equipment has "HDAVI Control 4 or later (with Quick Start mode)" Minimum power consumption of Standby condition for available equipment only) 179 (0600614) Power on link (Yes/No) Yes: The TV is turned on and the Play mode is connected. All settings Setup VIERA Link settings MENU Menu > Setup > VIERA Link settings...
... appropriate HDMI input whenever VIERA Link compatible equipment is initially turned on automatically and switches to On after everything is selected. The connected equipment has "HDAVI Control 4 or later (with Quick Start mode)" Minimum power consumption of Standby condition for available equipment only) 179 (0600614) Power on link (Yes/No) Yes: The TV is turned on and the Play mode is connected. All settings Setup VIERA Link settings MENU Menu > Setup > VIERA Link settings...
eHelp Guide
Page 195
This is normal operation and does not affect the performance of the TV get warm? Ensure good ventilation. HDMI cable is the only cable needed to connect an HD device to the TV? It carries both digital video and audio signal in HD. Why does the screen and back cover of the set. Closed caption is available only at supported TV programming. The main unit radiates heat...
This is normal operation and does not affect the performance of the TV get warm? Ensure good ventilation. HDMI cable is the only cable needed to connect an HD device to the TV? It carries both digital video and audio signal in HD. Why does the screen and back cover of the set. Closed caption is available only at supported TV programming. The main unit radiates heat...


