
Operating Instructions
Page 1
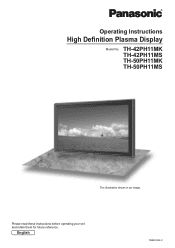
English TQBC2332-2 Operating Instructions High De¿nition Plasma Display Model No. Please read these instructions before operating your set and retain them for future reference. TH-42PH11MK TH-42PH11MS TH-50PH11MK TH-50PH11MS The illustration shown is an image.
English TQBC2332-2 Operating Instructions High De¿nition Plasma Display Model No. Please read these instructions before operating your set and retain them for future reference. TH-42PH11MK TH-42PH11MS TH-50PH11MK TH-50PH11MS The illustration shown is an image.
Operating Instructions
Page 2
... Panel Adjustment 28 Reduces power consumption 29 Customizing the Input labels 30 Display orientation 30 Setup for MULTI DISPLAY 31 How to the Panasonic family of customers. Retain your purchase receipt also, and note down the model number and serial number of your set in select.............. 46 Speci¿cations 47 2 To obtain maximum benefit from your new Plasma Display. We hope that you will have many years of enjoyment from your set , please read these instructions. Dear Panasonic Customer Welcome to Setup MULTI DISPLAY 31 ID Remote Control Function 32 Setup for...
... Panel Adjustment 28 Reduces power consumption 29 Customizing the Input labels 30 Display orientation 30 Setup for MULTI DISPLAY 31 How to the Panasonic family of customers. Retain your purchase receipt also, and note down the model number and serial number of your set in select.............. 46 Speci¿cations 47 2 To obtain maximum benefit from your new Plasma Display. We hope that you will have many years of enjoyment from your set , please read these instructions. Dear Panasonic Customer Welcome to Setup MULTI DISPLAY 31 ID Remote Control Function 32 Setup for...

Operating Instructions
Page 3
... shock hazard, do not remove cover. Even if no special notation has been made of strong electromagnetic ¿elds. Refer servicing to remain on the Plasma Display. Note: Do not allow a still picture to be displayed for use in 4:3 mode. 3 This plug will only ¿t an earthing-type power outlet. If...
... shock hazard, do not remove cover. Even if no special notation has been made of strong electromagnetic ¿elds. Refer servicing to remain on the Plasma Display. Note: Do not allow a still picture to be displayed for use in 4:3 mode. 3 This plug will only ¿t an earthing-type power outlet. If...
Operating Instructions
Page 4
...small parts away from being played with any other type of the Plasma Display. • If water is for TH-42PH11MK/S) Always be sure to ask a quali¿ed technician to carry out...Panasonic Corporation.) • Speakers TY-SP42P8W-K (for TH-42PH11MK), TY-SP42P8W-S (for TH-42PH11MS), TY-SP50P8W-K (for TH-50PH11MK), TY-SP50P8W-S (for TH-50PH11MS) • Pedestal TY-ST07-K (for TH-42PH11MK), TY-ST07-S (for TH-42PH11MS), TY-ST08-K (for TH-42PH11MK, TH-50PH11MK), TY-ST08-S (for TH-42PH11MS, TH-50PH11MS) • Mobile stand TY-ST42PF3 (for TH-42PH11MK/S), TY-ST58PF10 (for TH-42PH11MK/S, TH...
...small parts away from being played with any other type of the Plasma Display. • If water is for TH-42PH11MK/S) Always be sure to ask a quali¿ed technician to carry out...Panasonic Corporation.) • Speakers TY-SP42P8W-K (for TH-42PH11MK), TY-SP42P8W-S (for TH-42PH11MS), TY-SP50P8W-K (for TH-50PH11MK), TY-SP50P8W-S (for TH-50PH11MS) • Pedestal TY-ST07-K (for TH-42PH11MK), TY-ST07-S (for TH-42PH11MS), TY-ST08-K (for TH-42PH11MK, TH-50PH11MK), TY-ST08-S (for TH-42PH11MS, TH-50PH11MS) • Mobile stand TY-ST42PF3 (for TH-42PH11MK/S), TY-ST58PF10 (for TH-42PH11MK/S, TH...
Operating Instructions
Page 5
... the power cable, pull on 220 - 240 V AC, 50/60 Hz. If water or foreign objects get inside the Plasma Display. Contact your local Panasonic dealer so that provided with this condition, ¿re or electric shock could result. Securely insert the power supply plug as ...do so may cause electric shocks. Do not stick any foreign objects into the Plasma Display. • Do not insert any inspection, adjustment and repair work, please contact your local Panasonic dealer. Repairing the Plasma Display yourself is not fully inserted, heat may occur, which could cause ¿...
... the power cable, pull on 220 - 240 V AC, 50/60 Hz. If water or foreign objects get inside the Plasma Display. Contact your local Panasonic dealer so that provided with this condition, ¿re or electric shock could result. Securely insert the power supply plug as ...do so may cause electric shocks. Do not stick any foreign objects into the Plasma Display. • Do not insert any inspection, adjustment and repair work, please contact your local Panasonic dealer. Repairing the Plasma Display yourself is not fully inserted, heat may occur, which could cause ¿...
Operating Instructions
Page 6
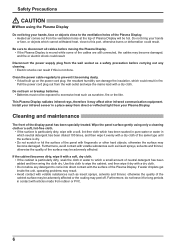
... solvents and thinner, otherwise the quality of the surface may be adversely affected or the coating may be adversely affected. Do not bring your Plasma Display. If the cabinet becomes dirty, wipe it becoming dusty. • If dust built up on the power cord plug, the resultant ... been added and then wring the cloth dry. Furthermore, avoid contact with volatile substances such as a safety precaution before moving the Plasma Display. • If the Plasma Display is dry. • Do not scratch or hit the surface of the panel with ¿ngernails or other infrared communication ...
... solvents and thinner, otherwise the quality of the surface may be adversely affected or the coating may be adversely affected. Do not bring your Plasma Display. If the cabinet becomes dirty, wipe it becoming dusty. • If dust built up on the power cord plug, the resultant ... been added and then wring the cloth dry. Furthermore, avoid contact with volatile substances such as a safety precaution before moving the Plasma Display. • If the Plasma Display is dry. • Do not scratch or hit the surface of the panel with ¿ngernails or other infrared communication ...
Operating Instructions
Page 7
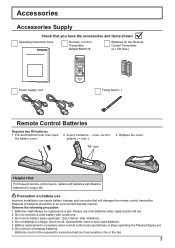
... shown Operating Instruction book Remote Control Transmitter N2QAYB000178 Batteries for longer life. Battery replacement is necessary when remote control acts sporadically or stops operating the Plasma Display set . 2. Observe the following precaution: 1. Do not burn or breakup batteries. Batteries must not be in an environment-friendly manner. Accessories Accessories Supply Check...
... shown Operating Instruction book Remote Control Transmitter N2QAYB000178 Batteries for longer life. Battery replacement is necessary when remote control acts sporadically or stops operating the Plasma Display set . 2. Observe the following precaution: 1. Do not burn or breakup batteries. Batteries must not be in an environment-friendly manner. Accessories Accessories Supply Check...
Operating Instructions
Page 10
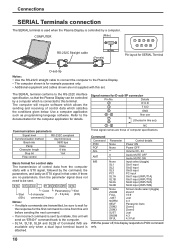
... (INPUT2A) Slot2 input (INPUT2B) DAM None ZOOM FULL JUST NORM SELF ZOM2 ZOM3 SJST SNOM SFUL Screen mode select (toggle) Zoom1 16:9 Just 4:3 Panasonic Auto Zoom2 Zoom3 Just 4:3 4:3 Full With the power off, this set ) 1 • 9 NC These signal names are those of control data ... there are not supplied with a STX signal, followed by a computer. Details 2 R X D 3 T X D 5 GND 4 • 6 Non use 7 8 (Shorted in that the Plasma Display can be sent. Use a computer application such as programming language software. STX C1 C2 C3 : P1 P2 P3 P4 P5 ETX Start (02h) Colon...
... (INPUT2A) Slot2 input (INPUT2B) DAM None ZOOM FULL JUST NORM SELF ZOM2 ZOM3 SJST SNOM SFUL Screen mode select (toggle) Zoom1 16:9 Just 4:3 Panasonic Auto Zoom2 Zoom3 Just 4:3 4:3 Full With the power off, this set ) 1 • 9 NC These signal names are those of control data ... there are not supplied with a STX signal, followed by a computer. Details 2 R X D 3 T X D 5 GND 4 • 6 Non use 7 8 (Shorted in that the Plasma Display can be sent. Use a computer application such as programming language software. STX C1 C2 C3 : P1 P2 P3 P4 P5 ETX Start (02h) Colon...
Operating Instructions
Page 12
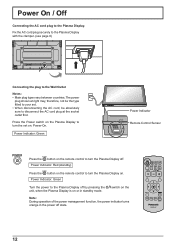
... button on the remote control to the Wall Outlet Notes: • Main plug types vary between countries. Fix the AC cord plug securely to the Plasma Display with the clamper. (see page 8) Connecting the plug to turn the set . • When disconnecting the AC cord, be absolutely sure to the... Plasma Display. switch on the Note: During operation of the power management function, the power indicator turns orange in standby mode. The power plug shown at ...
... button on the remote control to the Wall Outlet Notes: • Main plug types vary between countries. Fix the AC cord plug securely to the Plasma Display with the clamper. (see page 8) Connecting the plug to turn the set . • When disconnecting the AC cord, be absolutely sure to the... Plasma Display. switch on the Note: During operation of the power management function, the power indicator turns orange in standby mode. The power plug shown at ...
Operating Instructions
Page 14
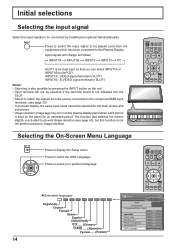
...display, the same input mode cannot be selected for the main picture and sub picture. • Image retention (image lag) may occur on the plasma display panel when a still picture is kept on the unit. • Input terminal will change as follows: INPUT1A INPUT1B INPUT2 INPUT3 PC SLOT1 is...8226; Selecting is not installed into the SLOT. • Select to match the signals from the equipment which has been connected to the Plasma Display. Initial selections Selecting the input signal Select the input signals to be connected by pressing the INPUT button on the panel for an extended...
...display, the same input mode cannot be selected for the main picture and sub picture. • Image retention (image lag) may occur on the plasma display panel when a still picture is kept on the unit. • Input terminal will change as follows: INPUT1A INPUT1B INPUT2 INPUT3 PC SLOT1 is...8226; Selecting is not installed into the SLOT. • Select to match the signals from the equipment which has been connected to the Plasma Display. Initial selections Selecting the input signal Select the input signals to be connected by pressing the INPUT button on the panel for an extended...

Operating Instructions
Page 16
...power switch (see page 23) Sound mute On / Off Press this button to turn the Plasma Display Off to stand-by after a ¿xed period. Press again to previous menu screen. R button... (see page 17) POWER button The Plasma Display must ¿rst be completely enveloped in sound; Press this button to adjust the aspect. (...is pressed. SET UP button (see page 21) SOUND button (see page 18) OFF TIMER button The Plasma Display can be plugged into the wall outlet and turned on at a concert hall or cinema. Basic ...
...power switch (see page 23) Sound mute On / Off Press this button to turn the Plasma Display Off to stand-by after a ¿xed period. Press again to previous menu screen. R button... (see page 17) POWER button The Plasma Display must ¿rst be completely enveloped in sound; Press this button to adjust the aspect. (...is pressed. SET UP button (see page 21) SOUND button (see page 18) OFF TIMER button The Plasma Display can be plugged into the wall outlet and turned on at a concert hall or cinema. Basic ...
Operating Instructions
Page 17
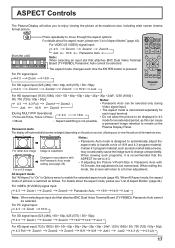
... Options menu to enable the extended aspect mode (page 40). mode for [During MULTI PIP Operations] • Picture and Picture, Picture in Panasonic Auto with 16:9 mode, the adjustment is pressed. When exiting the For a 4:3 image mode, the screen will return to "On" in...such programs, it is recommended that the Changes in accordance with ASPECT be selected. The display will automatically become enlarged (depending on the Panasonic Auto Plasma Display Panel. For details about the aspect mode, please see page 35). • If adjusting the Picture V-Pos/V-Size in Picture...
... Options menu to enable the extended aspect mode (page 40). mode for [During MULTI PIP Operations] • Picture and Picture, Picture in Panasonic Auto with 16:9 mode, the adjustment is pressed. When exiting the For a 4:3 image mode, the screen will return to "On" in...such programs, it is recommended that the Changes in accordance with ASPECT be selected. The display will automatically become enlarged (depending on the Panasonic Auto Plasma Display Panel. For details about the aspect mode, please see page 35). • If adjusting the Picture V-Pos/V-Size in Picture...
Operating Instructions
Page 26
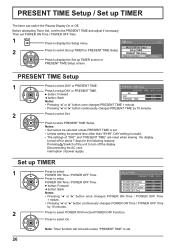
... select On. Press to setup DAY or PRESENT TIME. Disconnecting the AC cord. Setup 2/2 MULTI DISPLAY Setup Set up TIMER The timer can switch the Plasma Display On or Off.
... select On. Press to setup DAY or PRESENT TIME. Disconnecting the AC cord. Setup 2/2 MULTI DISPLAY Setup Set up TIMER The timer can switch the Plasma Display On or Off.

Operating Instructions
Page 29
... reduced during power supply standby (see page 12, 15, 16), so standby power of the set is set to On, the power supply of the Plasma Display is suppressed, so power consumption is set to select "On" or "Off". When pictures (HD/VD sync signals) are detected for input signals except...
... reduced during power supply standby (see page 12, 15, 16), so standby power of the set is set to On, the power supply of the Plasma Display is suppressed, so power consumption is set to select "On" or "Off". When pictures (HD/VD sync signals) are detected for input signals except...
Operating Instructions
Page 31
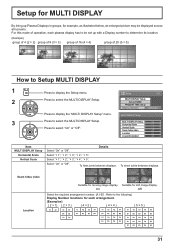
... MULTI DISPLAY Setup Horizontal Scale Vertical Scale Details Select "On" or "Off". Select "On" or "Off". Setup for MULTI DISPLAY By lining up Plasma Displays in groups, for each plasma display has to be displayed across all screens. For this mode of 25 (5 × 5) How to Setup MULTI DISPLAY 1 Press to display...
... MULTI DISPLAY Setup Horizontal Scale Vertical Scale Details Select "On" or "Off". Select "On" or "Off". Setup for MULTI DISPLAY By lining up Plasma Displays in groups, for each plasma display has to be displayed across all screens. For this mode of 25 (5 × 5) How to Setup MULTI DISPLAY 1 Press to display...
Operating Instructions
Page 43
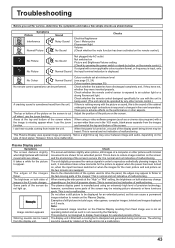
...and images displayed in the fast-moving parts of malfunctioning. Hence a slight time lag may occur between image and audio, depending on the Plasma Display. As such, it sometimes takes a few simple checks as such is normal and not indicative of the images: This is missing appear...are formed at the "High" or "Mid" setting, the brightness on both sides of malfunctioning. There are shown for an extended period. Plasma Display panel Symptoms The screen darkens slightly when bright pictures with minimal movements are no adverse effects on , a sound of malfunctioning. Check The...
...and images displayed in the fast-moving parts of malfunctioning. Hence a slight time lag may occur between image and audio, depending on the Plasma Display. As such, it sometimes takes a few simple checks as such is normal and not indicative of the images: This is missing appear...are formed at the "High" or "Mid" setting, the brightness on both sides of malfunctioning. There are shown for an extended period. Plasma Display panel Symptoms The screen darkens slightly when bright pictures with minimal movements are no adverse effects on , a sound of malfunctioning. Check The...
Operating Instructions
Page 47
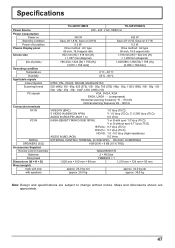
... kg net approx. 34.0 kg net with speakers approx. 29.0 kg approx. 38.0 kg Note: Design and specifications are approximate. 47 Speci¿cations TH-42PH11MK/S TH-50PH11MK/S Power Source 220 - 240 V AC, 50/60 Hz Power Consumption Power on 345 W 425 W Stand-by condition Save off 1.8 W, Save... on 0.9 W Save off 1.5 W, Save on 0.7 W Power off condition 0.5 W 0.3 W Plasma Display panel Drive method : AC type 42-inch, 16:9 aspect ratio Drive method : AC type 50-inch, 16:9 aspect ratio Screen size 922 mm (W) ×...
... kg net approx. 34.0 kg net with speakers approx. 29.0 kg approx. 38.0 kg Note: Design and specifications are approximate. 47 Speci¿cations TH-42PH11MK/S TH-50PH11MK/S Power Source 220 - 240 V AC, 50/60 Hz Power Consumption Power on 345 W 425 W Stand-by condition Save off 1.8 W, Save... on 0.9 W Save off 1.5 W, Save on 0.7 W Power off condition 0.5 W 0.3 W Plasma Display panel Drive method : AC type 42-inch, 16:9 aspect ratio Drive method : AC type 50-inch, 16:9 aspect ratio Screen size 922 mm (W) ×...