Operating Instructions
Page 2
...://panasonic.net Table of Contents Important Safety Notice 3 Safety Precautions 4 Accessories 7 Accessories Supply 7 Remote Control Batteries 7 Connections 8 PC Input Terminals connection 9 SERIAL Terminals connection 10 AV connection 11 Power On / Off 12 Initial selections 14 Selecting the input signal 14 Selecting the On-Screen Menu Language 14 Basic Controls 15 ASPECT Controls 17 MULTI PIP 18 Advanced PIP 19 Digital Zoom 20 On-Screen Menu Displays 21 Adjusting Pos. /Size 22 Picture Adjustments 23 Advanced settings 24 Sound Adjustment...
...://panasonic.net Table of Contents Important Safety Notice 3 Safety Precautions 4 Accessories 7 Accessories Supply 7 Remote Control Batteries 7 Connections 8 PC Input Terminals connection 9 SERIAL Terminals connection 10 AV connection 11 Power On / Off 12 Initial selections 14 Selecting the input signal 14 Selecting the On-Screen Menu Language 14 Basic Controls 15 ASPECT Controls 17 MULTI PIP 18 Advanced PIP 19 Digital Zoom 20 On-Screen Menu Displays 21 Adjusting Pos. /Size 22 Picture Adjustments 23 Advanced settings 24 Sound Adjustment...

Operating Instructions
Page 3
... still pictures include logos, video games, computer images, teletext and images displayed in 4:3 mode. 3 If you are registered trademarks of harm to this appliance to remain on the power plug. No user serviceable parts inside. Do not defeat the purpose of the earthing plug. 4) To prevent electric shock, ensure the earthing pin on / above , etc.) No naked Àame sources, such as lighted candles...
... still pictures include logos, video games, computer images, teletext and images displayed in 4:3 mode. 3 If you are registered trademarks of harm to this appliance to remain on the power plug. No user serviceable parts inside. Do not defeat the purpose of the earthing plug. 4) To prevent electric shock, ensure the earthing pin on / above , etc.) No naked Àame sources, such as lighted candles...
Operating Instructions
Page 4
...; RGB (Digital) Terminal Board TY-42TM6D • RGB Active Through Terminal Board TY-42TM6G • PC Input Terminal Board TY-42TM6P • Composite / Component Video Terminal Board .. Safety Precautions WARNING Setup This Plasma Display is spills onto the Plasma Display or foreign objects get inside it, a short-circuit may occur which could result in upright position! • Transporting the unit with its display panel facing...
...; RGB (Digital) Terminal Board TY-42TM6D • RGB Active Through Terminal Board TY-42TM6G • PC Input Terminal Board TY-42TM6P • Composite / Component Video Terminal Board .. Safety Precautions WARNING Setup This Plasma Display is spills onto the Plasma Display or foreign objects get inside it, a short-circuit may occur which could result in upright position! • Transporting the unit with its display panel facing...
Operating Instructions
Page 5
... not damage the cable, make any power supply cord other setting-up method, follow the manual of it will go. • If the plug is no sound), or if smoke or an abnormal odour starts to come out from the Plasma Display, immediately unplug the power supply plug from the wall outlet. Securely insert the power supply plug as far as doing so can be used for any hot...
... not damage the cable, make any power supply cord other setting-up method, follow the manual of it will go. • If the plug is no sound), or if smoke or an abnormal odour starts to come out from the Plasma Display, immediately unplug the power supply plug from the wall outlet. Securely insert the power supply plug as far as doing so can be used for any hot...
Operating Instructions
Page 8
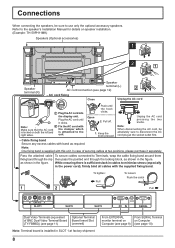
... socket outlet ¿rst. - Open 2. Unplug the AC cord pressing the two knobs. To secure cables connected to use only the optional accessory speakers. While ensuring there is installed in the ¿gure. Note: 2 Fix the AC cord with Make sure that the AC cord the clamper which is locked on speaker installation. (Example: TH-50PH11MK) Speakers (Optional accessories) 1 2 1 Speaker Speaker terminal (L) AC cord connection (see page 10) Note: One...
... socket outlet ¿rst. - Open 2. Unplug the AC cord pressing the two knobs. To secure cables connected to use only the optional accessory speakers. While ensuring there is installed in the ¿gure. Note: 2 Fix the AC cord with Make sure that the AC cord the clamper which is locked on speaker installation. (Example: TH-50PH11MK) Speakers (Optional accessories) 1 2 1 Speaker Speaker terminal (L) AC cord connection (see page 10) Note: One...
Operating Instructions
Page 9
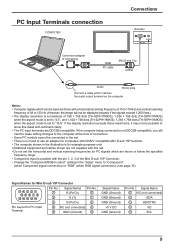
... (Male) Audio Stereo plug Connect a cable which can be input are those with a horizontal scanning frequency of 15 to 110 kHz and vertical scanning frequency of 48 to 120 Hz. (However, the image will need to make setting changes to the computer at the time of connection. • Some PC models cannot be connected to the set. • There is no need to use an adapter for computers with DOS/V compatible Mini...
... (Male) Audio Stereo plug Connect a cable which can be input are those with a horizontal scanning frequency of 15 to 110 kHz and vertical scanning frequency of 48 to 120 Hz. (However, the image will need to make setting changes to the computer at the time of connection. • Some PC models cannot be connected to the set. • There is no need to use an adapter for computers with DOS/V compatible Mini...

Operating Instructions
Page 16
... changed. Press it again to turn the Plasma Display On, from Standby mode. RECALL button Press the "RECALL" button to increase or decrease the sound volume level. Press again to previous menu screen. Basic Controls Remote Control Transmitter SURROUND button The surround setting switches on and off each time the SURROUND button is displayed depending on at a concert hall or cinema. just as if you were at the power switch...
... changed. Press it again to turn the Plasma Display On, from Standby mode. RECALL button Press the "RECALL" button to increase or decrease the sound volume level. Press again to previous menu screen. Basic Controls Remote Control Transmitter SURROUND button The surround setting switches on and off each time the SURROUND button is displayed depending on at a concert hall or cinema. just as if you were at the power switch...
Operating Instructions
Page 21
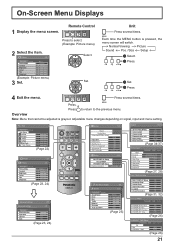
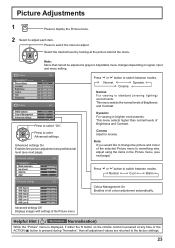
...4 Exit the menu. Set. MENU Press. Adjustable menu changes depending on signal, input and menu setting. Remote Control Press to the previous menu. Select. Press several times. Normal Viewing Picture Sound Pos. /Size Setup Select. Press. Unit Press several times. Press to return to select. (Example: Picture menu) 2 Select the item. On-Screen Menu Displays 1 Display the menu screen. Picture 1/2 Normalise Normal Picture Mode Contrast Brightness Colour Hue Sharpness Normal 25 0 0 0 5 (Example: Picture menu) 3 Set. MENU Each time the MENU button is grayout...
...4 Exit the menu. Set. MENU Press. Adjustable menu changes depending on signal, input and menu setting. Remote Control Press to the previous menu. Select. Press several times. Normal Viewing Picture Sound Pos. /Size Setup Select. Press. Unit Press several times. Press to return to select. (Example: Picture menu) 2 Select the item. On-Screen Menu Displays 1 Display the menu screen. Picture 1/2 Normalise Normal Picture Mode Contrast Brightness Colour Hue Sharpness Normal 25 0 0 0 5 (Example: Picture menu) 3 Set. MENU Each time the MENU button is grayout...
Operating Instructions
Page 22
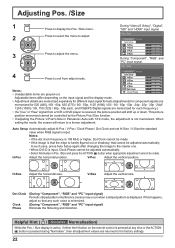
... signals are memorized for each frequency.) • If a "Cue" or "Rew" signal from adjust mode. Dot Clock Clock Phase (During "Component", "RGB" and "PC" input signal) Periodic striped pattern interference (noise) may occur when a striped pattern is input. During "Video (S Video)", "Digital", "SDI" and "HDMI" input signal. 2 Press to select the menu to adjust. 3 Press to display the Pos. /Size menu. In such case, press Auto Setup again after changing the image to the factory settings...
... signals are memorized for each frequency.) • If a "Cue" or "Rew" signal from adjust mode. Dot Clock Clock Phase (During "Component", "RGB" and "PC" input signal) Periodic striped pattern interference (noise) may occur when a striped pattern is input. During "Video (S Video)", "Digital", "SDI" and "HDMI" input signal. 2 Press to select the menu to adjust. 3 Press to display the Pos. /Size menu. In such case, press Auto Setup again after changing the image to the factory settings...
Operating Instructions
Page 23
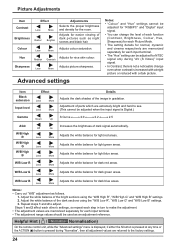
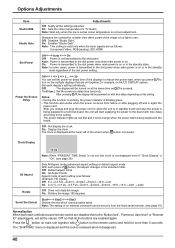
... the N button on signal, input and menu setting. Advanced settings 1/2 Normalise Normal Black extension Input level Gamma AGC 0 0 2.2 Off Press " " or " " button to the factory settings. 23 Dynamic For viewing in standard (evening lighting) environments. Normal Cool Warm Advanced settings 2/2 W/B High R 0 W/B High G 0 W/B High B 0 W/B Low R 0 W/B Low G 0 W/B Low B 0 Advanced settings Off Displays images with settings of Brightness and Contrast. Cinema Ideal for movies. Note: If you would like to switch between modes. This menu selects...
... the N button on signal, input and menu setting. Advanced settings 1/2 Normalise Normal Black extension Input level Gamma AGC 0 0 2.2 Off Press " " or " " button to the factory settings. 23 Dynamic For viewing in standard (evening lighting) environments. Normal Cool Warm Advanced settings 2/2 W/B High R 0 W/B High G 0 W/B High B 0 W/B Low R 0 W/B Low G 0 W/B Low B 0 Advanced settings Off Displays images with settings of Brightness and Contrast. Cinema Ideal for movies. Note: If you would like to switch between modes. This menu selects...
Operating Instructions
Page 24
... for each Picture Mode. • The setting details for normal, dynamic and cinema respectively are returned to adjust. Less More Hue Adjusts for light red areas. Item Black extension Input level Effect Less More Less More Details Adjusts the dark shades of each function (Contrast, Brightness, Colour, Hue, Sharpness) for each input terminal. • The "Hue" setting can change the level of the image in turn to...
... for each Picture Mode. • The setting details for normal, dynamic and cinema respectively are returned to adjust. Less More Hue Adjusts for light red areas. Item Black extension Input level Effect Less More Less More Details Adjusts the dark shades of each function (Contrast, Brightness, Colour, Hue, Sharpness) for each input terminal. • The "Hue" setting can change the level of the image in turn to...
Operating Instructions
Page 25
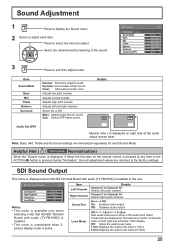
...-SDI Terminal Board with audio (TY-FB10HD) is pressed during "Normalise", then all adjustment values are memorized separately for each item. Clear: Attenuates human voice. Adjusts high pitch sounds. Helpful Hint ( / Normalise Normalisation) While the "Sound" menu is displayed, if either the N button on both right and left sides of the audio output screen label. Sound Adjustment 1 Press to display the Sound menu. 2 Select to the factory settings. Select...
...-SDI Terminal Board with audio (TY-FB10HD) is pressed during "Normalise", then all adjustment values are memorized separately for each item. Clear: Attenuates human voice. Adjusts high pitch sounds. Helpful Hint ( / Normalise Normalisation) While the "Sound" menu is displayed, if either the N button on both right and left sides of the audio output screen label. Sound Adjustment 1 Press to display the Sound menu. 2 Select to the factory settings. Select...
Operating Instructions
Page 27
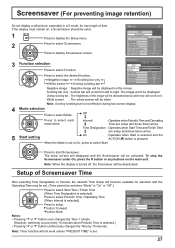
... / Operating Time (When Interval is set . Setup of Screensaver Time After selecting Time Designation or Interval, the relevant Time Setup will be set when "Mode" is turned off OSD Language Off English (UK) 3 Function selection Press to start Screensaver. Screensaver (For preventing image retention) Do not display a still picture, especially in select RGB Input label PC Power save Off Standby save Off Power management Off Auto power off , the Scrensaver will...
... / Operating Time (When Interval is set . Setup of Screensaver Time After selecting Time Designation or Interval, the relevant Time Setup will be set when "Mode" is turned off OSD Language Off English (UK) 3 Function selection Press to start Screensaver. Screensaver (For preventing image retention) Do not display a still picture, especially in select RGB Input label PC Power save Off Standby save Off Power management Off Auto power off , the Scrensaver will...
Operating Instructions
Page 30
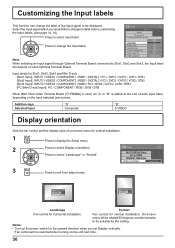
... Video Terminal Board (TY-FB9BD) is used, an "A" or "B" is added at the end of on the unit next time. 30 Select the input signal which you set Display vertically. • Fan control will be rotated 90 degrees counterclockwise to be switched when turning on -screen menu for horizontal installation. Notes: • Turn up TIMER PRESENT TIME Setup Display orientation Portrait Landscape Portrait Fan control for vertical installation. 1 Press to display the Setup menu...
... Video Terminal Board (TY-FB9BD) is used, an "A" or "B" is added at the end of on the unit next time. 30 Select the input signal which you set Display vertically. • Fan control will be rotated 90 degrees counterclockwise to be switched when turning on -screen menu for horizontal installation. Notes: • Turn up TIMER PRESENT TIME Setup Display orientation Portrait Landscape Portrait Fan control for vertical installation. 1 Press to display the Setup menu...
Operating Instructions
Page 33
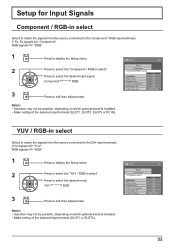
... exit from adjust mode. Setup Signal Screensaver YUV/RGB-in select Input label Power save Standby save Off Power management Off Auto power off OSD Language 1/2 RGB PC Off Off Off Off English (UK) 33 Y, PB, PR signals "Component" RGB signals "RGB" 1 Press to display the Setup menu. 2 Press to select the "Component / RGB-in select". Press to select the desired input signal. Setup for Input Signals Component / RGB-in select Select to match the signals from the source connected to the DVI input terminals.
... exit from adjust mode. Setup Signal Screensaver YUV/RGB-in select Input label Power save Standby save Off Power management Off Auto power off OSD Language 1/2 RGB PC Off Off Off Off English (UK) 33 Y, PB, PR signals "Component" RGB signals "RGB" 1 Press to display the Setup menu. 2 Press to select the "Component / RGB-in select". Press to select the desired input signal. Setup for Input Signals Component / RGB-in select Select to match the signals from the source connected to the DVI input terminals.

Operating Instructions
Page 34
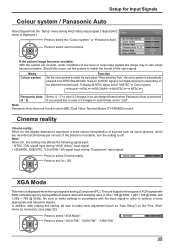
... Auto Cinema reality Off Cinema reality Off XGA Mode 1024 × 768 Panasonic Auto (4:3) 4:3 Refresh Rate 100 Hz 4 Press to exit from the "Setup" menu during AV(S Video) input signal. ("Signal [AV]" menu is displayed.) Press to select the "3D Y/C Filter (NTSC)" Press to set On / Off. 3D Y/C Filter (NTSC) On Note: When On, this setting only affects NTSC input signals. 34 V-Freq. For NTSC AV images Select "Signal" from adjust mode...
... Auto Cinema reality Off Cinema reality Off XGA Mode 1024 × 768 Panasonic Auto (4:3) 4:3 Refresh Rate 100 Hz 4 Press to exit from the "Setup" menu during AV(S Video) input signal. ("Signal [AV]" menu is displayed.) Press to select the "3D Y/C Filter (NTSC)" Press to set On / Off. 3D Y/C Filter (NTSC) On Note: When On, this setting only affects NTSC input signals. 34 V-Freq. For NTSC AV images Select "Signal" from adjust mode...
Operating Instructions
Page 35
... format when Panasonic Auto is not stable, turn the setting to view 4:3 images in accordance with 60Hz vertical frequency having different aspect ratios and sampling rates (1,024 × 768 @ 60Hz, 1,280 × 768 @ 60Hz, and 1,366 × 768 @ 60Hz). To display M.NTSC signal, select "M.NTSC" in rare cases become unstable. Press to select each adjustment (such as "Auto Setup") on Auto, under conditions of sources such...
... format when Panasonic Auto is not stable, turn the setting to view 4:3 images in accordance with 60Hz vertical frequency having different aspect ratios and sampling rates (1,024 × 768 @ 60Hz, 1,280 × 768 @ 60Hz, and 1,366 × 768 @ 60Hz). To display M.NTSC signal, select "M.NTSC" in rare cases become unstable. Press to select each adjustment (such as "Auto Setup") on Auto, under conditions of sources such...
Operating Instructions
Page 39
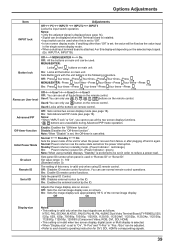
...: Power returns in "Remote ID" or "Serial ID". Initial Power Mode ID select Remote ID Serial ID Normal Standby On Sets the power mode of this is set to each board's operating instruction for DVI, SDI, HDMI's corresponding signals. 39 Sets Button lock with the unit buttons in as the same state as the value input in again. Off: Disables external control by the ID. Sets panel ID number when panel is preferred to reduce a power load. Adjusts the image display size...
...: Power returns in "Remote ID" or "Serial ID". Initial Power Mode ID select Remote ID Serial ID Normal Standby On Sets the power mode of this is set to each board's operating instruction for DVI, SDI, HDMI's corresponding signals. 39 Sets Button lock with the unit buttons in as the same state as the value input in again. Off: Disables external control by the ID. Sets panel ID number when panel is preferred to reduce a power load. Adjusts the image display size...
Operating Instructions
Page 40
... setting is too light to the "Button lock", "Remocon User level" or "Remote ID" adjustments, set only from failure or after plugging off and in the standby state. Sharpens the contrast for more than 5 seconds. On: Enables "Studio Gain". Notes: • During this setting. Off: Default aspect mode On: All Aspect mode Aspect mode of the displays to reduce the power load, when you unplug and plug the power cord...
... setting is too light to the "Button lock", "Remocon User level" or "Remote ID" adjustments, set only from failure or after plugging off and in the standby state. Sharpens the contrast for more than 5 seconds. On: Enables "Studio Gain". Notes: • During this setting. Off: Default aspect mode On: All Aspect mode Aspect mode of the displays to reduce the power load, when you unplug and plug the power cord...
Operating Instructions
Page 43
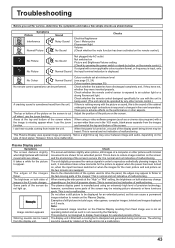
... remote control.) No Picture No Picture No Sound Normal Sound Not plugged into AC outlet Not switched on Picture and Brightness/Volume setting (Check by pressing the power switch or stand-by any other remote control.) A cracking sound is sometimes heard from the images function. off when I use the zoom screen wider than one in the fast-moving parts of the images: This is normal and not indicative of the screen do not light up. Plasma Display panel...
... remote control.) No Picture No Picture No Sound Normal Sound Not plugged into AC outlet Not switched on Picture and Brightness/Volume setting (Check by pressing the power switch or stand-by any other remote control.) A cracking sound is sometimes heard from the images function. off when I use the zoom screen wider than one in the fast-moving parts of the images: This is normal and not indicative of the screen do not light up. Plasma Display panel...


