
Plasma Display
Page 2
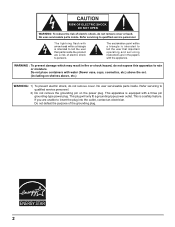
... electric shock, do not remove cover. The lightning flash with the appliance. This is equipped with water (flower vase, cups, cosmetics, etc.) above the set. (including on the power plug. Refer servicing to qualified service personnel. 2) Do not remove the grounding pin on shelves above, etc.) WARNING : 1) To...
... electric shock, do not remove cover. The lightning flash with the appliance. This is equipped with water (flower vase, cups, cosmetics, etc.) above the set. (including on the power plug. Refer servicing to qualified service personnel. 2) Do not remove the grounding pin on shelves above, etc.) WARNING : 1) To...

Plasma Display
Page 4
... Display location number for each Plasma Display 34 Option F for MULTI DISPLAY 34 ID Remote Control Function 35 SET UP for future reference. Retain your purchase receipt as well, and record the model number and serial number of your set, please read these instructions. Dear Panasonic Customer Welcome to set in the space provided on...
... Display location number for each Plasma Display 34 Option F for MULTI DISPLAY 34 ID Remote Control Function 35 SET UP for future reference. Retain your purchase receipt as well, and record the model number and serial number of your set, please read these instructions. Dear Panasonic Customer Welcome to set in the space provided on...
Plasma Display
Page 6
Use with any cleaning. • Electric shocks can result if this can cause a permanent after-image to carry out set-up dust on the Plasma Display. Keep small parts away from becoming dusty. • Built-up . Be sure to prevent it from young children. ...HDMI Terminal Board TY-FB8HM • Wireless Presentation Board TY-FB7WPU • Touch Panel TY-TP42P8-S (TH-42PWD8UK, TH-42PHD8UK), TY-TP50P8-S (TH-50PHD8UK) Always be displayed for use only with a dry cloth. Safety Precautions CAUTION This Plasma Display is for an extended period, as this is not done. Placing any body...
Use with any cleaning. • Electric shocks can result if this can cause a permanent after-image to carry out set-up dust on the Plasma Display. Keep small parts away from becoming dusty. • Built-up . Be sure to prevent it from young children. ...HDMI Terminal Board TY-FB8HM • Wireless Presentation Board TY-FB7WPU • Touch Panel TY-TP42P8-S (TH-42PWD8UK, TH-42PHD8UK), TY-TP50P8-S (TH-50PHD8UK) Always be displayed for use only with a dry cloth. Safety Precautions CAUTION This Plasma Display is for an extended period, as this is not done. Placing any body...

Plasma Display
Page 7
...panel surface gently using only a cleaning cloth or a soft, lint-free cloth. • If the surface is dropped, or if the cabinet becomes damaged, disconnect the power cord plug immediately. • A short may cause electric shocks. Do not place any modifications, place heavy objects on 120 V AC, 50...any repairs that might cause fire or permanent damage to come into direct contact with fingernails or other setting-up method, leave a space of the Plasma Display. Services to the Display by any detergent to the unit. Do not do not leave it evenly with ...
...panel surface gently using only a cleaning cloth or a soft, lint-free cloth. • If the surface is dropped, or if the cabinet becomes damaged, disconnect the power cord plug immediately. • A short may cause electric shocks. Do not place any modifications, place heavy objects on 120 V AC, 50...any repairs that might cause fire or permanent damage to come into direct contact with fingernails or other setting-up method, leave a space of the Plasma Display. Services to the Display by any detergent to the unit. Do not do not leave it evenly with ...
Plasma Display
Page 8
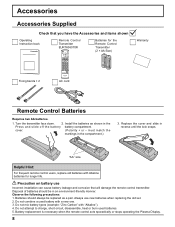
... burn used battery with a new one. 3. Battery replacement is necessary when the remote control acts sporadically or stops operating the Plasma Display. 8 Precaution on battery use new batteries when replacing the old set. 2. Helpful Hint: For frequent remote control users, replace old batteries with "Alkaline"). 4. Turn the transmitter face down. 2. Install the...
... burn used battery with a new one. 3. Battery replacement is necessary when the remote control acts sporadically or stops operating the Plasma Display. 8 Precaution on battery use new batteries when replacing the old set. 2. Helpful Hint: For frequent remote control users, replace old batteries with "Alkaline"). 4. Turn the transmitter face down. 2. Install the...

Plasma Display
Page 9
...attached cable fixing band through the locking block, as required. Connections When connecting the speakers, be the type fitted to your set. - Slide up the clamper and fix the AC cord plug securely. Cable fixing bands Secure any excess cables with the ...sufficient slack in the power cord), firmly bind all cables with bands as shown in SLOT 2 and SLOT 3. • TH-37PWD8UK / TH-37PHD8UK have two slots only. Refer to minimize stress (especially in cables to the speaker's Installation Manual for details on Computer (see page ...
...attached cable fixing band through the locking block, as required. Connections When connecting the speakers, be the type fitted to your set. - Slide up the clamper and fix the AC cord plug securely. Cable fixing bands Secure any excess cables with the ...sufficient slack in the power cord), firmly bind all cables with bands as shown in SLOT 2 and SLOT 3. • TH-37PWD8UK / TH-37PHD8UK have two slots only. Refer to minimize stress (especially in cables to the speaker's Installation Manual for details on Computer (see page ...

Plasma Display
Page 10
... × 480 dots (TH-37PWD8UK, TH-42PWD8UK), 768 × 720 dots (TH-37PHD8UK), 768 × 768 dots (TH-42PHD8UK), 1,024 × 768 dots (TH-50PHD8UK) when the aspect mode is set to "NORMAL", and 852 × 480 dots (TH-37PWD8UK, TH-42PWD8UK), 1,024 × 720 dots (TH-37PHD8UK), 1,024 × 768 dots (TH-42PHD8UK), 1,366 × 768 dots (TH-50PHD8UK) when the aspect...
... × 480 dots (TH-37PWD8UK, TH-42PWD8UK), 768 × 720 dots (TH-37PHD8UK), 768 × 768 dots (TH-42PHD8UK), 1,024 × 768 dots (TH-50PHD8UK) when the aspect mode is set to "NORMAL", and 852 × 480 dots (TH-37PWD8UK, TH-42PWD8UK), 1,024 × 720 dots (TH-37PHD8UK), 1,024 × 768 dots (TH-42PHD8UK), 1,366 × 768 dots (TH-50PHD8UK) when the aspect...

Plasma Display
Page 11
...select (toggle) NORMAL (4 : 3) ZOOM FULL JUST Panasonic AUTO With the power off, this display responds to the Plasma Display. • The computer shown is for the first command to come from the computer starts with this set. COMPUTER RS-232C Straight cable SERIAL Connections 6789 12345..., followed by a computer which satisfies the conditions given below. SERIAL Terminals connection The SERIAL terminal is used when the Plasma Display is controlled by mistake, this unit will require software which allows the sending and receiving of control data from this unit before...
...select (toggle) NORMAL (4 : 3) ZOOM FULL JUST Panasonic AUTO With the power off, this display responds to the Plasma Display. • The computer shown is for the first command to come from the computer starts with this set. COMPUTER RS-232C Straight cable SERIAL Connections 6789 12345..., followed by a computer which satisfies the conditions given below. SERIAL Terminals connection The SERIAL terminal is used when the Plasma Display is controlled by mistake, this unit will require software which allows the sending and receiving of control data from this unit before...
Plasma Display
Page 12
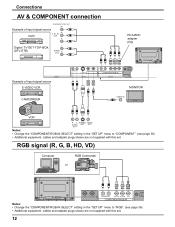
.../B Y/G COMPONENT/RGB IN SLOT3 PC IN MONITOR VIDEO IN VCR R L S VIDEO VIDEO AUDIO OUT OUT OUT Notes: • Change the "COMPONENT/RGB-IN SELECT" setting in the "SET UP" menu to "COMPONENT". (see page 36) • Additional equipment, cables and adapter plugs shown are not supplied with this...) Computer RGB Camcorder or VIDEO IN VIDEO OUT R AUDIO L PR/CR/R PB/CB/B Y/G COMPONENT/RGB IN Notes: • Change the "COMPONENT/RGB-IN SELECT" setting in the "SET UP" menu to "RGB". (see page 36) • Additional equipment, cables and adapter plugs shown are not supplied with this...
.../B Y/G COMPONENT/RGB IN SLOT3 PC IN MONITOR VIDEO IN VCR R L S VIDEO VIDEO AUDIO OUT OUT OUT Notes: • Change the "COMPONENT/RGB-IN SELECT" setting in the "SET UP" menu to "COMPONENT". (see page 36) • Additional equipment, cables and adapter plugs shown are not supplied with this...) Computer RGB Camcorder or VIDEO IN VIDEO OUT R AUDIO L PR/CR/R PB/CB/B Y/G COMPONENT/RGB IN Notes: • Change the "COMPONENT/RGB-IN SELECT" setting in the "SET UP" menu to "RGB". (see page 36) • Additional equipment, cables and adapter plugs shown are not supplied with this...
Plasma Display
Page 13
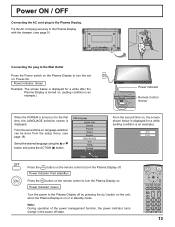
...Italiano Español ENGLISH (US) Select Set From the second time on, the screen shown below is displayed for a while after the Plasma Display is turned on. (setting condition is an example.) TH-42PWD8 INPUT MENU -/ VOL +/ ENTER/ TH-42PWD8 Power Indicator Remote Control Sensor When the... POWER is turned on the remote control to the Plasma Display. PC FULL Press the button on...
...Italiano Español ENGLISH (US) Select Set From the second time on, the screen shown below is displayed for a while after the Plasma Display is turned on. (setting condition is an example.) TH-42PWD8 INPUT MENU -/ VOL +/ ENTER/ TH-42PWD8 Power Indicator Remote Control Sensor When the... POWER is turned on the remote control to the Plasma Display. PC FULL Press the button on...

Plasma Display
Page 14
Red • Power-ON ...... The benefits of PC's screensaver.) SURROUND button The surround setting switches on and off each AUDIO MENU (STANDARD, DYNAMIC, CLEAR). Green • DPMS Orange (With PC input signal and during operation of ...surround sound are memorized separately for each time the SURROUND button is pressed. Note: The surround settings are enormous. Basic Controls Remote control sensor TH-42PWD8 INPUT MENU -/ VOL +/ ENTER/ Volume Adjustment Volume Up "+" Down "-" When the menu screen is displayed: "+": press to ...
Red • Power-ON ...... The benefits of PC's screensaver.) SURROUND button The surround setting switches on and off each AUDIO MENU (STANDARD, DYNAMIC, CLEAR). Green • DPMS Orange (With PC input signal and during operation of ...surround sound are memorized separately for each time the SURROUND button is pressed. Note: The surround settings are enormous. Basic Controls Remote control sensor TH-42PWD8 INPUT MENU -/ VOL +/ ENTER/ Volume Adjustment Volume Up "+" Down "-" When the menu screen is displayed: "+": press to ...

Plasma Display
Page 15
ACTION button Press to increase or decrease the sound volume level. Note: After-image (image lag) may occur on the plasma display panel when a still picture is activated to prevent after-image (see page 16, 17) DIRECT INPUT buttons Press the INPUT "1", "2", "3" or "PC" input mode ...is used for an extended period. Channel Adjustment This button cannot be used to switch directly to previous menu screen. The setting changes to Standby mode. Press ON to turn the Plasma Display Off to 30 minutes, 60 minutes, 90 minutes and 0 minutes (off timer cancelled) each time the button is...
ACTION button Press to increase or decrease the sound volume level. Note: After-image (image lag) may occur on the plasma display panel when a still picture is activated to prevent after-image (see page 16, 17) DIRECT INPUT buttons Press the INPUT "1", "2", "3" or "PC" input mode ...is used for an extended period. Channel Adjustment This button cannot be used to switch directly to previous menu screen. The setting changes to Standby mode. Press ON to turn the Plasma Display Off to 30 minutes, 60 minutes, 90 minutes and 0 minutes (off timer cancelled) each time the button is...

Plasma Display
Page 16
...SIZE CLOCK PHASE 16 To SOUND adjust menu (see page 20) During "VIDEO (S VIDEO)", "COMPONENT" and "DVI" input signal. SET UP 1/2 SIGNAL COMPONENT/RGB-IN SELECT RGB INPUT LABEL PC POWER SAVE OFF STANDBY SAVE OFF POWER MANAGEMENT OFF AUTO POWER OFF OSD LANGUAGE OFF... page 23) PICTURE 1/2 NORMALIZE NORMAL PICTURE MENU PICTURE BRIGHTNESS COLOR TINT SHARPNESS STANDARD 25 0 0 0 3 PICTURE 2/2 COLOR TEMP COLOR MANAGEMENT ADVANCED SETTINGS NORMAL OFF ON Press to select . INPUT MENU -/ VOL +/ ENTER/ Each time the MENU button is pressed, the menu screen will switch. ...
...SIZE CLOCK PHASE 16 To SOUND adjust menu (see page 20) During "VIDEO (S VIDEO)", "COMPONENT" and "DVI" input signal. SET UP 1/2 SIGNAL COMPONENT/RGB-IN SELECT RGB INPUT LABEL PC POWER SAVE OFF STANDBY SAVE OFF POWER MANAGEMENT OFF AUTO POWER OFF OSD LANGUAGE OFF... page 23) PICTURE 1/2 NORMALIZE NORMAL PICTURE MENU PICTURE BRIGHTNESS COLOR TINT SHARPNESS STANDARD 25 0 0 0 3 PICTURE 2/2 COLOR TEMP COLOR MANAGEMENT ADVANCED SETTINGS NORMAL OFF ON Press to select . INPUT MENU -/ VOL +/ ENTER/ Each time the MENU button is pressed, the menu screen will switch. ...

Plasma Display
Page 17
...is selected). On-Screen Menu Displays 2 Press to access each input signal. (see page 27) PRESENT TIME SETUP PRESENT TIME OF DAY 99:99 SET PRESENT TIME OF DAY 99:99 Press to select START TIME/ FINISH TIME (When TIME OF DAY is selected). To SIGNAL screen for VIDEO (S ... RGB (see page 37, 38) SIGNAL [ RGB ] To SIGNAL screen for DVI (see page 37, 38) SIGNAL [ Digital ] 3D Y/C FILTER (NTSC) COLOR SYSTEM 3 : 2 PULLDOWN Panasonic AUTO (4 : 3) VIDEO NR ON AUTO OFF NORMAL OFF 3 : 2 PULLDOWN OFF VIDEO NR OFF SYNC 3 : 2 PULLDOWN VIDEO NR H-FREQ. 33.8 V-FREQ. 60.0 AUTO OFF OFF...
...is selected). On-Screen Menu Displays 2 Press to access each input signal. (see page 27) PRESENT TIME SETUP PRESENT TIME OF DAY 99:99 SET PRESENT TIME OF DAY 99:99 Press to select START TIME/ FINISH TIME (When TIME OF DAY is selected). To SIGNAL screen for VIDEO (S ... RGB (see page 37, 38) SIGNAL [ RGB ] To SIGNAL screen for DVI (see page 37, 38) SIGNAL [ Digital ] 3D Y/C FILTER (NTSC) COLOR SYSTEM 3 : 2 PULLDOWN Panasonic AUTO (4 : 3) VIDEO NR ON AUTO OFF NORMAL OFF 3 : 2 PULLDOWN OFF VIDEO NR OFF SYNC 3 : 2 PULLDOWN VIDEO NR H-FREQ. 33.8 V-FREQ. 60.0 AUTO OFF OFF...

Plasma Display
Page 18
Press to select your preferred language. Input signals will change as follows: • TH-37PWD8UK, TH-37PHD8UK INPUT1 INPUT2 PC IN • TH-42PWD8UK, TH-42PHD8UK, TH-50PHD8UK INPUT1 INPUT2 INPUT3 PC IN Notes: • Selecting is not installed into the SLOT. • Select to match... selected for the main picture and sub picture. Press to select OSD LANGUAGE. Press to select the input signal to the Plasma Display. Selectable languages SET UP 1/2 English(UK) Deutsch Français Italiano Español ENGLISH(US) .......(Chinese) .......(Japanese Russian) SIGNAL COMPONENT...
Press to select your preferred language. Input signals will change as follows: • TH-37PWD8UK, TH-37PHD8UK INPUT1 INPUT2 PC IN • TH-42PWD8UK, TH-42PHD8UK, TH-50PHD8UK INPUT1 INPUT2 INPUT3 PC IN Notes: • Selecting is not installed into the SLOT. • Select to match... selected for the main picture and sub picture. Press to select OSD LANGUAGE. Press to select the input signal to the Plasma Display. Selectable languages SET UP 1/2 English(UK) Deutsch Français Italiano Español ENGLISH(US) .......(Chinese) .......(Japanese Russian) SIGNAL COMPONENT...

Plasma Display
Page 19
... its maximum size but with aspect JUST correction applied to the center of the screen so that the ASPECT be set to change unexpectedly. Notes: • Panasonic AUTO mode is designed to automatically adjust the aspect ratio to a former adjustment. Note: Do not allow you ...only 9 apparent at the left and right edges of 16:9 and 4:3 program material. When exiting the mode, the screen will depend on the Plasma Display Panel. 19 Mode NORMAL 4 NORMAL Picture 3 Explanation NORMAL will display a 4:3 picture at its maximum size, including wide screen cinema format picture. [...
... its maximum size but with aspect JUST correction applied to the center of the screen so that the ASPECT be set to change unexpectedly. Notes: • Panasonic AUTO mode is designed to automatically adjust the aspect ratio to a former adjustment. Note: Do not allow you ...only 9 apparent at the left and right edges of 16:9 and 4:3 program material. When exiting the mode, the screen will depend on the Plasma Display Panel. 19 Mode NORMAL 4 NORMAL Picture 3 Explanation NORMAL will display a 4:3 picture at its maximum size, including wide screen cinema format picture. [...

Plasma Display
Page 20
... signal. POS. /SIZE NORMALIZE NORMAL H-POS H-SIZE V-POS V-SIZE CLOCK PHASE H-POS Adjust the horizontal position. CLOCK PHASE (RGB/PC in Panasonic AUTO with FULL mode, the adjustment is pressed during "NORMALIZE", then all adjustment values are memorized for each , and RGB/PC/DVI signals are... returned to the factory settings. 20 Adjusting POS. /SIZE 1 Press to display the POS. /SIZE menu. 2 Press to select H-POS / H-SIZE / V-POS / V-SIZE / CLOCK ...
... signal. POS. /SIZE NORMALIZE NORMAL H-POS H-SIZE V-POS V-SIZE CLOCK PHASE H-POS Adjust the horizontal position. CLOCK PHASE (RGB/PC in Panasonic AUTO with FULL mode, the adjustment is pressed during "NORMALIZE", then all adjustment values are memorized for each , and RGB/PC/DVI signals are... returned to the factory settings. 20 Adjusting POS. /SIZE 1 Press to display the POS. /SIZE menu. 2 Press to select H-POS / H-SIZE / V-POS / V-SIZE / CLOCK ...

Plasma Display
Page 22
... two screen display mode Initial INPUT Initial VOL level Off Off 0 (see page 21). On : Sets Advanced PIP mode. There may not be displayed simultaneously for DVI, SDI, HDMI's corresponding signals. 22 Maximum VOL level INPUT lock Studio W/B ...Off 0 Off Off Advanced PIP Off Press to adjust the menu. Component, Component - PC (RGB) • Refer to each board's operating instruction for TH-37PWD8UK and TH-42PWD8UK; Component - Component, PC (RGB) - PC (RGB), PC (RGB) - Sub screen Main screen Notes: • Advanced PIP corresponding signal Sub screen ...
... two screen display mode Initial INPUT Initial VOL level Off Off 0 (see page 21). On : Sets Advanced PIP mode. There may not be displayed simultaneously for DVI, SDI, HDMI's corresponding signals. 22 Maximum VOL level INPUT lock Studio W/B ...Off 0 Off Off Advanced PIP Off Press to adjust the menu. Component, Component - PC (RGB) • Refer to each board's operating instruction for TH-37PWD8UK and TH-42PWD8UK; Component - Component, PC (RGB) - PC (RGB), PC (RGB) - Sub screen Main screen Notes: • Advanced PIP corresponding signal Sub screen ...

Plasma Display
Page 23
... Note: If you would like to switch between modes. STANDARD CINEMA DYNAMIC STANDARD For viewing in brighter environments. ADVANCED SETTINGS ON Enables fine picture adjustment at a professional level (see next page) Press the left or right button to change... the picture and color of BRIGHTNESS and PICTURE. ADVANCED SETTINGS NORMALIZE NORMAL BLACK EXTENSION INPUT LEVEL W/B HIGH R W/B HIGH B W/B LOW R W/B LOW B GAMMA AGC 0 0 0 0 0 0 2.2 OFF ADVANCED SETTINGS OFF Displays images with settings of BRIGHTNESS and PICTURE. This menu selects higher than normal ...
... Note: If you would like to switch between modes. STANDARD CINEMA DYNAMIC STANDARD For viewing in brighter environments. ADVANCED SETTINGS ON Enables fine picture adjustment at a professional level (see next page) Press the left or right button to change... the picture and color of BRIGHTNESS and PICTURE. ADVANCED SETTINGS NORMALIZE NORMAL BLACK EXTENSION INPUT LEVEL W/B HIGH R W/B HIGH B W/B LOW R W/B LOW B GAMMA AGC 0 0 0 0 0 0 2.2 OFF ADVANCED SETTINGS OFF Displays images with settings of BRIGHTNESS and PICTURE. This menu selects higher than normal ...

Plasma Display
Page 24
...memorized separately for easier viewing of each function (PICTURE, BRIGHTNESS, COLOR, TINT, SHARPNESS) for each PICTURE MENU. • The setting details for STANDARD, DYNAMIC and CINEMA respectively are returned to adjust. Notes: • Carry out "W/B" adjustment as night scenes and... black hair. COLOR Adjusts color saturation. ADVANCED SETTINGS Item BLACK EXTENSION INPUT LEVEL Effect Less More Less More W/B HIGH R Less More W/B HIGH B Less More W/B LOW R Less More...
...memorized separately for easier viewing of each function (PICTURE, BRIGHTNESS, COLOR, TINT, SHARPNESS) for each PICTURE MENU. • The setting details for STANDARD, DYNAMIC and CINEMA respectively are returned to adjust. Notes: • Carry out "W/B" adjustment as night scenes and... black hair. COLOR Adjusts color saturation. ADVANCED SETTINGS Item BLACK EXTENSION INPUT LEVEL Effect Less More Less More W/B HIGH R Less More W/B HIGH B Less More W/B LOW R Less More...


