

Plasma Display
Page 1
Operating Instructions Progressive Wide Plasma Display Model No. Please keep this product, please read these instructions completely. Before connecting, operating or adjusting this manual for future reference. English TQBC2026 TH-37PWD8UK TH-42PWD8UK TH-37PWD8 High Definition Plasma Display Model No. TH-37PHD8UK TH-42PHD8UK TH-50PHD8UK TH-37PWD8 The illustration shown is an image.
Operating Instructions Progressive Wide Plasma Display Model No. Please keep this product, please read these instructions completely. Before connecting, operating or adjusting this manual for future reference. English TQBC2026 TH-37PWD8UK TH-42PWD8UK TH-37PWD8 High Definition Plasma Display Model No. TH-37PHD8UK TH-42PHD8UK TH-50PHD8UK TH-37PWD8 The illustration shown is an image.

Plasma Display
Page 4
... Supplied 8 Remote Control Batteries 8 Connections 9 PC Input Terminals connection 10 SERIAL Terminals connection 11 AV & COMPONENT connection 12 RGB signal (R, G, B, HD, VD 12 Power ON / OFF 13 Basic Controls 14 On-Screen Menu Displays 16 Initial selections 18 Selecting the input signal 18 Selecting the On-Screen Menu Language 18 ASPECT Controls 19 Adjusting POS. /SIZE 20 MULTI PIP 21 Advanced PIP 22 PICTURE Adjustments 23 ADVANCED SETTINGS 24 SOUND Adjustment 25 MUTE 25 Digital Zoom 26 PRESENT TIME SETUP / SET UP TIMER 27...
... Supplied 8 Remote Control Batteries 8 Connections 9 PC Input Terminals connection 10 SERIAL Terminals connection 11 AV & COMPONENT connection 12 RGB signal (R, G, B, HD, VD 12 Power ON / OFF 13 Basic Controls 14 On-Screen Menu Displays 16 Initial selections 18 Selecting the input signal 18 Selecting the On-Screen Menu Language 18 ASPECT Controls 19 Adjusting POS. /SIZE 20 MULTI PIP 21 Advanced PIP 22 PICTURE Adjustments 23 ADVANCED SETTINGS 24 SOUND Adjustment 25 MUTE 25 Digital Zoom 26 PRESENT TIME SETUP / SET UP TIMER 27...

Plasma Display
Page 5
... instructions, may cause undesired operation. Note: Do not allow a still picture to be determined by turning the equipment off and on the Plasma Display. FCC STATEMENT This equipment has been tested and found to comply with the limits for a Class B digital device, pursuant to remain on , the user is encouraged to try to correct the interference by Panasonic...
... instructions, may cause undesired operation. Note: Do not allow a still picture to be determined by turning the equipment off and on the Plasma Display. FCC STATEMENT This equipment has been tested and found to comply with the limits for a Class B digital device, pursuant to remain on , the user is encouraged to try to correct the interference by Panasonic...
Plasma Display
Page 6
... carry out set-up dust on the Plasma Display. Small parts can cause fire or electric shock. When using the Plasma Display Do not bring your Plasma Display. Keep small parts away from your hands, face or objects close . Burns or personal injuries can happen if any other infrared communication equipment. Examples of still pictures include logos, video games, computer images, teletext and images displayed in turn, can...
... carry out set-up dust on the Plasma Display. Small parts can cause fire or electric shock. When using the Plasma Display Do not bring your Plasma Display. Keep small parts away from your hands, face or objects close . Burns or personal injuries can happen if any other infrared communication equipment. Examples of still pictures include logos, video games, computer images, teletext and images displayed in turn, can...

Plasma Display
Page 7
... from the Plasma Display, unplug the power cord immediately. • Continuous use of the Plasma Display. • If water spills onto the Plasma Display or foreign objects get inside the unit, operating problems may occur, which can cause fire or damage to come into direct contact with fingernails or other setting-up method, leave a space of time, unplug the power cord from the wall outlet...
... from the Plasma Display, unplug the power cord immediately. • Continuous use of the Plasma Display. • If water spills onto the Plasma Display or foreign objects get inside the unit, operating problems may occur, which can cause fire or damage to come into direct contact with fingernails or other setting-up method, leave a space of time, unplug the power cord from the wall outlet...

Plasma Display
Page 10
... PC input terminals are those with a horizontal scanning frequency of 15 to 110 kHz and vertical scanning frequency of 48 to 120 Hz. (However, the image will need to make setting changes to the computer at the time of the D-sub 15P Connector. Notes: • Due to space limitations, occasionally you will not be displayed properly if the signals exceed 1,200 lines...
... PC input terminals are those with a horizontal scanning frequency of 15 to 110 kHz and vertical scanning frequency of 48 to 120 Hz. (However, the image will need to make setting changes to the computer at the time of the D-sub 15P Connector. Notes: • Due to space limitations, occasionally you will not be displayed properly if the signals exceed 1,200 lines...

Plasma Display
Page 11
... SELF Control details Power ON Power OFF Volume 00 - 63 Audio MUTE OFF Audio MUTE ON Input select (toggle) Slot1 input Slot2 input Slot3 input PC input Screen mode select (toggle) NORMAL (4 : 3) ZOOM FULL JUST Panasonic AUTO With the power off, this display responds to the computer. SERIAL Terminals connection The SERIAL terminal is used when the Plasma Display is for example purposes only. • Additional equipment and cables shown are not supplied with a STX signal...
... SELF Control details Power ON Power OFF Volume 00 - 63 Audio MUTE OFF Audio MUTE ON Input select (toggle) Slot1 input Slot2 input Slot3 input PC input Screen mode select (toggle) NORMAL (4 : 3) ZOOM FULL JUST Panasonic AUTO With the power off, this display responds to the computer. SERIAL Terminals connection The SERIAL terminal is used when the Plasma Display is for example purposes only. • Additional equipment and cables shown are not supplied with a STX signal...
Plasma Display
Page 13
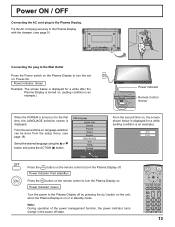
... the Plasma Display. Power ON / OFF Connecting the AC cord plug to the Plasma Display off by pressing the when the Plasma Display is on or in the power off . Power Indicator: Red (standby) Press the button on . Fix the AC cord plug securely to turn the set on: Power-On. Power Indicator: Green Example: The screen below is displayed for a while after the Plasma Display is turned on. (setting condition is an example.) TH-42PWD8 INPUT MENU -/ VOL +/ ENTER/ TH-42PWD8 Power Indicator Remote Control...
... the Plasma Display. Power ON / OFF Connecting the AC cord plug to the Plasma Display off by pressing the when the Plasma Display is on or in the power off . Power Indicator: Red (standby) Press the button on . Fix the AC cord plug securely to turn the set on: Power-On. Power Indicator: Green Example: The screen below is displayed for a while after the Plasma Display is turned on. (setting condition is an example.) TH-42PWD8 INPUT MENU -/ VOL +/ ENTER/ TH-42PWD8 Power Indicator Remote Control...

Plasma Display
Page 14
...). Note: The surround settings are enormous. just as the power cord is pressed. Red • Power-ON ...... Basic Controls Remote control sensor TH-42PWD8 INPUT MENU -/ VOL +/ ENTER/ Volume Adjustment Volume Up "+" Down "-" When the menu screen is displayed: "+": press to move the cursor up "-": press to adjust the aspect. (see page 19) MULTI Window buttons (see page 16, 19) Main Power On / Off Switch Power Indicator The Power Indicator will light. • Power-OFF ....
...). Note: The surround settings are enormous. just as the power cord is pressed. Red • Power-ON ...... Basic Controls Remote control sensor TH-42PWD8 INPUT MENU -/ VOL +/ ENTER/ Volume Adjustment Volume Up "+" Down "-" When the menu screen is displayed: "+": press to move the cursor up "-": press to adjust the aspect. (see page 19) MULTI Window buttons (see page 16, 19) Main Power On / Off Switch Power Indicator The Power Indicator will light. • Power-OFF ....

Plasma Display
Page 15
... sound volume level. Volume Adjustment Press the Volume Up "+" or Down "-" button to Standby mode. Press OFF to turn the Plasma Display On, from Standby mode. SET UP button (see page 43), this model. Note: After-image (image lag) may occur on the plasma display panel when a still picture is kept on at the power switch (see page 19) 3 Off timer The off timer indicator is 3 displayed only when the off timer is not installed, it automatically displays the current input signal...
... sound volume level. Volume Adjustment Press the Volume Up "+" or Down "-" button to Standby mode. Press OFF to turn the Plasma Display On, from Standby mode. SET UP button (see page 43), this model. Note: After-image (image lag) may occur on the plasma display panel when a still picture is kept on at the power switch (see page 19) 3 Off timer The off timer indicator is 3 displayed only when the off timer is not installed, it automatically displays the current input signal...

Plasma Display
Page 17
...) SIGNAL [ Digital ] 3D Y/C FILTER (NTSC) COLOR SYSTEM 3 : 2 PULLDOWN Panasonic AUTO (4 : 3) VIDEO NR ON AUTO OFF NORMAL OFF 3 : 2 PULLDOWN OFF VIDEO NR OFF SYNC 3 : 2 PULLDOWN VIDEO NR H-FREQ. 33.8 V-FREQ. 60.0 AUTO OFF OFF kHz Hz 3 : 2 PULLDOWN VIDEO NR H-FREQ. 33.8 V-FREQ. 60.0 OFF OFF kHz Hz Note: "SIGNAL" setup menu displays a different setting condition for each adjust screen. [ from the unit ] INPUT MENU -/ VOL +/ ENTER/ Press to return to next menu screen. PRESENT TIME...
...) SIGNAL [ Digital ] 3D Y/C FILTER (NTSC) COLOR SYSTEM 3 : 2 PULLDOWN Panasonic AUTO (4 : 3) VIDEO NR ON AUTO OFF NORMAL OFF 3 : 2 PULLDOWN OFF VIDEO NR OFF SYNC 3 : 2 PULLDOWN VIDEO NR H-FREQ. 33.8 V-FREQ. 60.0 AUTO OFF OFF kHz Hz 3 : 2 PULLDOWN VIDEO NR H-FREQ. 33.8 V-FREQ. 60.0 OFF OFF kHz Hz Note: "SIGNAL" setup menu displays a different setting condition for each adjust screen. [ from the unit ] INPUT MENU -/ VOL +/ ENTER/ Press to return to next menu screen. PRESENT TIME...

Plasma Display
Page 18
...) SIGNAL COMPONENT/RGB-IN SELECT RGB INPUT LABEL PC POWER SAVE OFF STANDBY SAVE OFF POWER MANAGEMENT OFF AUTO POWER OFF OFF OSD LANGUAGE ENGLISH (US) 18 Press to select the input signal to be played back from the source connected to the component/RGB input terminals. (see page 36) • In 2 screen display, the same input mode cannot be connected by installing the optional Terminal Boards. Press to the Plasma Display.
...) SIGNAL COMPONENT/RGB-IN SELECT RGB INPUT LABEL PC POWER SAVE OFF STANDBY SAVE OFF POWER MANAGEMENT OFF AUTO POWER OFF OFF OSD LANGUAGE ENGLISH (US) 18 Press to select the input signal to be played back from the source connected to the component/RGB input terminals. (see page 36) • In 2 screen display, the same input mode cannot be connected by installing the optional Terminal Boards. Press to the Plasma Display.

Plasma Display
Page 19
... of the screen. Certain 4:3 program material, such as stock market data screens, may occasionally cause the image size to be selected only during Video signal input. • The aspect mode is memorized separately for an extended period, as this can be displayed in NORMAL mode for each time the ENTER button is pressed. [During MULTI PIP Operations] • Picture and Picture, Picture in Panasonic AUTO with FULL mode, the adjustment is...
... of the screen. Certain 4:3 program material, such as stock market data screens, may occasionally cause the image size to be selected only during Video signal input. • The aspect mode is memorized separately for an extended period, as this can be displayed in NORMAL mode for each time the ENTER button is pressed. [During MULTI PIP Operations] • Picture and Picture, Picture in Panasonic AUTO with FULL mode, the adjustment is...

Plasma Display
Page 20
... the factory settings. 20 When exiting the mode, the screen will shift up or down. CLOCK PHASE (RGB/PC in Panasonic AUTO with FULL mode, the adjustment is received, the picture position will return to exit from a VCR or DVD player is not memorized. During "VIDEO (S VIDEO)", "COMPONENT" and "DVI" input signal. Helpful Hint ( / NORMALIZE Normalization) While the POS. /SIZE display is active, if either the N button on the remote control is...
... the factory settings. 20 When exiting the mode, the screen will shift up or down. CLOCK PHASE (RGB/PC in Panasonic AUTO with FULL mode, the adjustment is received, the picture position will return to exit from a VCR or DVD player is not memorized. During "VIDEO (S VIDEO)", "COMPONENT" and "DVI" input signal. Helpful Hint ( / NORMALIZE Normalization) While the POS. /SIZE display is active, if either the N button on the remote control is...
Plasma Display
Page 25
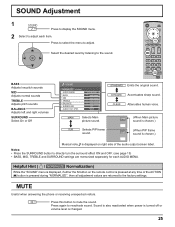
... returned to the factory settings. MUTE Useful when answering the phone or receiving unexpected visitors. Press this button to adjust. Press again to the sound. SOUND Adjustment 1 Press to display the SOUND menu. 2 Select to adjust each AUDIO MENU. BASS Adjusts low pitch sounds MID Adjusts normal sounds TREBLE Adjusts pitch sounds BALANCE Adjusts left and right volumes SURROUND Select On or Off SOUND NORMALIZE NORMAL AUDIO MENU BASS MID TREBLE BALANCE SURROUND AUDIO OUT (PIP) STANDARD 0 0 0 0 OFF...
... returned to the factory settings. MUTE Useful when answering the phone or receiving unexpected visitors. Press this button to adjust. Press again to the sound. SOUND Adjustment 1 Press to display the SOUND menu. 2 Select to adjust each AUDIO MENU. BASS Adjusts low pitch sounds MID Adjusts normal sounds TREBLE Adjusts pitch sounds BALANCE Adjusts left and right volumes SURROUND Select On or Off SOUND NORMALIZE NORMAL AUDIO MENU BASS MID TREBLE BALANCE SURROUND AUDIO OUT (PIP) STANDARD 0 0 0 0 OFF...
Plasma Display
Page 36
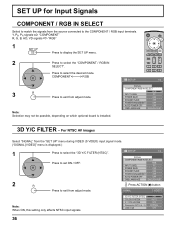
... STANDBY SAVE OFF POWER MANAGEMENT OFF AUTO POWER OFF OSD LANGUAGE OFF ENGLISH (US) 2 Press ACTION ( ) button Press to exit from adjust mode. Y, PB, PR signals "COMPONENT" R, G, B, HD, VD signals "RGB" 1 Press to display the SET UP menu. 2 Press to set ON / OFF. COMPONENT RGB 3 Press to exit from adjust mode. SET UP for Input Signals COMPONENT / RGB IN SELECT Select to match the signals from the "SET UP" menu during VIDEO (S VIDEO) input signal mode. ("SIGNAL [VIDEO]" menu...
... STANDBY SAVE OFF POWER MANAGEMENT OFF AUTO POWER OFF OSD LANGUAGE OFF ENGLISH (US) 2 Press ACTION ( ) button Press to exit from adjust mode. Y, PB, PR signals "COMPONENT" R, G, B, HD, VD signals "RGB" 1 Press to display the SET UP menu. 2 Press to set ON / OFF. COMPONENT RGB 3 Press to exit from adjust mode. SET UP for Input Signals COMPONENT / RGB IN SELECT Select to match the signals from the "SET UP" menu during VIDEO (S VIDEO) input signal mode. ("SIGNAL [VIDEO]" menu...

Plasma Display
Page 41
... Advanced PIP mode operation. Sets panel ID number when panel is available for TH-42PWD8UK without this mode setting. • Turn up the power switch for DVI, SDI, HDMI's corresponding signals. Off On Off Disables ID remote control functions. Press or button to each board's operating instruction for the upward direction when you cannot use normal remote control operations. Press or button to the vertical installation mode. Off On Off Sets normal two screen display mode (see page 22). Off Disables external control...
... Advanced PIP mode operation. Sets panel ID number when panel is available for TH-42PWD8UK without this mode setting. • Turn up the power switch for DVI, SDI, HDMI's corresponding signals. Off On Off Disables ID remote control functions. Press or button to each board's operating instruction for the upward direction when you cannot use normal remote control operations. Press or button to the vertical installation mode. Off On Off Sets normal two screen display mode (see page 22). Off Disables external control...

Plasma Display
Page 43
... unit digitally processes the various signals in NORMAL When viewing the side panels at minimum level. (see page 23, 24) COLOR SYSTEM (see page 37) No remote control operations can cause a permanent after-image to remain on the Plasma Display. The brightness on both sides mode changes. Some parts of the picture on the screen. The edges of input signal. The plasma display panel is not a malfunction. This is manufactured using a video software program...
... unit digitally processes the various signals in NORMAL When viewing the side panels at minimum level. (see page 23, 24) COLOR SYSTEM (see page 37) No remote control operations can cause a permanent after-image to remain on the Plasma Display. The brightness on both sides mode changes. Some parts of the picture on the screen. The edges of input signal. The plasma display panel is not a malfunction. This is manufactured using a video software program...

Plasma Display
Page 45
Mass and dimensions shown are subject to change without notice. Specifications TH-37PWD8UK TH-42PWD8UK Power Source 120 V AC, 50/60 Hz Power Consumption Maximum 250 W 275 W Stand-by condition Save OFF 1.0 W, Save ON 0.7 W Save OFF 1.0 W, Save ON 0.7 W Power off condition 0.05 W 0.05 W Plasma Display panel Drive method : AC type 37-inch, Drive method : AC type 42-inch, 16:9 aspect ratio 16:9 aspect ratio Contrast...
Mass and dimensions shown are subject to change without notice. Specifications TH-37PWD8UK TH-42PWD8UK Power Source 120 V AC, 50/60 Hz Power Consumption Maximum 250 W 275 W Stand-by condition Save OFF 1.0 W, Save ON 0.7 W Save OFF 1.0 W, Save ON 0.7 W Power off condition 0.05 W 0.05 W Plasma Display panel Drive method : AC type 37-inch, Drive method : AC type 42-inch, 16:9 aspect ratio 16:9 aspect ratio Contrast...
Plasma Display
Page 47
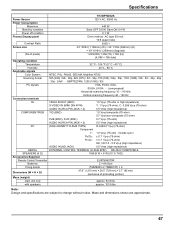
...fications Power Source Power Consumption Maximum Stand-by condition Power off condition Plasma Display panel Contrast Ratio Screen size (No.of pixels) Operating condition Temperature Humidity Applicable signals Color System Scanning format PC signals Connection terminals AV COMPONENT/RGB PC SERIAL SPEAKERS (6 ȍ) Accessories Supplied Remote Control Transmitter Batteries Fixing bands Dimensions (W × H × D) Mass (weight) main unit only with speakers TH-50PHD8UK 120 V AC, 50/60 Hz 440 W Save OFF 0.6 W, Save ON 0.4 W 0.1 W Drive method : AC type 50-inch, 16...
...fications Power Source Power Consumption Maximum Stand-by condition Power off condition Plasma Display panel Contrast Ratio Screen size (No.of pixels) Operating condition Temperature Humidity Applicable signals Color System Scanning format PC signals Connection terminals AV COMPONENT/RGB PC SERIAL SPEAKERS (6 ȍ) Accessories Supplied Remote Control Transmitter Batteries Fixing bands Dimensions (W × H × D) Mass (weight) main unit only with speakers TH-50PHD8UK 120 V AC, 50/60 Hz 440 W Save OFF 0.6 W, Save ON 0.4 W 0.1 W Drive method : AC type 50-inch, 16...


