
TH32LHD7UY User Guide
Page 2
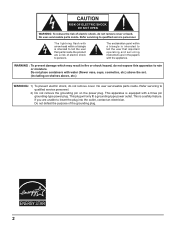
... tell the user that important operating and servicing instructions are in fire or shock hazard, do not expose this apparatus to insert the plug into the outlet, contact an electrician. No user-serviceable parts inside . Refer servicing to qualified service personnel. 2) Do not remove the grounding pin on shelves above the set. (including on the power plug. No user serviceable parts inside . CAUTION...
... tell the user that important operating and servicing instructions are in fire or shock hazard, do not expose this apparatus to insert the plug into the outlet, contact an electrician. No user-serviceable parts inside . Refer servicing to qualified service personnel. 2) Do not remove the grounding pin on shelves above the set. (including on the power plug. No user serviceable parts inside . CAUTION...
TH32LHD7UY User Guide
Page 4
...Instructions 3 FCC STATEMENT 5 Safety Precautions 6 MAINTENANCE 7 Accessories 8 Accessories Supplied 8 Remote Control Batteries 8 Connections 9 PC Input Terminals connection 10 SERIAL Terminals connection 11 AV & COMPONENT connection 12 RGB signal (R, G, B, HD, VD 12 Power ON / OFF 13 Basic Controls 14 On-Screen Menu Displays 16 Initial selections 18 Selecting the input signal 18 Selecting the On-Screen Menu Language 18 ASPECT Controls 19 Adjusting PICTURE POSITION / SIZE 20 MULTI PIP 21 PICTURE Adjustments 22 4 ADVANCED SETTINGS 23 SOUND Adjustment 24 MUTE 24 Digital...
...Instructions 3 FCC STATEMENT 5 Safety Precautions 6 MAINTENANCE 7 Accessories 8 Accessories Supplied 8 Remote Control Batteries 8 Connections 9 PC Input Terminals connection 10 SERIAL Terminals connection 11 AV & COMPONENT connection 12 RGB signal (R, G, B, HD, VD 12 Power ON / OFF 13 Basic Controls 14 On-Screen Menu Displays 16 Initial selections 18 Selecting the input signal 18 Selecting the On-Screen Menu Language 18 ASPECT Controls 19 Adjusting PICTURE POSITION / SIZE 20 MULTI PIP 21 PICTURE Adjustments 22 4 ADVANCED SETTINGS 23 SOUND Adjustment 24 MUTE 24 Digital...
TH32LHD7UY User Guide
Page 7
AC Power Supply Cord The LCD Display is designed to the cable is suspected, have it repaired at the rear. If the plug is damaged or the wall socket plate is detected from the LCD Display, unplug the power cord immediately. • Continuous use of the LCD Display. If damage to operate on 120 V AC, 50/60 Hz. If problems occur during use If a problem occurs (such as it with...
AC Power Supply Cord The LCD Display is designed to the cable is suspected, have it repaired at the rear. If the plug is damaged or the wall socket plate is detected from the LCD Display, unplug the power cord immediately. • Continuous use of the LCD Display. If damage to operate on 120 V AC, 50/60 Hz. If problems occur during use If a problem occurs (such as it with...
TH32LHD7UY User Guide
Page 8
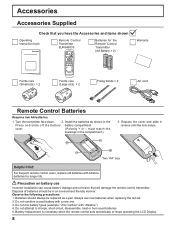
... battery compartment. Two "AA" size Helpful Hint: For frequent remote control users, replace old batteries with "Alkaline"). 4. Always use Incorrect installation can cause battery leakage and corrosion that you have the Accessories and items shown Operating Instruction book Remote Control Transmitter EUR646535 INPUT SURROUND VOL N R Batteries for longer life. cover. (Polarity + or - Accessories Accessories Supplied Check that will damage the remote control transmitter. Install the batteries as a pair...
... battery compartment. Two "AA" size Helpful Hint: For frequent remote control users, replace old batteries with "Alkaline"). 4. Always use Incorrect installation can cause battery leakage and corrosion that you have the Accessories and items shown Operating Instruction book Remote Control Transmitter EUR646535 INPUT SURROUND VOL N R Batteries for longer life. cover. (Polarity + or - Accessories Accessories Supplied Check that will damage the remote control transmitter. Install the batteries as a pair...
TH32LHD7UY User Guide
Page 10
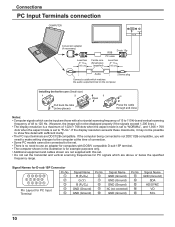
Connections PC Input Terminals connection COMPUTER AUDIO PC IN Conversion adapter (if necessary) Less than 3" 15/16 (10 cm) TH-32LHD7 D-sub 15p RGB PC cable Ferrite core (Small size) (supplied) Less than 3" 15/16 (10 cm) Audio Stereo plug Connect a cable which are above or below the specified frequency range. Installing the ferrite core (Small size) 1 2 Pull back the tabs (in two places) 3 Open Press the...
Connections PC Input Terminals connection COMPUTER AUDIO PC IN Conversion adapter (if necessary) Less than 3" 15/16 (10 cm) TH-32LHD7 D-sub 15p RGB PC cable Ferrite core (Small size) (supplied) Less than 3" 15/16 (10 cm) Audio Stereo plug Connect a cable which are above or below the specified frequency range. Installing the ferrite core (Small size) 1 2 Pull back the tabs (in two places) 3 Open Press the...
TH32LHD7UY User Guide
Page 12
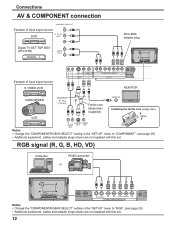
... MONITOR CAMCORDER VCR Less than 3" 15/16 (10 cm) Ferrite core (large size) (supplied) VIDEO IN Installing the ferrite core (Large size) Open R L S VIDEO VIDEO AUDIO OUT OUT OUT Notes: • Change the "COMPONENT/RGB-IN SELECT" setting in the "SET UP" menu to "COMPONENT". (see page 29) • Additional equipment, cables and adapter plugs shown are not supplied with this set . 12 RGB signal (R, G, B, HD, VD) Computer RGB Camcorder or R AUDIO L IN S VIDEO IN VIDEO...
... MONITOR CAMCORDER VCR Less than 3" 15/16 (10 cm) Ferrite core (large size) (supplied) VIDEO IN Installing the ferrite core (Large size) Open R L S VIDEO VIDEO AUDIO OUT OUT OUT Notes: • Change the "COMPONENT/RGB-IN SELECT" setting in the "SET UP" menu to "COMPONENT". (see page 29) • Additional equipment, cables and adapter plugs shown are not supplied with this set . 12 RGB signal (R, G, B, HD, VD) Computer RGB Camcorder or R AUDIO L IN S VIDEO IN VIDEO...
TH32LHD7UY User Guide
Page 13
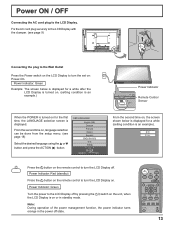
... LCD Display is on for a while (setting condition is displayed. INPUT SURROUND VOL N R PICTURE SOUND SET UP MULTI ZOOM PIP SWAP SELECT MOVE PICTURE POS. /SIZE ASPECT 13 Power Indicator: Red (standby) Press the button on the remote control to the LCD Display off state. switch on . Power Indicator: Green Example: The screen below is displayed for the first time, the LANGUAGE selection screen is an example). Power ON / OFF Connecting the AC cord plug to turn the LCD Display...
... LCD Display is on for a while (setting condition is displayed. INPUT SURROUND VOL N R PICTURE SOUND SET UP MULTI ZOOM PIP SWAP SELECT MOVE PICTURE POS. /SIZE ASPECT 13 Power Indicator: Red (standby) Press the button on the remote control to the LCD Display off state. switch on . Power Indicator: Green Example: The screen below is displayed for the first time, the LANGUAGE selection screen is an example). Power ON / OFF Connecting the AC cord plug to turn the LCD Display...
TH32LHD7UY User Guide
Page 14
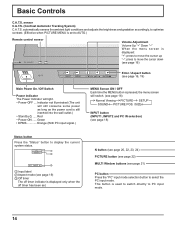
... button to AUTO.) Remote control sensor TH-32LHD7 Volume Adjustment Volume Up "+" Down "-" When the menu screen is displayed only when the off timer has been set. automatically senses the ambient light conditions and adjusts the brightness and gradation accordingly, to optimise contrast. (Effective when PICTURE MENU is set to select the PC input mode. sensor C.A.T.S. (Contrast Automatic Tracking System) C.A.T.S. Indicator not illuminated (The unit will switch. (see page 16) Normal Viewing PICTURE SETUP SOUND PICTURE POS. /SIZE INPUT button...
... button to AUTO.) Remote control sensor TH-32LHD7 Volume Adjustment Volume Up "+" Down "-" When the menu screen is displayed only when the off timer has been set. automatically senses the ambient light conditions and adjusts the brightness and gradation accordingly, to optimise contrast. (Effective when PICTURE MENU is set to select the PC input mode. sensor C.A.T.S. (Contrast Automatic Tracking System) C.A.T.S. Indicator not illuminated (The unit will switch. (see page 16) Normal Viewing PICTURE SETUP SOUND PICTURE POS. /SIZE INPUT button...
TH32LHD7UY User Guide
Page 15
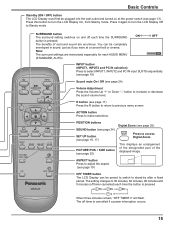
... setting switches on at a concert hall or cinema. Note: The surround settings are enormous. ASPECT button Press to turn the LCD Display On, from Stanby mode. The off each AUDIO MENU SURROUND ON (STANDARD, AUTO). ACTION button Press to increase or decrease the sound volume level. Press it again to adjust the aspect. (see page 24) SURROUND VOL N R Volume Adjustment Press the Volume Up "+" or Down "-" button to make selections. INPUT button...
... setting switches on at a concert hall or cinema. Note: The surround settings are enormous. ASPECT button Press to turn the LCD Display On, from Stanby mode. The off each AUDIO MENU SURROUND ON (STANDARD, AUTO). ACTION button Press to increase or decrease the sound volume level. Press it again to adjust the aspect. (see page 24) SURROUND VOL N R Volume Adjustment Press the Volume Up "+" or Down "-" button to make selections. INPUT button...
TH32LHD7UY User Guide
Page 17
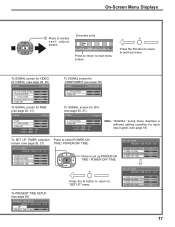
... "SET UP" menu. To SIGNAL screen for VIDEO (S VIDEO) (see page 29, 30) SIGNAL [ VIDEO ] 3D Y/C FILTER (NTSC) COLOR SYSTEM 3 : 2 PULLDOWN Panasonic AUTO (4 : 3) VIDEO NR ON AUTO OFF NORMAL OFF To SIGNAL screen for RGB (see page 30, 31) SIGNAL [ RGB ] SYNC 3 : 2 PULLDOWN VIDEO NR H-FREQ. 33.8 V-FREQ. 60.0 AUTO OFF OFF kHz Hz To SIGNAL screen for COMPONENT (see page 30) SIGNAL [ COMPONENT ] 3 : 2 PULLDOWN OFF VIDEO NR OFF To SIGNAL screen for DVI (see page 30, 31) SIGNAL [ Digital...
... "SET UP" menu. To SIGNAL screen for VIDEO (S VIDEO) (see page 29, 30) SIGNAL [ VIDEO ] 3D Y/C FILTER (NTSC) COLOR SYSTEM 3 : 2 PULLDOWN Panasonic AUTO (4 : 3) VIDEO NR ON AUTO OFF NORMAL OFF To SIGNAL screen for RGB (see page 30, 31) SIGNAL [ RGB ] SYNC 3 : 2 PULLDOWN VIDEO NR H-FREQ. 33.8 V-FREQ. 60.0 AUTO OFF OFF kHz Hz To SIGNAL screen for COMPONENT (see page 30) SIGNAL [ COMPONENT ] 3 : 2 PULLDOWN OFF VIDEO NR OFF To SIGNAL screen for DVI (see page 30, 31) SIGNAL [ Digital...
TH32LHD7UY User Guide
Page 18
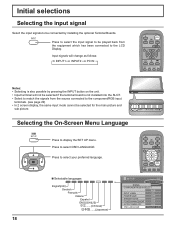
... be connected by installing the optional Terminal Boards. Press to display the SET UP menu. Selectable languages English(UK) Deutsch Français Italiano Español ENGLISH(US) .......(Chinese) .......(Japanese) INPUT SURROUND VOL N R PICTURE SOUND SET UP MULTI ZOOM PIP SWAP SELECT MOVE SET UP 1/2 SIGNAL COMPONENT/RGB-IN SELECT RGB INPUT LABEL PC POWER SAVE OFF STANDBY SAVE OFF POWER MANAGEMENT OFF AUTO POWER OFF OFF OSD LANGUAGE ENGLISH (US) Press to the component/RGB input terminals...
... be connected by installing the optional Terminal Boards. Press to display the SET UP menu. Selectable languages English(UK) Deutsch Français Italiano Español ENGLISH(US) .......(Chinese) .......(Japanese) INPUT SURROUND VOL N R PICTURE SOUND SET UP MULTI ZOOM PIP SWAP SELECT MOVE SET UP 1/2 SIGNAL COMPONENT/RGB-IN SELECT RGB INPUT LABEL PC POWER SAVE OFF STANDBY SAVE OFF POWER MANAGEMENT OFF AUTO POWER OFF OFF OSD LANGUAGE ENGLISH (US) Press to the component/RGB input terminals...
TH32LHD7UY User Guide
Page 19
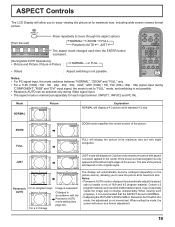
... Panasonic AUTO mode setting (see page 30). The size of the picture will depend on the picture source), allowing you to enjoy viewing the picture at its maximum size, including wide screen cinema format picture. ASPECT Controls The LCD Display will allow you to view the picture at the left and right edges of the screen. When exiting the mode, the screen will return to change unexpectedly. PICTURE POS. /SIZE ASPECT Notes: • For PC signal input...
... Panasonic AUTO mode setting (see page 30). The size of the picture will depend on the picture source), allowing you to enjoy viewing the picture at its maximum size, including wide screen cinema format picture. ASPECT Controls The LCD Display will allow you to view the picture at the left and right edges of the screen. When exiting the mode, the screen will return to change unexpectedly. PICTURE POS. /SIZE ASPECT Notes: • For PC signal input...
TH32LHD7UY User Guide
Page 20
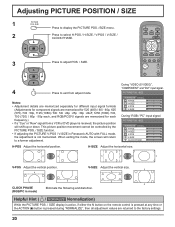
...; If adjusting the PICTURE V-POS / V-SIZE in mode) Eliminate the flickering and distortion. CLOCK PHASE (RGB/PC in Panasonic AUTO with FULL mode, the adjustment is received, the picture position will return to a former adjustment. Notes: • Adjustment details are memorized separately for different input signal formats (Adjustments for component signals are memorized for each , and RGB/PC/DVI signals are returned to adjust POS. / SIZE. Adjusting PICTURE POSITION / SIZE 1 PICTURE POS. /SIZE Press to display the PICTURE POS. /SIZE menu...
...; If adjusting the PICTURE V-POS / V-SIZE in mode) Eliminate the flickering and distortion. CLOCK PHASE (RGB/PC in Panasonic AUTO with FULL mode, the adjustment is received, the picture position will return to a former adjustment. Notes: • Adjustment details are memorized separately for different input signal formats (Adjustments for component signals are memorized for each , and RGB/PC/DVI signals are returned to adjust POS. / SIZE. Adjusting PICTURE POSITION / SIZE 1 PICTURE POS. /SIZE Press to display the PICTURE POS. /SIZE menu...
TH32LHD7UY User Guide
Page 22
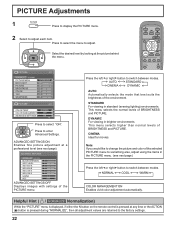
.... PICTURE SOUND SET UP MULTI ZOOM PIP SWAP SELECT MOVE PICTURE POS. /SIZE ASPECT PICTURE NORMALIZE NORMAL PICTURE MENU BACK LIGHT PICTURE BRIGHTNESS COLOR TINT SHARPNESS 1/2 STANDARD 20 25 0 0 0 3 PICTURE 2/2 COLOR TEMP COLOR MANAGEMENT ADVANCED SETTINGS NORMAL OFF ON Press to adjust each item. STANDARD For viewing in brighter environments. ADVANCED SETTINGS NORMALIZE NORMAL BLACK EXTENSION INPUT LEVEL W/B HIGH R W/B HIGH B W/B LOW R W/B LOW B GAMMA AGC 0 0 0 0 0 0 2.2 OFF ADVANCED SETTINGS OFF Displays images with settings of BRIGHTNESS and PICTURE. This menu...
.... PICTURE SOUND SET UP MULTI ZOOM PIP SWAP SELECT MOVE PICTURE POS. /SIZE ASPECT PICTURE NORMALIZE NORMAL PICTURE MENU BACK LIGHT PICTURE BRIGHTNESS COLOR TINT SHARPNESS 1/2 STANDARD 20 25 0 0 0 3 PICTURE 2/2 COLOR TEMP COLOR MANAGEMENT ADVANCED SETTINGS NORMAL OFF ON Press to adjust each item. STANDARD For viewing in brighter environments. ADVANCED SETTINGS NORMALIZE NORMAL BLACK EXTENSION INPUT LEVEL W/B HIGH R W/B HIGH B W/B LOW R W/B LOW B GAMMA AGC 0 0 0 0 0 0 2.2 OFF ADVANCED SETTINGS OFF Displays images with settings of BRIGHTNESS and PICTURE. This menu...
TH32LHD7UY User Guide
Page 23
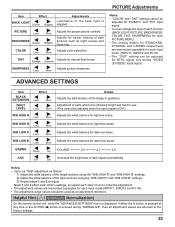
... white balance for dark blue areas. Adjust the white balance of the bright sections using the "W/B LOW R" and "W/B LOW B" settings. 3. N Helpful Hint ( / NORMALIZE Normalization) On the remote control unit, while the "ADVANCED SETTINGS" menu is displayed, if either the N button is pressed at any time or the ACTION ( ) button is adjusted. Reddish Greenish SHARPNESS Less Adjusts picture sharpness. More Notes: • "COLOR" and "TINT" settings cannot be adjusted for "RGB/PC" and "DVI" input signal...
... white balance for dark blue areas. Adjust the white balance of the bright sections using the "W/B LOW R" and "W/B LOW B" settings. 3. N Helpful Hint ( / NORMALIZE Normalization) On the remote control unit, while the "ADVANCED SETTINGS" menu is displayed, if either the N button is pressed at any time or the ACTION ( ) button is adjusted. Reddish Greenish SHARPNESS Less Adjusts picture sharpness. More Notes: • "COLOR" and "TINT" settings cannot be adjusted for "RGB/PC" and "DVI" input signal...
TH32LHD7UY User Guide
Page 24
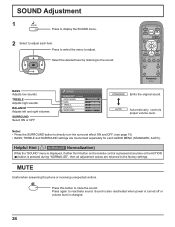
... power is turned off or volume level is pressed during "NORMALIZE", then all adjustment values are memorized separately for each item. MUTE Useful when answering the phone or receiving unexpected visitors. AUTO Automatically controls proper volume level. N Helpful Hint ( / NORMALIZE Normalization) While the "SOUND" menu is displayed, if either the N button on the remote control is pressed at any time or the ACTION ( ) button is changed. 24 INPUT...
... power is turned off or volume level is pressed during "NORMALIZE", then all adjustment values are memorized separately for each item. MUTE Useful when answering the phone or receiving unexpected visitors. AUTO Automatically controls proper volume level. N Helpful Hint ( / NORMALIZE Normalization) While the "SOUND" menu is displayed, if either the N button on the remote control is pressed at any time or the ACTION ( ) button is changed. 24 INPUT...
TH32LHD7UY User Guide
Page 26
.... 1 Press to display the SET UP menu. PRESENT TIME SETUP PRESENT TIME OF DAY 99:99 SET PRESENT TIME OF DAY 99:99 3 SET UP 26 Press to exit from PRESENT TIME SETUP. INPUT SURROUND VOL N R PICTURE SOUND SET UP MULTI ZOOM 2 Press to display the SET UP TIMER screen or PRESENT TIME SETUP screen. SET UP 1/2 SIGNAL COMPONENT/RGB-IN SELECT RGB INPUT LABEL PC POWER SAVE OFF STANDBY SAVE OFF Press to...
.... 1 Press to display the SET UP menu. PRESENT TIME SETUP PRESENT TIME OF DAY 99:99 SET PRESENT TIME OF DAY 99:99 3 SET UP 26 Press to exit from PRESENT TIME SETUP. INPUT SURROUND VOL N R PICTURE SOUND SET UP MULTI ZOOM 2 Press to display the SET UP TIMER screen or PRESENT TIME SETUP screen. SET UP 1/2 SIGNAL COMPONENT/RGB-IN SELECT RGB INPUT LABEL PC POWER SAVE OFF STANDBY SAVE OFF Press to...
TH32LHD7UY User Guide
Page 29
... board is displayed.) SET UP 1/2 1 Press to display the SET UP menu. RGB INPUT LABEL PC POWER SAVE OFF STANDBY SAVE OFF POWER MANAGEMENT OFF AUTO POWER OFF OSD LANGUAGE OFF ENGLISH (US) 2 R Press ACTION ( ) button Press to select the desired mode. Press to exit from adjust mode. For NTSC AV images Select "SIGNAL" from the "SET UP" menu during VIDEO (S VIDEO) input signal mode. ("SIGNAL [VIDEO]" menu is installed. SIGNAL [ VIDEO ] Note: When ON, this setting only affects NTSC input signals. 3D Y/C FILTER (NTSC) COLOR SYSTEM 3 : 2 PULLDOWN Panasonic AUTO...
... board is displayed.) SET UP 1/2 1 Press to display the SET UP menu. RGB INPUT LABEL PC POWER SAVE OFF STANDBY SAVE OFF POWER MANAGEMENT OFF AUTO POWER OFF OSD LANGUAGE OFF ENGLISH (US) 2 R Press ACTION ( ) button Press to select the desired mode. Press to exit from adjust mode. For NTSC AV images Select "SIGNAL" from the "SET UP" menu during VIDEO (S VIDEO) input signal mode. ("SIGNAL [VIDEO]" menu is installed. SIGNAL [ VIDEO ] Note: When ON, this setting only affects NTSC input signals. 3D Y/C FILTER (NTSC) COLOR SYSTEM 3 : 2 PULLDOWN Panasonic AUTO...
TH32LHD7UY User Guide
Page 30
... mode.("SIGNAL [VIDEO]" menu is determined automatically. SET UP 1/2 SIGNAL COMPONENT/RGB-IN SELECT RGB INPUT LABEL PC POWER SAVE OFF STANDBY SAVE OFF POWER MANAGEMENT OFF AUTO POWER OFF OSD LANGUAGE OFF ENGLISH (US) Press ACTION ( ) button SIGNAL [ VIDEO ] 3D Y/C FILTER (NTSC) COLOR SYSTEM 3 : 2 PULLDOWN Panasonic AUTO (4 : 3) VIDEO NR ON AUTO OFF NORMAL OFF Mode COLOR SYSTEM Function Set the color system to select each function. POWER SAVE OFF STANDBY SAVE OFF VIDEO NR: Automatically reduces unwanted picture noise. If you would like to view 4:3 images...
... mode.("SIGNAL [VIDEO]" menu is determined automatically. SET UP 1/2 SIGNAL COMPONENT/RGB-IN SELECT RGB INPUT LABEL PC POWER SAVE OFF STANDBY SAVE OFF POWER MANAGEMENT OFF AUTO POWER OFF OSD LANGUAGE OFF ENGLISH (US) Press ACTION ( ) button SIGNAL [ VIDEO ] 3D Y/C FILTER (NTSC) COLOR SYSTEM 3 : 2 PULLDOWN Panasonic AUTO (4 : 3) VIDEO NR ON AUTO OFF NORMAL OFF Mode COLOR SYSTEM Function Set the color system to select each function. POWER SAVE OFF STANDBY SAVE OFF VIDEO NR: Automatically reduces unwanted picture noise. If you would like to view 4:3 images...

TH32LHD7UY User Guide
Page 33
... red spots, blue spots and green spots on PICTURE and BRIGHTNESS/Volume setting (Check by pressing the power switch or stand-by any other remote control.) A cracking sound is built with good ventilation. Occasionally, a few non-active pixels may appear on the type of your LCD. The top or bottom of liquid crystal panels and is not a problem for the picture to an outdoor light or a strong fluorescent light. No Color Color controls set...
... red spots, blue spots and green spots on PICTURE and BRIGHTNESS/Volume setting (Check by pressing the power switch or stand-by any other remote control.) A cracking sound is built with good ventilation. Occasionally, a few non-active pixels may appear on the type of your LCD. The top or bottom of liquid crystal panels and is not a problem for the picture to an outdoor light or a strong fluorescent light. No Color Color controls set...


