
TH42PWD5UY User Guide
Page 4
... set the Display location number for each Plasma Display 35 SET UP for Input Signals 36 COMPONENT/RGB/ IN SELECT 36 3D Y/C FILTER - To obtain maximum benefit from your new Plasma Display. Retain your purchase receipt also, and note down the model number and serial number of enjoyment from Remote Control ........ 20 ASPECT Controls 22 Adjusting PICTURE POSITION/SIZE 24 SOUND Adjustment 26 MUTE 26 SURROUND Controls 27 PICTURE Adjustments 28 ADVANCED SETTINGS 29 SET UP TIMER 30 PRESENT TIME...
... set the Display location number for each Plasma Display 35 SET UP for Input Signals 36 COMPONENT/RGB/ IN SELECT 36 3D Y/C FILTER - To obtain maximum benefit from your new Plasma Display. Retain your purchase receipt also, and note down the model number and serial number of enjoyment from Remote Control ........ 20 ASPECT Controls 22 Adjusting PICTURE POSITION/SIZE 24 SOUND Adjustment 26 MUTE 26 SURROUND Controls 27 PICTURE Adjustments 28 ADVANCED SETTINGS 29 SET UP TIMER 30 PRESENT TIME...

TH42PWD5UY User Guide
Page 5
... as this Plasma Display to video equipment. (see page 15, 17) FCC CAUTION: To assure continued compliance and possible undesirable interference, the provided ferrite cores must be used in which case the user will be required to instructions on the High Definition Plasma Display. Note: Do not allow a still picture to be displayed for a Class A digital device, pursuant to part 15 of...
... as this Plasma Display to video equipment. (see page 15, 17) FCC CAUTION: To assure continued compliance and possible undesirable interference, the provided ferrite cores must be used in which case the user will be required to instructions on the High Definition Plasma Display. Note: Do not allow a still picture to be displayed for a Class A digital device, pursuant to part 15 of...
TH42PWD5UY User Guide
Page 6
..., keep video equipment away from the Plasma Display, unplug the power cord immediately. • Continuous use If a problem occurs (such as it repaired at an Authorized Service Center. Securely insert the power cord plug as far as no picture or no sound), or if smoke or an abnormal odor is detected from this product near hot objects, heat, bend, twist or forcefully pull the power cable...
..., keep video equipment away from the Plasma Display, unplug the power cord immediately. • Continuous use If a problem occurs (such as it repaired at an Authorized Service Center. Securely insert the power cord plug as far as no picture or no sound), or if smoke or an abnormal odor is detected from this product near hot objects, heat, bend, twist or forcefully pull the power cable...
TH42PWD5UY User Guide
Page 7
... instability which could also result in turn, can result if this cloth to disconnect all cables before carrying out any body parts are brought too close to the ventilation holes of the Plasma Display. • Top of still pictures include logos, video games, computer images, teletext and images displayed in contact with articles made from the wall outlet and clean it with a soft...
... instability which could also result in turn, can result if this cloth to disconnect all cables before carrying out any body parts are brought too close to the ventilation holes of the Plasma Display. • Top of still pictures include logos, video games, computer images, teletext and images displayed in contact with articles made from the wall outlet and clean it with a soft...

TH42PWD5UY User Guide
Page 8
... Instruction book Remote Control Transmitter EUR646525 INPUT SURROUND VOL N R PICTURE SOUND SET UP PICTURE POS. /SIZE ASPECT PC OFF TIMER PLASMA DISPLAY Batteries for the Remote Control Transmitter (AA(R6) Battery × 2) Warranty Ferrite core (small size) J0KF00000018 × 1 Ferrite core (large size) J0KG00000054 × 2 Fixing bands AC cord Optional Accessories • Speakers TY-SP42PWD3W TY-SP42P5W-K • Pedestal TY-ST05-K • Wall stand TY-ST42PW1 • Mobile stand TY-ST42PF3 • Wall-hanging bracket (vertical...
... Instruction book Remote Control Transmitter EUR646525 INPUT SURROUND VOL N R PICTURE SOUND SET UP PICTURE POS. /SIZE ASPECT PC OFF TIMER PLASMA DISPLAY Batteries for the Remote Control Transmitter (AA(R6) Battery × 2) Warranty Ferrite core (small size) J0KF00000018 × 1 Ferrite core (large size) J0KG00000054 × 2 Fixing bands AC cord Optional Accessories • Speakers TY-SP42PWD3W TY-SP42P5W-K • Pedestal TY-ST05-K • Wall stand TY-ST42PW1 • Mobile stand TY-ST42PF3 • Wall-hanging bracket (vertical...

TH42PWD5UY User Guide
Page 10
...) PICTURE POS./SIZE button ASPECT button (see page 24) Press to adjust the aspect. (see page 22) 3 OFF TIMER " button to turn the Plasma Display ON, from STAND-BY mode. R button (see page 19) VOLUME Adjustment Press the Volume Up "+" or Down "-" button to PC mode. VOL + Remote control sensor Power Indicator The Power Indicator will light. • POWER-OFF Indicator not illuminated (The unit will flash. 30 60 90 The off timer is pressed. VIDEO 1 NORMAL 2 INPUT button (VIDEO (S VIDEO...
...) PICTURE POS./SIZE button ASPECT button (see page 24) Press to adjust the aspect. (see page 22) 3 OFF TIMER " button to turn the Plasma Display ON, from STAND-BY mode. R button (see page 19) VOLUME Adjustment Press the Volume Up "+" or Down "-" button to PC mode. VOL + Remote control sensor Power Indicator The Power Indicator will light. • POWER-OFF Indicator not illuminated (The unit will flash. 30 60 90 The off timer is pressed. VIDEO 1 NORMAL 2 INPUT button (VIDEO (S VIDEO...
TH42PWD5UY User Guide
Page 15
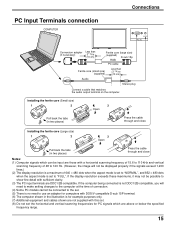
... (large size) (supplied) D-sub 15p RGB PC cable Ferrite core (small size) (supplied) Less than 3" 15/16 (10 cm) Audio Stereo plug Connect a cable that matches the audio output terminal on the computer. Connections PC Input Terminals connection COMPUTER AUDIO PC IN Conversion adapter (if necessary) POWER / R - STANDBY G POWER ON INPUT - If the computer being connected is not DDC1/2B-compatible, you will not be displayed properly if the signals exceed 1,200 lines.) (2) The display resolution is...
... (large size) (supplied) D-sub 15p RGB PC cable Ferrite core (small size) (supplied) Less than 3" 15/16 (10 cm) Audio Stereo plug Connect a cable that matches the audio output terminal on the computer. Connections PC Input Terminals connection COMPUTER AUDIO PC IN Conversion adapter (if necessary) POWER / R - STANDBY G POWER ON INPUT - If the computer being connected is not DDC1/2B-compatible, you will not be displayed properly if the signals exceed 1,200 lines.) (2) The display resolution is...

TH42PWD5UY User Guide
Page 17
... AMT IIS (When Used RCA Terminal Board) DAM Parameter None None ** 0 1 None VID YP1 RG1 None NORM ZOOM FULL JUST SELF Control details Power ON Power OFF Volume 00 - 63 Audio MUTE OFF Audio MUTE ON Input select (toggle) VIDEO Mode COMPONENT / RGB mode (processed as a Y/PB/PR or RGB signals as programming language software. Connections SERIAL Terminals connection The SERIAL terminal is used when the Plasma Display is connected to this terminal...
... AMT IIS (When Used RCA Terminal Board) DAM Parameter None None ** 0 1 None VID YP1 RG1 None NORM ZOOM FULL JUST SELF Control details Power ON Power OFF Volume 00 - 63 Audio MUTE OFF Audio MUTE ON Input select (toggle) VIDEO Mode COMPONENT / RGB mode (processed as a Y/PB/PR or RGB signals as programming language software. Connections SERIAL Terminals connection The SERIAL terminal is used when the Plasma Display is connected to this terminal...
TH42PWD5UY User Guide
Page 18
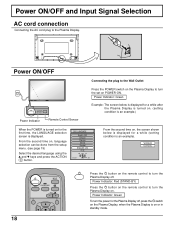
... first time, the LANGUAGE selection screen is an example). Power Indicator: Green Example: The screen below is displayed for a while (setting condition is displayed. Power ON/OFF Connecting the plug to turn the set on the remote control to the Wall Outlet R - VIDEO NORMAL INPUT SURROUND VOL N R 18 Press the button on the remote control to turn the Plasma Display on or in standby mode. STANDBY G POWER ON INPUT - Power Indicator: Green To turn the Plasma Display off , press the switch on the Plasma Display, when the Plasma Display...
... first time, the LANGUAGE selection screen is an example). Power Indicator: Green Example: The screen below is displayed for a while (setting condition is displayed. Power ON/OFF Connecting the plug to turn the set on the remote control to the Wall Outlet R - VIDEO NORMAL INPUT SURROUND VOL N R 18 Press the button on the remote control to turn the Plasma Display on or in standby mode. STANDBY G POWER ON INPUT - Power Indicator: Green To turn the Plasma Display off , press the switch on the Plasma Display, when the Plasma Display...
TH42PWD5UY User Guide
Page 19
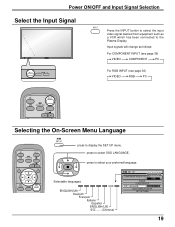
... the Input Signal R - Input signals will change as a VCR which has been connected to select your preferred language. press to the Plasma Display. VOL + INPUT Press the INPUT button to select the input video signal desired from equipment such as follows: For COMPONENT INPUT (see page 36) VIDEO RGB PC INPUT SURROUND VOL N R Selecting the On-Screen Menu Language INPUT SURROUND VOL N R PICTURE SOUND SET UP SET UP press to select OSD LANGUAGE. STANDBY G POWER ON INPUT -
... the Input Signal R - Input signals will change as a VCR which has been connected to select your preferred language. press to the Plasma Display. VOL + INPUT Press the INPUT button to select the input video signal desired from equipment such as follows: For COMPONENT INPUT (see page 36) VIDEO RGB PC INPUT SURROUND VOL N R Selecting the On-Screen Menu Language INPUT SURROUND VOL N R PICTURE SOUND SET UP SET UP press to select OSD LANGUAGE. STANDBY G POWER ON INPUT -
TH42PWD5UY User Guide
Page 20
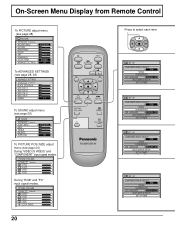
...Menu Display from Remote Control To PICTURE adjust menu (see page 28) PICTURE NORMALIZE NORMAL PICTURE MENU PICTURE BRIGHTNESS COLOR TINT SHARPNESS COLOR TEMP ADVANCED SETTINGS STANDARD 0 0 0 0 0 NORMAL ON To ADVANCED SETTINGS (see page 28, 29) ADVANCED SETTINGS NORMALIZE NORMAL BLACK EXTENSION W/B HIGH R W/B HIGH B W/B LOW R W/B LOW B GAMMA 0 0 0 0 0 2. 2 To SOUND adjust menu (see page 26) SOUND NORMALIZE NORMAL AUDIO MENU BASS TREBLE BALANCE SURROUND STANDARD 0 0 0 ON To PICTURE POS./SIZE adjust menu (see page 24) During "VIDEO (S VIDEO)" and "COMPONENT" input signal modes. PICTURE...
...Menu Display from Remote Control To PICTURE adjust menu (see page 28) PICTURE NORMALIZE NORMAL PICTURE MENU PICTURE BRIGHTNESS COLOR TINT SHARPNESS COLOR TEMP ADVANCED SETTINGS STANDARD 0 0 0 0 0 NORMAL ON To ADVANCED SETTINGS (see page 28, 29) ADVANCED SETTINGS NORMALIZE NORMAL BLACK EXTENSION W/B HIGH R W/B HIGH B W/B LOW R W/B LOW B GAMMA 0 0 0 0 0 2. 2 To SOUND adjust menu (see page 26) SOUND NORMALIZE NORMAL AUDIO MENU BASS TREBLE BALANCE SURROUND STANDARD 0 0 0 ON To PICTURE POS./SIZE adjust menu (see page 24) During "VIDEO (S VIDEO)" and "COMPONENT" input signal modes. PICTURE...
TH42PWD5UY User Guide
Page 21
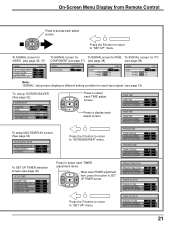
...) COLOR SYSTEM 3:2 PULLDOWN Panasonic AUTO (4:3) [ VIDEO ] ON AUTO OFF NORMAL SIGNAL 3:2 PULLDOWN [ COMPONENT ] OFF SIGNAL [ RGB ] SYNC H & V H-FREQ. 31.5 kHz V-FREQ. 60.0 Hz SIGNAL [ PC ] SYNC H & V H-FREQ. 31.5 kHz V-FREQ. 60.0 Hz Note: "SIGNAL" setup menu displays a different setting condition for each input signal. (see page 30) SET UP TIMER PRESENT TIME 0:52 POWER ON FUNCTION OFF POWER ON TIME 0:00 POWER OFF FUNCTION OFF POWER OFF TIME 0:00 Press to select each TIMER adjustment items. When select TIMER adjustment...
...) COLOR SYSTEM 3:2 PULLDOWN Panasonic AUTO (4:3) [ VIDEO ] ON AUTO OFF NORMAL SIGNAL 3:2 PULLDOWN [ COMPONENT ] OFF SIGNAL [ RGB ] SYNC H & V H-FREQ. 31.5 kHz V-FREQ. 60.0 Hz SIGNAL [ PC ] SYNC H & V H-FREQ. 31.5 kHz V-FREQ. 60.0 Hz Note: "SIGNAL" setup menu displays a different setting condition for each input signal. (see page 30) SET UP TIMER PRESENT TIME 0:52 POWER ON FUNCTION OFF POWER ON TIME 0:00 POWER OFF FUNCTION OFF POWER OFF TIME 0:00 Press to select each TIMER adjustment items. When select TIMER adjustment...

TH42PWD5UY User Guide
Page 22
INPUT SURROUND VOL N R PICTURE SOUND SET UP PICTURE POS. /SIZE ASPECT ASPECT ASPECT button The aspect mode changes each input terminal (VIDEO, COMPONENT, RGB and PC). PC OFF TIMER PLASMA DISPLAY 22 For a 525i (480i), 625i (575i) signal input during "COMPONENT" input signal mode, the mode is set to enjoy viewing the picture at its maximum size, including wide screen cinema format picture. NORMAL ZOOM FULL Panasonic AUTO JUST Notes: (1) During RGB and PC input signal modes, the mode switches between "NORMAL", "ZOOM" and "FULL...
INPUT SURROUND VOL N R PICTURE SOUND SET UP PICTURE POS. /SIZE ASPECT ASPECT ASPECT button The aspect mode changes each input terminal (VIDEO, COMPONENT, RGB and PC). PC OFF TIMER PLASMA DISPLAY 22 For a 525i (480i), 625i (575i) signal input during "COMPONENT" input signal mode, the mode is set to enjoy viewing the picture at its maximum size, including wide screen cinema format picture. NORMAL ZOOM FULL Panasonic AUTO JUST Notes: (1) During RGB and PC input signal modes, the mode switches between "NORMAL", "ZOOM" and "FULL...

TH42PWD5UY User Guide
Page 24
... "Rew" signal from adjust mode. PICTURE POS./SIZE NORMALIZE NORMAL H-POS H-SIZE V-POS V-SIZE CLOCK PHASE 3 Press to select H-POS/H-SIZE/V-POS/ V-SIZE/CLOCK PHASE. PICTURE SOUND SET UP PICTURE POS. /SIZE ASPECT PC OFF TIMER PLASMA DISPLAY R Press to exit from a VCR or DVD player is received, the picture position will shift up or down. This picture position movement cannot be controlled by the PICTURE POS./SIZE function. 24 INPUT SURROUND VOL N R During "VIDEO (S VIDEO)" and "COMPONENT" input signal modes.
... "Rew" signal from adjust mode. PICTURE POS./SIZE NORMALIZE NORMAL H-POS H-SIZE V-POS V-SIZE CLOCK PHASE 3 Press to select H-POS/H-SIZE/V-POS/ V-SIZE/CLOCK PHASE. PICTURE SOUND SET UP PICTURE POS. /SIZE ASPECT PC OFF TIMER PLASMA DISPLAY R Press to exit from a VCR or DVD player is received, the picture position will shift up or down. This picture position movement cannot be controlled by the PICTURE POS./SIZE function. 24 INPUT SURROUND VOL N R During "VIDEO (S VIDEO)" and "COMPONENT" input signal modes.

TH42PWD5UY User Guide
Page 26
... sound. MUTE Useful when answering the phone or receiving visitors. 26 Press this button to select the desired adjustment menu. AUTO Automatically controls proper volume level. Press to mute the sound. Press again to reactivate sound. Sound is also reactivated when power is turned off or volume level is pressed during "NORMALIZE", then all adjustment values are memorized separately for each item. INPUT SURROUND VOL N R PICTURE SOUND SET UP BASS Adjusts...
... sound. MUTE Useful when answering the phone or receiving visitors. 26 Press this button to select the desired adjustment menu. AUTO Automatically controls proper volume level. Press to mute the sound. Press again to reactivate sound. Sound is also reactivated when power is turned off or volume level is pressed during "NORMALIZE", then all adjustment values are memorized separately for each item. INPUT SURROUND VOL N R PICTURE SOUND SET UP BASS Adjusts...

TH42PWD5UY User Guide
Page 28
... button to switch between modes. Press the left or right button to the factory settings. 28 AUTO STANDARD CINEMA DYNAMIC AUTO Automatically selects the mode that best suits the brightness of BRIGHTNESS and PICTURE. Press the down button to adjust each item. DYNAMIC For viewing in standard (evening lighting) environments. NORMAL COOL WARM Helpful Hint ( N / NORMALIZE Normalization) While the "PICTURE" menu is displayed, if either the N button on the remote control...
... button to switch between modes. Press the left or right button to the factory settings. 28 AUTO STANDARD CINEMA DYNAMIC AUTO Automatically selects the mode that best suits the brightness of BRIGHTNESS and PICTURE. Press the down button to adjust each item. DYNAMIC For viewing in standard (evening lighting) environments. NORMAL COOL WARM Helpful Hint ( N / NORMALIZE Normalization) While the "PICTURE" menu is displayed, if either the N button on the remote control...
TH42PWD5UY User Guide
Page 30
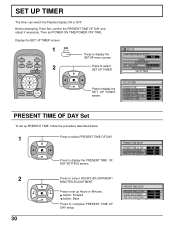
... DISPLAY SETUP SET UP TIMER SET UP TIMER PRESENT TIME 0:52 POWER ON FUNCTION OFF POWER ON TIME 0:00 POWER OFF FUNCTION OFF POWER OFF TIME 0:00 PRESENT TIME OF DAY Set To set POWER ON TIME/POWER OFF TIME. Then set up Hours or Minutes. INPUT SURROUND VOL N R 1 SET UP 2 Press to display the PRESENT TIME OF DAY SETTING screen. Press to display the SETUP menu screen. Press to display the SET UP TIMER screen. PICTURE SOUND SET UP Press to select SET UP TIMER. Press to set up PRESENT TIME...
... DISPLAY SETUP SET UP TIMER SET UP TIMER PRESENT TIME 0:52 POWER ON FUNCTION OFF POWER ON TIME 0:00 POWER OFF FUNCTION OFF POWER OFF TIME 0:00 PRESENT TIME OF DAY Set To set POWER ON TIME/POWER OFF TIME. Then set up Hours or Minutes. INPUT SURROUND VOL N R 1 SET UP 2 Press to display the PRESENT TIME OF DAY SETTING screen. Press to display the SETUP menu screen. Press to display the SET UP TIMER screen. PICTURE SOUND SET UP Press to select SET UP TIMER. Press to set up PRESENT TIME...

TH42PWD5UY User Guide
Page 36
... mode. Press (ACTION) button SIGNAL 3D Y/C FILTER (NTSC) COLOR SYSTEM 3:2 PULLDOWN Panasonic AUTO (4:3) [ VIDEO ] ON AUTO OFF NORMAL Note: When ON, this setting only affects NTSC input signals. 36 For NTSC Video images Select "SIGNAL" from adjust mode. 3D Y/C FILTER - N R PICTURE SOUND SET UP SET UP COMPONENT/RGB-IN SELECT RGB SIGNAL SCREENSAVER OSD LANGUAGE ENGLISH (US) MULTI DISPLAY SETUP SET UP TIMER PICTURE POS. /SIZE ASPECT COMPONENT RGB R Press to exit from the "SET UP" menu during VIDEO (S VIDEO) input signal mode. ("SIGNAL [VIDEO]" menu is displayed.) SET...
... mode. Press (ACTION) button SIGNAL 3D Y/C FILTER (NTSC) COLOR SYSTEM 3:2 PULLDOWN Panasonic AUTO (4:3) [ VIDEO ] ON AUTO OFF NORMAL Note: When ON, this setting only affects NTSC input signals. 36 For NTSC Video images Select "SIGNAL" from adjust mode. 3D Y/C FILTER - N R PICTURE SOUND SET UP SET UP COMPONENT/RGB-IN SELECT RGB SIGNAL SCREENSAVER OSD LANGUAGE ENGLISH (US) MULTI DISPLAY SETUP SET UP TIMER PICTURE POS. /SIZE ASPECT COMPONENT RGB R Press to exit from the "SET UP" menu during VIDEO (S VIDEO) input signal mode. ("SIGNAL [VIDEO]" menu is displayed.) SET...

TH42PWD5UY User Guide
Page 37
... the format of the input signal. If set to select 3:2 PULLDOWN. SET UP Select "SIGNAL" from adjust mode. SIGNAL 3D Y/C FILTER (NTSC) COLOR SYSTEM 3:2 PULLDOWN Panasonic AUTO (4:3) [ VIDEO ] ON AUTO OFF NORMAL SIGNAL 3:2 PULLDOWN [ COMPONENT ] OFF 37 SET UP COMPONENT/RGB-IN SELECT RGB SIGNAL SCREENSAVER OSD LANGUAGE ENGLISH (US) MULTI DISPLAY SETUP SET UP TIMER If the image becomes unstable: With the system set on Auto, under conditions of sources such as movie pictures, which...
... the format of the input signal. If set to select 3:2 PULLDOWN. SET UP Select "SIGNAL" from adjust mode. SIGNAL 3D Y/C FILTER (NTSC) COLOR SYSTEM 3:2 PULLDOWN Panasonic AUTO (4:3) [ VIDEO ] ON AUTO OFF NORMAL SIGNAL 3:2 PULLDOWN [ COMPONENT ] OFF 37 SET UP COMPONENT/RGB-IN SELECT RGB SIGNAL SCREENSAVER OSD LANGUAGE ENGLISH (US) MULTI DISPLAY SETUP SET UP TIMER If the image becomes unstable: With the system set on Auto, under conditions of sources such as movie pictures, which...

TH42PWD5UY User Guide
Page 39
.../Volume setting (Check by pressing the power switch or stand-by button on the Plasma Display resulting from fixed image use is not an operating defect and as shown below. No Color Plasma Display panel Symptoms Normal Sound Color controls set at minimum level. (see page 28, 29) COLOR SYSTEM (see page 37) Check Some parts of still pictures include logos, video games, computer images, teletext and images displayed in 4:3 mode. Examples of the screen do not light up. The plasma display panel...
.../Volume setting (Check by pressing the power switch or stand-by button on the Plasma Display resulting from fixed image use is not an operating defect and as shown below. No Color Plasma Display panel Symptoms Normal Sound Color controls set at minimum level. (see page 28, 29) COLOR SYSTEM (see page 37) Check Some parts of still pictures include logos, video games, computer images, teletext and images displayed in 4:3 mode. Examples of the screen do not light up. The plasma display panel...


