Operating Instructions
Page 2
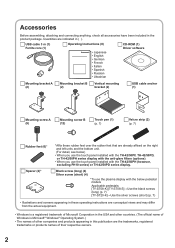
... (1) Driver software Mounting bracket A (2) Mounting bracket B (2) Vertical mounting bracket (2) USB cable anchor (1) Mounting screw A (9) Mounting screw B (12) Touch pen (1) (p. 7) Velcro strip (2) (p. 7) Rubber feet (6)* Spacer (2)* *Affix these rubber feet over the rubber feet that are already af...: [TY-ST08-K] [TY-ST08-S]→Use the black screws (long) (p. 7) [TY-ST20-K]→Use the silver screws (short) (p. 7) • Illustrations and screens appearing in these operating instructions are conceptual views and may differ from the actual equipment. • Windows is ...
... (1) Driver software Mounting bracket A (2) Mounting bracket B (2) Vertical mounting bracket (2) USB cable anchor (1) Mounting screw A (9) Mounting screw B (12) Touch pen (1) (p. 7) Velcro strip (2) (p. 7) Rubber feet (6)* Spacer (2)* *Affix these rubber feet over the rubber feet that are already af...: [TY-ST08-K] [TY-ST08-S]→Use the black screws (long) (p. 7) [TY-ST20-K]→Use the silver screws (short) (p. 7) • Illustrations and screens appearing in these operating instructions are conceptual views and may differ from the actual equipment. • Windows is ...
Operating Instructions
Page 13
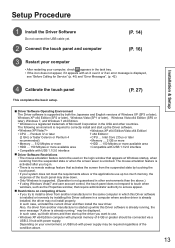
... a driver from the suspended state or when the screen saver is unlocked. may be required regardless of the condition above .) • If using Windows Vista/7 and user account control, the touch panel does not respond to touch when windows, such as the Properties window, that appears at Windows startup, when restoring from another manufacturer in the same...
... a driver from the suspended state or when the screen saver is unlocked. may be required regardless of the condition above .) • If using Windows Vista/7 and user account control, the touch panel does not respond to touch when windows, such as the Properties window, that appears at Windows startup, when restoring from another manufacturer in the same...
Operating Instructions
Page 14
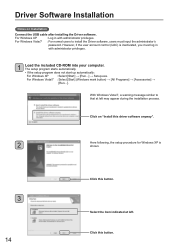
...included CD-ROM into your computer. The setup program starts automatically. • If the setup program does not start up automatically: For Windows XP : Select [Start] → [Run...] → Setup.exe. Click on Installation Connect the USB cable after installing the ...Driver software. Select the item indicated at left . For Windows XP : Log in with administrator privileges. Click this button. Driver Software Installation Notes on "Install this driver software anyway". 2 Here ...
...included CD-ROM into your computer. The setup program starts automatically. • If the setup program does not start up automatically: For Windows XP : Select [Start] → [Run...] → Setup.exe. Click on Installation Connect the USB cable after installing the ...Driver software. Select the item indicated at left . For Windows XP : Log in with administrator privileges. Click this button. Driver Software Installation Notes on "Install this driver software anyway". 2 Here ...

Operating Instructions
Page 15
... select a complete installation, the Driver software is automatically installed in the Program Files folder. Note on reinstallation (upgrading) If using Windows Vista/7, some specifications prevent users from where they can be referenced. Driver Software Installation 4 Installation & Setup Click this button...in the Compatibility folder. * With Windows Vista/7 and OSs of some of the lsdrv.ini file is complete. To completely uninstall this Driver software is uninstalled and reinstalled, it starts up , making the touch panel immediately operable. The files...
... select a complete installation, the Driver software is automatically installed in the Program Files folder. Note on reinstallation (upgrading) If using Windows Vista/7, some specifications prevent users from where they can be referenced. Driver Software Installation 4 Installation & Setup Click this button...in the Compatibility folder. * With Windows Vista/7 and OSs of some of the lsdrv.ini file is complete. To completely uninstall this Driver software is uninstalled and reinstalled, it starts up , making the touch panel immediately operable. The files...

Operating Instructions
Page 17
...driver is connected. (The operating window that appears after that differs slightly according to OS.) Plug & Play starts up according to that at left appears, installation is complete. Windows XP 1 When a window similar to the number of connected touch panels. Installation & Setup Connections... and Plug-Ins ■ Plug & Play Using Plug & Play, the touch panel is automatically detected as a USB device when ...
...driver is connected. (The operating window that appears after that differs slightly according to OS.) Plug & Play starts up according to that at left appears, installation is complete. Windows XP 1 When a window similar to the number of connected touch panels. Installation & Setup Connections... and Plug-Ins ■ Plug & Play Using Plug & Play, the touch panel is automatically detected as a USB device when ...

Operating Instructions
Page 18
...; [Device Manager]. 2 18 A warning message similar to that "Panasonic Touch Panel Unit" appears under "Universal Serial Bus controllers". Click this button. When the Device Manager window opens, check that "Panasonic Touch Panel Unit" is shown under "Universal Serial Bus controllers". Connections and... Plug-Ins ■ Checks After Installation Windows XP Select [Start] → [Control Panel] ...
...; [Device Manager]. 2 18 A warning message similar to that "Panasonic Touch Panel Unit" appears under "Universal Serial Bus controllers". Click this button. When the Device Manager window opens, check that "Panasonic Touch Panel Unit" is shown under "Universal Serial Bus controllers". Connections and... Plug-Ins ■ Checks After Installation Windows XP Select [Start] → [Control Panel] ...

Operating Instructions
Page 19
Click this button. Installation & Setup Driver Software Uninstallation Note on [Start] (Windows mark button) → [Control Panel] → [Programs] → [Programs and Features]. 2 Select "LSaDrv" from the "Uninstall or change a program" window. Select "Yes" to uninstall the Driver software. 19 Windows Vista/7 1 Click on Uninstallation Quit the Driver software before uninstalling it. (p. 20) Windows XP 1 Select [Start] → [Control Panel] → [Add or Remove Programs]. 2 Select "LSaDrv". Click this button.
Click this button. Installation & Setup Driver Software Uninstallation Note on [Start] (Windows mark button) → [Control Panel] → [Programs] → [Programs and Features]. 2 Select "LSaDrv" from the "Uninstall or change a program" window. Select "Yes" to uninstall the Driver software. 19 Windows Vista/7 1 Click on Uninstallation Quit the Driver software before uninstalling it. (p. 20) Windows XP 1 Select [Start] → [Control Panel] → [Add or Remove Programs]. 2 Select "LSaDrv". Click this button.
Operating Instructions
Page 23
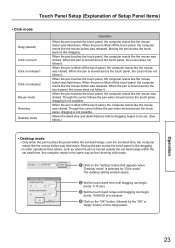
..., the computer reacts like dragging. Though the cursor follows the pen when moved across the touch panel, dragging is like the mouse was clicked. Touch Panel Setup (Explanation of a window) Click on the "OK" button, followed by the "OK" or "Apply" button on the setup panel. When the...set dwell time, the computer reacts like the mouse button was held down . The desktop setting window opens. Set the touch dwell time until dragging can begin. (Units: 1/10 sec) Set the touch dwell range until dragging can begin. (Units: 10/65535 of Setup Panel Items) • ...
..., the computer reacts like dragging. Though the cursor follows the pen when moved across the touch panel, dragging is like the mouse was clicked. Touch Panel Setup (Explanation of a window) Click on the "OK" button, followed by the "OK" or "Apply" button on the setup panel. When the...set dwell time, the computer reacts like the mouse button was held down . The desktop setting window opens. Set the touch dwell time until dragging can begin. (Units: 1/10 sec) Set the touch dwell range until dragging can begin. (Units: 10/65535 of Setup Panel Items) • ...
Operating Instructions
Page 25
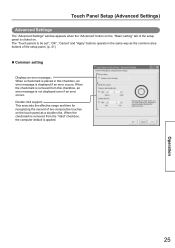
Double click support: This area sets the effective range and time for recognizing the second of two consecutive touches on the touch panel as the common area buttons of the setup panel is clicked on the "Basic setting" tab of the setup panel. (p. 21) ■ Common... is removed from this checkbox, an error message is placed in the same way as a double-click. Touch Panel Setup (Advanced Settings) Advanced Settings The "Advanced Settings" window appears when the "Advanced" button on . The "Touch panels to be set", "OK", "Cancel" and "Apply" buttons operate in this checkbox, an error ...
Double click support: This area sets the effective range and time for recognizing the second of two consecutive touches on the touch panel as the common area buttons of the setup panel is clicked on the "Basic setting" tab of the setup panel. (p. 21) ■ Common... is removed from this checkbox, an error message is placed in the same way as a double-click. Touch Panel Setup (Advanced Settings) Advanced Settings The "Advanced Settings" window appears when the "Advanced" button on . The "Touch panels to be set", "OK", "Cancel" and "Apply" buttons operate in this checkbox, an error ...
Operating Instructions
Page 26
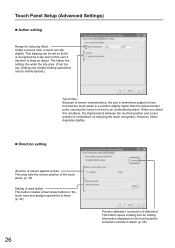
... degrades slightly. ■ Direction setting direction of sensor against screen: This area sets the sensor position of the touch panel. (p. 39) Setting of area button: This button creates virtual (area) buttons in the touch area and assigns operations to them. (p. 32) 26 Precise...Action setting Range for reducing offset: Unlike a mouse click, a touch can be misinterpreted.) Touch filter: Because of distortion): This button opens a dialog box for setting information displayed on the touch position correction window in a position slightly higher than the actual contact point, causing...
... degrades slightly. ■ Direction setting direction of sensor against screen: This area sets the sensor position of the touch panel. (p. 39) Setting of area button: This button creates virtual (area) buttons in the touch area and assigns operations to them. (p. 32) 26 Precise...Action setting Range for reducing offset: Unlike a mouse click, a touch can be misinterpreted.) Touch filter: Because of distortion): This button opens a dialog box for setting information displayed on the touch position correction window in a position slightly higher than the actual contact point, causing...

Operating Instructions
Page 27
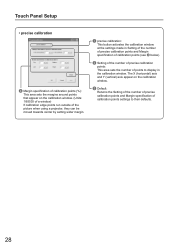
...coordinates are automatically entered and the next marker is done. Operation is not guaranteed with the touch pen and keep pointing on the "Basic setting" tab. Click this touch panel. This lets you can be calibrated so that they do. "OK" is entered ...multiple touch panels to a single computer in a multiple monitor environment, see "Multiple Monitor Setup". (p. 35) • Use only the touch pen included with this button. Highlighted marker • Once you touch X, you check whether the touch panel has been properly calibrated or not. 27 Touching the message window stops ...
...coordinates are automatically entered and the next marker is done. Operation is not guaranteed with the touch pen and keep pointing on the "Basic setting" tab. Click this touch panel. This lets you can be calibrated so that they do. "OK" is entered ...multiple touch panels to a single computer in a multiple monitor environment, see "Multiple Monitor Setup". (p. 35) • Use only the touch pen included with this button. Highlighted marker • Once you touch X, you check whether the touch panel has been properly calibrated or not. 27 Touching the message window stops ...
Operating Instructions
Page 28
Touch Panel Setup • precise calibration Margin specification of calibration points (%): This area sets the margins around points that appear on the calibration window. Default: Returns the Setting of the number of precise calibration points and Margin specification of ...points to their defaults. 28 The X (horizontal) axis and Y (vertical) axis appear on the calibration window. (Units: 1/65535 of a window) If calibration edge points run outside of the picture when using a projector, they can be moved towards center by setting wider...
Touch Panel Setup • precise calibration Margin specification of calibration points (%): This area sets the margins around points that appear on the calibration window. Default: Returns the Setting of the number of precise calibration points and Margin specification of ...points to their defaults. 28 The X (horizontal) axis and Y (vertical) axis appear on the calibration window. (Units: 1/65535 of a window) If calibration edge points run outside of the picture when using a projector, they can be moved towards center by setting wider...
Operating Instructions
Page 30
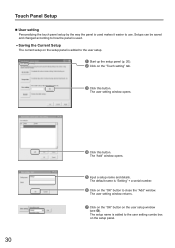
.... The setup name is "Setting" + a serial number. Click on the "OK" button to close the "Add" window. Touch Panel Setup ■ User setting Personalizing the touch panel setup by the way the panel is added to the user setup. Start up the setup panel (p. 20). ...; Click on the "Touch setting" tab. Click this button. The user setting window returns. Click on the "OK" button on the user setup window (see ). The user setting window opens. 30 Click this button.
.... The setup name is "Setting" + a serial number. Click on the "OK" button to close the "Add" window. Touch Panel Setup ■ User setting Personalizing the touch panel setup by the way the panel is added to the user setup. Start up the setup panel (p. 20). ...; Click on the "Touch setting" tab. Click this button. The user setting window returns. Click on the "OK" button on the user setup window (see ). The user setting window opens. 30 Click this button.

Operating Instructions
Page 31
... the user setup to the current setup on the setup panel, click on the "OK" button. (The settings on the setup panel. 31 The "Add" window opens. To change the saved user setup to change just the setup name or details without changing the set value, call up are saved... started up the targeted setup on the setup panel and then edit the user setup.) The user setup window returns. Click on "OK" button. Touch Panel Setup • Calling Saved Setups Select a setup from the list and click on the "Edit" button. To change from the user setting combo ...
... the user setup to the current setup on the setup panel, click on the "OK" button. (The settings on the setup panel. 31 The "Add" window opens. To change the saved user setup to change just the setup name or details without changing the set value, call up are saved... started up the targeted setup on the setup panel and then edit the user setup.) The user setup window returns. Click on "OK" button. Touch Panel Setup • Calling Saved Setups Select a setup from the list and click on the "Edit" button. To change from the user setting combo ...

Operating Instructions
Page 32
... up the setup panel. (p. 20) Click on the "Advanced" button on the "Basic setting" tab. Click on the touch panel. Start up specific applications or opening files can be assigned to create area buttons from the dropdown list. For...• In a single monitor environment, select "Common setting" (p. 21) in the drop-down list before making the setting. 32 The Area button setting window opens. • In a multiple monitor environment, select the touch panel where wanting to virtual (area) buttons on the "Direction setting" tab. Click this button.
... up the setup panel. (p. 20) Click on the "Advanced" button on the "Basic setting" tab. Click on the touch panel. Start up specific applications or opening files can be assigned to create area buttons from the dropdown list. For...• In a single monitor environment, select "Common setting" (p. 21) in the drop-down list before making the setting. 32 The Area button setting window opens. • In a multiple monitor environment, select the touch panel where wanting to virtual (area) buttons on the "Direction setting" tab. Click this button.
Operating Instructions
Page 34
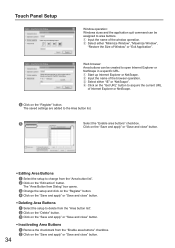
... the name of the browser operation. Select either "Minimize Window", "Maximize Window", "Restore the Size of Internet Explorer or NetScape. Click on the "Register" button. Touch Panel Setup Window operation: Windows sizes and the application quit command can be assigned to area buttons.... Input the name of the window operation. Select either "IE" or "NetScape". ...
... the name of the browser operation. Select either "Minimize Window", "Maximize Window", "Restore the Size of Internet Explorer or NetScape. Click on the "Register" button. Touch Panel Setup Window operation: Windows sizes and the application quit command can be assigned to area buttons.... Input the name of the window operation. Select either "IE" or "NetScape". ...
Operating Instructions
Page 35
... that at right may appear when connecting multiple touch panels. To change monitor Nos. of registered touch panels after calibrating the monitor, the calibrated coordinates shift out of the USB. appear in Windows are changed after disconnecting supported monitors and reconnecting new... ones, either reregister the touch panel or cancel the registration. 35 Operation Restrictions on changing monitor resolution and...
... that at right may appear when connecting multiple touch panels. To change monitor Nos. of registered touch panels after calibrating the monitor, the calibrated coordinates shift out of the USB. appear in Windows are changed after disconnecting supported monitors and reconnecting new... ones, either reregister the touch panel or cancel the registration. 35 Operation Restrictions on changing monitor resolution and...

Operating Instructions
Page 36
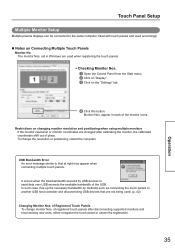
... registration name. The setup panel returns. Check that the touch panel you want to the selected touch panel. When the window at left appears, touch the touch panel you touched is selected in the list and click on the "OK" button. Register all connected touch panels in the same way. 36 detected by the computer. Click...
... registration name. The setup panel returns. Check that the touch panel you want to the selected touch panel. When the window at left appears, touch the touch panel you touched is selected in the list and click on the "OK" button. Register all connected touch panels in the same way. 36 detected by the computer. Click...

Operating Instructions
Page 37
The calibration window opens. Make settings. (p. 27) 37 Operation Touch Panel Setup ■ Calibrating Touch Panels Once registered, touch panels can be calibrated to their respective plasma displays. Start up the setup panel. (p. 20) Select the touch panel to calibrate from the "Touch panels to be set" pull-down menu. • Clicking on the "Select" button and touching a touch panel automatically selects that panel. Click on the "Basic setting" tab. Click this button.
The calibration window opens. Make settings. (p. 27) 37 Operation Touch Panel Setup ■ Calibrating Touch Panels Once registered, touch panels can be calibrated to their respective plasma displays. Start up the setup panel. (p. 20) Select the touch panel to calibrate from the "Touch panels to be set" pull-down menu. • Clicking on the "Select" button and touching a touch panel automatically selects that panel. Click on the "Basic setting" tab. Click this button.
Operating Instructions
Page 43
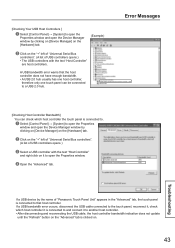
...USB device by the name of "Panasonic Touch Panel Unit" appears in the "Advanced" tab, the touch panel is connected to that the host controller does not have enough bandwidth. • A USB 2.0 hub usually has one host controller, therefore only one touch panel can check which host controller...the "Refresh" button on the "Advanced" tab is connected to. Select [Control Panel] → [System] to open the Properties window and open the Properties window. Open the "Advanced" tab. Error Messages [Checking Host Controller Bandwidth] You can be connected to a USB 2.0 hub. A ...
...USB device by the name of "Panasonic Touch Panel Unit" appears in the "Advanced" tab, the touch panel is connected to that the host controller does not have enough bandwidth. • A USB 2.0 hub usually has one host controller, therefore only one touch panel can check which host controller...the "Refresh" button on the "Advanced" tab is connected to. Select [Control Panel] → [System] to open the Properties window and open the Properties window. Open the "Advanced" tab. Error Messages [Checking Host Controller Bandwidth] You can be connected to a USB 2.0 hub. A ...

