

VML153 User Guide
Page 3
... be used by turning the equipment off and on your VHS VCR using the supplied VHS PlayPak. If this unit has been included. You may cause interference to radio or television reception, which can also play back in a residential environment. You can be installed near maritime safety communications equipment or other critical navigation or communication equipment operating between 0.45-30 MHz. 3 This Camcorder...
... be used by turning the equipment off and on your VHS VCR using the supplied VHS PlayPak. If this unit has been included. You may cause interference to radio or television reception, which can also play back in a residential environment. You can be installed near maritime safety communications equipment or other critical navigation or communication equipment operating between 0.45-30 MHz. 3 This Camcorder...

VML153 User Guide
Page 4
... a safety feature. These openings must not be followed. 5. This video unit should be adhered to : consumerproducts@panasonic.com Grounding or Polarization - Power-Cord Protection - Retain Instructions - Do not use a mounting accessory recommended by the manufacturer, or sold with care. The video unit may cause the appliance and cart combination to grounding electrodes, and requirements for future reference. 3. All operating and maintenance instructions should be operated only...
... a safety feature. These openings must not be followed. 5. This video unit should be adhered to : consumerproducts@panasonic.com Grounding or Polarization - Power-Cord Protection - Retain Instructions - Do not use a mounting accessory recommended by the manufacturer, or sold with care. The video unit may cause the appliance and cart combination to grounding electrodes, and requirements for future reference. 3. All operating and maintenance instructions should be operated only...

VML153 User Guide
Page 5
... into such power lines or circuits. If the video unit does not operate normally by the operating instructions, as the original part. Adjust only those controls that will often require extensive work by the manufacturer or have fallen onto, the video unit. this video unit through openings as , in safe operating order. When replacement parts are covered by following conditions: a. This action could be sure the service technician has used replacement parts specified...
... into such power lines or circuits. If the video unit does not operate normally by the operating instructions, as the original part. Adjust only those controls that will often require extensive work by the manufacturer or have fallen onto, the video unit. this video unit through openings as , in safe operating order. When replacement parts are covered by following conditions: a. This action could be sure the service technician has used replacement parts specified...

VML153 User Guide
Page 6
... 4~5 Precautions ...5 Quick Operation Guide 7 Supplying Power (Battery Charge/Use/Refresh/Care, AC Adaptor, Car Battery Cord) ...... 8~9 Cassette Information 10 Before Using (Remove the Sensor tag, Using the Shoulder and Hand Straps, Lens Cap) ...... 11 Using MENU Mode 12 Setting the Clock (Time Zone, Auto Daylight Saving Time 13~14 AccuBrite™ Built-in Light (Using the Light, Replacing the Bulb 15 Camera Recording (Basic, Stand-by, Programmed Recording 16~18 Playing Back Recordings (Basic Playback, Visual Search, Still Picture, Tracking, TV/VCR Playback 19~20 Copying...
... 4~5 Precautions ...5 Quick Operation Guide 7 Supplying Power (Battery Charge/Use/Refresh/Care, AC Adaptor, Car Battery Cord) ...... 8~9 Cassette Information 10 Before Using (Remove the Sensor tag, Using the Shoulder and Hand Straps, Lens Cap) ...... 11 Using MENU Mode 12 Setting the Clock (Time Zone, Auto Daylight Saving Time 13~14 AccuBrite™ Built-in Light (Using the Light, Replacing the Bulb 15 Camera Recording (Basic, Stand-by, Programmed Recording 16~18 Playing Back Recordings (Basic Playback, Visual Search, Still Picture, Tracking, TV/VCR Playback 19~20 Copying...

VML153 User Guide
Page 10
...@panasonic.com Record/Playback Time Use tapes with the mark in direction of arrow until there is no slack. 2 Attach Battery (page 8). 3 Slide TAPE EJECT to open .) 2 To record again, cover hole with adhesive tape. (Or, slide tab closed.) 10 For assistance, please call : 1-800-211-PANA(7262) or send e-mail to close door. • To remove the cassette, slide the TAPE EJECT switch. Tape Speed Selector Position Cassette type...
...@panasonic.com Record/Playback Time Use tapes with the mark in direction of arrow until there is no slack. 2 Attach Battery (page 8). 3 Slide TAPE EJECT to open .) 2 To record again, cover hole with adhesive tape. (Or, slide tab closed.) 10 For assistance, please call : 1-800-211-PANA(7262) or send e-mail to close door. • To remove the cassette, slide the TAPE EJECT switch. Tape Speed Selector Position Cassette type...
VML153 User Guide
Page 12
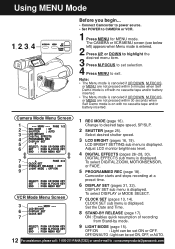
Camera Mode Menu Screen 1 2 3 4 5 6 7 8 9 1 REC MODE (page 16). Select desired shutter speed. 3 LCD BRIGHT (pages 16, 19). DISPLAY SET sub menu is on with no cassette tape and/or battery inserted. OFF/ON/AUTO : Light can be set selection. 4 Press MENU to : consumerproducts@panasonic.com The CAMERA or VCR MENU screen (see below left) appears when Menu mode is displayed. To select DISPLAY or MODE SELECT. 7 CLOCK SET (pages 13, 14). Set the Date and Time. 8 STAND-BY RELEASE (page 17). Adjust LCD...
Camera Mode Menu Screen 1 2 3 4 5 6 7 8 9 1 REC MODE (page 16). Select desired shutter speed. 3 LCD BRIGHT (pages 16, 19). DISPLAY SET sub menu is on with no cassette tape and/or battery inserted. OFF/ON/AUTO : Light can be set selection. 4 Press MENU to : consumerproducts@panasonic.com The CAMERA or VCR MENU screen (see below left) appears when Menu mode is displayed. To select DISPLAY or MODE SELECT. 7 CLOCK SET (pages 13, 14). Set the Date and Time. 8 STAND-BY RELEASE (page 17). Adjust LCD...

VML153 User Guide
Page 14
... 8 listed time zones to set clock, see "Setting Date and Time" (below). 3b Auto Daylight Saving Time Clock will auto-adjust to local time. Note: • Auto DST does not function if time zone is set to Hawaii or Samoa (see "Setting the Time Zone" above). 3c Setting Date and Time Date and time including leap year are calculated up to 2 minutes per month. • When traveling outside the listed time zones, set clock to local time manually. • To adjust...
... 8 listed time zones to set clock, see "Setting Date and Time" (below). 3b Auto Daylight Saving Time Clock will auto-adjust to local time. Note: • Auto DST does not function if time zone is set to Hawaii or Samoa (see "Setting the Time Zone" above). 3c Setting Date and Time Date and time including leap year are calculated up to 2 minutes per month. • When traveling outside the listed time zones, set clock to local time manually. • To adjust...
VML153 User Guide
Page 15
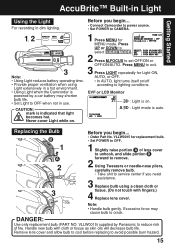
... remove bulb. • Take unit to service center if you begin ... • Connect Camcorder to power source. • Set POWER to CAMERA. 1, 2 3 Note: • Using Light reduces battery operating time. • Provide proper ventilation when using a clean cloth or tissue. (Do not touch with cloth or tissue as skin oils will decrease bulb life. CAUTION: mark is powered by Panasonic to lighting conditions. Press MENU to exit. 3 Press LIGHT repeatedly for Light ON, AUTO...
... remove bulb. • Take unit to service center if you begin ... • Connect Camcorder to power source. • Set POWER to CAMERA. 1, 2 3 Note: • Using Light reduces battery operating time. • Provide proper ventilation when using a clean cloth or tissue. (Do not touch with cloth or tissue as skin oils will decrease bulb life. CAUTION: mark is powered by Panasonic to lighting conditions. Press MENU to exit. 3 Press LIGHT repeatedly for Light ON, AUTO...

VML153 User Guide
Page 16
...; Connect Camcorder to power source. • Insert cassette with record tab (page 10). 1 Press LCD-OPEN to select LCD BRIGHT . Try to adjust LCD monitor brightness level. • To remove the cassette, slide the TAPE EJECT switch (page 10). Press UP or DOWN to unlock the LCD monitor. Camera Recording Recording via EVF or LCD Monitor View recording scene on when LCD is at excessively bright objects, or bright lights, a vertical...
...; Connect Camcorder to power source. • Insert cassette with record tab (page 10). 1 Press LCD-OPEN to select LCD BRIGHT . Try to adjust LCD monitor brightness level. • To remove the cassette, slide the TAPE EJECT switch (page 10). Press UP or DOWN to unlock the LCD monitor. Camera Recording Recording via EVF or LCD Monitor View recording scene on when LCD is at excessively bright objects, or bright lights, a vertical...

VML153 User Guide
Page 17
... resume recording, set to CAMERA. Basic Operation Camera Recording Before you begin... • Connect Camcorder to CAMERA. B a bc 2, 3, 4 1, A, C, b, c D, a, d Stand-by mode, press RECORD/PAUSE two times to resume recording. Manual Easy Editing For proper continuity when taping from Stop mode or after attaching a new Battery. C Set POWER to ON, Stand-by Quick Release lets you resume recording by Quick Release is stopped, and then started within 24 hours. When set POWER to power source...
... resume recording, set to CAMERA. Basic Operation Camera Recording Before you begin... • Connect Camcorder to CAMERA. B a bc 2, 3, 4 1, A, C, b, c D, a, d Stand-by mode, press RECORD/PAUSE two times to resume recording. Manual Easy Editing For proper continuity when taping from Stop mode or after attaching a new Battery. C Set POWER to ON, Stand-by Quick Release lets you resume recording by Quick Release is stopped, and then started within 24 hours. When set POWER to power source...

VML153 User Guide
Page 18
... repeatedly to : consumerproducts@panasonic.com Note: • Start time may not be set over 24 hours from current time. • Camcorder shuts off at tape end, or 12 hours after Interval Recording starts. • To cancel, set a 5 or 10 second interval recording to power source. Before you begin... • Connect Camcorder to be done as scheduled. Recording will be done each minute. Use AC Adaptor for MENU mode. Camera Recording Programmed Recording Set a recording start time...
... repeatedly to : consumerproducts@panasonic.com Note: • Start time may not be set over 24 hours from current time. • Camcorder shuts off at tape end, or 12 hours after Interval Recording starts. • To cancel, set a 5 or 10 second interval recording to power source. Before you begin... • Connect Camcorder to be done as scheduled. Recording will be done each minute. Use AC Adaptor for MENU mode. Camera Recording Programmed Recording Set a recording start time...

VML153 User Guide
Page 19
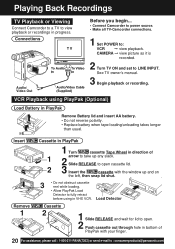
... Effects Tracking Control Auto Tracking Continuously analyzes each recording for optimum picture quality. Audio is muted. • To protect video heads and tape, operating modes will appear. Basic Operation Press "W" : Press "T" : Volume down. Note: • Using LCD monitor reduces battery operating time. A (REWIND/SEARCH) : Rewind tape. Playing Back Recordings Before you begin... • Connect Camcorder to power source. • Insert recorded tape. 1 Speaker 3 D A B C E Playback on EVF or LCD Monitor 1 Press LCD-OPEN and swing LCD monitor fully open. 2 Set POWER to VCR...
... Effects Tracking Control Auto Tracking Continuously analyzes each recording for optimum picture quality. Audio is muted. • To protect video heads and tape, operating modes will appear. Basic Operation Press "W" : Press "T" : Volume down. Note: • Using LCD monitor reduces battery operating time. A (REWIND/SEARCH) : Rewind tape. Playing Back Recordings Before you begin... • Connect Camcorder to power source. • Insert recorded tape. 1 Speaker 3 D A B C E Playback on EVF or LCD Monitor 1 Press LCD-OPEN and swing LCD monitor fully open. 2 Set POWER to VCR...
VML153 User Guide
Page 20
.... 3 • Do not obstruct cassette reel while loading. • Allow PlayPak Load Detector to fully retract before using PlayPak (Optional) Load Battery in progress. Connections Audio/ Video Out Before you begin... • Connect Camcorder to power source. • Make all TV-Camcorder connections. 1 Set POWER to LINE INPUT. Playing Back Recordings TV Playback or Viewing Connect Camcorder to a TV to : consumerproducts@panasonic.com Load Detector Cassette 2 1 Slide RELEASE and wait for lid to open cassette lid. 2 3 Insert the cassette with your finger. 20...
.... 3 • Do not obstruct cassette reel while loading. • Allow PlayPak Load Detector to fully retract before using PlayPak (Optional) Load Battery in progress. Connections Audio/ Video Out Before you begin... • Connect Camcorder to power source. • Make all TV-Camcorder connections. 1 Set POWER to LINE INPUT. Playing Back Recordings TV Playback or Viewing Connect Camcorder to a TV to : consumerproducts@panasonic.com Load Detector Cassette 2 1 Slide RELEASE and wait for lid to open cassette lid. 2 3 Insert the cassette with your finger. 20...
VML153 User Guide
Page 21
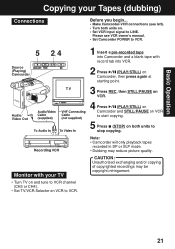
... playback tapes recorded in SP or SLP mode. • Dubbing may be copyright infringement. 21 CAUTION: Unauthorized exchanging and/or copying of copyrighted recordings may reduce picture quality. Please see left). • Turn both units to LINE. Basic Operation Copying your Tapes (dubbing) Connections Before you begin... • Make Camcorder-VCR connections (see VCR owner's manual. • Set Camcorder POWER to VCR. 5 Source (Playing) Camcorder 2, 4 Audio/ Video Out Monitor with your TV • Turn TV on and tune to VCR channel...
... playback tapes recorded in SP or SLP mode. • Dubbing may be copyright infringement. 21 CAUTION: Unauthorized exchanging and/or copying of copyrighted recordings may reduce picture quality. Please see left). • Turn both units to LINE. Basic Operation Copying your Tapes (dubbing) Connections Before you begin... • Make Camcorder-VCR connections (see VCR owner's manual. • Set Camcorder POWER to VCR. 5 Source (Playing) Camcorder 2, 4 Audio/ Video Out Monitor with your TV • Turn TV on and tune to VCR channel...

VML153 User Guide
Page 25
... repeatedly to exit. Before you begin... • Connect Camcorder to power source. • Insert cassette with record tab (page 10). • Set POWER to 1/60 if Digital E.I.S. Provide additional light. 1, 2, 3 1 Press MENU for use indoors or in inadequate light. • Setting reverts to subject brightness. • AUTO mode is selected each time POWER is inadequate. a tennis stroke), when viewed on Camcorder or 3 or 4 head VCR. Manual Selection The faster the shutter speed, the more light...
... repeatedly to exit. Before you begin... • Connect Camcorder to power source. • Insert cassette with record tab (page 10). • Set POWER to 1/60 if Digital E.I.S. Provide additional light. 1, 2, 3 1 Press MENU for use indoors or in inadequate light. • Setting reverts to subject brightness. • AUTO mode is selected each time POWER is inadequate. a tennis stroke), when viewed on Camcorder or 3 or 4 head VCR. Manual Selection The faster the shutter speed, the more light...

VML153 User Guide
Page 30
... ceases. Before you begin... • Connect Camcorder to OFF. MotionSensor may mistakenly start when: • background is plain, like a venetian blind. • brightness suddenly changes. To cancel MotionSensor Mode, set POWER to power source. MotionSensor Recording starts automatically if motion is not available during normal recording. • While in MotionSensor stand-by mode, Digital E.I.S., Video Effects (Auto/Digital Fade). 30 For assistance, please call...
... ceases. Before you begin... • Connect Camcorder to OFF. MotionSensor may mistakenly start when: • background is plain, like a venetian blind. • brightness suddenly changes. To cancel MotionSensor Mode, set POWER to power source. MotionSensor Recording starts automatically if motion is not available during normal recording. • While in MotionSensor stand-by mode, Digital E.I.S., Video Effects (Auto/Digital Fade). 30 For assistance, please call...

VML153 User Guide
Page 38
... to : consumerproducts@panasonic.com Specifications Power Source: Compact VHS Camcorder: DC 6 V AC Adaptor: 110/120/220/240 V AC, 50/60 Hz Battery: Nickel-Cadmium Type DC 6 V Power Consumption: Compact VHS Camcorder: 6V DC 8.5 W (Max. 11.5 W) AC Adaptor: 19 W 1.2 W (when not in use.) Video Signal: EIA Standard (525 lines, 60 fields) NTSC color signal Video Recording System: 2 rotary heads plus flying erase head Helical scanning system Audio: 1 track Pick-Up System...
... to : consumerproducts@panasonic.com Specifications Power Source: Compact VHS Camcorder: DC 6 V AC Adaptor: 110/120/220/240 V AC, 50/60 Hz Battery: Nickel-Cadmium Type DC 6 V Power Consumption: Compact VHS Camcorder: 6V DC 8.5 W (Max. 11.5 W) AC Adaptor: 19 W 1.2 W (when not in use.) Video Signal: EIA Standard (525 lines, 60 fields) NTSC color signal Video Recording System: 2 rotary heads plus flying erase head Helical scanning system Audio: 1 track Pick-Up System...

VML153 User Guide
Page 39
... cleaning cassette instructions exactly and only use when symptoms occur. 39 Camera picture is too dark ... • Set HIGH SPEED SHUTTER to AUTO. (p. 25) No playback picture, or the playback • Press UP/DOWN button during playback. Symptom Correction No picture in EVF or LCD monitor ... • Connect Power Source. (pp. 8, 9) • Set POWER to VCR or CAMERA. (pp. 16, 19) • Check for Dew Indication. (p. 33) • Use fully charged Battery. (p. 8) • Firmly connect all needed , playing...
... cleaning cassette instructions exactly and only use when symptoms occur. 39 Camera picture is too dark ... • Set HIGH SPEED SHUTTER to AUTO. (p. 25) No playback picture, or the playback • Press UP/DOWN button during playback. Symptom Correction No picture in EVF or LCD monitor ... • Connect Power Source. (pp. 8, 9) • Set POWER to VCR or CAMERA. (pp. 16, 19) • Check for Dew Indication. (p. 33) • Use fully charged Battery. (p. 8) • Firmly connect all needed , playing...
VML153 User Guide
Page 41
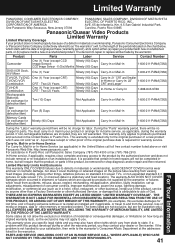
... repairs will , for parts. During the "Parts" warranty period, there will be removed for in-home service, as applicable) in the United States call toll free contact number listed above or visit Panasonic Web Site: http://www.panasonic.com For assistance in Puerto Rico call Panasonic Sales Company (787)-750-4300 or fax (787)-768-2910. home, but are not warranted. If the problem...
... repairs will , for parts. During the "Parts" warranty period, there will be removed for in-home service, as applicable) in the United States call toll free contact number listed above or visit Panasonic Web Site: http://www.panasonic.com For assistance in Puerto Rico call Panasonic Sales Company (787)-750-4300 or fax (787)-768-2910. home, but are not warranted. If the problem...

VML153 User Guide
Page 44
... Light 15 Audio/Video Cable ... 20, 21 Audio/Video Out ....... 20, 21 Auto Daylight Saving Time 14 B Backlight 23 BACK LIGHT Button ...... 23 Battery Pack 8, 9 BATTERY RELEASE Button 8 Before Requesting Service 39 Built-in Microphone ........ 16 C Camera Recording ... 16~18 Car Battery Cord 9 Cassette Information ...... 10 Charging Battery 8 Clock Battery 35 Clock Set 13, 14 Copying your Tapes ....... 21 Customer Servicenter Directory 42 D DC IN 9 DC Power Cable 9 Digital E.I.S 29 Digital Zoom 28 Display-off Mode 32 E EIS Button 29 F Fade 26, 27 FADE Button...
... Light 15 Audio/Video Cable ... 20, 21 Audio/Video Out ....... 20, 21 Auto Daylight Saving Time 14 B Backlight 23 BACK LIGHT Button ...... 23 Battery Pack 8, 9 BATTERY RELEASE Button 8 Before Requesting Service 39 Built-in Microphone ........ 16 C Camera Recording ... 16~18 Car Battery Cord 9 Cassette Information ...... 10 Charging Battery 8 Clock Battery 35 Clock Set 13, 14 Copying your Tapes ....... 21 Customer Servicenter Directory 42 D DC IN 9 DC Power Cable 9 Digital E.I.S 29 Digital Zoom 28 Display-off Mode 32 E EIS Button 29 F Fade 26, 27 FADE Button...


