
WJNT314 User Guide
Page 1
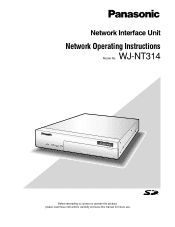
Network Interface Unit Network Operating Instructions WJ-NT314 Model No. OPERATE LINK RCV SND Network Interface Unit WJ-NT314 Before attempting to connect or operate this product, please read these instructions carefully and save this manual for future use.
Network Interface Unit Network Operating Instructions WJ-NT314 Model No. OPERATE LINK RCV SND Network Interface Unit WJ-NT314 Before attempting to connect or operate this product, please read these instructions carefully and save this manual for future use.

WJNT314 User Guide
Page 3
... connect to a network. Adobe® Reader® is required to read these operating instructions may be licensed individually. tered trademarks of how to install this product using a PC via a network and of their respective owners. Refer to your dealer for descriptions of how to configure the settings. Viewer Software • Images will not be displayed when the viewer software "Network camera View3" is not installed...
... connect to a network. Adobe® Reader® is required to read these operating instructions may be licensed individually. tered trademarks of how to install this product using a PC via a network and of their respective owners. Refer to your dealer for descriptions of how to configure the settings. Viewer Software • Images will not be displayed when the viewer software "Network camera View3" is not installed...

WJNT314 User Guide
Page 4
User name: admin Password: 12345 When accessing the unit without changing the default password, the pop-up window saying that it is recommended to change the password will be displayed. When "OFF" is in a local network, configure the web browser to change the password for the total of all the channels. Monitor images from "80", enter "http://IP address of the unit +: (colon) + port number" in the address...
User name: admin Password: 12345 When accessing the unit without changing the default password, the pop-up window saying that it is recommended to change the password will be displayed. When "OFF" is in a local network, configure the web browser to change the password for the total of all the channels. Monitor images from "80", enter "http://IP address of the unit +: (colon) + port number" in the address...
WJNT314 User Guide
Page 5
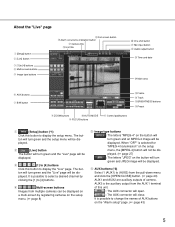
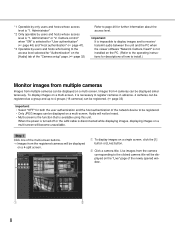
... indication button !7 Camera title !6 Unit title @0 One shot button @1 Mic input button @2 Audio output button @3 Time and date @4 Main area y AUX buttons u B/W button !4 Frame !5 Track !2 BRIGHTNESS buttons !3 Preset i ZOOM buttons !0 AUTO MODE o FOCUS buttons !1 Control pad/buttons q [Setup] button (*1) Click this button to change the names of AUX buttons on the "Alarm setup" page. ( page 43) 5 The but - It is the auxiliary output from multiple cameras can be displayed on a multi-screen by clicking the [1] to (AUX3) from the pull-down menu...
... indication button !7 Camera title !6 Unit title @0 One shot button @1 Mic input button @2 Audio output button @3 Time and date @4 Main area y AUX buttons u B/W button !4 Frame !5 Track !2 BRIGHTNESS buttons !3 Preset i ZOOM buttons !0 AUTO MODE o FOCUS buttons !1 Control pad/buttons q [Setup] button (*1) Click this button to change the names of AUX buttons on the "Alarm setup" page. ( page 43) 5 The but - It is the auxiliary output from multiple cameras can be displayed on a multi-screen by clicking the [1] to (AUX3) from the pull-down menu...
WJNT314 User Guide
Page 6
... settings on the SETUP MENU of the camera. !1 Control pad/buttons (*2) : Left-click on . When the right half area is required to perform the settings on the SETUP MENU of camera in advance. ( page 28) • To check if the camera supports auto track, refer to the operating instructions of camera in . The camera will move to stop when the camera (panning/tilting/zooming/focusing) is rightclicked, the displayed...
... settings on the SETUP MENU of the camera. !1 Control pad/buttons (*2) : Left-click on . When the right half area is required to perform the settings on the SETUP MENU of camera in advance. ( page 28) • To check if the camera supports auto track, refer to the operating instructions of camera in . The camera will move to stop when the camera (panning/tilting/zooming/focusing) is rightclicked, the displayed...
WJNT314 User Guide
Page 7
... light. The picture will be displayed on a newly opened window will be closed by the detected person. Notes: • When this function, set date/time display format ( page 20). @4 Main area (*2) Images from the camera will be displayed in the main area on the unit speaker). Notes: • When a user is clicked, the button will disappear and the alarm output connector will be reset. ( page 40) !9 Full screen button...
... light. The picture will be displayed on a newly opened window will be closed by the detected person. Notes: • When this function, set date/time display format ( page 20). @4 Main area (*2) Images from the camera will be displayed in the main area on the unit speaker). Notes: • When a user is clicked, the button will disappear and the alarm output connector will be reset. ( page 40) !9 Full screen button...
WJNT314 User Guide
Page 8
...) and "Host authentication" ( page 47). *3 Operable by users and hosts who belong to the clicked camera title will become unavailable. Audio will be displayed on a single screen, click the [1] button or [Live] button. q To display images on a multi-screen. Administrator" or "2. When the power is turned off or the LAN cable is available using this unit. Live images from 4 cameras can be registered. ( page 33) Important...
...) and "Host authentication" ( page 47). *3 Operable by users and hosts who belong to the clicked camera title will become unavailable. Audio will be displayed on a single screen, click the [1] button or [Live] button. q To display images on a multi-screen. Administrator" or "2. When the power is turned off or the LAN cable is available using this unit. Live images from 4 cameras can be registered. ( page 33) Important...
WJNT314 User Guide
Page 10
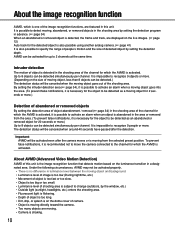
... change (outdoors, by the window, etc.) • Outside light (sunlight, headlights, etc.) enters the shooting area. • Fluorescent light is flickering. • Depth of object is too long. • Dirt, drip, or splash is on the dome cover of camera. • Object is moving directly toward the camera. • Too many objects are displayed on the size of the channel...
... change (outdoors, by the window, etc.) • Outside light (sunlight, headlights, etc.) enters the shooting area. • Fluorescent light is flickering. • Depth of object is too long. • Dirt, drip, or splash is on the dome cover of camera. • Object is moving directly toward the camera. • Too many objects are displayed on the size of the channel...
WJNT314 User Guide
Page 13
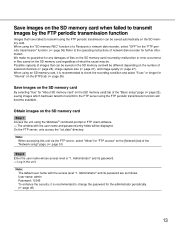
... [Network] tab of images that have failed to transmit using the Windows® command prompt or FTP client software. → The window with the access level "1. User name: admin Password: 12345 To enhance the security, it is recommended to the operating instructions of selected channels ( page 26), image capture size ( page 27), and image quality ( page 27). When using an SD memory card...
... [Network] tab of images that have failed to transmit using the Windows® command prompt or FTP client software. → The window with the access level "1. User name: admin Password: 12345 To enhance the security, it is recommended to the operating instructions of selected channels ( page 26), image capture size ( page 27), and image quality ( page 27). When using an SD memory card...
WJNT314 User Guide
Page 20
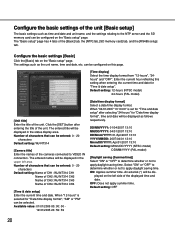
... "ON" or "OFF" to determine whether or not to apply daylight saving time. The "Basic setup" page has 4 tabs of the cameras connected to VIDEO IN connectors. The settings such as the unit name, time and date, etc. Number of characters that can be entered: 0 - 20 characters Default setting: Name of CH1: WJ-NT314 CH1 Name of CH2: WJ-NT314 CH2 Name...
... "ON" or "OFF" to determine whether or not to apply daylight saving time. The "Basic setup" page has 4 tabs of the cameras connected to VIDEO IN connectors. The settings such as the unit name, time and date, etc. Number of characters that can be entered: 0 - 20 characters Default setting: Name of CH1: WJ-NT314 CH1 Name of CH2: WJ-NT314 CH2 Name...
WJNT314 User Guide
Page 24
... recording function of Panasonic's network disk recorder. • It is impossible to format the SD memory card in the process of accessing, for "FTP periodic transmission" on the [FTP] tab of the SD memory card, it is not supported.) • Depending on the SD memory card. After formatting the SD memory card, available size/total size will be refreshed when the window...
... recording function of Panasonic's network disk recorder. • It is impossible to format the SD memory card in the process of accessing, for "FTP periodic transmission" on the [FTP] tab of the SD memory card, it is not supported.) • Depending on the SD memory card. After formatting the SD memory card, available size/total size will be refreshed when the window...
WJNT314 User Guide
Page 27
... the value when the setting value with frequent error occurrences, shorten the refresh interval for the image capture size of MPEG-4 images from the following . Default setting: 3 sec [To individual setup] button Moves to diminish image distortions. However, the refresh interval (JPEG) may be longer than the set value when displaying JPEG images. If using under the network environment with an...
... the value when the setting value with frequent error occurrences, shorten the refresh interval for the image capture size of MPEG-4 images from the following . Default setting: 3 sec [To individual setup] button Moves to diminish image distortions. However, the refresh interval (JPEG) may be longer than the set value when displaying JPEG images. If using under the network environment with an...
WJNT314 User Guide
Page 28
... as when using the multicast port. [Unicast port1 (Image)] Enter the unicast port number (used to select "Unicast port (AUTO)". Available value: 1024 - 50000 (Only even numbers are approximate. Change the multicast port number. • When transmitting MPEG-4 image via the Internet by setting "Unicast port (MANUAL)". Refer to page 4 for receiving images should be invalidated when displaying images using in use . Refer to the operating instructions of users to monitor...
... as when using the multicast port. [Unicast port1 (Image)] Enter the unicast port number (used to select "Unicast port (AUTO)". Available value: 1024 - 50000 (Only even numbers are approximate. Change the multicast port number. • When transmitting MPEG-4 image via the Internet by setting "Unicast port (MANUAL)". Refer to page 4 for receiving images should be invalidated when displaying images using in use . Refer to the operating instructions of users to monitor...
WJNT314 User Guide
Page 30
... on the "Camera setup" page. ( page 26) The following buttons on the SPECIAL SETUP menu, and click this button to be reset. ZOOM buttons, FOCUS buttons, Control pad/buttons Refer to the camera operation. For further information, refer to the operating instructions of how to display the setup menu and configure the settings relating to the SPECIAL SETUP menu. Refer to the provided operating instructions for further information about emergency recording. [CH No.] Select a channel to configure...
... on the "Camera setup" page. ( page 26) The following buttons on the SPECIAL SETUP menu, and click this button to be reset. ZOOM buttons, FOCUS buttons, Control pad/buttons Refer to the camera operation. For further information, refer to the operating instructions of how to display the setup menu and configure the settings relating to the SPECIAL SETUP menu. Refer to the provided operating instructions for further information about emergency recording. [CH No.] Select a channel to configure...
WJNT314 User Guide
Page 32
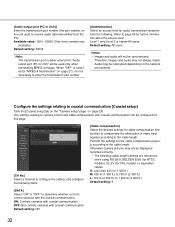
.... ON: Controls cameras with coaxial communication. [Audio output port (PC to Unit )] Enter the transmission port number (the port number on this page. [CH No.] Select a channel to configure the setting, and configure the following items. [Cable compensation] Select the desired settings for cable compensation (the function to compensate the attenuation of video input signals) according to the cable length. Refer to control cameras with coaxial communication can be used to receive audio data transmitted...
.... ON: Controls cameras with coaxial communication. [Audio output port (PC to Unit )] Enter the transmission port number (the port number on this page. [CH No.] Select a channel to configure the setting, and configure the following items. [Cable compensation] Select the desired settings for cable compensation (the function to compensate the attenuation of video input signals) according to the cable length. Refer to control cameras with coaxial communication can be used to receive audio data transmitted...
WJNT314 User Guide
Page 41
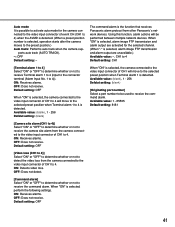
... that receives Panasonic alarm protocol from the camera connected to the video input connector of CH1 to 4. The command alarm is selected, perform the following settings. Auto mode It is possible to activate auto mode for the selected channel. (When "-" is selected, alarm image FTP transmission and alarm output are activated for the camera connected to the video input connector of event CH (CH1 to 4) when the AVMD is detected. (When a preset position number...
... that receives Panasonic alarm protocol from the camera connected to the video input connector of CH1 to 4. The command alarm is selected, perform the following settings. Auto mode It is possible to activate auto mode for the selected channel. (When "-" is selected, alarm image FTP transmission and alarm output are activated for the camera connected to the video input connector of event CH (CH1 to 4) when the AVMD is detected. (When a preset position number...
WJNT314 User Guide
Page 46
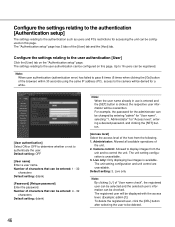
... the unit. 2. For example, the password for the administrator can be registered. Up to 16 users can be changed by entering "admin" for "User name", selecting "1. Camera control: Allowed to display images from the following. 1. The unit setting configuration and unit control are unavailable. The registered user will be displayed with the access level. (Example: admin [1]) To delete the registered user, click the [DEL] button after...
... the unit. 2. For example, the password for the administrator can be registered. Up to 16 users can be changed by entering "admin" for "User name", selecting "1. Camera control: Allowed to display images from the following. 1. The unit setting configuration and unit control are unavailable. The registered user will be displayed with the access level. (Example: admin [1]) To delete the registered user, click the [DEL] button after...
WJNT314 User Guide
Page 57
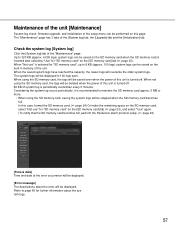
... stopped when the SD memory card becomes full. Up to maintain the SD memory card approx. 5 MB or more. • When using the SD memory card, the logs will be displayed. Maintenance of the unit [Maintenance] System log check, firmware upgrade, and initialization of the setup menu can be deleted when the power of this unit is turned off . Check the system log...
... stopped when the SD memory card becomes full. Up to maintain the SD memory card approx. 5 MB or more. • When using the SD memory card, the logs will be displayed. Maintenance of the unit [Maintenance] System log check, firmware upgrade, and initialization of the setup menu can be deleted when the power of this unit is turned off . Check the system log...
WJNT314 User Guide
Page 59
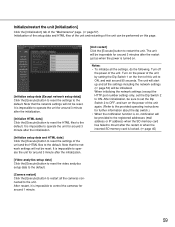
... network settings (except the HTTP port number setting) only, set the Dip Switch 2 to OFF, and turn on the power of the unit again. (Refer to the provided operating instructions for around 3 minute after the initialization. [Video analytics setup data] Click the [Execute] button to reset the video analytics setup data to the default. [Camera restart] Click the [Execute] button to restart all the settings, do the following. After restart, it is impossible to control...
... network settings (except the HTTP port number setting) only, set the Dip Switch 2 to OFF, and turn on the power of the unit again. (Refer to the provided operating instructions for around 3 minute after the initialization. [Video analytics setup data] Click the [Execute] button to reset the video analytics setup data to the default. [Camera restart] Click the [Execute] button to restart all the settings, do the following. After restart, it is impossible to control...
WJNT314 User Guide
Page 62
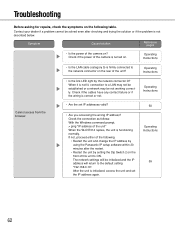
... the cables have any contact failure or if the wiring is firmly connected to the default setting "192.168.0.10". Operating Instructions 59 62 Operating Instructions Cannot access from the browser. • Is the link LED right by setting the Dip Switch 2 on ? Troubleshooting Before asking for repairs, check the symptoms on the following . • Restart the unit and change the IP address by using the Panasonic IP setup software...
... the cables have any contact failure or if the wiring is firmly connected to the default setting "192.168.0.10". Operating Instructions 59 62 Operating Instructions Cannot access from the browser. • Is the link LED right by setting the Dip Switch 2 on ? Troubleshooting Before asking for repairs, check the symptoms on the following . • Restart the unit and change the IP address by using the Panasonic IP setup software...


