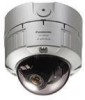

Network Camera
Page 1
Network Camera Operating Instructions Model No. WV-NW484S Before attempting to connect or operate this product, please read these instructions carefully and save this manual for future use.
Network Camera Operating Instructions Model No. WV-NW484S Before attempting to connect or operate this product, please read these instructions carefully and save this manual for future use.

Network Camera
Page 5
...from here on, "PoE") function SD memory card slot 5 Internet) so that images from the camera can be checked on a personal computer (from here on, "PC") on a PC, the PC's network environment must also be set up. in the monitoring area and sounding an alarm by an alarm signal.../progressive conversion function) Dual Encode Function for detecting motion of JPEG and MPEG-4 Power over Ethernet (IEEE802.3af-compliant, from the camera on the network. This network terminal is equipped with a 10BASE-T/100BASE-TX terminal (network terminal) for connection to establish a connection between the...
...from here on, "PoE") function SD memory card slot 5 Internet) so that images from the camera can be checked on a personal computer (from here on, "PC") on a PC, the PC's network environment must also be set up. in the monitoring area and sounding an alarm by an alarm signal.../progressive conversion function) Dual Encode Function for detecting motion of JPEG and MPEG-4 Power over Ethernet (IEEE802.3af-compliant, from the camera on the network. This network terminal is equipped with a 10BASE-T/100BASE-TX terminal (network terminal) for connection to establish a connection between the...
Network Camera
Page 6
... this book, and the Operating Manual (PDF) and Setup Manual (PDF). This book explains how to install the camera, and how to connect and set up the camera, refer to operate and set up the network. For details on how to the " Operating Manual/Setup Manual" in the CD-ROM (provided). Preface (continued...
... this book, and the Operating Manual (PDF) and Setup Manual (PDF). This book explains how to install the camera, and how to connect and set up the camera, refer to operate and set up the network. For details on how to the " Operating Manual/Setup Manual" in the CD-ROM (provided). Preface (continued...

Network Camera
Page 7
...United States and/or other malicious entities (using a regularly updated anti-virus program, anti-spyware program, etc.). • Protect your network against unauthorized access by restricting users to those who log in with an authorized user name and password. • Apply measures such as... other countries. • The SD logo is a trademark. • Other names of companies and products contained in locations where the camera or the cables can be trademarks or registered trademarks of information, including image data, authentication information (user names and passwords), alarm mail ...
...United States and/or other malicious entities (using a regularly updated anti-virus program, anti-spyware program, etc.). • Protect your network against unauthorized access by restricting users to those who log in with an authorized user name and password. • Apply measures such as... other countries. • The SD logo is a trademark. • Other names of companies and products contained in locations where the camera or the cables can be trademarks or registered trademarks of information, including image data, authentication information (user names and passwords), alarm mail ...

Network Camera
Page 8
...20 Installing the Camera 21 Connecting the Cables 25 Adjusting the Camera 28 Handling SD Memory Cards 32 Insertion and Removal of SD Memory Cards 32 Heater Unit 33 How to Install the Heater Unit 33 Connection Examples 34 Network Setup 35 Installing the Software 35 Using the Panasonic IP Setup ...Software to Set Up the Camera 35 Monitor Images on a PC 37 Monitor images from a single...
...20 Installing the Camera 21 Connecting the Cables 25 Adjusting the Camera 28 Handling SD Memory Cards 32 Insertion and Removal of SD Memory Cards 32 Heater Unit 33 How to Install the Heater Unit 33 Connection Examples 34 Network Setup 35 Installing the Software 35 Using the Panasonic IP Setup ...Software to Set Up the Camera 35 Monitor Images on a PC 37 Monitor images from a single...

Network Camera
Page 10
... off . Refresh Interval The refresh interval may cause a malfunction. Do not touch the dome cover with a soft, dry cloth. Handle the camera carefully. When using a screen saver. Wring all remaining solution with your bare hands. A dirty dome cover causes deterioration of water and neutral ... clean the lens. Note the following to be used Displaying the same image on the network environment, PC performance, photographic subject, access traffic, etc. Cleaning the camera Before cleaning the camera, turn the power breaker off. Not doing so may discolor the case. Doing so ...
... off . Refresh Interval The refresh interval may cause a malfunction. Do not touch the dome cover with a soft, dry cloth. Handle the camera carefully. When using a screen saver. Wring all remaining solution with your bare hands. A dirty dome cover causes deterioration of water and neutral ... clean the lens. Note the following to be used Displaying the same image on the network environment, PC performance, photographic subject, access traffic, etc. Cleaning the camera Before cleaning the camera, turn the power breaker off. Not doing so may discolor the case. Doing so ...

Network Camera
Page 11
... used on this system before use . See http://www.mpegla.com. No license is granted or shall be obtained from a video provider licensed by Panasonic is formatted, all content recorded on how to format SD memory cards, refer to promotional, internal and commercial uses and licensing may be reduced. &#...8226; For details on the card will remain on the screen. 11 If the SD memory card is inserted while the camera is still turned on, the SD memory card may not function properly, or the data recorded on a different system is changed, the discoloration at...
... used on this system before use . See http://www.mpegla.com. No license is granted or shall be obtained from a video provider licensed by Panasonic is formatted, all content recorded on how to format SD memory cards, refer to promotional, internal and commercial uses and licensing may be reduced. &#...8226; For details on the card will remain on the screen. 11 If the SD memory card is inserted while the camera is still turned on, the SD memory card may not function properly, or the data recorded on a different system is changed, the discoloration at...

Network Camera
Page 12
...; Condensation forms due to temperature, humidity, weather and other conditions, and may take time to maintain a low-humidity state inside the camera. Replace it using the service life values as that actual service life is a consumable. Note that produced by the operating environment and ...conditions. Smearing Bright subject Dehumidifying Element • This camera has a built-in dehumidifying element to clear up. • Do not block the surface of the screen can cause blooming (rainbow...
...; Condensation forms due to temperature, humidity, weather and other conditions, and may take time to maintain a low-humidity state inside the camera. Replace it using the service life values as that actual service life is a consumable. Note that produced by the operating environment and ...conditions. Smearing Bright subject Dehumidifying Element • This camera has a built-in dehumidifying element to clear up. • Do not block the surface of the screen can cause blooming (rainbow...

Network Camera
Page 14
...) This LED indicates the reception status. (17) Link LED (LINK) This LED indicates the network link status. (18) ABF LED (ABF) This LED indicates the busy status of the camera. (9) Focus lever Fixes the focus position. (10) Panning lock screw Fixes the panning position after...card error LED This LED indicates the SD memory card error status. 14 Names of Components (continued) (1) Enclosure (2) Mounting bracket (accessory) (3) Network cable (4) Alarm I/O cable (5) Power cable (6) Tilting lock screw Fixes the tilt position after adjusting. (7) Tilt adjustment seat Adjusts the screen tilt...
...) This LED indicates the reception status. (17) Link LED (LINK) This LED indicates the network link status. (18) ABF LED (ABF) This LED indicates the busy status of the camera. (9) Focus lever Fixes the focus position. (10) Panning lock screw Fixes the panning position after...card error LED This LED indicates the SD memory card error status. 14 Names of Components (continued) (1) Enclosure (2) Mounting bracket (accessory) (3) Network cable (4) Alarm I/O cable (5) Power cable (6) Tilting lock screw Fixes the tilt position after adjusting. (7) Tilt adjustment seat Adjusts the screen tilt...

Network Camera
Page 15
...with an image that is set up for any losses incurred while this product is being monitored, the camera adjusts the lens iris in the monitoring area, such as the camera being covered with the bright areas. Functions Super Dynamic III (SUPER-D III) When there is wide variation...a clear view Motion Detector This function outputs an alarm signal when motion is detected in accordance with a cloth or its cover, or the camera's orientation being changed, during monitoring. Not.e...• The motion detector function is not exclusively for the dark areas causes brighter areas to see ...
...with an image that is set up for any losses incurred while this product is being monitored, the camera adjusts the lens iris in the monitoring area, such as the camera being covered with the bright areas. Functions Super Dynamic III (SUPER-D III) When there is wide variation...a clear view Motion Detector This function outputs an alarm signal when motion is detected in accordance with a cloth or its cover, or the camera's orientation being changed, during monitoring. Not.e...• The motion detector function is not exclusively for the dark areas causes brighter areas to see ...

Network Camera
Page 16
...Privacy Zone Setting The privacy zone function allows you to an SD memory card when an alarm occurs. Recording to an SD Memory Card Camera images can also be saved to mask specific areas, such as well-defined images. When switching between color and black and white images, ... automatically adjusted by the motion adaptive interlace/progressive conversion function and converted to be backed up when a network failure occurs. Not.e...• This operation has already been confirmed on the following SD memory cards: Panasonic SD memory cards (64 MB, 128 MB, 256 MB, 512 MB, 1 GB, 2 GB) ...
...Privacy Zone Setting The privacy zone function allows you to an SD memory card when an alarm occurs. Recording to an SD Memory Card Camera images can also be saved to mask specific areas, such as well-defined images. When switching between color and black and white images, ... automatically adjusted by the motion adaptive interlace/progressive conversion function and converted to be backed up when a network failure occurs. Not.e...• This operation has already been confirmed on the following SD memory cards: Panasonic SD memory cards (64 MB, 128 MB, 256 MB, 512 MB, 1 GB, 2 GB) ...

Network Camera
Page 17
... Installation Not Required (Power over Ethernet) Power can both be supplied to the camera and images transmitted on a single LAN cable by connecting to PoE-compatible network devices. Special installation of a power supply for Higher Efficiency Operation in Network Environments MPEG-4 and JPEG can be output at the same time in real time... a remote site, and JPEG operation when recording and verifying images at high quality can be achieved at the same time. MPEG-4 operation when monitoring in a network environment. 17 Dual Encoding for the camera and video cables is not required.
... Installation Not Required (Power over Ethernet) Power can both be supplied to the camera and images transmitted on a single LAN cable by connecting to PoE-compatible network devices. Special installation of a power supply for Higher Efficiency Operation in Network Environments MPEG-4 and JPEG can be output at the same time in real time... a remote site, and JPEG operation when recording and verifying images at high quality can be achieved at the same time. MPEG-4 operation when monitoring in a network environment. 17 Dual Encoding for the camera and video cables is not required.

Network Camera
Page 18
... or in low illumination. • When capturing images having sufficient bearing strength. When not in use on a vehicle.) • When installing the camera on the foundation section of the allowable ambient operating temperature range (→ page 47). • On a motor vehicle, a boat, or other special...• At sea, in coastal areas, or in the following describes how to strong vibration. (This camera is for use , always remove the unit. Never install or use the camera in the following locations. • Near a swimming pool or other areas where chemicals are used. •...
... or in low illumination. • When capturing images having sufficient bearing strength. When not in use on a vehicle.) • When installing the camera on the foundation section of the allowable ambient operating temperature range (→ page 47). • On a motor vehicle, a boat, or other special...• At sea, in coastal areas, or in the following describes how to strong vibration. (This camera is for use , always remove the unit. Never install or use the camera in the following locations. • Near a swimming pool or other areas where chemicals are used. •...

Network Camera
Page 19
... be used in accordance with the materials and structure of the installation location. Configure the power supply to a network. • Wire and install the camera so that the network will not be influenced by PoE Use a PoE-compatible (IEEE802.3afcompliant) hub or power supply unit.... Network Connection Pay attention to the following points when using the camera's network cable to connect to the camera so that it can be tightened sufficiently in combination with this case, setup a specialized ...
... be used in accordance with the materials and structure of the installation location. Configure the power supply to a network. • Wire and install the camera so that the network will not be influenced by PoE Use a PoE-compatible (IEEE802.3afcompliant) hub or power supply unit.... Network Connection Pay attention to the following points when using the camera's network cable to connect to the camera so that it can be tightened sufficiently in combination with this case, setup a specialized ...

Network Camera
Page 20
Before Starting Installation The following procedures are for mounting. Metal material: Use M6 or M5 bolts and nuts for installing the camera on walls and ceilings. Concrete wall: Use M6 or M5 anchor bolts for mounting. (Recommended tightening torque M4 : 0.8 N·m {8 kgf·cm} M5 : ...• Screws for the installation depend on a wall or ceiling that are made of the installation location. • Screws for fixing the camera to the bracket are provided with the materials and structure of gypsum board and are not provided. Choose screws in which you will install the...
Before Starting Installation The following procedures are for mounting. Metal material: Use M6 or M5 bolts and nuts for installing the camera on walls and ceilings. Concrete wall: Use M6 or M5 anchor bolts for mounting. (Recommended tightening torque M4 : 0.8 N·m {8 kgf·cm} M5 : ...• Screws for the installation depend on a wall or ceiling that are made of the installation location. • Screws for fixing the camera to the bracket are provided with the materials and structure of gypsum board and are not provided. Choose screws in which you will install the...

Network Camera
Page 21
... not provided.) When using the imbedded box, we recommend using the driver bit (provided). Installing the Camera 1 Install the mounting bracket. Not.e • When replacing the dome cover (WV-CW4C, sold separately), refer to pass the cables through.) Cable pass-through hole 85 mm Installation screws... x 4 Not.e • When installing the camera outdoors, waterproof the screws and screw holes. 83.5 mm 85...
... not provided.) When using the imbedded box, we recommend using the driver bit (provided). Installing the Camera 1 Install the mounting bracket. Not.e • When replacing the dome cover (WV-CW4C, sold separately), refer to pass the cables through.) Cable pass-through hole 85 mm Installation screws... x 4 Not.e • When installing the camera outdoors, waterproof the screws and screw holes. 83.5 mm 85...
Network Camera
Page 22
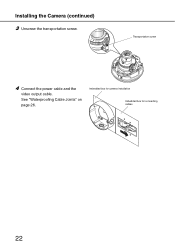
Imbedded box for camera installation Imbedded box for connecting cables 22 See "Waterproofing Cable Joints" on page 26. Installing the Camera (continued) 3 Unscrew the transportation screw. Transportation screw 4 Connect the power cable and the video output cable.
Imbedded box for camera installation Imbedded box for connecting cables 22 See "Waterproofing Cable Joints" on page 26. Installing the Camera (continued) 3 Unscrew the transportation screw. Transportation screw 4 Connect the power cable and the video output cable.

Network Camera
Page 23
...part on the mounting bracket and the indented part on the camera to tighten the screws used for mounting the camera. (M4:0.78 N·m) {8kgf·cm} You can keep the camera waterproof by firmly tightening the installation screws. Camera body Mounting bracket 2 positioning convex parts (left and right... screws Installation screws Not.e...• When using the four screws (provided). Make sure to fix the position of the camera. 5 Install the camera on the right. Fix the camera onto the mounting bracket using the embedded box, run the cable as shown on the mounting bracket.
...part on the mounting bracket and the indented part on the camera to tighten the screws used for mounting the camera. (M4:0.78 N·m) {8kgf·cm} You can keep the camera waterproof by firmly tightening the installation screws. Camera body Mounting bracket 2 positioning convex parts (left and right... screws Installation screws Not.e...• When using the four screws (provided). Make sure to fix the position of the camera. 5 Install the camera on the right. Fix the camera onto the mounting bracket using the embedded box, run the cable as shown on the mounting bracket.

Network Camera
Page 24
... 75° monitoring the image on the side Installation bracket Enlarged view of A Enclosure Not.e...• When installing the enclosure, the camera focus may shift slightly out of position. Align the ▲ mark on the side of the Panning table enclosure with the line on... seat 7 Install the enclosure. Tighten the screws unscrewed at least two seconds before installing the enclosure. (→ page 32) ... 24 See "Adjusting the Camera" on the PC after installing the dome cover. (→ page 28) • When installing an SD memory card, insert the card before installing the ...
... 75° monitoring the image on the side Installation bracket Enlarged view of A Enclosure Not.e...• When installing the enclosure, the camera focus may shift slightly out of position. Align the ▲ mark on the side of the Panning table enclosure with the line on... seat 7 Install the enclosure. Tighten the screws unscrewed at least two seconds before installing the enclosure. (→ page 32) ... 24 See "Adjusting the Camera" on the PC after installing the dome cover. (→ page 28) • When installing an SD memory card, insert the card before installing the ...

Network Camera
Page 26
... a malfunction. 1 Connect the power cable and the Alarm I /O cable) and LAN cable connections using exposed wiring, or when installing the camera under eaves. Stretch the tape to about 2x obtained unless the tape is sufficiently stretched. 2x • Waterproof the cable when installing the... camera outdoors. The mounting bracket is conducted correctly. Power cable 3 LAN cable Not.e... • How to wrap butyl rubber tape (provided). ...
... a malfunction. 1 Connect the power cable and the Alarm I /O cable) and LAN cable connections using exposed wiring, or when installing the camera under eaves. Stretch the tape to about 2x obtained unless the tape is sufficiently stretched. 2x • Waterproof the cable when installing the... camera outdoors. The mounting bracket is conducted correctly. Power cable 3 LAN cable Not.e... • How to wrap butyl rubber tape (provided). ...


