
Network Camera
Page 8
...20 Installing the Camera 21 Connecting the Cables 25 Adjusting the Camera 28 Handling SD Memory Cards 32 Insertion and Removal of SD Memory Cards 32 Heater Unit 33 How to Install the Heater Unit 33 Connection Examples 34 Network Setup 35 Installing the Software 35 Using the Panasonic IP Setup ...Software to Set Up the Camera 35 Monitor Images on a PC 37 Monitor images from a single camera 40 Monitor images from ...
...20 Installing the Camera 21 Connecting the Cables 25 Adjusting the Camera 28 Handling SD Memory Cards 32 Insertion and Removal of SD Memory Cards 32 Heater Unit 33 How to Install the Heater Unit 33 Connection Examples 34 Network Setup 35 Installing the Software 35 Using the Panasonic IP Setup ...Software to Set Up the Camera 35 Monitor Images on a PC 37 Monitor images from a single camera 40 Monitor images from ...

Network Camera
Page 10
...the lens. Alcoholbased solvents may be used Displaying the same image on the network environment, PC performance, photographic subject, access traffic, etc. Note the following to strong impact or vibration. Handle the camera carefully. Refresh Interval The refresh interval may be used for a long time ... Use lens cleaning paper (like the type available for the cloth. Next, wipe off all excess moisture from a radiator, heater, etc. Doing so may discolor the case. Long operation under high temperatures and high humidity can cause components to deteriorate and shorten...
...the lens. Alcoholbased solvents may be used Displaying the same image on the network environment, PC performance, photographic subject, access traffic, etc. Note the following to strong impact or vibration. Handle the camera carefully. Refresh Interval The refresh interval may be used for a long time ... Use lens cleaning paper (like the type available for the cloth. Next, wipe off all excess moisture from a radiator, heater, etc. Doing so may discolor the case. Long operation under high temperatures and high humidity can cause components to deteriorate and shorten...

Network Camera
Page 13
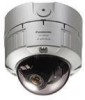
Names of Components (1) Enclosure (11) Zoom lever (7)Tilt adjustment seat (9) Focus lever (6) Tilting lock screw (2) Mounting bracket (accessory) (3) Network cable (4) Alarm I/O cable (8) Panning table (10) Panning lock screw (19) Monitor output jack (5) Power cable (12) Heater Unit connector (15) LED ON/OFF switch button (16) Access LED (ACT) (17) Link LED (LINK) (18) ABF LED (ABF) (21) SD memory card error LED (13) INIT button (INIT) (14) ABF button (ABF) (20) SD memory card slot 13
Names of Components (1) Enclosure (11) Zoom lever (7)Tilt adjustment seat (9) Focus lever (6) Tilting lock screw (2) Mounting bracket (accessory) (3) Network cable (4) Alarm I/O cable (8) Panning table (10) Panning lock screw (19) Monitor output jack (5) Power cable (12) Heater Unit connector (15) LED ON/OFF switch button (16) Access LED (ACT) (17) Link LED (LINK) (18) ABF LED (ABF) (21) SD memory card error LED (13) INIT button (INIT) (14) ABF button (ABF) (20) SD memory card slot 13

Network Camera
Page 14
... button is OFF or the computer's LED display settings is set to "ON". Names of Components (continued) (1) Enclosure (2) Mounting bracket (accessory) (3) Network cable (4) Alarm I/O cable (5) Power cable (6) Tilting lock screw Fixes the tilt position after adjusting. (7) Tilt adjustment seat Adjusts the screen tilt. ... connector Used for connecting the heater unit (sold separately) cable. (13) INIT button (INIT) Used for initializing setup. (14) ABF button (ABF) Used for starting ABF. (15) LED ON/OFF switch button Used for confirming images at camera installation. (20) SD memory card slot ...
... button is OFF or the computer's LED display settings is set to "ON". Names of Components (continued) (1) Enclosure (2) Mounting bracket (accessory) (3) Network cable (4) Alarm I/O cable (5) Power cable (6) Tilting lock screw Fixes the tilt position after adjusting. (7) Tilt adjustment seat Adjusts the screen tilt. ... connector Used for connecting the heater unit (sold separately) cable. (13) INIT button (INIT) Used for initializing setup. (14) ABF button (ABF) Used for starting ABF. (15) LED ON/OFF switch button Used for confirming images at camera installation. (20) SD memory card slot ...
Network Camera
Page 33
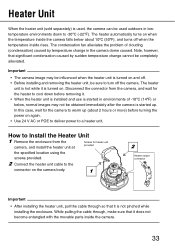
...pinched while installing the enclosure. In this case, wait for the heater to cool down to warm up . The heater automatically turns on the camera body. 1 2 Heater output connector Important • After installing the heater unit, pull the cable through , make sure that significant condensation ...hot while it does not become entangled with the movable parts inside rises. Important • The camera image may not be sure to a heater unit. Heater Unit When the heater unit (sold separately) is used outdoors in lowtemperature environments down before turning the power on ....
...pinched while installing the enclosure. In this case, wait for the heater to cool down to warm up . The heater automatically turns on the camera body. 1 2 Heater output connector Important • After installing the heater unit, pull the cable through , make sure that significant condensation ...hot while it does not become entangled with the movable parts inside rises. Important • The camera image may not be sure to a heater unit. Heater Unit When the heater unit (sold separately) is used outdoors in lowtemperature environments down before turning the power on ....
Network Camera
Page 47
...10ºC to +50ºC {14ºF to 122ºF} (When heater unit is used) -30ºC to +50ºC {-22ºF to 122ºF} (AC 24 V or PoE) Less than 90% (non-condensation) Camera unit: IEC60529 (IP66, Against ingress of water with harmful effects powerful jetting) *...) Dynamic range Gain 1/3-inch interline transfer CCD 768 (H) x 494 (V) 4.8 mm (H) x 3.6 mm (V) 2:1 interlace * Mounted with motion adaptive interlace/progressive conversion function for network output 1.5 lux {fc} (color), 0.16 lux {fc} (black and white) (When optional clear dome is used.) 0.6 lux {fc} (color), 0.08 lux {fc...
...10ºC to +50ºC {14ºF to 122ºF} (When heater unit is used) -30ºC to +50ºC {-22ºF to 122ºF} (AC 24 V or PoE) Less than 90% (non-condensation) Camera unit: IEC60529 (IP66, Against ingress of water with harmful effects powerful jetting) *...) Dynamic range Gain 1/3-inch interline transfer CCD 768 (H) x 494 (V) 4.8 mm (H) x 3.6 mm (V) 2:1 interlace * Mounted with motion adaptive interlace/progressive conversion function for network output 1.5 lux {fc} (color), 0.16 lux {fc} (black and white) (When optional clear dome is used.) 0.6 lux {fc} (color), 0.08 lux {fc...
Network Camera
Page 49
... Bit 1 pc. number of connected cameras FTP client Multi-screen Operation confirmed SD memory cards (sold separately) • Optional accessories Heater unit Clear dome cover Ceiling Mount Bracket...WV-CW4H WV-CW4C WV-Q169 Weight, approx. 40 g Weight, approx. 110 g Weight, approx. 705 g Accessories CD-ROM 1 pc. Warranty Certificate 1 Label (MAC address 1 pc. RJ-45 female-female conversion connector 1 pc. Supported OS Supported browser Max. Waterproof tape (butyl rubber tape) . . . 1 pc. * The CD-ROM contains the Panasonic IP Setup Software, viewer software "Network Camera...
... Bit 1 pc. number of connected cameras FTP client Multi-screen Operation confirmed SD memory cards (sold separately) • Optional accessories Heater unit Clear dome cover Ceiling Mount Bracket...WV-CW4H WV-CW4C WV-Q169 Weight, approx. 40 g Weight, approx. 110 g Weight, approx. 705 g Accessories CD-ROM 1 pc. Warranty Certificate 1 Label (MAC address 1 pc. RJ-45 female-female conversion connector 1 pc. Supported OS Supported browser Max. Waterproof tape (butyl rubber tape) . . . 1 pc. * The CD-ROM contains the Panasonic IP Setup Software, viewer software "Network Camera...
