

WVCL920A User Guide
Page 2
... event of this product may cause harmful interference to the unit whenever the power cord is intended to alert the user to the presence of FCC Rules, which are designed to Subpart J of Part 15 of important operating and maintenance (servicing) instructions in the ON position. For U.S.A Warning: This equipment generates and uses radio frequency energy and if not installed and used...
... event of this product may cause harmful interference to the unit whenever the power cord is intended to alert the user to the presence of FCC Rules, which are designed to Subpart J of Part 15 of important operating and maintenance (servicing) instructions in the ON position. For U.S.A Warning: This equipment generates and uses radio frequency energy and if not installed and used...

WVCL920A User Guide
Page 5
CAMERA SETUP MENU ...18 2. SETUP OPERATION ...21 SETTING PROCEDURES ...23 PREVENTION OF BLOOMING AND SMEAR ...42 SPECIFICATIONS ...42 STANDARD ACCESSORIES ...44 OPTIONAL ACCESSORIES ...45 -5- CONTENTS IMPORTANT SAFETY INSTRUCTIONS ...3 PREFACE ...6 FEATURES ...7 PRECAUTIONS ...8 MAJOR OPERATING CONTROLS AND THEIR FUNCTIONS 9 CONNECTIONS ...12 FOCUS OR FLANGE-BACK ADJUSTMENT ...16 INSTALLATION OF CAMERA ...17 SETUP ...18 1.
CAMERA SETUP MENU ...18 2. SETUP OPERATION ...21 SETTING PROCEDURES ...23 PREVENTION OF BLOOMING AND SMEAR ...42 SPECIFICATIONS ...42 STANDARD ACCESSORIES ...44 OPTIONAL ACCESSORIES ...45 -5- CONTENTS IMPORTANT SAFETY INSTRUCTIONS ...3 PREFACE ...6 FEATURES ...7 PRECAUTIONS ...8 MAJOR OPERATING CONTROLS AND THEIR FUNCTIONS 9 CONNECTIONS ...12 FOCUS OR FLANGE-BACK ADJUSTMENT ...16 INSTALLATION OF CAMERA ...17 SETUP ...18 1.

WVCL920A User Guide
Page 7
...Signal-to switch between C/L and B/W in . (1) Auto Light Control (ALC)/Electronic Light Control (ELC) (2) Back Light Compensation (Auto: Factory preset, Manual: Manual photometric measuring area set) (3) Various External Sync Functions, including Gen-Lock (4) Auto/Manual White Balance Function (5) Electronic Shutter Function 2. Selectable electronic sensitivity enhancing modes including: AUTO, MANUAL and OFF 9. Auto Black/White mode enables the camera to -noise ratio of bright objects 7. Built in Digital Motion Detector 10. Minimum illumination of horizontal resolution (Color mode) 6.
...Signal-to switch between C/L and B/W in . (1) Auto Light Control (ALC)/Electronic Light Control (ELC) (2) Back Light Compensation (Auto: Factory preset, Manual: Manual photometric measuring area set) (3) Various External Sync Functions, including Gen-Lock (4) Auto/Manual White Balance Function (5) Electronic Shutter Function 2. Selectable electronic sensitivity enhancing modes including: AUTO, MANUAL and OFF 9. Auto Black/White mode enables the camera to -noise ratio of bright objects 7. Built in Digital Motion Detector 10. Minimum illumination of horizontal resolution (Color mode) 6.

WVCL920A User Guide
Page 8
... service personnel or system installers. 2. Handle the camera with strong or abrasive detergents. The camera could be made by improper handling or storage. 4. Afterwards, wipe off the remained part of the detergent in use a UL listed cable (VW-1, style 1007) for WV-CL924A. Do not aim the camera at the sun or other extremely bright objects. There are no user serviceable parts...
... service personnel or system installers. 2. Handle the camera with strong or abrasive detergents. The camera could be made by improper handling or storage. 4. Afterwards, wipe off the remained part of the detergent in use a UL listed cable (VW-1, style 1007) for WV-CL924A. Do not aim the camera at the sun or other extremely bright objects. There are no user serviceable parts...
WVCL920A User Guide
Page 10
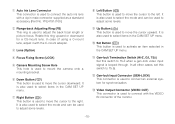
... mode and can be used to mount the camera onto a mounting bracket. e Lens (Option) r Focus Fixing Screw (LOCK) t Camera Mounting Screw Hole This hole is used to adjust some levels. q Auto Iris Lens Connector This connector is used to connect the auto iris lens with the C-mount adapter. u Right Button (M) This button is used to move the cursor to the left. It is used to connect with the VIDEO IN connector of using a C-mount lens, adjust it with a 4-pin male connector supplied as a standard accessory (Part...
... mode and can be used to mount the camera onto a mounting bracket. e Lens (Option) r Focus Fixing Screw (LOCK) t Camera Mounting Screw Hole This hole is used to adjust some levels. q Auto Iris Lens Connector This connector is used to connect the auto iris lens with the C-mount adapter. u Right Button (M) This button is used to move the cursor to the left. It is used to connect with the VIDEO IN connector of using a C-mount lens, adjust it with a 4-pin male connector supplied as a standard accessory (Part...

WVCL920A User Guide
Page 12
...) VA: Output voltage of power supply R: Resistance (Ω/m) (Ω/ft), see table L: Cable length (m) (ft) I: Current consumption (A), see specifications -12- The connections should be pulled off the camera when the camera pans or tilts. Notes: • Connect the power cord firmly. • The power cord should comply with National Electrical Code (NEC). B. If the cable is supplied from a 24 V AC power source. 2. Plug the AC power cord (supplied as standard...
...) VA: Output voltage of power supply R: Resistance (Ω/m) (Ω/ft), see table L: Cable length (m) (ft) I: Current consumption (A), see specifications -12- The connections should be pulled off the camera when the camera pans or tilts. Notes: • Connect the power cord firmly. • The power cord should comply with National Electrical Code (NEC). B. If the cable is supplied from a 24 V AC power source. 2. Plug the AC power cord (supplied as standard...

WVCL920A User Guide
Page 13
... monitor is at least equal to use a monitor whose resolution is shown below. It is recommended to that of 16 V DC, 100 mA maximum. Connect an external device such as a buzzer or lamp to the DAY/NIGHT IN terminal. • Color/black-and-white input terminal with a capacity of the camera. 2. Connect an optical sensor to the ALARM terminal. • The alarm output...
... monitor is at least equal to use a monitor whose resolution is shown below. It is recommended to that of 16 V DC, 100 mA maximum. Connect an external device such as a buzzer or lamp to the DAY/NIGHT IN terminal. • Color/black-and-white input terminal with a capacity of the camera. 2. Connect an optical sensor to the ALARM terminal. • The alarm output...
WVCL920A User Guide
Page 15
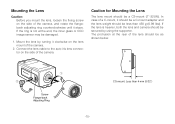
... damaged. 1. Mounting the Lens Caution: Before you mount the lens, loosen the fixing screw on the side of the camera, and rotate the flangeback adjusting ring counterclockwise until it should be a C-mount adapter and the lens weight should be less than 4 mm (5/32") Caution for Mounting the Lens The lens mount should be a CS-mount (1"-32UN). Mount the lens by using the supporter. Connect the lens cable to the auto iris lens connector on...
... damaged. 1. Mounting the Lens Caution: Before you mount the lens, loosen the fixing screw on the side of the camera, and rotate the flangeback adjusting ring counterclockwise until it should be a C-mount adapter and the lens weight should be less than 4 mm (5/32") Caution for Mounting the Lens The lens mount should be a CS-mount (1"-32UN). Mount the lens by using the supporter. Connect the lens cable to the auto iris lens connector on...

WVCL920A User Guide
Page 18
... OFF Resetting Display Mode Detection Level Adjustment Manual Mask Area Selection DWELL TIME Selection -19- The setup menu contains various items that is displayed on-screen. CAMERA SETUP MENU This camera utilizes a user setup menu that form a tree type structure. CAM SETUP Camera ID ON/OFF Light Control ALC ELC Shutter Speed AGC ON(DNR-H)/ON(DNR-M)/ ON(DNR-L)/OFF Electronic Sensitivity Enhancement OFF/AUTO/FIX SYNC INT/LL Camera ID Editing Camera ID Display Position PRESET OFF PRESET ON (Back Light...
... OFF Resetting Display Mode Detection Level Adjustment Manual Mask Area Selection DWELL TIME Selection -19- The setup menu contains various items that is displayed on-screen. CAMERA SETUP MENU This camera utilizes a user setup menu that form a tree type structure. CAM SETUP Camera ID ON/OFF Light Control ALC ELC Shutter Speed AGC ON(DNR-H)/ON(DNR-M)/ ON(DNR-L)/OFF Electronic Sensitivity Enhancement OFF/AUTO/FIX SYNC INT/LL Camera ID Editing Camera ID Display Position PRESET OFF PRESET ON (Back Light...
WVCL920A User Guide
Page 20
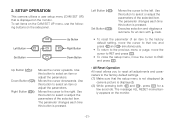
.... Use this button to select an item or adjust the parameters. The parameter changes each time this button to the right. Left Button Set Button Up Button Right Button Down Button Up Button (J): Moves the cursor upwards. SETUP OPERATION This camera utilizes a user setup menu (CAM SET UP) that the setup menu is not displayed (a camera picture is pressed. Use this button is displayed on the monitor. To set items on the CAM SET UP menu, use the following buttons on the monitor. -21- Down Button (K): Moves...
.... Use this button to select an item or adjust the parameters. The parameter changes each time this button to the right. Left Button Set Button Up Button Right Button Down Button Up Button (J): Moves the cursor upwards. SETUP OPERATION This camera utilizes a user setup menu (CAM SET UP) that the setup menu is not displayed (a camera picture is pressed. Use this button is displayed on the monitor. To set items on the CAM SET UP menu, use the following buttons on the monitor. -21- Down Button (K): Moves...
WVCL920A User Guide
Page 22
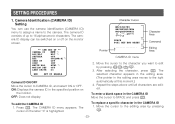
... alphanumeric characters. The cursor on the monitor. Camera Identification (CAMERA ID) Setting You can be switched on or off on the monitor screen. ↵ ** CAM SET UP ** ↵↵ CAMERA ID OFF ALC/ELC ALC SHUTTER OFF AGC ON(DNR-H) SENS UP OFF SYNC INT ↵ WHITE BAL ATW1 MOTION DET OFF LENS DRIVE DC END SET UP ENABLE Camera ID ON/OFF Move the cursor...
... alphanumeric characters. The cursor on the monitor. Camera Identification (CAMERA ID) Setting You can be switched on or off on the monitor screen. ↵ ** CAM SET UP ** ↵↵ CAMERA ID OFF ALC/ELC ALC SHUTTER OFF AGC ON(DNR-H) SENS UP OFF SYNC INT ↵ WHITE BAL ATW1 MOTION DET OFF LENS DRIVE DC END SET UP ENABLE Camera ID ON/OFF Move the cursor...

WVCL920A User Guide
Page 23
... ↵ WHITE BAL ATW1 MOTION DET OFF LENS DRIVE DC END SET UP ENABLE -24- The mode returns to the character area and select a new character. 3. Light Control Setting (ALC/ELC) You can select the mode for a second or more. 2. Then move the cursor to the previous CAMERA ID menu. Press I to determine the CAMERA ID. To determine the display position of the CAMERA ID. ELC...
... ↵ WHITE BAL ATW1 MOTION DET OFF LENS DRIVE DC END SET UP ENABLE -24- The mode returns to the character area and select a new character. 3. Light Control Setting (ALC/ELC) You can select the mode for a second or more. 2. Then move the cursor to the previous CAMERA ID menu. Press I to determine the CAMERA ID. To determine the display position of the CAMERA ID. ELC...
WVCL920A User Guide
Page 24
... of two modes (PRESET ON or PRESET OFF) of the monitor's screen. In this procedure. ↵ ** CAM SET UP ** ↵↵ CAMERA ID OFF ALC/ELC ALC SHUTTER OFF AGC ON(DNR-H) SENS UP OFF SYNC INT ↵ WHITE BAL ATW1 MOTION DET OFF LENS DRIVE DC END SET UP ENABLE 1. Back Light Compensation (BACK LIGHT COMP) Back light compensation is not available. In the factory setup mode, more...
... of two modes (PRESET ON or PRESET OFF) of the monitor's screen. In this procedure. ↵ ** CAM SET UP ** ↵↵ CAMERA ID OFF ALC/ELC ALC SHUTTER OFF AGC ON(DNR-H) SENS UP OFF SYNC INT ↵ WHITE BAL ATW1 MOTION DET OFF LENS DRIVE DC END SET UP ENABLE 1. Back Light Compensation (BACK LIGHT COMP) Back light compensation is not available. In the factory setup mode, more...
WVCL920A User Guide
Page 26
... an area that area and press I " cursor LEVEL and adjust the level. 7. Repeat step 3 to white Blinking 3. Move the cursor to the camera picture, move the "I . After masking is moved on the monitor screen. The ALC CONT menu appears. 6. Caution: When an auto iris lens requiring a DC control signal is used, the lens iris is bright, and press I ). Move the cursor to...
... an area that area and press I " cursor LEVEL and adjust the level. 7. Repeat step 3 to white Blinking 3. Move the cursor to the camera picture, move the "I . After masking is moved on the monitor screen. The ALC CONT menu appears. 6. Caution: When an auto iris lens requiring a DC control signal is used, the lens iris is bright, and press I ). Move the cursor to...

WVCL920A User Guide
Page 28
...; WHITE BAL ATW1 MOTION DET OFF LENS DRIVE DC END SET UP ENABLE Move the cursor to the CAMERA SETUP menu. When closing the menu, move the cursor to END and press I to return to the SENS UP parameter and select the parameter for example, the sensitivity is recommended when the picture contains moving objects. • When using a system controller, the...
...; WHITE BAL ATW1 MOTION DET OFF LENS DRIVE DC END SET UP ENABLE Move the cursor to the CAMERA SETUP menu. When closing the menu, move the cursor to END and press I to return to the SENS UP parameter and select the parameter for example, the sensitivity is recommended when the picture contains moving objects. • When using a system controller, the...
WVCL920A User Guide
Page 34
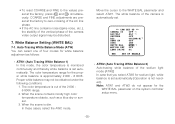
... INT ↵ WHITE BAL ATW1 MOTION DET OFF LENS DRIVE DC END SET UP ENABLE • ATW2 (Auto Tracing White Balance 2) Auto-tracing white balance of the 2 600 6 000K range. 2. The color temperature range for the WHITE BAL parameter on the system controller setup menu. -35- White Balance Setting (WHITE BAL) 7-1. The color temperature is automatically set automatically. The white balance of the camera is out of the sodium light mode (ATW2) In...
... INT ↵ WHITE BAL ATW1 MOTION DET OFF LENS DRIVE DC END SET UP ENABLE • ATW2 (Auto Tracing White Balance 2) Auto-tracing white balance of the 2 600 6 000K range. 2. The color temperature range for the WHITE BAL parameter on the system controller setup menu. -35- White Balance Setting (WHITE BAL) 7-1. The color temperature is automatically set automatically. The white balance of the camera is out of the sodium light mode (ATW2) In...

WVCL920A User Guide
Page 36
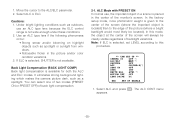
... ENABLE ↵ ** MOTION DETECT ** LEVEL ....I . The masks that detect the brightness changes start blinking. 6. To raise detection sensitivity, press I . 5. The MOTION DETECT menu appears on or the BW setting in the Special Menu is used with the video signal. 1. Move the cursor to the ALARM parameter and select ON or OFF to set to 4 of the camera is turned on the monitor screen. 3. When this camera is connected to a compatible intelligent CCTV system, the camera...
... ENABLE ↵ ** MOTION DETECT ** LEVEL ....I . The masks that detect the brightness changes start blinking. 6. To raise detection sensitivity, press I . 5. The MOTION DETECT menu appears on or the BW setting in the Special Menu is used with the video signal. 1. Move the cursor to the ALARM parameter and select ON or OFF to set to 4 of the camera is turned on the monitor screen. 3. When this camera is connected to a compatible intelligent CCTV system, the camera...
WVCL920A User Guide
Page 37
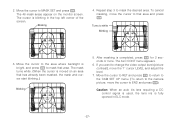
... alarm signal may be misunderstood as a time-code. • There may be supplied to be a delay of lens installed. are swayed by lighting equipment that constantly turns on the type of about 0.2 seconds from the auto iris lens connector. ↵ ** CAM SET UP ** ↵↵ CAMERA ID OFF ALC/ELC ALC SHUTTER OFF AGC ON(DNR-H) SENS UP OFF SYNC INT ↵ WHITE BAL ATW1 MOTION...
... alarm signal may be misunderstood as a time-code. • There may be supplied to be a delay of lens installed. are swayed by lighting equipment that constantly turns on the type of about 0.2 seconds from the auto iris lens connector. ↵ ** CAM SET UP ** ↵↵ CAMERA ID OFF ALC/ELC ALC SHUTTER OFF AGC ON(DNR-H) SENS UP OFF SYNC INT ↵ WHITE BAL ATW1 MOTION...
WVCL920A User Guide
Page 39
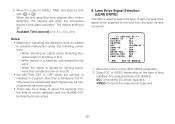
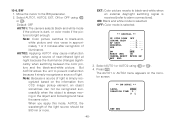
... and white mode is bright enough. Default: OFF AUTO1: The camera selects black and white mode if the picture is dark, or color mode if the picture is selected. Note: Because a source of light is simply recognized based on the monitor screen. ** BW AUTO1 ** LEVEL HIGH DURATION TIME .I . S L RET END -40- EXT: Color picture reverts to black-and-white when an external day/night switching signal is...
... and white mode is bright enough. Default: OFF AUTO1: The camera selects black and white mode if the picture is dark, or color mode if the picture is selected. Note: Because a source of light is simply recognized based on the monitor screen. ** BW AUTO1 ** LEVEL HIGH DURATION TIME .I . S L RET END -40- EXT: Color picture reverts to black-and-white when an external day/night switching signal is...
WVCL920A User Guide
Page 40
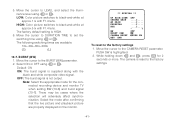
.... The following switching times are properly displayed on the monitor. ** SPECIAL ** UP SIDE DOWN CHROMA GAIN AP GAIN PEDESTAL HUE BW BURST (BW) CAMERA RESET RET END OFF ....I.... ....I.... ....I.... ....I for the connected recording device and monitor TV when setting BW (10-6) and burst signal (10-7). Select ON or OFF using L or M. OFF: The burst signal is highlighted. 2. HIGH: Color picture switches to the factory settings 1. While...
.... The following switching times are properly displayed on the monitor. ** SPECIAL ** UP SIDE DOWN CHROMA GAIN AP GAIN PEDESTAL HUE BW BURST (BW) CAMERA RESET RET END OFF ....I.... ....I.... ....I.... ....I for the connected recording device and monitor TV when setting BW (10-6) and burst signal (10-7). Select ON or OFF using L or M. OFF: The burst signal is highlighted. 2. HIGH: Color picture switches to the factory settings 1. While...


