

WVCP300 User Guide
Page 1
Operating Instructions Color CCTV Camera Model No: WV-CP310, WV-CP314 WV-CP300, WV-CP304 This illustration represents WV-CP300. The model number is abbreviated in some descriptions in this manual for future use. Lens: Option Before attempting to connect or operate this product, please read these instructions carefully and save this manual.
Operating Instructions Color CCTV Camera Model No: WV-CP310, WV-CP314 WV-CP300, WV-CP304 This illustration represents WV-CP300. The model number is abbreviated in some descriptions in this manual for future use. Lens: Option Before attempting to connect or operate this product, please read these instructions carefully and save this manual.
WVCP300 User Guide
Page 2
... when using the model WV-CP310 and CP310 CP310 WV-CP314. The functions without the notations are either registered trademarks or trademarks of 2 sets: these operating instructions (PDF) and Installation Guide. Preface About the user manuals The operating instructions of the camera consist of Adobe Systems Incorporated in the United States and/or other countries. Adobe® Reader® is not installed on the PC, download...
... when using the model WV-CP310 and CP310 CP310 WV-CP314. The functions without the notations are either registered trademarks or trademarks of 2 sets: these operating instructions (PDF) and Installation Guide. Preface About the user manuals The operating instructions of the camera consist of Adobe Systems Incorporated in the United States and/or other countries. Adobe® Reader® is not installed on the PC, download...
WVCP300 User Guide
Page 4
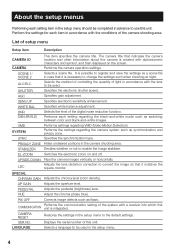
... STABILIZER EL-ZOOM UPSIDE-DOWN LDC Performs settings regarding VMD (Video Motion Detection) Performs the settings regarding the black-and-white mode such as switching between color and black-and-white images. Adjusts the aperture level. Adjusts the pedestal (brightness) level. COMMUNICATION Performs the communication setting of the camera shooting area. It is integrated. Specifies white balance adjustment. Flips the camera images vertically or horizontally. Adjust the chroma phase (hue). Displays the serial number of light in the setup menu to enable...
... STABILIZER EL-ZOOM UPSIDE-DOWN LDC Performs settings regarding VMD (Video Motion Detection) Performs the settings regarding the black-and-white mode such as switching between color and black-and-white images. Adjusts the aperture level. Adjusts the pedestal (brightness) level. COMMUNICATION Performs the communication setting of the camera shooting area. It is integrated. Specifies white balance adjustment. Flips the camera images vertically or horizontally. Adjust the chroma phase (hue). Displays the serial number of light in the setup menu to enable...
WVCP300 User Guide
Page 5
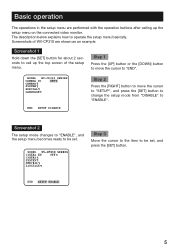
... top screen of WV-CP310 are performed with the operation buttons after calling up ] button or the [down] button to move the cursor to "SETUP", and press the [SET] button to change the setup mode from "DISABLE" to "ENABLE". MODEL WV-CP310 SERIES CAMERA ID OFF CAMERA SYSTEM SPECIAL LANGUAGE Step 3 Move the cursor to the item to be set . Step 1 Press the [up the setup menu on the connected video...
... top screen of WV-CP310 are performed with the operation buttons after calling up ] button or the [down] button to move the cursor to "SETUP", and press the [SET] button to change the setup mode from "DISABLE" to "ENABLE". MODEL WV-CP310 SERIES CAMERA ID OFF CAMERA SYSTEM SPECIAL LANGUAGE Step 3 Move the cursor to the item to be set . Step 1 Press the [up the setup menu on the connected video...
WVCP300 User Guide
Page 6
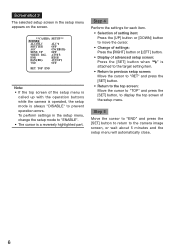
...) AUTO1 VMD OFF RET TOP END Note: • If the top screen of the setup menu. Step 5 Move the cursor to "END" and press the [SET] button to return to the camera image screen, or wait about 5 minutes and the setup menu will automatically close. 6 Screenshot 3 The selected setup screen in the setup menu, change the setup mode to "ENABLE". • The cursor is always "DISABLE" to prevent operation errors.
...) AUTO1 VMD OFF RET TOP END Note: • If the top screen of the setup menu. Step 5 Move the cursor to "END" and press the [SET] button to return to the camera image screen, or wait about 5 minutes and the setup menu will automatically close. 6 Screenshot 3 The selected setup screen in the setup menu, change the setup mode to "ENABLE". • The cursor is always "DISABLE" to prevent operation errors.

WVCP300 User Guide
Page 8
CP310 CP310 Screen transition diagram CP300 Top screen MODEL WV-CP300 SERIES CAMERA ID OFF CAMERA SYSTEM SPECIAL LANGUAGE END SETUP DISABLE 8 "CAMERA ID" screen **CAMERA ID** 0123456789 ABCDEFGHIJKLM NOPQRSTUVWXYZ SPACE POSI RET TOP END RESET "CAMERA SETUP" screen **CAMERA SETUP** SCENE1 ALC/ELC ALC SHUTTER OFF AGC ON(HIGH) SENS UP OFF WHITE BAL ATW1 DNR HIGH D&N(ELE) OFF VMD OFF RET TOP END "SYSTEM SETUP" screen **SYSTEM SETUP** SYNC INT PRIVACY...
CP310 CP310 Screen transition diagram CP300 Top screen MODEL WV-CP300 SERIES CAMERA ID OFF CAMERA SYSTEM SPECIAL LANGUAGE END SETUP DISABLE 8 "CAMERA ID" screen **CAMERA ID** 0123456789 ABCDEFGHIJKLM NOPQRSTUVWXYZ SPACE POSI RET TOP END RESET "CAMERA SETUP" screen **CAMERA SETUP** SCENE1 ALC/ELC ALC SHUTTER OFF AGC ON(HIGH) SENS UP OFF WHITE BAL ATW1 DNR HIGH D&N(ELE) OFF VMD OFF RET TOP END "SYSTEM SETUP" screen **SYSTEM SETUP** SYNC INT PRIVACY...

WVCP300 User Guide
Page 9
..., English letters and numbers can be used together. The "CAMERA ID" display can be turned on or off on the monitor screen. Top screen MODEL WV-CP310 SERIES CAMERA ID ON CAMERA SYSTEM SPECIAL LANGUAGE END SETUP ENABLE "CAMERA ID" screen **CAMERA ID** 0123456789 ABCDEFGHIJKLM NOPQRSTUVWXYZ SPACE POSI RET TOP END RESET Editing area Display positioning screen FLOOR 1 Step 1 Select "ON" for "CAMERA ID", and then press the [SET] button. → The "CAMERA...
..., English letters and numbers can be used together. The "CAMERA ID" display can be turned on or off on the monitor screen. Top screen MODEL WV-CP310 SERIES CAMERA ID ON CAMERA SYSTEM SPECIAL LANGUAGE END SETUP ENABLE "CAMERA ID" screen **CAMERA ID** 0123456789 ABCDEFGHIJKLM NOPQRSTUVWXYZ SPACE POSI RET TOP END RESET Editing area Display positioning screen FLOOR 1 Step 1 Select "ON" for "CAMERA ID", and then press the [SET] button. → The "CAMERA...
WVCP300 User Guide
Page 10
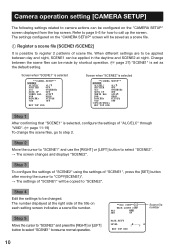
... Scene file number MASK SET LEVEL .I..... 0 - + RET TOP END 10 The number displayed at night. When different settings are to "COPY(SCENE1)". → The settings of the title on the "CAMERA SETUP" screen displayed from the top screen. Change between day and night, SCENE1 can be copied to select "SCENE2". → The screen changes and displays "SCENE2". Step 3 To configure the settings of "SCENE2" using the settings of "SCENE1", press the [SET] button after...
... Scene file number MASK SET LEVEL .I..... 0 - + RET TOP END 10 The number displayed at night. When different settings are to "COPY(SCENE1)". → The settings of the title on the "CAMERA SETUP" screen displayed from the top screen. Change between day and night, SCENE1 can be copied to select "SCENE2". → The screen changes and displays "SCENE2". Step 3 To configure the settings of "SCENE2" using the settings of "SCENE1", press the [SET] button after...
WVCP300 User Guide
Page 11
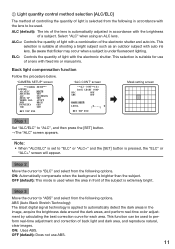
... not use of a lens with the brightness of the electronic shutter and auto iris. Step 2 Move the cursor to perform real-time adjustment and correction of back light and dark area, and reproduce natural, clear images. ON: Automatically compensate when the background is suitable for each area. "CAMERA SETUP" screen **CAMERA SETUP** SCENE1 ALC/ELC ALC SHUTTER OFF AGC ON(HIGH) SENS UP OFF WHITE...
... not use of a lens with the brightness of the electronic shutter and auto iris. Step 2 Move the cursor to perform real-time adjustment and correction of back light and dark area, and reproduce natural, clear images. ON: Automatically compensate when the background is suitable for each area. "CAMERA SETUP" screen **CAMERA SETUP** SCENE1 ALC/ELC ALC SHUTTER OFF AGC ON(HIGH) SENS UP OFF WHITE...
WVCP300 User Guide
Page 12
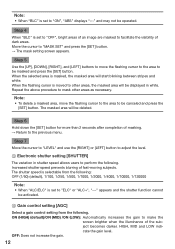
... to be displayed in shutter speed allows users to "ELC" or "ALC+", "---" appears and the shutter function cannot be masked and press the [SET] button. Note: • To delete a masked area, move the flashing cursor to the area to "MASK SET" and press the [SET] button. → The mask setting screen appears. Step 6 Hold down ], [right ], and [left ] button to adjust the level. 3 Electronic shutter setting [SHUTTER] The variation in white. When...
... to be displayed in shutter speed allows users to "ELC" or "ALC+", "---" appears and the shutter function cannot be masked and press the [SET] button. Note: • To delete a masked area, move the flashing cursor to the area to "MASK SET" and press the [SET] button. → The mask setting screen appears. Step 6 Hold down ], [right ], and [left ] button to adjust the level. 3 Electronic shutter setting [SHUTTER] The variation in white. When...

WVCP300 User Guide
Page 13
.... • When the magnification of the light source and automatically adjusts the white balance. ATW1 (default): Activates the automatic color temperature tracking mode. "CAMERA SETUP" screen **CAMERA SETUP** SCENE1 ALC/ELC ALC SHUTTER OFF AGC ON(HIGH) SENS UP OFF WHITE BAL ATW1 DNR HIGH D&N(IR) AUTO1 VMD OFF RET TOP END 13 The camera continuously check the color temperature of "SENS UP" is increased, the...
.... • When the magnification of the light source and automatically adjusts the white balance. ATW1 (default): Activates the automatic color temperature tracking mode. "CAMERA SETUP" screen **CAMERA SETUP** SCENE1 ALC/ELC ALC SHUTTER OFF AGC ON(HIGH) SENS UP OFF WHITE BAL ATW1 DNR HIGH D&N(IR) AUTO1 VMD OFF RET TOP END 13 The camera continuously check the color temperature of "SENS UP" is increased, the...
WVCP300 User Guide
Page 14
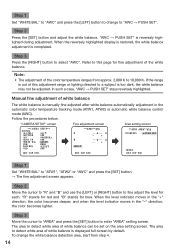
... to detect white area of white balance The white balance is displayed full-screen by default. Note: • The adjustment of white balance can be adjusted. Follow the procedures below. When the level indicator moves in the "+" direction, the color becomes deeper, and when the level indicator moves in the automatic color temperature tracking mode (ATW1, ATW2) or automatic white balance control mode (AWC). Step 2 Press the [SET] button and adjust the white balance. "AWC →...
... to detect white area of white balance The white balance is displayed full-screen by default. Note: • The adjustment of white balance can be adjusted. Follow the procedures below. When the level indicator moves in the "+" direction, the color becomes deeper, and when the level indicator moves in the automatic color temperature tracking mode (ATW1, ATW2) or automatic white balance control mode (AWC). Step 2 Press the [SET] button and adjust the white balance. "AWC →...

WVCP300 User Guide
Page 15
... nm) ON: Displays black-and-white images. "CAMERA SETUP" screen **CAMERA SETUP** SCENE1 ALC/ELC ALC SHUTTER OFF AGC ON(HIGH) SENS UP OFF WHITE BAL ATW1 DNR HIGH D&N(IR) AUTO1 VMD OFF RET TOP END "D&N (IR)" screen **D&N(IR) **(1) AUTO1 LEVEL DURATION TIME HIGH .I.. S L BURST(BW) ON RET TOP END Step 1 Move the cursor to "POSITION" and press the [SET ] button. The black-and-white mode is CP300 selected...
... nm) ON: Displays black-and-white images. "CAMERA SETUP" screen **CAMERA SETUP** SCENE1 ALC/ELC ALC SHUTTER OFF AGC ON(HIGH) SENS UP OFF WHITE BAL ATW1 DNR HIGH D&N(IR) AUTO1 VMD OFF RET TOP END "D&N (IR)" screen **D&N(IR) **(1) AUTO1 LEVEL DURATION TIME HIGH .I.. S L BURST(BW) ON RET TOP END Step 1 Move the cursor to "POSITION" and press the [SET ] button. The black-and-white mode is CP300 selected...
WVCP300 User Guide
Page 17
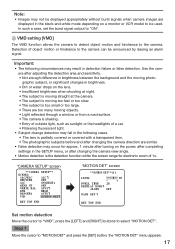
... on the power, after changing the camera direction are displayed in the black-and-white mode depending on a monitor or VCR model to be announced by issuing an alarm signal. In such a case, set the burst signal output to "ON". 9 VMD setting [VMD] The VMD function allows the camera to detect object motion and hindrance to select "MOTION DET". Detection of 1x. "CAMERA SETUP" screen **CAMERA SETUP** SCENE1 ALC/ELC ALC SHUTTER OFF...
... on the power, after changing the camera direction are displayed in the black-and-white mode depending on a monitor or VCR model to be announced by issuing an alarm signal. In such a case, set the burst signal output to "ON". 9 VMD setting [VMD] The VMD function allows the camera to detect object motion and hindrance to select "MOTION DET". Detection of 1x. "CAMERA SETUP" screen **CAMERA SETUP** SCENE1 ALC/ELC ALC SHUTTER OFF...
WVCP300 User Guide
Page 20
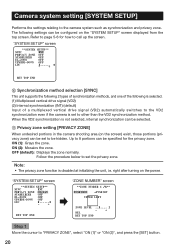
... "ZONE NUMBER" screen **ZONE NUMBER 1 /8** POSITION PUSH SET UPPER LEFT ZONE LEVEL ..I ...... 0 - + RET TOP END @ Synchronization method selection [SYNC] This unit supports the following 2 types of synchronization methods, and one of the following settings can be set the privacy zone. The following is selected. (1) Multiplexed vertical drive signal (VD2) (2) Internal synchronization (INT) (default) Input of a multiplexed vertical drive signal (VD2) automatically switches to other...
... "ZONE NUMBER" screen **ZONE NUMBER 1 /8** POSITION PUSH SET UPPER LEFT ZONE LEVEL ..I ...... 0 - + RET TOP END @ Synchronization method selection [SYNC] This unit supports the following 2 types of synchronization methods, and one of the following settings can be set the privacy zone. The following is selected. (1) Multiplexed vertical drive signal (VD2) (2) Internal synchronization (INT) (default) Input of a multiplexed vertical drive signal (VD2) automatically switches to other...
WVCP300 User Guide
Page 21
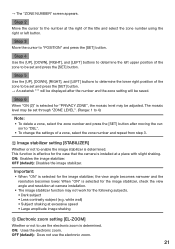
... the zone to use the electronic zoom. 21 This function is selected for "PRIVACY ZONE", the mosaic level may be saved. OFF (default): Disables the image stabilizer. OFF (default): Does not use the electronic zoom is installed at camera installation. • The image stabilizer function may be set through "ZONE LEVEL". (Range: 1 to 4) Note: • To delete a zone, select the zone number and press the [SET ] button after moving the...
... the zone to use the electronic zoom. 21 This function is selected for "PRIVACY ZONE", the mosaic level may be saved. OFF (default): Disables the image stabilizer. OFF (default): Does not use the electronic zoom is installed at camera installation. • The image stabilizer function may be set through "ZONE LEVEL". (Range: 1 to 4) Note: • To delete a zone, select the zone number and press the [SET ] button after moving the...
WVCP300 User Guide
Page 22
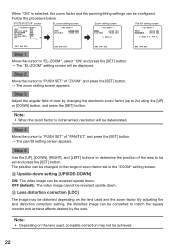
... "PUSH SET" of view by the user. E Lens distortion correction [LDC] The image may be distorted depending on the lens used and the zoom factor. D Upside-down . Step 3 Adjust the angular field of "PAN/TILT" and press the [SET ] button. → The pan/tilt setting screen appears. By adjusting the lens distortion correction setting, the distorted image can be reversed upside down setting [UPSIDE-DOWN] ON: The video image can...
... "PUSH SET" of view by the user. E Lens distortion correction [LDC] The image may be distorted depending on the lens used and the zoom factor. D Upside-down . Step 3 Adjust the angular field of "PAN/TILT" and press the [SET ] button. → The pan/tilt setting screen appears. By adjusting the lens distortion correction setting, the distorted image can be reversed upside down setting [UPSIDE-DOWN] ON: The video image can...
WVCP300 User Guide
Page 23
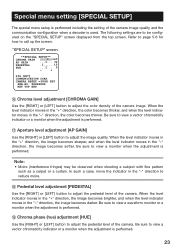
... on the "SPECIAL SETUP" screen displayed from the top screen. Be sure to call up the screen. XXXXXXXX RET TOP END F Chroma level adjustment [CHROMA GAIN] Use the [right ] or [left ] button to reduce moire. G Aperture level adjustment [AP GAIN] Use the [RIGHT] or [LEFT] button to view a monitor when the adjustment is performed. 23 When the level indicator moves in the "+" direction, the image becomes sharper, and...
... on the "SPECIAL SETUP" screen displayed from the top screen. Be sure to call up the screen. XXXXXXXX RET TOP END F Chroma level adjustment [CHROMA GAIN] Use the [right ] or [left ] button to reduce moire. G Aperture level adjustment [AP GAIN] Use the [RIGHT] or [LEFT] button to view a monitor when the adjustment is performed. 23 When the level indicator moves in the "+" direction, the image becomes sharper, and...

WVCP300 User Guide
Page 25
... data of the controller. To return to the previous screen without resetting, move the cursor to the default settings. M Serial number viewing [SER.NO.] Displays the serial number of "CAMERA RESET" and hold down the [SET] button for more than 2 seconds to "NO" and press the [SET] button. To set whether to the instruction manual of the registered pixel compensation points is not cleared. • To set with a controller, refer to reset the camera...
... data of the controller. To return to the previous screen without resetting, move the cursor to the default settings. M Serial number viewing [SER.NO.] Displays the serial number of "CAMERA RESET" and hold down the [SET] button for more than 2 seconds to "NO" and press the [SET] button. To set whether to the instruction manual of the registered pixel compensation points is not cleared. • To set with a controller, refer to reset the camera...
WVCP300 User Guide
Page 27
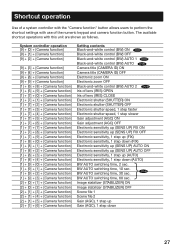
... function] Setting contents CP310 Black-and-white control (BW) ON CP310 Black-and-white control (BW) OFF CPC3P13010 CP300 Black-and-white control (BW) AUTO 1 CPC3P13010 Black-and-white control (BW) AUTO CPC3P03000 Camera title (CAMERA ID) ON Camera title (CAMERA ID) OFF Electronic zoom ON Electronic zoom OFF CP310 Black-and-white control (BW) AUTO 2 CP310 Iris of lens (IRIS) OPEN CP300 Iris of lens (IRIS) CLOSE Electronic shutter (SHUTTER) ON Electronic shutter (SHUTTER) OFF Electronic shutter speed, 1 step faster Electronic shutter speed, 1 step slower Gain adjustment...
... function] Setting contents CP310 Black-and-white control (BW) ON CP310 Black-and-white control (BW) OFF CPC3P13010 CP300 Black-and-white control (BW) AUTO 1 CPC3P13010 Black-and-white control (BW) AUTO CPC3P03000 Camera title (CAMERA ID) ON Camera title (CAMERA ID) OFF Electronic zoom ON Electronic zoom OFF CP310 Black-and-white control (BW) AUTO 2 CP310 Iris of lens (IRIS) OPEN CP300 Iris of lens (IRIS) CLOSE Electronic shutter (SHUTTER) ON Electronic shutter (SHUTTER) OFF Electronic shutter speed, 1 step faster Electronic shutter speed, 1 step slower Gain adjustment...


