
WVLC1710 User Guide
Page 1
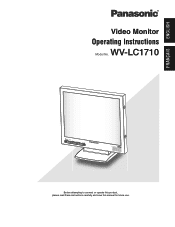
FRANÇAIS ENGLISH Video Monitor Operating Instructions Model No. W V-LC1710 Before attempting to connect or operate this product, please read these instructions carefully and save this manual for future use.
FRANÇAIS ENGLISH Video Monitor Operating Instructions Model No. W V-LC1710 Before attempting to connect or operate this product, please read these instructions carefully and save this manual for future use.
WVLC1710 User Guide
Page 2
...NOT REMOVE COVER NO USER-SERVICEABLE PARTS INSIDE REFER SERVICING TO QUALIFIED PERSONNEL. SA 1965 SA 1966 The lightning flash with or without ON-OFF switches have power supplied to the unit whenever the power cord is inserted into the power source; Unit...uses, and can radiate radio frequency energy and, if not installed and used in the event of the unit. Cet appareil numérique de la classe A est conforme à la norme NMB-003 du Canada. Model No. The power cord is intended to alert the user to the presence of important operating and maintenance (servicing) instructions...
...NOT REMOVE COVER NO USER-SERVICEABLE PARTS INSIDE REFER SERVICING TO QUALIFIED PERSONNEL. SA 1965 SA 1966 The lightning flash with or without ON-OFF switches have power supplied to the unit whenever the power cord is inserted into the power source; Unit...uses, and can radiate radio frequency energy and, if not installed and used in the event of the unit. Cet appareil numérique de la classe A est conforme à la norme NMB-003 du Canada. Model No. The power cord is intended to alert the user to the presence of important operating and maintenance (servicing) instructions...
WVLC1710 User Guide
Page 3
... install near water. 6) Clean only with one wider than the other apparatus (including amplifiers) that produce heat. 9) Do not defeat the safety purpose of the polarized or grounding type plug. S3125A 13) Unplug this apparatus near any ventilation openings. A polarized plug has two blades with dry cloth. 7) Do not block any heat sources such as power- Servicing is used, use...
... install near water. 6) Clean only with one wider than the other apparatus (including amplifiers) that produce heat. 9) Do not defeat the safety purpose of the polarized or grounding type plug. S3125A 13) Unplug this apparatus near any ventilation openings. A polarized plug has two blades with dry cloth. 7) Do not block any heat sources such as power- Servicing is used, use...
WVLC1710 User Guide
Page 5
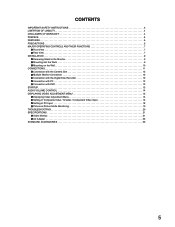
...Rear View 7 INSTALLATION 9 Removing Stand in the Monitor 9 Mounting into the Rack 9 Mounting on the Wall 10 CONNECTIONS 11 Connection with the Camera Site 12 Multiple Monitor Connection 12 Connection with the Digital Disk Recorder 12 Connection with PC 12 Connection with DVD 12 STARTUP 13 AUDIO VOLUME CONTROL 14 DISPLAYING VIDEO ADJUSTMENT MENU 15 Displaying Video Adjustment Menu 15 Setting of Composite Video / S-Video / Component Video Input 16 Setting of PC Input 18 Picture-in-Picture Mode Monitoring 19 TROUBLESHOOTING 20 SPECIFICATIONS 21 Video Monitor 21 AC Adapter 22...
...Rear View 7 INSTALLATION 9 Removing Stand in the Monitor 9 Mounting into the Rack 9 Mounting on the Wall 10 CONNECTIONS 11 Connection with the Camera Site 12 Multiple Monitor Connection 12 Connection with the Digital Disk Recorder 12 Connection with PC 12 Connection with DVD 12 STARTUP 13 AUDIO VOLUME CONTROL 14 DISPLAYING VIDEO ADJUSTMENT MENU 15 Displaying Video Adjustment Menu 15 Setting of Composite Video / S-Video / Component Video Input 16 Setting of PC Input 18 Picture-in-Picture Mode Monitoring 19 TROUBLESHOOTING 20 SPECIFICATIONS 21 Video Monitor 21 AC Adapter 22...
WVLC1710 User Guide
Page 6
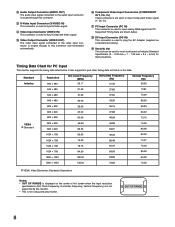
.... It can support VGA (640 × 480) ~ SXGA (1280 × 1024) resolutions. Other AC Adapters cannot be mounted in the panel board connecting to qualified service personnel. It is made from overheating, place it with high contrast ratio, wide view angle and true 8 bit full color. • Selectable inputs, including Composite Video, S-Video, Component Video and analog RGB signal input for this appliance is dirty. Use the appliance at least 5 cm {2 inches} away...
.... It can support VGA (640 × 480) ~ SXGA (1280 × 1024) resolutions. Other AC Adapters cannot be mounted in the panel board connecting to qualified service personnel. It is made from overheating, place it with high contrast ratio, wide view angle and true 8 bit full color. • Selectable inputs, including Composite Video, S-Video, Component Video and analog RGB signal input for this appliance is dirty. Use the appliance at least 5 cm {2 inches} away...
WVLC1710 User Guide
Page 7
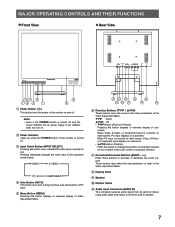
... of the LCD screen in the Video Adjustment Menu. h Display Panel i Speaker j Monitor Stand k Audio Input Connector (AUDIO IN) This connector receives audio signal from an external device using audio cable and output to change the position of subscreen located on use. Pressing repeatedly changes the video input in speaker. 7 When PC input is currently on . b Power Indicator Lights up when the POWER button of the monitor is turned off and the power indicator lits off . VIDEO S-VIDEO PC COMPONENT d Auto Button (AUTO) This button is currently on main screen, PC input displays on...
... of the LCD screen in the Video Adjustment Menu. h Display Panel i Speaker j Monitor Stand k Audio Input Connector (AUDIO IN) This connector receives audio signal from an external device using audio cable and output to change the position of subscreen located on use. Pressing repeatedly changes the video input in speaker. 7 When PC input is currently on . b Power Indicator Lights up when the POWER button of the monitor is turned off and the power indicator lits off . VIDEO S-VIDEO PC COMPONENT d Auto Button (AUTO) This button is currently on main screen, PC input displays on...
WVLC1710 User Guide
Page 8
...OF RANGE is displayed on the center of the screen when the input resolution specifications (Dot Clock Frequency, Horizontal Frequency, Vertical Frequency) are not supported by this monitor. • This is looped through this connector and terminated automatically. n Video Input Connector (VIDEO IN) This connector is used to input Composite Video signal. r DC Input Connector (DC IN) This connector is used to plug the AC Adapter (supplied as a standard accessory). OUT OF RANGE 8 l Audio Output Connector (AUDIO OUT) The audio input signal connected to the audio input connector is...
...OF RANGE is displayed on the center of the screen when the input resolution specifications (Dot Clock Frequency, Horizontal Frequency, Vertical Frequency) are not supported by this monitor. • This is looped through this connector and terminated automatically. n Video Input Connector (VIDEO IN) This connector is used to input Composite Video signal. r DC Input Connector (DC IN) This connector is used to plug the AC Adapter (supplied as a standard accessory). OUT OF RANGE 8 l Audio Output Connector (AUDIO OUT) The audio input signal connected to the audio input connector is...
WVLC1710 User Guide
Page 9
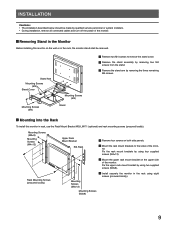
... removed. Removing Stand in the Monitor Before installing this monitor in the rack using four supplied screws (M4×12). 3 Mount the upper rack mount bracket on both side panels. 2 Mount the rack mount brackets to remove the stand cover. 2 Remove the stand assembly by removing four M4 screws from the stand. 3 Remove the stand arm by qualified service personnel or system installers. • During installation, remove all connected cables and turn off the power of the monitor. Mounting Screws (M3×8) Mounting Screws (M4×12) + Rack Mounting Screws...
... removed. Removing Stand in the Monitor Before installing this monitor in the rack using four supplied screws (M4×12). 3 Mount the upper rack mount bracket on both side panels. 2 Mount the rack mount brackets to remove the stand cover. 2 Remove the stand assembly by removing four M4 screws from the stand. 3 Remove the stand arm by qualified service personnel or system installers. • During installation, remove all connected cables and turn off the power of the monitor. Mounting Screws (M3×8) Mounting Screws (M4×12) + Rack Mounting Screws...
WVLC1710 User Guide
Page 10
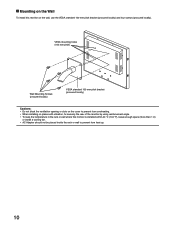
... not block the ventilation opening or slots on the cover to prevent from overheating. • When installing on the wall, use the VESA standard 100 mm pitch bracket (procured locally) and four screws (procured locally). Mounting on the Wall To install this monitor on places with vibration, fix securely the rear of the monitor by using reinforcement angle. • To keep the temperature in the...
... not block the ventilation opening or slots on the cover to prevent from overheating. • When installing on the wall, use the VESA standard 100 mm pitch bracket (procured locally) and four screws (procured locally). Mounting on the Wall To install this monitor on places with vibration, fix securely the rear of the monitor by using reinforcement angle. • To keep the temperature in the...
WVLC1710 User Guide
Page 11
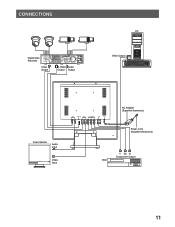
CONNECTIONS Digital Disk Recorder Video Output S-Video Audio Output Output PC Video Output Video Monitor Audio Input Video Input AC Adapter (Supplied Accessory) Power Cord (Supplied Accessory) DVD Y Cb Cr Component Output 11
CONNECTIONS Digital Disk Recorder Video Output S-Video Audio Output Output PC Video Output Video Monitor Audio Input Video Input AC Adapter (Supplied Accessory) Power Cord (Supplied Accessory) DVD Y Cb Cr Component Output 11
WVLC1710 User Guide
Page 12
... connector of this monitor to the video output (analog RGB) of the PC or other equipment using VGA cable. Up to the video input of the Digital Disk Recorder or other equipment using coaxial cable. If more than 10 monitors are shown below. Connect the AUDIO OUT connector of this monitor to the audio input of the Digital Disk Recorder or other equipment using an audio cable, if applicable. • Monitoring the playback picture Connect the VIDEO IN, S-VIDEO...
... connector of this monitor to the video output (analog RGB) of the PC or other equipment using VGA cable. Up to the video input of the Digital Disk Recorder or other equipment using coaxial cable. If more than 10 monitors are shown below. Connect the AUDIO OUT connector of this monitor to the audio input of the Digital Disk Recorder or other equipment using an audio cable, if applicable. • Monitoring the playback picture Connect the VIDEO IN, S-VIDEO...
WVLC1710 User Guide
Page 13
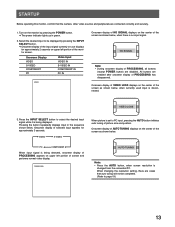
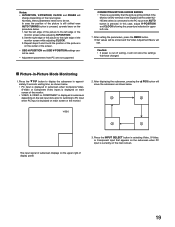
... picture size and position. The power indicator lights up in the sequence shown below . When changing the resolution setting, there are cases that the camera, other video sources and peripherals are disabled. Onscreen display of VIDEO LOSS displays on upper left portion of the screen as shown below . VIDEO S-VIDEO When picture is set to PC input, pressing the AUTO button initiates auto tuning of the screen as shown below , when there is no input signal...
... picture size and position. The power indicator lights up in the sequence shown below . When changing the resolution setting, there are cases that the camera, other video sources and peripherals are disabled. Onscreen display of VIDEO LOSS displays on upper left portion of the screen as shown below . VIDEO S-VIDEO When picture is set to PC input, pressing the AUTO button initiates auto tuning of the screen as shown below , when there is no input signal...
WVLC1710 User Guide
Page 14
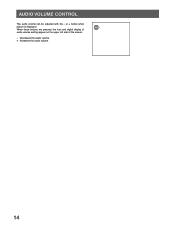
or + button when picture is displayed. When these buttons are pressed, the icon and digital display of audio volume setting appear on the upper left side of the screen. - : Decreases the audio volume. + : Increases the audio volume. 14 AUDIO VOLUME CONTROL The audio volume can be adjusted with the -
or + button when picture is displayed. When these buttons are pressed, the icon and digital display of audio volume setting appear on the upper left side of the screen. - : Decreases the audio volume. + : Increases the audio volume. 14 AUDIO VOLUME CONTROL The audio volume can be adjusted with the -
WVLC1710 User Guide
Page 15
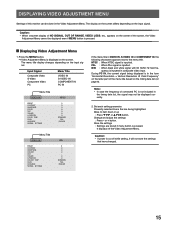
... LANGUAGE NORMAL SETTINGS NTSC 0 0 0 0 0 0 0 STANDARD FULL ENGLISH Menu Title VIDEO IN BRIGHT CONTRAST SHARPNESS COLOUR TINT VOLUME H-POSITION COLOUR TEMP SCAN LANGUAGE NORMAL SETTINGS PAL 0 0 0 0 0 0 STANDARD FULL ENGLISH If the menu title is pressed. B/W : When black and white signal with 60 Hz/50 Hz field fre- quency is not included in the form "Horizontal Resolution × Vertical Resolution @ Field Frequency" on the latter part of the screen, the Video Adjustment Menu cannot be displayed even if MENU button is displayed...
... LANGUAGE NORMAL SETTINGS NTSC 0 0 0 0 0 0 0 STANDARD FULL ENGLISH Menu Title VIDEO IN BRIGHT CONTRAST SHARPNESS COLOUR TINT VOLUME H-POSITION COLOUR TEMP SCAN LANGUAGE NORMAL SETTINGS PAL 0 0 0 0 0 0 STANDARD FULL ENGLISH If the menu title is pressed. B/W : When black and white signal with 60 Hz/50 Hz field fre- quency is not included in the form "Horizontal Resolution × Vertical Resolution @ Field Frequency" on the latter part of the screen, the Video Adjustment Menu cannot be displayed even if MENU button is displayed...
WVLC1710 User Guide
Page 16
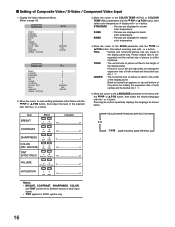
... display panel. UNDER : The horizontal size of picture is fitted to the COLOR TEMP (NTSC) or COLOUR TEMP (PAL) parameters with the PIP or POS button, then adjust the level of both vertical and horizontal into 1 : 1. Black horizontal bar appears on left and right sides for NTSC system only. 16 Move the cursor to page 15) VIDEO IN NTSC BRIGHT CONTRAST SHARPNESS COLOR TINT VOLUME H-POSITION COLOR TEMP SCAN LANGUAGE...
... display panel. UNDER : The horizontal size of picture is fitted to the COLOR TEMP (NTSC) or COLOUR TEMP (PAL) parameters with the PIP or POS button, then adjust the level of both vertical and horizontal into 1 : 1. Black horizontal bar appears on left and right sides for NTSC system only. 16 Move the cursor to page 15) VIDEO IN NTSC BRIGHT CONTRAST SHARPNESS COLOR TINT VOLUME H-POSITION COLOR TEMP SCAN LANGUAGE...
WVLC1710 User Guide
Page 17
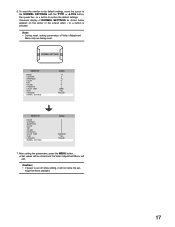
... Video Adjustment Menu only are being reset. To reset the monitor to the default settings, move the cursor to restore the default settings. tings that have changed. 17 or + button to the NORMAL SETTINGS with the PIP or POS button, then press the - Note: • During reset, setting parameters of the screen when - NORMAL SETTINGS VIDEO IN BRIGHT CONTRAST SHARPNESS COLOR TINT VOLUME H-POSITION COLOR TEMP SCAN LANGUAGE NORMAL SETTINGS NTSC -12 8 -16 -6 -2 -4 3 6500K FULL ENGLISH VIDEO IN BRIGHT CONTRAST SHARPNESS COLOR...
... Video Adjustment Menu only are being reset. To reset the monitor to the default settings, move the cursor to restore the default settings. tings that have changed. 17 or + button to the NORMAL SETTINGS with the PIP or POS button, then press the - Note: • During reset, setting parameters of the screen when - NORMAL SETTINGS VIDEO IN BRIGHT CONTRAST SHARPNESS COLOR TINT VOLUME H-POSITION COLOR TEMP SCAN LANGUAGE NORMAL SETTINGS NTSC -12 8 -16 -6 -2 -4 3 6500K FULL ENGLISH VIDEO IN BRIGHT CONTRAST SHARPNESS COLOR...
WVLC1710 User Guide
Page 18
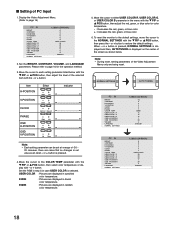
... IN BRIGHT CONTRAST H-POSITION V -POSITION CLOCK PHASE COLOR TEMP USER COLOR R USER COLOR G USER COLOR B OSD H-POSITION OSD V-POSITION VOLUME LANGUAGE NORMAL SETTINGS 1280x1024@60Hz 0 0 0 0 0 0 USER COLOR 20 20 20 0 0 0 ENGLISH 2. Note: • During reset, setting parameters of dis- or + button. When - Display the Video Adjustment Menu. (Refer to restore the default settings. play with the PIP or POS button, then press the - Move the cursor to page 16 for color temperature. - : Decreases the red, green, or blue color. + : Increases the red, green, or blue color. 6. Item...
... IN BRIGHT CONTRAST H-POSITION V -POSITION CLOCK PHASE COLOR TEMP USER COLOR R USER COLOR G USER COLOR B OSD H-POSITION OSD V-POSITION VOLUME LANGUAGE NORMAL SETTINGS 1280x1024@60Hz 0 0 0 0 0 0 USER COLOR 20 20 20 0 0 0 ENGLISH 2. Note: • During reset, setting parameters of dis- or + button. When - Display the Video Adjustment Menu. (Refer to restore the default settings. play with the PIP or POS button, then press the - Move the cursor to page 16 for color temperature. - : Decreases the red, green, or blue color. + : Increases the red, green, or blue color. 6. Item...
WVLC1710 User Guide
Page 19
... be reset. • Adjustment parameters from PC are not supported. Normally, these parameters need not to the PC input even AUTO button is displayed on the input signal. Repeat steps 2 and 3 until the position of the picture is on the center of the screen. • OSD H-POSITION and OSD V-POSITION settings cannot be shifted if the Monitor (VGA) terminal of the Digital Disk Recorder WJHD300 series is connected to be stored and the Video Adjustment Menu...
... be reset. • Adjustment parameters from PC are not supported. Normally, these parameters need not to the PC input even AUTO button is displayed on the input signal. Repeat steps 2 and 3 until the position of the picture is on the center of the screen. • OSD H-POSITION and OSD V-POSITION settings cannot be shifted if the Monitor (VGA) terminal of the Digital Disk Recorder WJHD300 series is connected to be stored and the Video Adjustment Menu...
WVLC1710 User Guide
Page 20
... power plug of picture display during use . Cable is not connected to DC IN connector of the AC Adapter to respective signal input. TROUBLESHOOTING Phenomenon Power is damaged. What to do Connect the DC input terminal of this monitor. The power cord insulation is not turned on. Connect the respective cable properly. Rearrange to the AC outlet. Press the INPUT SELECT button after onscreen display of the screen and picture is not properly connected. Connect the power supply plug to connect the cables...
... power plug of picture display during use . Cable is not connected to DC IN connector of the AC Adapter to respective signal input. TROUBLESHOOTING Phenomenon Power is damaged. What to do Connect the DC input terminal of this monitor. The power cord insulation is not turned on. Connect the respective cable properly. Rearrange to the AC outlet. Press the INPUT SELECT button after onscreen display of the screen and picture is not properly connected. Connect the power supply plug to connect the cables...
WVLC1710 User Guide
Page 21
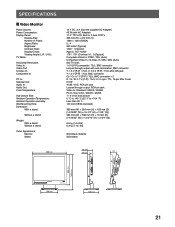
... Power Source: Power Consumption: Display Panel: Display Area: Number of Pixels: Aspect Ratio: Brightness: Contrast Ratio: Display Colors: Viewing Angle (L-R / U-D): TV Mode: Horizontal Resolution: Video In: Video Out: S-Video In: Component In: PC In: Speaker Out: Audio In: Audio Out: Color Temperature: Sub-picture Size: Ambient Operation Temperature: Ambient Operation Humidity: Wall Mounting Hole: Dimension: With a stand: Without a stand: Weight: With a stand: Without a stand: Outer Appearance: Monitor: Stand: 12 V DC, 3 A (Use the supplied AC Adapter) 43 W (with AC Adapter) 17.0" TFT LCD...
... Power Source: Power Consumption: Display Panel: Display Area: Number of Pixels: Aspect Ratio: Brightness: Contrast Ratio: Display Colors: Viewing Angle (L-R / U-D): TV Mode: Horizontal Resolution: Video In: Video Out: S-Video In: Component In: PC In: Speaker Out: Audio In: Audio Out: Color Temperature: Sub-picture Size: Ambient Operation Temperature: Ambient Operation Humidity: Wall Mounting Hole: Dimension: With a stand: Without a stand: Weight: With a stand: Without a stand: Outer Appearance: Monitor: Stand: 12 V DC, 3 A (Use the supplied AC Adapter) 43 W (with AC Adapter) 17.0" TFT LCD...


