
K1000 Manual
Page 2
...from the use of lenses and 25 accessories made to these precise 15 specifications and therefore, may cause difficulties with Pentax 30 cameras and photographical 32 products. However, many 10 of the commercially available 11 12 lenses and accessories produced... 13 by other manufacturers are 6 engineered and produced 7 meticulously to precise Pentax 8 specifications. a Pentax 18 camera. TABLE OF THE CONTENTS Nomenclature of Working Parts Specifications Using SMC PENTAX-A/-F Lens • Attaching and Detaching Lens Inserting Battery Basic Operating Instructions Loading...
...from the use of lenses and 25 accessories made to these precise 15 specifications and therefore, may cause difficulties with Pentax 30 cameras and photographical 32 products. However, many 10 of the commercially available 11 12 lenses and accessories produced... 13 by other manufacturers are 6 engineered and produced 7 meticulously to precise Pentax 8 specifications. a Pentax 18 camera. TABLE OF THE CONTENTS Nomenclature of Working Parts Specifications Using SMC PENTAX-A/-F Lens • Attaching and Detaching Lens Inserting Battery Basic Operating Instructions Loading...
K1000 Manual
Page 3
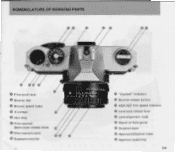
NOMENCLATURE OF WORKING PARTS 3 4 O/ O 0 O Film-wind lever Shutter dial 0 Shutter speed index O X contact O Hot shoe O Film-rewind/ Back-cover-release knob • Film-rewind crank O Exposure counter 14 II 16 Z 9 Z. 7 95 8 II 8e/Z,, u, 0„,8, E 3t .3) 17 )6 O O "Cocked" indicator e Shutter-release button ASA/ISO film speed indicator ® Lens-lock-release lever Lens-alignment node fD Depth-of-field guide m Distance scale • Aperture/distance index fp Aperture scale/ring 1 •
NOMENCLATURE OF WORKING PARTS 3 4 O/ O 0 O Film-wind lever Shutter dial 0 Shutter speed index O X contact O Hot shoe O Film-rewind/ Back-cover-release knob • Film-rewind crank O Exposure counter 14 II 16 Z 9 Z. 7 95 8 II 8e/Z,, u, 0„,8, E 3t .3) 17 )6 O O "Cocked" indicator e Shutter-release button ASA/ISO film speed indicator ® Lens-lock-release lever Lens-alignment node fD Depth-of-field guide m Distance scale • Aperture/distance index fp Aperture scale/ring 1 •

K1000 Manual
Page 4
U )C1000 PENTAX 4? • 'fir 12 ED Focusing ring e Strap-lug co X flash sync terminal ED Accessory groove ED Film guide rail ED Film rail • 2 ED Viewfinder eyepiece ED Film chamber ED Battery-chamber cap ED Tripod socket ED Shutter curtain ED Film-rewind button ED Film-sprocket spool ED Film-take-up spool m Film-roller ED Back cover ED Film-pressure plate
U )C1000 PENTAX 4? • 'fir 12 ED Focusing ring e Strap-lug co X flash sync terminal ED Accessory groove ED Film guide rail ED Film rail • 2 ED Viewfinder eyepiece ED Film chamber ED Battery-chamber cap ED Tripod socket ED Shutter curtain ED Film-rewind button ED Film-sprocket spool ED Film-take-up spool m Film-roller ED Back cover ED Film-pressure plate

K1000 Manual
Page 6
... cell. Film Rewind: Flash Synchronization: Exposure Metering: Metering Range: Power Source: Power Switch: Crank type Hot shoe, X-Sync at infinity. -1 diopter eyepiece. Speeds: B, 1 to 3200 Pentax K bayonet mount Shutter: Rubberized silk focal plane shutter. Type: Film: Mount: 35mm SLR with built-in photoswitch Size & Weight: 143(W) x 93.5(H) x 49.5(D) mm (5.6" x 3.7" x 1.9"), 525g (18...
... cell. Film Rewind: Flash Synchronization: Exposure Metering: Metering Range: Power Source: Power Switch: Crank type Hot shoe, X-Sync at infinity. -1 diopter eyepiece. Speeds: B, 1 to 3200 Pentax K bayonet mount Shutter: Rubberized silk focal plane shutter. Type: Film: Mount: 35mm SLR with built-in photoswitch Size & Weight: 143(W) x 93.5(H) x 49.5(D) mm (5.6" x 3.7" x 1.9"), 525g (18...
K1000 Manual
Page 7
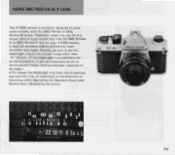
...ring from the other two types. Therefore, when you use the KA mount lens or KAF mount lens like the SMC PentaxA or SMC Pentax-F lens on your K1000 camera, it will automatically be set to the minimum f-stop other than "A" (Auto). (If the diaphragm is primarily designed to be ... arrow. }Clout] PE NToN>C e7 • I ft m C°10 15 I I III If1-r I 38 I 26 2- 16 8 4 1 4 8 16 22 22 16 11 8 5.6 4 2. 5• USING SMC PENTAX-A/-F LENS The K1000 camera is accidentally set the diaphragm ring to any proper f-stop , causing improper exposure to work more suitably with the SMC...
...ring from the other two types. Therefore, when you use the KA mount lens or KAF mount lens like the SMC PentaxA or SMC Pentax-F lens on your K1000 camera, it will automatically be set to the minimum f-stop other than "A" (Auto). (If the diaphragm is primarily designed to be ... arrow. }Clout] PE NToN>C e7 • I ft m C°10 15 I I III If1-r I 38 I 26 2- 16 8 4 1 4 8 16 22 22 16 11 8 5.6 4 2. 5• USING SMC PENTAX-A/-F LENS The K1000 camera is accidentally set the diaphragm ring to any proper f-stop , causing improper exposure to work more suitably with the SMC...
K1000 Manual
Page 8
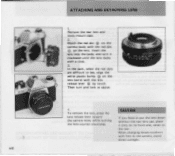
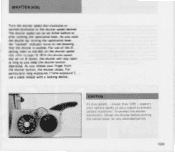
In the dark, when the red dots are difficult to put the lens down without the rear lens cap, place it ~ol~ e f enit 7u ri tip oa ,u 71 • 4 To remove the lens, press the lens release lever toward the camera body while turning the lens counter-clockwise. When changing lenses outdoors with the lens release lever 0 by touch. Then turn it clockwise until the lens locks with the red dot O on the lens barrel with film in the camera, avoid direct sunlight. CAUTION If you have to tee, align the e white plastic bump on the lens. cD PO N •6 ATTACHING AND DETACHING ...
In the dark, when the red dots are difficult to put the lens down without the rear lens cap, place it ~ol~ e f enit 7u ri tip oa ,u 71 • 4 To remove the lens, press the lens release lever toward the camera body while turning the lens counter-clockwise. When changing lenses outdoors with the lens release lever 0 by touch. Then turn it clockwise until the lens locks with the red dot O on the lens barrel with film in the camera, avoid direct sunlight. CAUTION If you have to tee, align the e white plastic bump on the lens. cD PO N •6 ATTACHING AND DETACHING ...

K1000 Manual
Page 9
... Set the ASA/ISO to 100 and the shutter speed dial to insert it into the battery chamber before operating the camera. CAUTION As the K1000 has the built-in photoswitch, the exposure meter turns on while the camera is good if the needle remains "up" position steadily. The battery is...
... Set the ASA/ISO to 100 and the shutter speed dial to insert it into the battery chamber before operating the camera. CAUTION As the K1000 has the built-in photoswitch, the exposure meter turns on while the camera is good if the needle remains "up" position steadily. The battery is...
K1000 Manual
Page 10
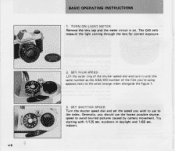
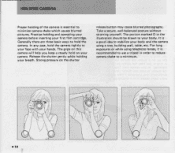
TURN ON LIGHT METER Remove the lens cap and the meter circuit is on. Generally, you should use to avoid blurred pictures caused by camera movement. outdoors in daylight and 1/60 sec. The CdS cells measure the light coming through the lens for correct exposure. 2. Try starting with 1/125 sec. indoors. SET SHUTTER SPEED Turn the shutter speed dial and set the speed you 're using appears next to the small orange index alongside the figure 1. 3. 4( • 8 BASIC OPERATING INSTRUCTIONS 1. SET FILM SPEED Lift the outer ring of the shutter speed dial and turn it until the same ...
TURN ON LIGHT METER Remove the lens cap and the meter circuit is on. Generally, you should use to avoid blurred pictures caused by camera movement. outdoors in daylight and 1/60 sec. The CdS cells measure the light coming through the lens for correct exposure. 2. Try starting with 1/125 sec. indoors. SET SHUTTER SPEED Turn the shutter speed dial and set the speed you 're using appears next to the small orange index alongside the figure 1. 3. 4( • 8 BASIC OPERATING INSTRUCTIONS 1. SET FILM SPEED Lift the outer ring of the shutter speed dial and turn it until the same ...
K1000 Manual
Page 11
Then cock the rapid-wind lever for the next picture. COMPOSE AND FOCUS While viewing through the viewfinder, turn the focusing ring until your camera firmly and release the shutter. RELEASE SHUTTER Cock the rapid-wind lever. 4. ROTATE DIAPHRAGM RING The needle moves as you will get correct exposure. When the needle on the right side of the viewfinder image is at the center, you turn the diaphragm ring, change the shutter speed. 6. If the needle does not come to the center no matter how far you turn the diaphragm ring. Hold your subject comes into sharp focus. 5. PE &#...
Then cock the rapid-wind lever for the next picture. COMPOSE AND FOCUS While viewing through the viewfinder, turn the focusing ring until your camera firmly and release the shutter. RELEASE SHUTTER Cock the rapid-wind lever. 4. ROTATE DIAPHRAGM RING The needle moves as you will get correct exposure. When the needle on the right side of the viewfinder image is at the center, you turn the diaphragm ring, change the shutter speed. 6. If the needle does not come to the center no matter how far you turn the diaphragm ring. Hold your subject comes into sharp focus. 5. PE &#...
K1000 Manual
Page 12
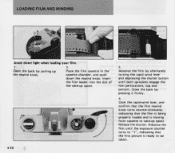
Insert the film leader into the slot of the take -up spool. Close the back by alternately turning the rapid wind lever and depressing the shutter button until the exposure counter turns to "1", indicating that the film is being properly loaded and is ready to take -up the rewind knob. Cock the rapid-wind lever, and confirm that the film rewind knob turns counter-clockwise, indicating that the first picture is moving from cassette to be taken. • 10 Release the shutter. Advance the film by pressing it firmly. 4. Advance the film until both sprockets engage the ...
Insert the film leader into the slot of the take -up spool. Close the back by alternately turning the rapid wind lever and depressing the shutter button until the exposure counter turns to "1", indicating that the film is being properly loaded and is ready to take -up the rewind knob. Cock the rapid-wind lever, and confirm that the film rewind knob turns counter-clockwise, indicating that the first picture is moving from cassette to be taken. • 10 Release the shutter. Advance the film by pressing it firmly. 4. Advance the film until both sprockets engage the ...
K1000 Manual
Page 13
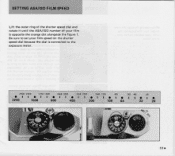
Be sure to the exposure meter. 2500 2000 1250 1000 640 500 320 250 160 125 60 50 40 25 • I I • I I • II • I I • I I• I • I I• I • 3200 1600 800 400 200 100 64 32 20 5 en 4 1" 10 • Si, .44/ 'tr"_'111. /t"-- 04.4N o Of ll• SETTING ASA/ISO FILM SPEED Lift the outer ring of the shutter speed dial and rotate it until the ASA/ISO number of your film is connected to set your film speed on the shutter speed dial because the dial is opposite the orange dot alongside the figure 1.
Be sure to the exposure meter. 2500 2000 1250 1000 640 500 320 250 160 125 60 50 40 25 • I I • I I • II • I I • I I• I • I I• I • 3200 1600 800 400 200 100 64 32 20 5 en 4 1" 10 • Si, .44/ 'tr"_'111. /t"-- 04.4N o Of ll• SETTING ASA/ISO FILM SPEED Lift the outer ring of the shutter speed dial and rotate it until the ASA/ISO number of your film is connected to set your film speed on the shutter speed dial because the dial is opposite the orange dot alongside the figure 1.

K1000 Manual
Page 14
If your subject is not in focus, the microprism will break the image up into many small dots. • 12 With split-image focusing system, when your camera is held horizontally and the image is in focus, the image in sharp focus, all vertical lines seen through the viewfinder, turn the focusing ring until your subject comes into upper and lower portions. FOCUSING While viewing through the viewfinder will appear to be sharp. Cross-microprism focusing system With cross-microprism focusing system, when your subject is not in the microprism center will be divided into sharp focus...
If your subject is not in focus, the microprism will break the image up into many small dots. • 12 With split-image focusing system, when your camera is held horizontally and the image is in focus, the image in sharp focus, all vertical lines seen through the viewfinder, turn the focusing ring until your subject comes into upper and lower portions. FOCUSING While viewing through the viewfinder will appear to be sharp. Cross-microprism focusing system With cross-microprism focusing system, when your subject is not in the microprism center will be divided into sharp focus...
K1000 Manual
Page 15
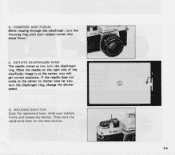
support your finger from the shutter button, the shutter closes. The shutter speed can be set on the shutter speed dial, refer to the shutter speed desired. slower than 1/30 - As you release your camera rigidly or use a tripod to red showing that the shutter is cocked. As you cock the shutter by turning the rapid-wind lever, the "cocked" indicator turns to prevent camera movement. For particularly long exposures ("time exposure"), use of the X setting (next to the 60) on B (bulb), the shutter will stay open as long as you keep the shutter button depressed. To protect the ...
support your finger from the shutter button, the shutter closes. The shutter speed can be set on the shutter speed dial, refer to the shutter speed desired. slower than 1/30 - As you release your camera rigidly or use a tripod to red showing that the shutter is cocked. As you cock the shutter by turning the rapid-wind lever, the "cocked" indicator turns to prevent camera movement. For particularly long exposures ("time exposure"), use of the X setting (next to the 60) on B (bulb), the shutter will stay open as long as you keep the shutter button depressed. To protect the ...
K1000 Manual
Page 16
In any case, hold on your camera. The grips on the shutter release button may cause blurred photographs. It is a good idea to stabilize your body and the camera using telephoto lenses, it is essential to minimize camera shake which causes blurred pictures. O O • 14 Practice holding your breath. Take a secure, well-balanced posture without straining yourself. For long exposures or while using a tree, building wall, table, etc. The portion marked 0 in order to reduce camera shake to a minimum. Generally there are three basic ways to your face with your ...
In any case, hold on your camera. The grips on the shutter release button may cause blurred photographs. It is a good idea to stabilize your body and the camera using telephoto lenses, it is essential to minimize camera shake which causes blurred pictures. O O • 14 Practice holding your breath. Take a secure, well-balanced posture without straining yourself. For long exposures or while using a tree, building wall, table, etc. The portion marked 0 in order to reduce camera shake to a minimum. Generally there are three basic ways to your face with your ...

K1000 Manual
Page 17
If you accidentally opened the back cover without rewinding the film, close it immediately. Depress the film rewind release button and turn (Caution: do not try to rewind the film into its cassette. UNLOADING FILM After the final picture on the crank lessens, indicating that the film must be saved. 15• Some pictures could be rewound. Lift the rewind crank up spool. Pull out the film rewind knob (the back will not turn the rewind crank as indicated to force the lever), indicating that the leader end of the film has been released from the take-up . Rewind until the ...
If you accidentally opened the back cover without rewinding the film, close it immediately. Depress the film rewind release button and turn (Caution: do not try to rewind the film into its cassette. UNLOADING FILM After the final picture on the crank lessens, indicating that the film must be saved. 15• Some pictures could be rewound. Lift the rewind crank up spool. Pull out the film rewind knob (the back will not turn the rewind crank as indicated to force the lever), indicating that the leader end of the film has been released from the take-up . Rewind until the ...

K1000 Manual
Page 18
... be used. O IC loop I, r.? This indicates the highest shutter speed at which has a flash contact on the body front. A'''r T • 16 USING FLASH UNIT The K1000 has an X terminal on the front of electric shocks.
... be used. O IC loop I, r.? This indicates the highest shutter speed at which has a flash contact on the body front. A'''r T • 16 USING FLASH UNIT The K1000 has an X terminal on the front of electric shocks.

K1000 Manual
Page 19
11 * Electronic flash unit used wiatailltaTV II --
11 * Electronic flash unit used wiatailltaTV II --
K1000 Manual
Page 20
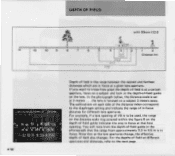
DEPTH OF FIELD with 50mm f/2.0 CO 15 10 9 8 7 6 4 2 f/2.0 f/5.6 f/11 f/22 1 Distance (m) ftm co 10 1.5 3 8 26 1.5 4 - 22116" e' "444" '8"16 I22 22 16 11 8 56 4 282 • 18 Depth of in-focus distance for different lens apertures. The calibrations on each side of the distance index correspond to 4.5 m is in focus at that lens opening of f/8 is to be used, the range on the distance scale ring covered within the figure 8 on a subject and look at the depth-of -field guide in the photograph that as the lens apertures change, the effective depth of -field guide indicates ...
DEPTH OF FIELD with 50mm f/2.0 CO 15 10 9 8 7 6 4 2 f/2.0 f/5.6 f/11 f/22 1 Distance (m) ftm co 10 1.5 3 8 26 1.5 4 - 22116" e' "444" '8"16 I22 22 16 11 8 56 4 282 • 18 Depth of in-focus distance for different lens apertures. The calibrations on each side of the distance index correspond to 4.5 m is in focus at that lens opening of f/8 is to be used, the range on the distance scale ring covered within the figure 8 on a subject and look at the depth-of -field guide in the photograph that as the lens apertures change, the effective depth of -field guide indicates ...
K1000 Manual
Page 21
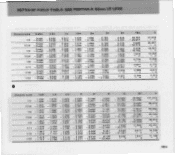
... 9.611' 7.827' 121.623' 86.915' 60.884' 43.530' 30.514' 00 22.231' 15.329' 11.188' 190 DEPTH-OF-FIELD TABLE: SMC PENTAX-A 50mm f/2 LENS Distance scale f/2 1/ 2.8 f/4 f/5.6 f/8 f/11 f/16 f/22 0.45m 0.446 - 0.454 0.445 ^- 0.455 0.443 '`' 0.458 0.440 - 0.461 0.436 0.466 0.430 - 0.472 0.422 -.. 0.482 0.413 -- 0.496 0.6m...
... 9.611' 7.827' 121.623' 86.915' 60.884' 43.530' 30.514' 00 22.231' 15.329' 11.188' 190 DEPTH-OF-FIELD TABLE: SMC PENTAX-A 50mm f/2 LENS Distance scale f/2 1/ 2.8 f/4 f/5.6 f/8 f/11 f/16 f/22 0.45m 0.446 - 0.454 0.445 ^- 0.455 0.443 '`' 0.458 0.440 - 0.461 0.436 0.466 0.430 - 0.472 0.422 -.. 0.482 0.413 -- 0.496 0.6m...
K1000 Manual
Page 22
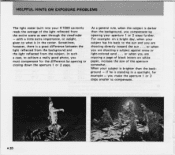
HELPFUL HINTS ON EXPOSURE PROBLEMS The light meter built into your K1000 correctly reads the average of the aperture somewhat. As a general rule, when the subject is brighter than the background, you compensate by opening your subject ...
HELPFUL HINTS ON EXPOSURE PROBLEMS The light meter built into your K1000 correctly reads the average of the aperture somewhat. As a general rule, when the subject is brighter than the background, you compensate by opening your subject ...
