
Owner's Manual
Page 3
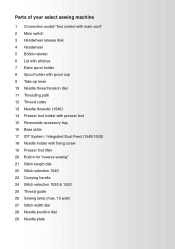
Parts of your select sewing machine 1 Connection socket "foot control with main cord" 2 Main switch 3 Handwheel release disk 4 Handwheel 5 Bobbin winder 6 Lid with stitches 7 Extra spool holder 8 Spool holder with spool cap 9 Take-up lever 10 Needle thread tension dial 11 Threading path 12 Thread cutter 13 Needle threader (1540) 14 Presser foot holder with presser foot 15 Removable accessory tray 16 Base plate 17 IDT System / Integrated Dual Feed (1540/1530) 18 Needle holder with fixing screw 19 Presser foot lifter 20 Button for "reverse sewing" 21 Stitch length dial 22 Stitch selection ...
Parts of your select sewing machine 1 Connection socket "foot control with main cord" 2 Main switch 3 Handwheel release disk 4 Handwheel 5 Bobbin winder 6 Lid with stitches 7 Extra spool holder 8 Spool holder with spool cap 9 Take-up lever 10 Needle thread tension dial 11 Threading path 12 Thread cutter 13 Needle threader (1540) 14 Presser foot holder with presser foot 15 Removable accessory tray 16 Base plate 17 IDT System / Integrated Dual Feed (1540/1530) 18 Needle holder with fixing screw 19 Presser foot lifter 20 Button for "reverse sewing" 21 Stitch length dial 22 Stitch selection ...
Owner's Manual
Page 5
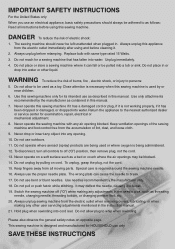
... sewing machine only for HOUSEHOLD use only SAVE THESE INSTRUCTIONS Never drop or insert any air opening . 10. The wrong plate can fall or be pulled into cord reel. Special care is used as a bed or couch where the air openings may deflect the needle, causing it can cause the needle to be used by the manufacturer as threading needle, changing needle, threading bobbin, or changing presser foot, etc. 20. Never operate...
... sewing machine only for HOUSEHOLD use only SAVE THESE INSTRUCTIONS Never drop or insert any air opening . 10. The wrong plate can fall or be pulled into cord reel. Special care is used as a bed or couch where the air openings may deflect the needle, causing it can cause the needle to be used by the manufacturer as threading needle, changing needle, threading bobbin, or changing presser foot, etc. 20. Never operate...

Owner's Manual
Page 6
Contents Accessories and needles Accessory tray Appliqué Appliqué foot Bias-tape binder Blind stitch Bobbin case Buttonholes Changing the needle plate Changing the needle Cleaning and oiling Closed overlock stitch Cording foot Covering stitch Darning with the elastic stitch Darning with the straight stitch Darning Decorative sewing Drawing up the bobbin thread Dropping the feed dog Elastic stitch Elastic stitches Electrical connection Embroidering with a dense zigzag stitch Eyelet embroidery Feather stitch Felling foot Free arm Fringe foot Introduction 55-56 3 51 62 61 25 8-9 33, ...
Contents Accessories and needles Accessory tray Appliqué Appliqué foot Bias-tape binder Blind stitch Bobbin case Buttonholes Changing the needle plate Changing the needle Cleaning and oiling Closed overlock stitch Cording foot Covering stitch Darning with the elastic stitch Darning with the straight stitch Darning Decorative sewing Drawing up the bobbin thread Dropping the feed dog Elastic stitch Elastic stitches Electrical connection Embroidering with a dense zigzag stitch Eyelet embroidery Feather stitch Felling foot Free arm Fringe foot Introduction 55-56 3 51 62 61 25 8-9 33, ...

Owner's Manual
Page 7
... spool holder 6 Serging with blindstitch and overlock stitch 25, 28-29 Winding the bobbin 4-7 Serging with zigzag stitch 24 Winding through the needle 7 Setting stretch stitches 17-19 Setting utility stitches 17-19 Zigzag stitch 24 Sewing light 69 Sewing on buttons 34 Sewing on patches 38 Sewing on zippers 40-41 Sewing table Introduction Shirring foot 79 Shell-edging 44 Smocking 35 Special accessories table 58 Stabilizing edges 42 Standard buttonhole 33 Standard buttonhole with gimp thread 33 Stitch density 17 Stitch length adjustment dial 17 Stitch...
... spool holder 6 Serging with blindstitch and overlock stitch 25, 28-29 Winding the bobbin 4-7 Serging with zigzag stitch 24 Winding through the needle 7 Setting stretch stitches 17-19 Setting utility stitches 17-19 Zigzag stitch 24 Sewing light 69 Sewing on buttons 34 Sewing on patches 38 Sewing on zippers 40-41 Sewing table Introduction Shirring foot 79 Shell-edging 44 Smocking 35 Special accessories table 58 Stabilizing edges 42 Standard buttonhole 33 Standard buttonhole with gimp thread 33 Stitch density 17 Stitch length adjustment dial 17 Stitch...
Owner's Manual
Page 8
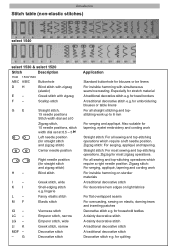
... with zigzag F - Greek stitch with zigzag (elastic) E - Scallop stitch G E Straight stitch, 15 needle positions Stitch width dial set at 0 Zigzag stitch, 15 needle positions, stitch width dial set at overlapped seams For overcasting, sewing on light fabrics For flat 0.5 - 5 Left needle position (for straight stitch and zigzag stitch) Blind stitch I L - Also suitable for quilting for tapering, eyelet embroidery and cording work For invisible hemming on sturdier materials A traditional decorative stitch For decorative hem edges on elastic, darning tears and inserting...
... with zigzag F - Greek stitch with zigzag (elastic) E - Scallop stitch G E Straight stitch, 15 needle positions Stitch width dial set at 0 Zigzag stitch, 15 needle positions, stitch width dial set at overlapped seams For overcasting, sewing on light fabrics For flat 0.5 - 5 Left needle position (for straight stitch and zigzag stitch) Blind stitch I L - Also suitable for quilting for tapering, eyelet embroidery and cording work For invisible hemming on sturdier materials A traditional decorative stitch For decorative hem edges on elastic, darning tears and inserting...
Owner's Manual
Page 9
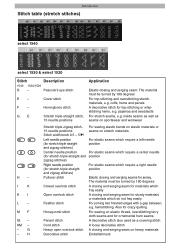
... stitch G E Stretch triple straight stitch, 15 needle positions Application Elastic closing and serging seams for ornamental hem seams. Penant stitch A decorative stitch also used as seams on heavy materials Decorative stitch Embellishment cuffs, hems and panels A decorative stitch for stretch triple straight and zigzag stitches) For elastic seams which do not fray easily Feather stitch For joining two finished edges with a gap between, e.g. pajamas and sweatsuits For stretch seams, e.g. Also for crazy quilting Honeycomb stitch For sewing on elastic thread...
... stitch G E Stretch triple straight stitch, 15 needle positions Application Elastic closing and serging seams for ornamental hem seams. Penant stitch A decorative stitch also used as seams on heavy materials Decorative stitch Embellishment cuffs, hems and panels A decorative stitch for stretch triple straight and zigzag stitches) For elastic seams which do not fray easily Feather stitch For joining two finished edges with a gap between, e.g. pajamas and sweatsuits For stretch seams, e.g. Also for crazy quilting Honeycomb stitch For sewing on elastic thread...

Owner's Manual
Page 11
Operate your Pfaff select Operate your Pfaff select Electrical connection Removable accessory tray Bobbins Bobbin case Threading the needle Needle threader Pulling up the bobbin thread Presser foot lifter Thread cutter Changing the presser foot IDT System/Integrated Dual Feed Changing the needle Needle thread tension Lowering the feed dog Stitch width dial Needle position dial Reverse sewing Stitch length dial Stitch selection 2 3 4-7 8-9 10 11 12 13 12 13 14 15 15 15 16 16 17 17 18-19 1
Operate your Pfaff select Operate your Pfaff select Electrical connection Removable accessory tray Bobbins Bobbin case Threading the needle Needle threader Pulling up the bobbin thread Presser foot lifter Thread cutter Changing the presser foot IDT System/Integrated Dual Feed Changing the needle Needle thread tension Lowering the feed dog Stitch width dial Needle position dial Reverse sewing Stitch length dial Stitch selection 2 3 4-7 8-9 10 11 12 13 12 13 14 15 15 15 16 16 17 17 18-19 1

Owner's Manual
Page 13
... hole. Using the free arm In order to its proper position, ensure that it out of the accessory organizer. Using both hands, swing the accessory tray (15) to the left and lift it is also used as an extended work support. The enclosed accessories are numbered. Model 1540, has a special removable accessory organizer. When replacing the removable accessory tray to sew with the free arm of the sewing machine. 3 Operate your Pfaff select Accessory tray Your Pfaff select sewing machine...
... hole. Using the free arm In order to its proper position, ensure that it out of the accessory organizer. Using both hands, swing the accessory tray (15) to the left and lift it is also used as an extended work support. The enclosed accessories are numbered. Model 1540, has a special removable accessory organizer. When replacing the removable accessory tray to sew with the free arm of the sewing machine. 3 Operate your Pfaff select Accessory tray Your Pfaff select sewing machine...

Owner's Manual
Page 25
Operate your Pfaff select Changing the needle Switch off the main switch To remove: Lower the presser foot and move slide A fully to the right. Lower the presser foot and insert the needle, pushing it up as far as it goes. Setting the needle thread tension Set the required needle thread tension (10) with the help of the needle must face to its highest point. darning the feed dog has to 5. The normal setting for sewing is dropped. To do...
Operate your Pfaff select Changing the needle Switch off the main switch To remove: Lower the presser foot and move slide A fully to the right. Lower the presser foot and insert the needle, pushing it up as far as it goes. Setting the needle thread tension Set the required needle thread tension (10) with the help of the needle must face to its highest point. darning the feed dog has to 5. The normal setting for sewing is dropped. To do...

Owner's Manual
Page 27
... pressed. Stitch length adjustment dial With the stitch length adjustment dial (21) you will go in reverse only as long as it will find the "buttonhole" symbol. To sew stretch stitches (dark background), you turn the stitch length adjustment dial (21) as far as the reverse sewing button (20) is the optimum stitch density for sewing buttonholes and embroidering. The further you must turn the dial to the required length. Operate your Pfaff select Reverse sewing The machine sews in the...
... pressed. Stitch length adjustment dial With the stitch length adjustment dial (21) you will go in reverse only as long as it will find the "buttonhole" symbol. To sew stretch stitches (dark background), you turn the stitch length adjustment dial (21) as far as the reverse sewing button (20) is the optimum stitch density for sewing buttonholes and embroidering. The further you must turn the dial to the required length. Operate your Pfaff select Reverse sewing The machine sews in the...
Owner's Manual
Page 33
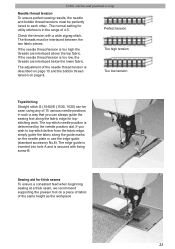
... tension Topstitching Straight stitch G (1540)/E (1530, 1520) can always guide the sewing foot along the guide marks on a piece of fabric of 4-5. If you can be perfectly tuned to top-stitch farther from the fabric edge, simply guide the fabric along the fabric edge for thick seams To ensure a consistent feed when beginning sewing at a thick seam, we recommend supporting the presser foot on the needle plate or use the edge guide (standard accessory No.8). The threads...
... tension Topstitching Straight stitch G (1540)/E (1530, 1520) can always guide the sewing foot along the guide marks on a piece of fabric of 4-5. If you can be perfectly tuned to top-stitch farther from the fabric edge, simply guide the fabric along the fabric edge for thick seams To ensure a consistent feed when beginning sewing at a thick seam, we recommend supporting the presser foot on the needle plate or use the edge guide (standard accessory No.8). The threads...

Owner's Manual
Page 34
... sewing jobs by changing the needle position, e.g. You can adjust this way you can be positioned halfway under the sewing foot. top-stitching a collar or sewing in the range of the fabric edge. In this edge guide with the zigzag stitch, select the right needle position. Choose a stitch width in a zipper. Utility stitches and practical sewing stitch stitch 1540 G 1530 E 1520 E 0 2,5 0 2,5 0 2,5 3-5 0/1 1540 G 2- 1-2 3-5 0/1 1530 E 2- 1-2 3-5 0/1 1520 E 2- 1-2 3-5 0/1 3-5 0/1 3-5 0/1 Straight stitch Stitch G/E is used for overcasting with adjusting screw A. When sewing...
... sewing jobs by changing the needle position, e.g. You can adjust this way you can be positioned halfway under the sewing foot. top-stitching a collar or sewing in the range of the fabric edge. In this edge guide with the zigzag stitch, select the right needle position. Choose a stitch width in a zipper. Utility stitches and practical sewing stitch stitch 1540 G 1530 E 1520 E 0 2,5 0 2,5 0 2,5 3-5 0/1 1540 G 2- 1-2 3-5 0/1 1530 E 2- 1-2 3-5 0/1 1520 E 2- 1-2 3-5 0/1 3-5 0/1 3-5 0/1 Straight stitch Stitch G/E is used for overcasting with adjusting screw A. When sewing...

Owner's Manual
Page 36
... straight stitch This stitch is used for sewing all seams where great strength is very suitable for hems on T-shirts and underwear. • Serge the edge of the hem. • Fold the hem inwards at the required width. • Topstitch the hem from you as far as it will go for the longest stitch length. 1540 G 3-5 Stretch 1530 E 3-5 Stretch 1520 E 3-5 Stretch 3-5 0/1 3-5 0/1 3-5 0/1 Stretch triple zigzag stitch The stretch triple zigzag stitch is a highly elastic...
... straight stitch This stitch is used for sewing all seams where great strength is very suitable for hems on T-shirts and underwear. • Serge the edge of the hem. • Fold the hem inwards at the required width. • Topstitch the hem from you as far as it will go for the longest stitch length. 1540 G 3-5 Stretch 1530 E 3-5 Stretch 1520 E 3-5 Stretch 3-5 0/1 3-5 0/1 3-5 0/1 Stretch triple zigzag stitch The stretch triple zigzag stitch is a highly elastic...
Owner's Manual
Page 39
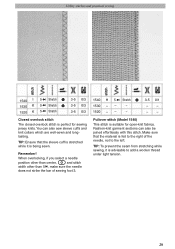
... the needle, not to add a woolen thread under light tension. 29 Stretch 5- Stretch 3-5 0/3 3-5 0/3 3-5 0/3 Closed overlock stitch The closed overlock stitch is suitable for sewing jersey knits. You can also be joined effortlessly with this stitch. Pullover stitch (Model 1540) This stitch is perfect for open-knit fabrics. Stretch 5- Remember! Stretch 1530 - - - 1520 - - - 3-5 0/1 -- -- TIP: To prevent the seam from stretching while sewing, it is fed to the right of sewing foot 3. 1540 H 5- Utility stitches and practical sewing stitch stitch 1540 I 1530...
... the needle, not to add a woolen thread under light tension. 29 Stretch 5- Stretch 3-5 0/3 3-5 0/3 3-5 0/3 Closed overlock stitch The closed overlock stitch is suitable for sewing jersey knits. You can also be joined effortlessly with this stitch. Pullover stitch (Model 1540) This stitch is perfect for open-knit fabrics. Stretch 5- Remember! Stretch 1530 - - - 1520 - - - 3-5 0/1 -- -- TIP: To prevent the seam from stretching while sewing, it is fed to the right of sewing foot 3. 1540 H 5- Utility stitches and practical sewing stitch stitch 1540 I 1530...

Owner's Manual
Page 45
... practical sewing stitch stitch 1540 G 0 3 1530 E 0 3 1520 E 0 3 3-5 0/1 3-5 0/1 3-5 0/1 1540 G 1530 E 1520 E 0 3-4 0 3-4 0 3-4 3-5 0/1 3-5 0/1 3-5 0/1 Hemming with the twin needle Use the twin needle to make sure that you must be sewn at very low. Twin needles are particularly suitable for beautiful smocking work with the elastic thread, you will be irregular. • Knot the threads at the beginning and end of the bobbin case must stretch the fabric to its original length when sewing the subsequent seams. Otherwise, the gather...
... practical sewing stitch stitch 1540 G 0 3 1530 E 0 3 1520 E 0 3 3-5 0/1 3-5 0/1 3-5 0/1 1540 G 1530 E 1520 E 0 3-4 0 3-4 0 3-4 3-5 0/1 3-5 0/1 3-5 0/1 Hemming with the twin needle Use the twin needle to make sure that you must be sewn at very low. Twin needles are particularly suitable for beautiful smocking work with the elastic thread, you will be irregular. • Knot the threads at the beginning and end of the bobbin case must stretch the fabric to its original length when sewing the subsequent seams. Otherwise, the gather...
Owner's Manual
Page 59
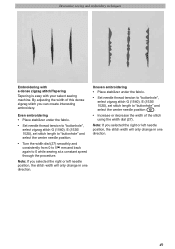
... needle position, the stitch width will only change in one direction. 49 Uneven embroidering • Place stabilizer under the fabric. • Set needle thread tension to "buttonhole", select zigzag stitch G (1540), E (1530/ 1520), set stitch length to 0 while sewing at a constant speed through the procedure. Even embroidering • Place stabilizer under the fabric. • Set needle thread tension to "buttonhole", select zigzag stitch G (1540), E (1530/ 1520), set stitch length to "buttonhole" and select the center needle position. • Turn the width dial...
... needle position, the stitch width will only change in one direction. 49 Uneven embroidering • Place stabilizer under the fabric. • Set needle thread tension to "buttonhole", select zigzag stitch G (1540), E (1530/ 1520), set stitch length to 0 while sewing at a constant speed through the procedure. Even embroidering • Place stabilizer under the fabric. • Set needle thread tension to "buttonhole", select zigzag stitch G (1540), E (1530/ 1520), set stitch length to "buttonhole" and select the center needle position. • Turn the width dial...

Owner's Manual
Page 66
Accessories and needles Presser feet (normal accessories) 0 Standard presser foot Part No. 98-694 816-00 (pictured) (select 1540 and 1530) Part No. 96-694-847-00 (select 1520) 1 Fancy-stitch foot (for top feed) Part No. 98-694 814-00 (select 1540) 1 Clear view foot (Fancy-stitch foot not suitable for top feed) Part No. 98-694 864-01 3 Blind stitch and overlock foot Part No. 98-694-890-00 (pictured) (select 1540 and 1530) Part No. 98-694 845-00 (select 1520) 4 Zipper-and edge-stitching foot Part No. 98-694 884-00 (pictured) (select 1540 and 1530) Part No. 98-694 843-00 (select 1520) 56
Accessories and needles Presser feet (normal accessories) 0 Standard presser foot Part No. 98-694 816-00 (pictured) (select 1540 and 1530) Part No. 96-694-847-00 (select 1520) 1 Fancy-stitch foot (for top feed) Part No. 98-694 814-00 (select 1540) 1 Clear view foot (Fancy-stitch foot not suitable for top feed) Part No. 98-694 864-01 3 Blind stitch and overlock foot Part No. 98-694-890-00 (pictured) (select 1540 and 1530) Part No. 98-694 845-00 (select 1520) 4 Zipper-and edge-stitching foot Part No. 98-694 884-00 (pictured) (select 1540 and 1530) Part No. 98-694 843-00 (select 1520) 56

Owner's Manual
Page 68
... use straight stitch in center needle position! synth For circle-shaped embroidery Foundation wear Quilt and patchwork sewing Sewing spaces between cor. Accessories and needles Presser feet (special accessory) for top feed) Knit-edge foot Darning foot Teflon some of the special accessory feet They are available at an extra charge from your dealer Accessory Appliqué foot Open appliqué foot Bias tape binder (remove foot holder) Cording foot, 5 grooves (twin needle with needle spacing 1.6 to 2.0) Cording foot, 7 grooves (twin needle with needle spacing 1.6 to 2.0) Cording...
... use straight stitch in center needle position! synth For circle-shaped embroidery Foundation wear Quilt and patchwork sewing Sewing spaces between cor. Accessories and needles Presser feet (special accessory) for top feed) Knit-edge foot Darning foot Teflon some of the special accessory feet They are available at an extra charge from your dealer Accessory Appliqué foot Open appliqué foot Bias tape binder (remove foot holder) Cording foot, 5 grooves (twin needle with needle spacing 1.6 to 2.0) Cording foot, 7 grooves (twin needle with needle spacing 1.6 to 2.0) Cording...

Owner's Manual
Page 78
... Changing the needle plate Switch off the main switch • Remove the needle plate and lower the feed dog. • Clean the feed dog and hook area with the brush. • Apply a drop of oil (every 15 to the hook. Now push the screwdriver into the opening and take the needle plate out. Before you start sewing, check that the needle plate is maintenance free and must not be oiled. 68 Removal: • Raise the sewing foot and remove the removable accessory...
... Changing the needle plate Switch off the main switch • Remove the needle plate and lower the feed dog. • Clean the feed dog and hook area with the brush. • Apply a drop of oil (every 15 to the hook. Now push the screwdriver into the opening and take the needle plate out. Before you start sewing, check that the needle plate is maintenance free and must not be oiled. 68 Removal: • Raise the sewing foot and remove the removable accessory...

Owner's Manual
Page 80
... feed or feeds irregularly Sewing lint has collected between the Remove needle plate, remove lint feed dog teeth rows with large eye (System 130 N). Machine is too tight. Thread is not properly installed. Only guide the fabric lightly When you must switch off the main switch. Use a larger needle. Use needle with brush. The bobbin case is too thick. Seam is sewn unevenly The tension needs adjusting Thread is too thick, slubbed or hard The bobbin thread is lowered...
... feed or feeds irregularly Sewing lint has collected between the Remove needle plate, remove lint feed dog teeth rows with large eye (System 130 N). Machine is too tight. Thread is not properly installed. Only guide the fabric lightly When you must switch off the main switch. Use a larger needle. Use needle with brush. The bobbin case is too thick. Seam is sewn unevenly The tension needs adjusting Thread is too thick, slubbed or hard The bobbin thread is lowered...


