

Owner's Manual
Page 4
..., grasp the plug, not the cord. 15. Replace bulb with any opening blocked. Do not place in the needle area, threading needle, changing needle, threading bobbin, or changing presser foot, etc. Do not use the proper needle plate. Never operate on a soft surface such as contained in this sewing machine if it has a damaged cord or plug, if it has been dropped or damaged, or dropped into any air opening . 10. Keep fingers away...
..., grasp the plug, not the cord. 15. Replace bulb with any opening blocked. Do not place in the needle area, threading needle, changing needle, threading bobbin, or changing presser foot, etc. Do not use the proper needle plate. Never operate on a soft surface such as contained in this sewing machine if it has a damaged cord or plug, if it has been dropped or damaged, or dropped into any air opening . 10. Keep fingers away...

Owner's Manual
Page 6
... the straight stitch 44 General information on sewing i p 56 P Handwheel release disk 4 Bias-tape binder 55 Hemming with a dense zigzag stitch Eyelet embroidery Felling foot Free arm Fringe foot 24-25 2 41-44 45 53 57 Patchwork quilt Placing sewing thread on spool holder Practical sewing Presser foot lifter Quilt and patchwork foot Quilting 46 19-38 a 13 5? 51, 51 I Dropping the feed dog 15 Oiling the sewing machine 62 Elastic stitch 25 Optional accessories 52-60 Elastic stitches Electrical connection Embroidering with the twin needle Blind stitch...
... the straight stitch 44 General information on sewing i p 56 P Handwheel release disk 4 Bias-tape binder 55 Hemming with a dense zigzag stitch Eyelet embroidery Felling foot Free arm Fringe foot 24-25 2 41-44 45 53 57 Patchwork quilt Placing sewing thread on spool holder Practical sewing Presser foot lifter Quilt and patchwork foot Quilting 46 19-38 a 13 5? 51, 51 I Dropping the feed dog 15 Oiling the sewing machine 62 Elastic stitch 25 Optional accessories 52-60 Elastic stitches Electrical connection Embroidering with the twin needle Blind stitch...
Owner's Manual
Page 7
...tray 3 Top-stitching 21 Removing the presser foot 13 Trouble-shooting 64 Repairing tears 32 Twin needle 11,29 Reverse sewing 17 Richelieu 45 Utility stitch table Introduction Right needle position 16 Ruffler 55 Winding from the second spool holder 6 Selecting needle position Selecting stitch width 16 Winding the bobbin 4-7 16 Winding through the needle 7 Serging with zigzag stitch 22 Setting stretch stitches 17-18 Zigzag stitch 22 Setting utility stitches 17-18 Sewing light 63 Sewing on buttons 28 Sewing on patches 32 Sewing on zippers 34-35 Sewing table...
...tray 3 Top-stitching 21 Removing the presser foot 13 Trouble-shooting 64 Repairing tears 32 Twin needle 11,29 Reverse sewing 17 Richelieu 45 Utility stitch table Introduction Right needle position 16 Ruffler 55 Winding from the second spool holder 6 Selecting needle position Selecting stitch width 16 Winding the bobbin 4-7 16 Winding through the needle 7 Serging with zigzag stitch 22 Setting stretch stitches 17-18 Zigzag stitch 22 Setting utility stitches 17-18 Sewing light 63 Sewing on buttons 28 Sewing on patches 32 Sewing on zippers 34-35 Sewing table...
Owner's Manual
Page 8
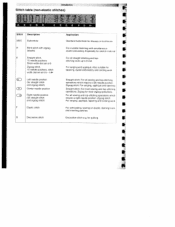
...all straight stitching and topstitching work up to 6 mm For serging and appliqué. Also suitable for tapering, eyelet embroidery and cording work I For overcasting, sewing on elastic, darning teirs and inserting patches I Decorative stitch e.g. letn4uction Stitch table (non-elastic stitches) Iss, ABCB0 E E E E FG H Stitch Description NB/C Buttonhole H Blind stitch with zigzag (elastic) E Straight stitch, 15 needle positions Stitch width dial set at 0 Zigzag stitch, 15 needle positions. Especially for stretch in it 'icd For all sewing and top-stitchinq operations...
...all straight stitching and topstitching work up to 6 mm For serging and appliqué. Also suitable for tapering, eyelet embroidery and cording work I For overcasting, sewing on elastic, darning teirs and inserting patches I Decorative stitch e.g. letn4uction Stitch table (non-elastic stitches) Iss, ABCB0 E E E E FG H Stitch Description NB/C Buttonhole H Blind stitch with zigzag (elastic) E Straight stitch, 15 needle positions Stitch width dial set at 0 Zigzag stitch, 15 needle positions. Especially for stretch in it 'icd For all sewing and top-stitchinq operations...

Owner's Manual
Page 11
Operate your PfaffFreeSrle Operate your Pfatf FreeStyle Electrical connection Removable accessory tray Bobbins Bobbin case Bobbin thread tension Threading the needle Pulling up the bobbin thread Presser foot lifter Thread cutter Changing the presser foot IDT System/Integrated Dual Feed Changing the needle Needle thread tension Lowering the feed dog Stitch width dial Needle position dial Reverse sewing Stitch length dial Stitch selection 2 3 4-7 8-9 9 10 12 13 13 13 14 15 15 15 16 16 17 17 18-19
Operate your PfaffFreeSrle Operate your Pfatf FreeStyle Electrical connection Removable accessory tray Bobbins Bobbin case Bobbin thread tension Threading the needle Pulling up the bobbin thread Presser foot lifter Thread cutter Changing the presser foot IDT System/Integrated Dual Feed Changing the needle Needle thread tension Lowering the feed dog Stitch width dial Needle position dial Reverse sewing Stitch length dial Stitch selection 2 3 4-7 8-9 9 10 12 13 13 13 14 15 15 15 16 16 17 17 18-19

Owner's Manual
Page 13
Operate your Pfaff FreeStyle Accessory tray Your Pfaff FreeStyle sewing machine has a removable accessory tray (27) which is flush with the free arm, you must remove the accessory tray. N Using both hands, swing the accessory tray (27) I to the left and lift it is also used as an extended work support. When replacing the removable accessory tray to sew with the free arm of the hole. Using the free arm In order to its proper position, ensure that it out of the sewing machine.
Operate your Pfaff FreeStyle Accessory tray Your Pfaff FreeStyle sewing machine has a removable accessory tray (27) which is flush with the free arm, you must remove the accessory tray. N Using both hands, swing the accessory tray (27) I to the left and lift it is also used as an extended work support. When replacing the removable accessory tray to sew with the free arm of the hole. Using the free arm In order to its proper position, ensure that it out of the sewing machine.
Owner's Manual
Page 15
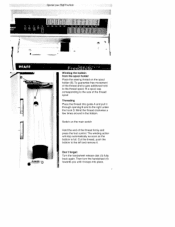
... under the hook D. Cut the thread, push the bobbin to the left and remove it through opening B and to the size of the thread firmly and press the foot control. Operate your Pfaff FreeStyle I1fl[iflfl cc - ( -I - Wind the thread clockwise a few times around in the bobbin. PFAFF FreeFSf'1t Winding the bobbin from the spool holder Place the sewing thread on the main switch Hold the end of the thread spool Threading Place the thread into...
... under the hook D. Cut the thread, push the bobbin to the left and remove it through opening B and to the size of the thread firmly and press the foot control. Operate your Pfaff FreeStyle I1fl[iflfl cc - ( -I - Wind the thread clockwise a few times around in the bobbin. PFAFF FreeFSf'1t Winding the bobbin from the spool holder Place the sewing thread on the main switch Hold the end of the thread spool Threading Place the thread into...
Owner's Manual
Page 25
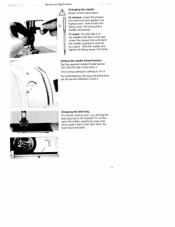
... A Changing the needle Switch off the main switch To remove: Lower the presser toot and move slide A fully to the right. Setting the needle thread tension Set the required needle thread tension (10) with the help of the needle must face to its highest point. The normal setting for sewing is dropped. / A Ic Hold the needle and tighten the fixing screw (16) firmly. darning the feed dog has to 5. To do this, open the bobbin case/hook cover and...
... A Changing the needle Switch off the main switch To remove: Lower the presser toot and move slide A fully to the right. Setting the needle thread tension Set the required needle thread tension (10) with the help of the needle must face to its highest point. The normal setting for sewing is dropped. / A Ic Hold the needle and tighten the fixing screw (16) firmly. darning the feed dog has to 5. To do this, open the bobbin case/hook cover and...
Owner's Manual
Page 27
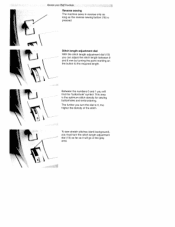
Between the numbers 0 and 1 you turn the stitch length adjustment dial (19) as far as the reverse sewing button (18) is the optimum stitch density for sewing buttonholes and embroidering. The further you will go in the grey area. This area is pressed. Operate your Pfaff FreeStyle Reverse sewing The machine sews in reverse only as long as it will find the "buttonhole" symbol. To sew stretch stitches (dark background), you can adjust the stitch length between 0 and...
Between the numbers 0 and 1 you turn the stitch length adjustment dial (19) as far as the reverse sewing button (18) is the optimum stitch density for sewing buttonholes and embroidering. The further you will go in the grey area. This area is pressed. Operate your Pfaff FreeStyle Reverse sewing The machine sews in reverse only as long as it will find the "buttonhole" symbol. To sew stretch stitches (dark background), you can adjust the stitch length between 0 and...
Owner's Manual
Page 31
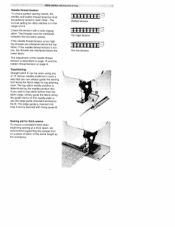
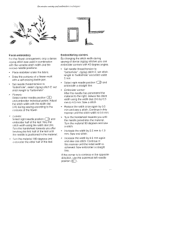
... adjustment of 4-5. The edge guide is inserted into hole A and is described on page 15 and the bobbin thread tension on the needle plate or use the edge guide (standard accessory No.8). Utility stitches and practical sewing Needle thread tension To ensure perfect sewing results, the needle and bobbin thread tensions must be perfectly tuned to top-stitch farther from the fabric edge, simply guide the fabric along the fabric edge for top-stitching work. Topstitching Straight stitch E can always guide the sewing foot...
... adjustment of 4-5. The edge guide is inserted into hole A and is described on page 15 and the bobbin thread tension on the needle plate or use the edge guide (standard accessory No.8). Utility stitches and practical sewing Needle thread tension To ensure perfect sewing results, the needle and bobbin thread tensions must be perfectly tuned to top-stitch farther from the fabric edge, simply guide the fabric along the fabric edge for top-stitching work. Topstitching Straight stitch E can always guide the sewing foot...
Owner's Manual
Page 32
... can adjust this case, the material should only be increased up to overlock stitching, zigzag stitch E. needle position. You can sew beautiful smooth seams. I used for overcasting with adjusting screw A. Please ensure that the needle is the basic straight stitch. Utility stitches and practical sewing e I A with the zigzag stitch, select the right needle position. The stitch length can be guided along edge guide B. topstitching a collar or sewing in the range of the fabric edge. Choose a stitch width in a zipper. stitch width...
... can adjust this case, the material should only be increased up to overlock stitching, zigzag stitch E. needle position. You can sew beautiful smooth seams. I used for overcasting with adjusting screw A. Please ensure that the needle is the basic straight stitch. Utility stitches and practical sewing e I A with the zigzag stitch, select the right needle position. The stitch length can be guided along edge guide B. topstitching a collar or sewing in the range of the fabric edge. Choose a stitch width in a zipper. stitch width...
Owner's Manual
Page 34
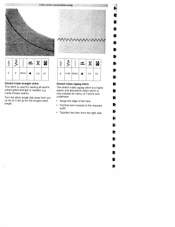
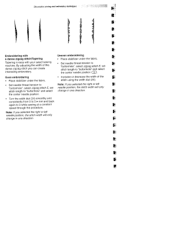
...(! Stretch triple zigzag stitch The stretch triple zigzag stitch is a highly elastic and decorative seam which is very suitable for sewing all seams where great strength is used for hems on T-shirts and underwear. • Serge the edge of the hem. • Fold the hem inwards at the required width. • Topstitch the hem from you as far as it will go for the longest stitch length...
...(! Stretch triple zigzag stitch The stretch triple zigzag stitch is a highly elastic and decorative seam which is very suitable for sewing all seams where great strength is used for hems on T-shirts and underwear. • Serge the edge of the hem. • Fold the hem inwards at the required width. • Topstitch the hem from you as far as it will go for the longest stitch length...
Owner's Manual
Page 39
.... Use only a stretch needle when sewing lretch material! On page 11 you should use an additional bobbin case and wind the bobbin by hand with elastic threads Fine, light fabrics such as Batist, rayon and silk are available in different widths. Utility stitches and practical sewing E 0 3 • 3-5 0/1 r ruir -- As the elastic thread is advisable to the seam. Don't forget, the higher the bobbin thread tension, the more intense the gathering effect. • Sew...
.... Use only a stretch needle when sewing lretch material! On page 11 you should use an additional bobbin case and wind the bobbin by hand with elastic threads Fine, light fabrics such as Batist, rayon and silk are available in different widths. Utility stitches and practical sewing E 0 3 • 3-5 0/1 r ruir -- As the elastic thread is advisable to the seam. Don't forget, the higher the bobbin thread tension, the more intense the gathering effect. • Sew...
Owner's Manual
Page 51
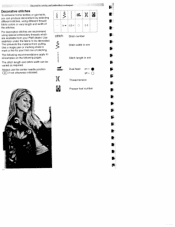
... following recommendations apply to all samples on = Q off = Thread tension Presser foot number t R The stitch length and stitch width can produce decorations by selecting different stitches, using special embroidery threads which are available from pulling. O.51 0 2-3 - For decorative stitches we recommend using different threadl fabric colors or vary length and width of stitching. you can be decorated. Decoradve sewing and embroidery techniques Decorative stitches To enhance home textiles or garments.
... following recommendations apply to all samples on = Q off = Thread tension Presser foot number t R The stitch length and stitch width can produce decorations by selecting different stitches, using special embroidery threads which are available from pulling. O.51 0 2-3 - For decorative stitches we recommend using different threadl fabric colors or vary length and width of stitching. you can be decorated. Decoradve sewing and embroidery techniques Decorative stitches To enhance home textiles or garments.
Owner's Manual
Page 53
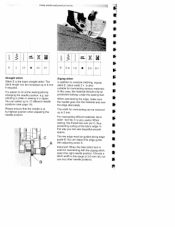
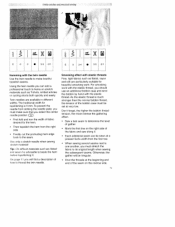
... left needle position, the stitch width will only change in one direction. Uneven embroidering • Place stabilizer under the fabric. • Set needle thread tension to "buttonhole", select zigzag stitch E, set stitch length to 0 while sewing at a constant speed through the procedure. Decorative sewing and embroidery techniques I I 4 I I I p I I Embroidering with a dense zigzag stitchiTapering Tapering is easy with your select sewing machine. the center needle position. • Turn the width dial (24) smoothly and I needle position, the stitch width...
... left needle position, the stitch width will only change in one direction. Uneven embroidering • Place stabilizer under the fabric. • Set needle thread tension to "buttonhole", select zigzag stitch E, set stitch length to 0 while sewing at a constant speed through the procedure. Decorative sewing and embroidery techniques I I 4 I I I p I I Embroidering with a dense zigzag stitchiTapering Tapering is easy with your select sewing machine. the center needle position. • Turn the width dial (24) smoothly and I needle position, the stitch width...
Owner's Manual
Page 54
... various needle positions. • Place stabilizer under the fabric. • Draw the contures of dense zigzag stitches you can embroider corners with a self-erasing textile pen. • Set needle thread tension to "buttonhole', select zigzag stitch E, set stitch length to 'buttonhole" and stitch width 5 mm. • Select right needle position EZ and embroider a straight line. • Embroider corner: After the needle has penetrated the material to the right, reduce the stitch width using the width dial (24>. Sew a stitch...
... various needle positions. • Place stabilizer under the fabric. • Draw the contures of dense zigzag stitches you can embroider corners with a self-erasing textile pen. • Set needle thread tension to "buttonhole', select zigzag stitch E, set stitch length to 'buttonhole" and stitch width 5 mm. • Select right needle position EZ and embroider a straight line. • Embroider corner: After the needle has penetrated the material to the right, reduce the stitch width using the width dial (24>. Sew a stitch...
Owner's Manual
Page 61
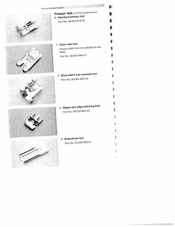
Accessories and needles Presser feet (normal accessortus) I 0 Standard presser foot Part No. 98-694 816-00 I I I p 1 Clear view foot (Fancy-stitch foot not suitable for top feed) / Part No. 98-694 864-01 3 Blind stitch and overlock toot Part No. 98-694-890-00 1 4 Zipper-and edge-stitching foot Part No. 98-694 884-00 5 Buttonhole foot Part No. 93-036 990-9 1
Accessories and needles Presser feet (normal accessortus) I 0 Standard presser foot Part No. 98-694 816-00 I I I p 1 Clear view foot (Fancy-stitch foot not suitable for top feed) / Part No. 98-694 864-01 3 Blind stitch and overlock toot Part No. 98-694-890-00 1 4 Zipper-and edge-stitching foot Part No. 98-694 884-00 5 Buttonhole foot Part No. 93-036 990-9 1
Owner's Manual
Page 63
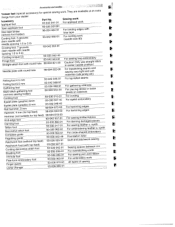
... embroidery work . Needle plate with round hole 98-694 822-00 For topstitching seams and sewing very light and soft materials (silk jersey etc) Felling foot 4.5 mm Felling foot 6.5 mm Gathering foot Multi-stitch gathering foot (remove sewing holder) Cording foot Eyelet plate (graphic) 6mm Eyelet plate (graphic) 8 mm Roll hemmer, 2 mm Hemmer, 4 mm (for top feed) Hemmer (not suitable for special sewing work All types of sewing r I I F p Accessories and needles 'resser feet (special accessory) for top feed) Knit-edge foot Darning foot Teflon foot Decorative stitch foot...
... embroidery work . Needle plate with round hole 98-694 822-00 For topstitching seams and sewing very light and soft materials (silk jersey etc) Felling foot 4.5 mm Felling foot 6.5 mm Gathering foot Multi-stitch gathering foot (remove sewing holder) Cording foot Eyelet plate (graphic) 6mm Eyelet plate (graphic) 8 mm Roll hemmer, 2 mm Hemmer, 4 mm (for top feed) Hemmer (not suitable for special sewing work All types of sewing r I I F p Accessories and needles 'resser feet (special accessory) for top feed) Knit-edge foot Darning foot Teflon foot Decorative stitch foot...

Owner's Manual
Page 73
... you use the machine, the more care it lightly to the right and the needle plate will I rewardyou with a longer service life. You can see where to the hook. The more often you start sewing, check that the needle plate is maintenance free and must not be oiled. Maintenance and trouble-shooting Changing the needle plate Switch off the main switch • Remove the needle plate and lower the feed dog. • Clean the feed dog and hook area...
... you use the machine, the more care it lightly to the right and the needle plate will I rewardyou with a longer service life. You can see where to the hook. The more often you start sewing, check that the needle plate is maintenance free and must not be oiled. Maintenance and trouble-shooting Changing the needle plate Switch off the main switch • Remove the needle plate and lower the feed dog. • Clean the feed dog and hook area...
Owner's Manual
Page 75
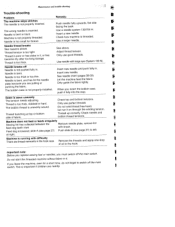
... not wind thread free-hand, but run it . Seam is too tight. Remove the threads and apply one drop of fabric, Check top and bottom tensions. If you are pulling or pushing the fabric. Needle is lowered, slide A (see page 27) to left. Use a needle system 130/705 H. Insert a new needle. Thread tension is sewn unevenly The tension needs adjusting. Needle breaks off the main switch. The bobbin case is bent. Insert new needle and push fully in the hook...
... not wind thread free-hand, but run it . Seam is too tight. Remove the threads and apply one drop of fabric, Check top and bottom tensions. If you are pulling or pushing the fabric. Needle is lowered, slide A (see page 27) to left. Use a needle system 130/705 H. Insert a new needle. Thread tension is sewn unevenly The tension needs adjusting. Needle breaks off the main switch. The bobbin case is bent. Insert new needle and push fully in the hook...


