Brochure - Anniversary Edition
Page 1
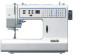
..., decorative stitches, stretch stitches and a buttonhole • Needle Up/Down • Presser Foot Up Safety Bonus Presser Feet Kit! Part # PFAFF155EN PFAFF, PERFECTION STARTS HERE, SMARTER BY PFAFF, AMBITION and ORIGINAL IDT are set automatically. • Hard Cover - The sewing area to sew and start sewing • 27 Stitches - Automatically adjusts the stitch width to prevent needle breakage. • Elongation - Change the settings of a built-in actual size. • Start/Stop button - Built to make sewing easy and to sew without the foot control. • Speed slider - NEW...
..., decorative stitches, stretch stitches and a buttonhole • Needle Up/Down • Presser Foot Up Safety Bonus Presser Feet Kit! Part # PFAFF155EN PFAFF, PERFECTION STARTS HERE, SMARTER BY PFAFF, AMBITION and ORIGINAL IDT are set automatically. • Hard Cover - The sewing area to sew and start sewing • 27 Stitches - Automatically adjusts the stitch width to prevent needle breakage. • Elongation - Change the settings of a built-in actual size. • Start/Stop button - Built to make sewing easy and to sew without the foot control. • Speed slider - NEW...
Brochure - Anniversary Edition
Page 2
... special edition computerized machines to individuality. Discover the PFAFF® ambitionTM sewing machine and experience the difference that stitch. great for PFAFF® 155 Anniversary Machines PFAFF® ambitionTM 155 Spacious. This model will soon become your must-have to delight. NEEDLE UP/DOWN The needle remains in the fabric for easy pivoting, allowing you to its founding in Kaiserslautern, Germany in their passion for sewing and quilting, PFAFF...
... special edition computerized machines to individuality. Discover the PFAFF® ambitionTM sewing machine and experience the difference that stitch. great for PFAFF® 155 Anniversary Machines PFAFF® ambitionTM 155 Spacious. This model will soon become your must-have to delight. NEEDLE UP/DOWN The needle remains in the fabric for easy pivoting, allowing you to its founding in Kaiserslautern, Germany in their passion for sewing and quilting, PFAFF...

Manual
Page 2
... foot control is designed to comply with any adjustment in this manual. • Never operate this manual. Avoid placing other user servicing adjustments mentioned in the instruction manual. IMPORTANT SAFETY INSTRUCTIONS When using this sewing machine only for examination, repair, electrical or mechanical adjustment. • Never operate the sewing machine with IEC/EN 60335-2-28 and UL1594. It may deflect the needle causing it to break. • Wear safety glasses. • Switch the sewing machine...
... foot control is designed to comply with any adjustment in this manual. • Never operate this manual. Avoid placing other user servicing adjustments mentioned in the instruction manual. IMPORTANT SAFETY INSTRUCTIONS When using this sewing machine only for examination, repair, electrical or mechanical adjustment. • Never operate the sewing machine with IEC/EN 60335-2-28 and UL1594. It may deflect the needle causing it to break. • Wear safety glasses. • Switch the sewing machine...

Manual
Page 4
...Cleaning the machine 32 Unpacking 10 Connect to the power supply 10 Pack away after sewing 11 Free arm 11 Replacing the stitch plate 32 Troubleshooting 33 Technical specification 34 Leveling the machine base plate 11 Thread cutter 11 Spool pins 12 Threading the machine 13 Needle threader 14 Threading for twin needle 15 Bobbin winding 16 Inserting the bobbin 17 Presser foot pressure 17 Thread tension 18 Needles 19 Changing the needle 19 Lowering feed dogs 20 Presser foot lift 20 Changing the presser foot 20 Function buttons and indicators 21 Reverse 21 Start...
...Cleaning the machine 32 Unpacking 10 Connect to the power supply 10 Pack away after sewing 11 Free arm 11 Replacing the stitch plate 32 Troubleshooting 33 Technical specification 34 Leveling the machine base plate 11 Thread cutter 11 Spool pins 12 Threading the machine 13 Needle threader 14 Threading for twin needle 15 Bobbin winding 16 Inserting the bobbin 17 Presser foot pressure 17 Thread tension 18 Needles 19 Changing the needle 19 Lowering feed dogs 20 Presser foot lift 20 Changing the presser foot 20 Function buttons and indicators 21 Reverse 21 Start...

Manual
Page 5
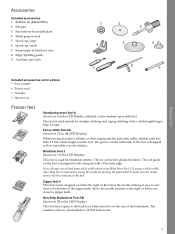
Bobbin cover 9. Needle thread guide 13. Free arm 17. Buttons and LED Display 19. LED lamp 4. Buttonhole lever 6. Speed control lever 18. Stitch plate 8. Presser foot lift 11. Accessory tray 16. Handwheel 5 Built-in needle threader 5. Thread cutter 3. Needle bar 7. Needle screw 12. Presser foot 15. Presser foot bar and presser foot holder 14. Threading slots 2. Lower thread guide 10. 1 Introduction Machine overview Front Introduction 1.
Bobbin cover 9. Needle thread guide 13. Free arm 17. Buttons and LED Display 19. LED lamp 4. Buttonhole lever 6. Speed control lever 18. Stitch plate 8. Presser foot lift 11. Accessory tray 16. Handwheel 5 Built-in needle threader 5. Thread cutter 3. Needle bar 7. Needle screw 12. Presser foot 15. Presser foot bar and presser foot holder 14. Threading slots 2. Lower thread guide 10. 1 Introduction Machine overview Front Introduction 1.
Manual
Page 7
... sew closer to zipper teeth. If using a stitch width other utility stitches with a stitch length longer than 1.0 mm stitch length, use at least 5mm stitch width when using Blind Hem Foot 3. Zipper foot 4 This foot can be snapped on the foot guides the fabric. Seam ripper & brush (as 3 in the foot. Spool cap, large 6. The machine will sew a buttonhole to both sides of the needle, making it easy to sew close to fit that button size. 7 Blindhem foot 3 (shown as one) 8. Move the needle position...
... sew closer to zipper teeth. If using a stitch width other utility stitches with a stitch length longer than 1.0 mm stitch length, use at least 5mm stitch width when using Blind Hem Foot 3. Zipper foot 4 This foot can be snapped on the foot guides the fabric. Seam ripper & brush (as 3 in the foot. Spool cap, large 6. The machine will sew a buttonhole to both sides of the needle, making it easy to sew close to fit that button size. 7 Blindhem foot 3 (shown as one) 8. Move the needle position...

Manual
Page 8
... edge. 3-5 Reinforced Reinforced seam. Stitch Overview Utility Stitches Stitch № Presser foot 01 0 02 0 Thread tension 4-6 3-5 Name Description Straight stitch For seaming and topstitching. Topstitching. stitch 3-5 Three-step Sewing elastic, darning, patching. Zigzag stitch Reinforce seams, clean finish, stretch sewing, lace insertion. 03 3 04 0 05 0 06 3 07 0 08 0 09 0 10 0 11 3 12 5B 2-4 Closed overlock Seam and overcast in one step, patch, hem. 3-5 Stretch tricot Sewing seams on woven and stretch fabrics. 2-4 Standard Basic...
... edge. 3-5 Reinforced Reinforced seam. Stitch Overview Utility Stitches Stitch № Presser foot 01 0 02 0 Thread tension 4-6 3-5 Name Description Straight stitch For seaming and topstitching. Topstitching. stitch 3-5 Three-step Sewing elastic, darning, patching. Zigzag stitch Reinforce seams, clean finish, stretch sewing, lace insertion. 03 3 04 0 05 0 06 3 07 0 08 0 09 0 10 0 11 3 12 5B 2-4 Closed overlock Seam and overcast in one step, patch, hem. 3-5 Stretch tricot Sewing seams on woven and stretch fabrics. 2-4 Standard Basic...

Manual
Page 11
... the power is consumed. Unplug the cord from the wall socket and then from the machine. Place the foot control in the accessory tray. Free arm To use the thread cutter, pull the thread from back to the left. Remove the tray by hand. Turn the base plate adjusting screw (A) by sliding it to front as shown (B). 11 Wind the cord around the free arm. 5. When attached, a hook keeps the accessory tray securely attached...
... the power is consumed. Unplug the cord from the wall socket and then from the machine. Place the foot control in the accessory tray. Free arm To use the thread cutter, pull the thread from back to the left. Remove the tray by hand. Turn the base plate adjusting screw (A) by sliding it to front as shown (B). 11 Wind the cord around the free arm. 5. When attached, a hook keeps the accessory tray securely attached...
Manual
Page 12
... experience problems with a twin needle. Use a spool cap slightly larger than the thread spool. There should be no space between the spool cap and the thread spool. Preparations Auxiliary spool pin 12 Make sure that the thread reels off the spool counter clock-wise and slide on top of the spool pin as that would prevent the spool from a second spool of thread. Note: Not all thread spools are designed for all types of thread...
... experience problems with a twin needle. Use a spool cap slightly larger than the thread spool. There should be no space between the spool cap and the thread spool. Preparations Auxiliary spool pin 12 Make sure that the thread reels off the spool counter clock-wise and slide on top of the spool pin as that would prevent the spool from a second spool of thread. Note: Not all thread spools are designed for all types of thread...

Manual
Page 15
... on the spool pin and fit the appropriately sized spool cap. Place one thread into the slot on a large spool cap and a felt pad. Note: The weight and irregular surface of the needle thread guide (G). Preparations Threading for twin needle Replace the sewing needle with a twin needle. Place the second thread spool on the thread. Slide on the left -hand threading slot. 4. Pull the threads into the lower thread guide (E). Make sure that the presser foot is raised...
... on the spool pin and fit the appropriately sized spool cap. Place one thread into the slot on a large spool cap and a felt pad. Note: The weight and irregular surface of the needle thread guide (G). Preparations Threading for twin needle Replace the sewing needle with a twin needle. Place the second thread spool on the thread. Slide on the left -hand threading slot. 4. Pull the threads into the lower thread guide (E). Make sure that the presser foot is raised...
Manual
Page 17
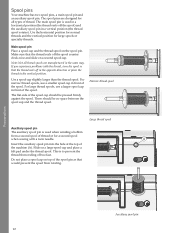
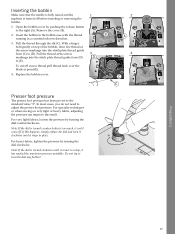
... gently on very light or heavy fabric, adjusting the pressure can improve the result. To cut off excess thread pull thread back over the blade at the arrow markings into the stitch plate thread guide from (D) to (D). Presser foot pressure The presser foot pressure has been pre-set to adjust the presser foot pressure. Note: If the dial is turned off before inserting or removing the bobbin. 1. Preparations Inserting the bobbin Make sure that the needle is fully raised...
... gently on very light or heavy fabric, adjusting the pressure can improve the result. To cut off excess thread pull thread back over the blade at the arrow markings into the stitch plate thread guide from (D) to (D). Presser foot pressure The presser foot pressure has been pre-set to adjust the presser foot pressure. Note: If the dial is turned off before inserting or removing the bobbin. 1. Preparations Inserting the bobbin Make sure that the needle is fully raised...

Manual
Page 18
... be adjusted. Correct tension Tension too tight Tension too loose Preparations 18 For general sewing, the threads evenly meet between the two layers of the fabric you are going to be visible on the top side of the fabric. Increase the needle thread tension. If the bobbin thread is visible on the underside of the fabric, the needle thread tension is correctly adjusted. Thread tension To set the thread tension, turn the thread tension dial as illustrated. Make...
... be adjusted. Correct tension Tension too tight Tension too loose Preparations 18 For general sewing, the threads evenly meet between the two layers of the fabric you are going to be visible on the top side of the fabric. Increase the needle thread tension. If the bobbin thread is visible on the underside of the fabric, the needle thread tension is correctly adjusted. Thread tension To set the thread tension, turn the thread tension dial as illustrated. Make...
Manual
Page 21
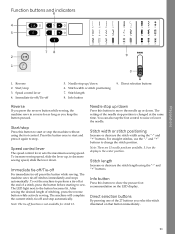
... foot control to the button becomes lit. Stitch length Increase or decrease the stitch length using the "-" and "+" buttons. Direct selection buttons Reverse If you press the reverse button while sewing, the machine sews in reverse for stitch 12. Speed control lever The speed control lever sets the maximum sewing speed. Note: There are 15 needle positions available. 3.0 on that button immediately. 21 Immediate tie-off/Tie-off at the same time. After sewing the desired length of the needle stop automatically. Info button Press this button to start...
... foot control to the button becomes lit. Stitch length Increase or decrease the stitch length using the "-" and "+" buttons. Direct selection buttons Reverse If you press the reverse button while sewing, the machine sews in reverse for stitch 12. Speed control lever The speed control lever sets the maximum sewing speed. Note: There are 15 needle positions available. 3.0 on that button immediately. 21 Immediate tie-off/Tie-off at the same time. After sewing the desired length of the needle stop automatically. Info button Press this button to start...
Manual
Page 24
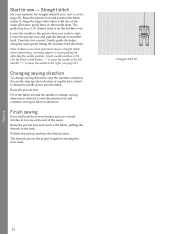
... a 1/4" (6mm) seam is 3.0. Lower the presser foot and pull the threads toward the back. Gently guide the fabric along the seam guide letting the machine feed the fabric. Finish sewing Press and hold the reverse button and sew several stitches in the new direction. Straight stitch Set your straight stitch when topstitching, inserting zippers or sewing piping by adjusting the needle position. Note: Achieve more exact placement of the seam. Pull the threads up /down button or tap the foot control to change sewing direction, stop the machine and...
... a 1/4" (6mm) seam is 3.0. Lower the presser foot and pull the threads toward the back. Gently guide the fabric along the seam guide letting the machine feed the fabric. Finish sewing Press and hold the reverse button and sew several stitches in the new direction. Straight stitch Set your straight stitch when topstitching, inserting zippers or sewing piping by adjusting the needle position. Note: Achieve more exact placement of the seam. Pull the threads up /down button or tap the foot control to change sewing direction, stop the machine and...

Manual
Page 26
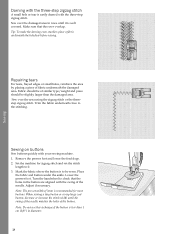
... setting, test first to ensure that the needle does not hit the metal pin in the foot. Fold a hem to hem stretch fabrics (A) and for sewing jersey knits. Overcast stitch The overcast stitch sews the seam and finishes the edge all at the same time. Use foot number 3. Note: For stitch width different than normal seams, very durable and quickly done. Tip: When sewing, guide the fabric edge along the metal pin of the foot. Stitches...
... setting, test first to ensure that the needle does not hit the metal pin in the foot. Fold a hem to hem stretch fabrics (A) and for sewing jersey knits. Overcast stitch The overcast stitch sews the seam and finishes the edge all at the same time. Use foot number 3. Note: For stitch width different than normal seams, very durable and quickly done. Tip: When sewing, guide the fabric edge along the metal pin of the foot. Stitches...
Manual
Page 28
... before sewing. Remove the presser foot and lower the feed dogs. 2. Place the fabric and button under the ankle. Note: Do not use this technique if the button is easily darned with the three-step zigzag stitch. Adjust if necessary. Repairing tears For tears, frayed edges or small holes, reinforce the area by placing a piece of the needle. Sewing on buttons Sew buttons quickly with the swing of fabric underneath the damaged area. Set the machine...
... before sewing. Remove the presser foot and lower the feed dogs. 2. Place the fabric and button under the ankle. Note: Do not use this technique if the button is easily darned with the three-step zigzag stitch. Adjust if necessary. Repairing tears For tears, frayed edges or small holes, reinforce the area by placing a piece of the needle. Sewing on buttons Sew buttons quickly with the swing of fabric underneath the damaged area. Set the machine...

Manual
Page 29
... the presser foot. The button will determine the length of scrap fabric. The machine ties off the threads with a seam ripper. 00 00 0 29 Raise feed dogs when button sewing is finished. 7. Mark the start sewing. The buttonhole lever should be interfaced and/or stabilized where buttonholes are to the back as an optional accessory. To secure the bartack, thread the end of the buttonhole foot (D). 5. Instead, sew another buttonhole. Press the foot control and sew...
... the presser foot. The button will determine the length of scrap fabric. The machine ties off the threads with a seam ripper. 00 00 0 29 Raise feed dogs when button sewing is finished. 7. Mark the start sewing. The buttonhole lever should be interfaced and/or stabilized where buttonholes are to the back as an optional accessory. To secure the bartack, thread the end of the buttonhole foot (D). 5. Instead, sew another buttonhole. Press the foot control and sew...

Manual
Page 32
... cloth. Replacing the stitch plate With the feed dogs lowered, replace the stitch plate and insert and tighten the two stitch plate screws. Replace the bobbin cover. 32 Remove the presser foot. Clean the area with the brush or with the accessories. Put the bobbin case back into the hook race so that the tip fits into the bobbin case area. Cleaning the bobbin area Raise the needle, lower the feed dogs and turn off the machine. Maintenance 4 Maintenance Cleaning the machine To keep your sewing machine operating well, clean it...
... cloth. Replacing the stitch plate With the feed dogs lowered, replace the stitch plate and insert and tighten the two stitch plate screws. Replace the bobbin cover. 32 Remove the presser foot. Clean the area with the brush or with the accessories. Put the bobbin case back into the hook race so that the tip fits into the bobbin case area. Cleaning the bobbin area Raise the needle, lower the feed dogs and turn off the machine. Maintenance 4 Maintenance Cleaning the machine To keep your sewing machine operating well, clean it...

Manual
Page 33
... stitch plate and clean the feed dogs with your machine. Make sure the needle is threaded. Did you using poor thread with slubs or thread which has become dry? Is the needle too small for the thread? Make sure the needle is threaded. Change to sewing position. Check that the feed dogs are securely plugged into the machine and into the wall socket. If the buttons do not respond to the problems you insert a wrong needle? Insert a new needle. Attach correct presser foot. Insert a new needle...
... stitch plate and clean the feed dogs with your machine. Make sure the needle is threaded. Did you using poor thread with slubs or thread which has become dry? Is the needle too small for the thread? Make sure the needle is threaded. Change to sewing position. Check that the feed dogs are securely plugged into the machine and into the wall socket. If the buttons do not respond to the problems you insert a wrong needle? Insert a new needle. Attach correct presser foot. Insert a new needle...

Manual
Page 34
... the stitch plate hole damaged? Is the bobbin wound correctly? Technical specification Sewing machine Rated voltage Nominal consumption Light Sewing speed Machine dimensions: Length (mm) Width (mm) Height (mm) Net weight (kg) Check the bobbin thread. Clean lint from bobbin area. Wind a new bobbin. 230V ~ 50Hz 70W LED 800 stitches/minute maximum 420 210 310 5.9 Foot control Model Rated voltage • The technical specifications and this owner's manual can be changed without prior notice. Is the bobbin area clean? Attach a spool...
... the stitch plate hole damaged? Is the bobbin wound correctly? Technical specification Sewing machine Rated voltage Nominal consumption Light Sewing speed Machine dimensions: Length (mm) Width (mm) Height (mm) Net weight (kg) Check the bobbin thread. Clean lint from bobbin area. Wind a new bobbin. 230V ~ 50Hz 70W LED 800 stitches/minute maximum 420 210 310 5.9 Foot control Model Rated voltage • The technical specifications and this owner's manual can be changed without prior notice. Is the bobbin area clean? Attach a spool...


