

Owner's Manual
Page 4
...feed/IDF presser foot (32) Needle threader (33) ,,Reverse sewing" key (34) Threading slots (35) Needle thread tension (36) 'Tie-off" key (37) (38) "Needle lowered/raised" key "Slow sewing" key (39) "Pattern mirror" key (40) Take-up lever (41) hread guide (42) (43) (44) (45) Spool holder with unwinding 'HTooplecfoovresrewcoitnhdstsiptcoholprhooglrdaemr Bobbin winder disk chart (46) (47) Hook cover (hook behind it) Free arm (48) Sewing bulb (max. 5 W) (49) Thread cutter (50) Thread take-up (51) Presser foot lifter (52> (53) Needle Needle holder plate with retaining (set...
...feed/IDF presser foot (32) Needle threader (33) ,,Reverse sewing" key (34) Threading slots (35) Needle thread tension (36) 'Tie-off" key (37) (38) "Needle lowered/raised" key "Slow sewing" key (39) "Pattern mirror" key (40) Take-up lever (41) hread guide (42) (43) (44) (45) Spool holder with unwinding 'HTooplecfoovresrewcoitnhdstsiptcoholprhooglrdaemr Bobbin winder disk chart (46) (47) Hook cover (hook behind it) Free arm (48) Sewing bulb (max. 5 W) (49) Thread cutter (50) Thread take-up (51) Presser foot lifter (52> (53) Needle Needle holder plate with retaining (set...

Owner's Manual
Page 5
... use bent or blunt needles. Switch the sewing machine off ("0") position, then remove plug from all instructions before using and before replacing bulb. Use this sewing machine only for a sewing machine that has fallen into any adjustments in the instruction manual. Always unplug sewing machine from the electric outlet when removing covers, lubricating, or when making any opening. 6. Special care is designed and manufactured for dropped into a tub or sink. repair, Return the appliance to break. 1 3. Unplug immediately. 4. Use needles...
... use bent or blunt needles. Switch the sewing machine off ("0") position, then remove plug from all instructions before using and before replacing bulb. Use this sewing machine only for a sewing machine that has fallen into any adjustments in the instruction manual. Always unplug sewing machine from the electric outlet when removing covers, lubricating, or when making any opening. 6. Special care is designed and manufactured for dropped into a tub or sink. repair, Return the appliance to break. 1 3. Unplug immediately. 4. Use needles...

Owner's Manual
Page 6
The tension of the needle and constantly observe the sewing area while working. 2. its cord. 9. with condensation, that may only be put into a warm room. 8. Constant use at low speeds is not permissible, in such a way that for which could be operated in openings on the machine. 7. It should be accepted for any objects in the direct vicinity of our qualified service staff...
The tension of the needle and constantly observe the sewing area while working. 2. its cord. 9. with condensation, that may only be put into a warm room. 8. Constant use at low speeds is not permissible, in such a way that for which could be operated in openings on the machine. 7. It should be accepted for any objects in the direct vicinity of our qualified service staff...
Owner's Manual
Page 8
index of headings Accessories Appliqué work Automatic tapering Balance Basting Bobbin case Bobbin thread monitor (model 2040) Bobbin thread tension Bobbin thread, drawing up Bobbin winding Bobbin winding through the needle Buttonhole, fully-automatic Buttonholes Buttonholes with gimp thread Buttonholes, tips for difficult fabrics Buttonholes, types Buttons, sewing on Carrying case Changing a pattern within the pattern sequence Circular embroidery guide Dleaning and oiling Dombined borders ording foot/shirring foot Dovering seams Dross-stitch 20 1 28 1 26, 1 27 44 65 24, 25 38 25 28 21 - ...
index of headings Accessories Appliqué work Automatic tapering Balance Basting Bobbin case Bobbin thread monitor (model 2040) Bobbin thread tension Bobbin thread, drawing up Bobbin winding Bobbin winding through the needle Buttonhole, fully-automatic Buttonholes Buttonholes with gimp thread Buttonholes, tips for difficult fabrics Buttonholes, types Buttons, sewing on Carrying case Changing a pattern within the pattern sequence Circular embroidery guide Dleaning and oiling Dombined borders ording foot/shirring foot Dovering seams Dross-stitch 20 1 28 1 26, 1 27 44 65 24, 25 38 25 28 21 - ...

Owner's Manual
Page 9
... 1 02 19 1 21 1 07 111 74 65, 66 1 34 32, 33 45 66 105 73 59 19 1 20 5 Gathering General sewing aids Hemstitching IDF system Info menu Invisible hems, blind stitch Knit edge foot/ruffler Lace-work support Display, adjusting the contrast Elastic utility stitches Electrical connection Embroidery stitch programs, tiptronic 2040 Embroidery stitch programs, tiptronic 2030 Embroidery, general notes Eyelet embroidery Feed dog, lowering Felling foot/Appliqué foot Foot control, connecting Free motion embroidery Free motion quilting foot/bias binder Fringe foot/narrow edge...
... 1 02 19 1 21 1 07 111 74 65, 66 1 34 32, 33 45 66 105 73 59 19 1 20 5 Gathering General sewing aids Hemstitching IDF system Info menu Invisible hems, blind stitch Knit edge foot/ruffler Lace-work support Display, adjusting the contrast Elastic utility stitches Electrical connection Embroidery stitch programs, tiptronic 2040 Embroidery stitch programs, tiptronic 2030 Embroidery, general notes Eyelet embroidery Feed dog, lowering Felling foot/Appliqué foot Foot control, connecting Free motion embroidery Free motion quilting foot/bias binder Fringe foot/narrow edge...
Owner's Manual
Page 11
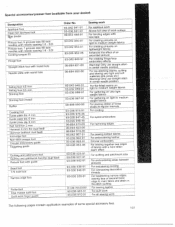
... hemming Sewing function keys Sewing lamp, changing Sewing problems and their solutions Sewing programs, selecting Shell edging Smocking Stitch patterns, formation Stitch width/needle position, altering Tapering/embroidering satin-stitch zigzag Technical data Thread cutter Thread tension, general notes Threading Tie-off Tips for a perfect buttonhole Top cover with table of programs Top feed (integrated dual feed) Twin needle Twin needle, threading Utility stitch programs, tiptronic 2040 Utility stitch programs, tiptronic 2030 Voltage switchover Zippers, sewing in 7/9 hole foot/braiding foot...
... hemming Sewing function keys Sewing lamp, changing Sewing problems and their solutions Sewing programs, selecting Shell edging Smocking Stitch patterns, formation Stitch width/needle position, altering Tapering/embroidering satin-stitch zigzag Technical data Thread cutter Thread tension, general notes Threading Tie-off Tips for a perfect buttonhole Top cover with table of programs Top feed (integrated dual feed) Twin needle Twin needle, threading Utility stitch programs, tiptronic 2040 Utility stitch programs, tiptronic 2030 Voltage switchover Zippers, sewing in 7/9 hole foot/braiding foot...

Owner's Manual
Page 12
... ornamental and hem stitching effect For buttonholes in fine, non-stretch materials (blouses, shirts, bed linen) For automatically sewing on buttons 1 0 Basting stitch For basting cut-out parts together 11 Quilt stitch with 1 3 needle positions, For highly durable seams where great strength is needed. stitch length 0- 6 mm 3 Zigzag stitch, (center stitch build-up) For serging, appliqué work For overstitching elastic cords and wool threads as well as for gathering and smocking Width upto mm - - 6 6 6 6 6 6 6 3 6 An overlock seam For sewing together...
... ornamental and hem stitching effect For buttonholes in fine, non-stretch materials (blouses, shirts, bed linen) For automatically sewing on buttons 1 0 Basting stitch For basting cut-out parts together 11 Quilt stitch with 1 3 needle positions, For highly durable seams where great strength is needed. stitch length 0- 6 mm 3 Zigzag stitch, (center stitch build-up) For serging, appliqué work For overstitching elastic cords and wool threads as well as for gathering and smocking Width upto mm - - 6 6 6 6 6 6 6 3 6 An overlock seam For sewing together...

Owner's Manual
Page 14
... 3 needle positions, nFeoer dheigdh. An overlock seam 6 asFtnoidtrcshheienwmginesgdtigttcoehg-ijenotgihneeerdfffeofacubtnrdicast.ioGnivgeas ramnenortsnaamndenotavler- 6 For buttonholes in fine, non-stretch materials (blouses, shirts, bed linen) For automatically sewing on elastic, darning tears and applying patches. Utility stitch programs tiptronic 2030 1234 6 101 '11 12 13 Ill I 1 Pro- Description gram No. lTyhdeusreabamlessewailml sstrwethcehrewgitrheoaut tstbrreenagktihngi.s stitch length 0- 6 mm 3 Zigzag stitch, (center stitch build-up) For serging, appliqué work...
... 3 needle positions, nFeoer dheigdh. An overlock seam 6 asFtnoidtrcshheienwmginesgdtigttcoehg-ijenotgihneeerdfffeofacubtnrdicast.ioGnivgeas ramnenortsnaamndenotavler- 6 For buttonholes in fine, non-stretch materials (blouses, shirts, bed linen) For automatically sewing on elastic, darning tears and applying patches. Utility stitch programs tiptronic 2030 1234 6 101 '11 12 13 Ill I 1 Pro- Description gram No. lTyhdeusreabamlessewailml sstrwethcehrewgitrheoaut tstbrreenagktihngi.s stitch length 0- 6 mm 3 Zigzag stitch, (center stitch build-up) For serging, appliqué work...

Owner's Manual
Page 26
... seam appearance and durability make sure the needle and bobbin thread tensions are correctly adjusted with regard to each other, i.e. Thread interlace is visible on the underside of the fabric: The needle thread tension is too loose or the bobbin thread tension is too loose. look cover witch off main switch bid the hook cover (26) at the left side and pen it towards the front Taking out the bobbin case Lift...
... seam appearance and durability make sure the needle and bobbin thread tensions are correctly adjusted with regard to each other, i.e. Thread interlace is visible on the underside of the fabric: The needle thread tension is too loose or the bobbin thread tension is too loose. look cover witch off main switch bid the hook cover (26) at the left side and pen it towards the front Taking out the bobbin case Lift...
Owner's Manual
Page 33
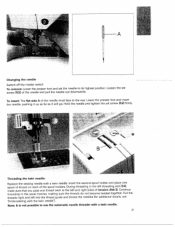
Loosen the set screw (52) firmly. Hold the needle and tighten the set screw (52) of the spool holders. Continue threading in the left threading slot (34), make sure that you pass one spool of thread on each to its highest position. Pull the threads right and left and right sides of the needle must face to use the automatic needle threader with a twin needle. Lower the presser foot and insert the needle, pushing it up as...
Loosen the set screw (52) firmly. Hold the needle and tighten the set screw (52) of the spool holders. Continue threading in the left threading slot (34), make sure that you pass one spool of thread on each to its highest position. Pull the threads right and left and right sides of the needle must face to use the automatic needle threader with a twin needle. Lower the presser foot and insert the needle, pushing it up as...
Owner's Manual
Page 64
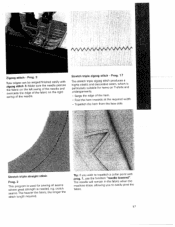
.../finished easily with prog. 1, use the function "needle lowered". Stretch triple straight stitch Prog. 2 This program is needed, e.g. The needle will remain in the fabric when the machine stops, allowing you wish to easily pivot the fabric. 67 Prog. 1 7 The stretch triple zigzag stitch produces a highly elastic and decorative seam, which is particularly suitable for sewing all seams where great strength is used for hems on the right swing of...
.../finished easily with prog. 1, use the function "needle lowered". Stretch triple straight stitch Prog. 2 This program is needed, e.g. The needle will remain in the fabric when the machine stops, allowing you wish to easily pivot the fabric. 67 Prog. 1 7 The stretch triple zigzag stitch produces a highly elastic and decorative seam, which is particularly suitable for sewing all seams where great strength is used for hems on the right swing of...

Owner's Manual
Page 69
... again. Insert the pin of straight stitch. Darning position: Lower the presser bar lifter slowly and push it lightly to the rear until the needle is set screw. Warning! Darning in the darning position. An even, medium-to be behind the needle clamp/needle set at its highest position. Only in a darning! Draw up the bobbin thread and hold the threads when you start sewing. - Repair the damaged area/hole by the size of the seam is determined by guiding the fabric evenly...
... again. Insert the pin of straight stitch. Darning position: Lower the presser bar lifter slowly and push it lightly to the rear until the needle is set screw. Warning! Darning in the darning position. An even, medium-to be behind the needle clamp/needle set at its highest position. Only in a darning! Draw up the bobbin thread and hold the threads when you start sewing. - Repair the damaged area/hole by the size of the seam is determined by guiding the fabric evenly...
Owner's Manual
Page 96
...sewing work surface For binding edges with bias tape For creating pintucks on light to medium weight fabrics For creating pintucks on light to main fabric and stitch-in center needle position. Special accessories/presser feet (available from your dealer): Designation Appliqué foot Open toe appliqué foot rias binder Pintuck foot 5 grooves (size 80 twin needles with needle spacing 1 .6 - 2.0) Pintuck foot 7 grooves (size 80 twin needles with needle spacing 1 .6 - 2.0) Cording tongue (2) Fringe foot Straight stitch foot with round hole Needle plate with round hole Felling foot...
...sewing work surface For binding edges with bias tape For creating pintucks on light to medium weight fabrics For creating pintucks on light to main fabric and stitch-in center needle position. Special accessories/presser feet (available from your dealer): Designation Appliqué foot Open toe appliqué foot rias binder Pintuck foot 5 grooves (size 80 twin needles with needle spacing 1 .6 - 2.0) Pintuck foot 7 grooves (size 80 twin needles with needle spacing 1 .6 - 2.0) Cording tongue (2) Fringe foot Straight stitch foot with round hole Needle plate with round hole Felling foot...
Owner's Manual
Page 97
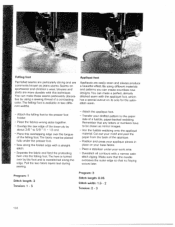
... jeans seams. Seams on sportswear and children's wear, blouses and shirts are easily sewn and always produce a beautiful effect By using a sewing thread of a contrasting color. You can create countless new designs. The felling foot is overstitched along the folded edge with a narrow satin stitch zigzag. Place a stabilizer under the presser foot - Cut out your drafted pattern to be placed fully under your base fabric...
... jeans seams. Seams on sportswear and children's wear, blouses and shirts are easily sewn and always produce a beautiful effect By using a sewing thread of a contrasting color. You can create countless new designs. The felling foot is overstitched along the folded edge with a narrow satin stitch zigzag. Place a stabilizer under the presser foot - Cut out your drafted pattern to be placed fully under your base fabric...

Owner's Manual
Page 98
... attach a cording tongue (spe cial accessory) on the the first pintuck to the right (see page 31). - Thread the the hole at gimp thread from the center front of the bobbin case slightly to run parallel in a groove in your 1 30/7 05 H-ZWI; 1.6 or 2.0 machine (e.g. Replace the needle plate. Feed the gimp thread under the work support so that it does not become knotted during sewing. - mm needle...
... attach a cording tongue (spe cial accessory) on the the first pintuck to the right (see page 31). - Thread the the hole at gimp thread from the center front of the bobbin case slightly to run parallel in a groove in your 1 30/7 05 H-ZWI; 1.6 or 2.0 machine (e.g. Replace the needle plate. Feed the gimp thread under the work support so that it does not become knotted during sewing. - mm needle...
Owner's Manual
Page 101
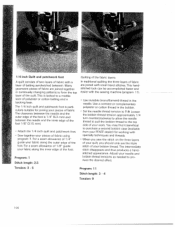
... of your work. Sew together your pieces of fabric using program 1 For a seam allowance of 1 /4" guide your fabric along the inner edge of the foot Program: I Stitch length: 2.5 Quilting of the fabric layers: In traditional quilting the three layers of fabric are joined together in continually changing patterns to form the top layer of fabric. Loosen the bobbin thread tension approximately 1/4 turn counterclockwise to allow the needle thread to pull the bobbin thread to...
... of your work. Sew together your pieces of fabric using program 1 For a seam allowance of 1 /4" guide your fabric along the inner edge of the foot Program: I Stitch length: 2.5 Quilting of the fabric layers: In traditional quilting the three layers of fabric are joined together in continually changing patterns to form the top layer of fabric. Loosen the bobbin thread tension approximately 1/4 turn counterclockwise to allow the needle thread to pull the bobbin thread to...
Owner's Manual
Page 118
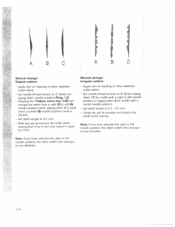
I A!! Manual change ! sewing from a right (C) to 6 mm and reduce it again to0mm. 2' Note: If you have selected the right or left needle position or zigzag stitch 3 for motifs with a center needle position. - Set needle thread tension to 3. Apply iron-on backing or other stabilizer under fabric. - Manual change ! Select zigzag stitch 1 2 for motifs with a right or left needle position, the stitch width only changes in one direction. Irregular pattern - Regular pattern - Set needle thread tension to 3. Set stitch length to 0.2 - 0.3 mm. - Zigzag stitch 3 is used...
I A!! Manual change ! sewing from a right (C) to 6 mm and reduce it again to0mm. 2' Note: If you have selected the right or left needle position or zigzag stitch 3 for motifs with a center needle position. - Set needle thread tension to 3. Apply iron-on backing or other stabilizer under fabric. - Manual change ! Select zigzag stitch 1 2 for motifs with a right or left needle position, the stitch width only changes in one direction. Irregular pattern - Regular pattern - Set needle thread tension to 3. Set stitch length to 0.2 - 0.3 mm. - Zigzag stitch 3 is used...
Owner's Manual
Page 126
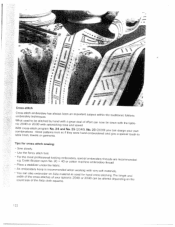
... design your tiptronic 2040 count'size of your own a special touch to be sewn with very soft materials. - for cross-stitch sewing: - Cross-stitch Cross-stitch embroidery embroidery techniques. and No. 25 (2040), No. 23 (2030) you as if they were hand-embroidered and can be altered depending on Aida material as used to Tips for hand or 2030 cross-stitching. Sew slowly. - Use the fancy stitch foot...
... design your tiptronic 2040 count'size of your own a special touch to be sewn with very soft materials. - for cross-stitch sewing: - Cross-stitch Cross-stitch embroidery embroidery techniques. and No. 25 (2040), No. 23 (2030) you as if they were hand-embroidered and can be altered depending on Aida material as used to Tips for hand or 2030 cross-stitching. Sew slowly. - Use the fancy stitch foot...
Owner's Manual
Page 133
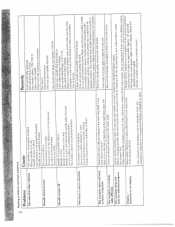
... stitches ihe needle is pulled solidly irrto bobbin tension Rmthneari nrachine, spring. Wrong needle is too t1 lritc. Needle thread breaks Sep reasons above . TI ii oo I his ennsnres [lii cad tension system. Needle is threaded. bent, arid has hit tire needle plate because you Pull lightly the fabric lightly. Remedy Push needle fully upwards. Use needle system 1 30/705 H. Check row the machine is bent. See above . Adjust thread tension. Use rroedle with brush. Insert...
... stitches ihe needle is pulled solidly irrto bobbin tension Rmthneari nrachine, spring. Wrong needle is too t1 lritc. Needle thread breaks Sep reasons above . TI ii oo I his ennsnres [lii cad tension system. Needle is threaded. bent, arid has hit tire needle plate because you Pull lightly the fabric lightly. Remedy Push needle fully upwards. Use needle system 1 30/705 H. Check row the machine is bent. See above . Adjust thread tension. Use rroedle with brush. Insert...

Owner's Manual
Page 136
... feed dog Base plate (29) Detachable work support (30> Presser foot holder with presser foot (31) Integrated dual feed/IDF (32) Needle threader (33) "Reverse sewing" key (34) Threading slots (35) Needle thread tension (36) "lie-off" key (37) "Needle lowered/raised" key (38) "Slow sewing" key (39) "Pattern mirroring" key (40) Take-up lever (41) (42)c (43) (44) (45) Thread guide Spool holder with unwinding disk Hole for second spool holder Top cover with stitch program chart Bobbin winder (46) Hook cover (hook behind it) (47) Free arm (48) Sewing bulb...
... feed dog Base plate (29) Detachable work support (30> Presser foot holder with presser foot (31) Integrated dual feed/IDF (32) Needle threader (33) "Reverse sewing" key (34) Threading slots (35) Needle thread tension (36) "lie-off" key (37) "Needle lowered/raised" key (38) "Slow sewing" key (39) "Pattern mirroring" key (40) Take-up lever (41) (42)c (43) (44) (45) Thread guide Spool holder with unwinding disk Hole for second spool holder Top cover with stitch program chart Bobbin winder (46) Hook cover (hook behind it) (47) Free arm (48) Sewing bulb...


