

Owner's Manual
Page 4
...11) Stitch length knob (1 2) Connection socket ,,foot control" (Model 6230) (13) Base plate (14) Detachable work support (1 5) Sewing foot holder with sewing foot (16) Needle threader (17) Threading slit (1 8) Needle thread tension (19) Take-up lever (20) Presser bar lifter (21) Key for ,,reverse sewing" (22) Needle holder with fixing screw (23) Dual feed (top feed) (24) Reel holder with unwinding disk (25) Second spare reel holder (26) Lid with program table (27) Bobbin winder (28) Hook cover (29) Free arm (30) Thread trimmer (31) Sewing lamp (max. 15 watt) (32) Thread guide (33) Needle plate
...11) Stitch length knob (1 2) Connection socket ,,foot control" (Model 6230) (13) Base plate (14) Detachable work support (1 5) Sewing foot holder with sewing foot (16) Needle threader (17) Threading slit (1 8) Needle thread tension (19) Take-up lever (20) Presser bar lifter (21) Key for ,,reverse sewing" (22) Needle holder with fixing screw (23) Dual feed (top feed) (24) Reel holder with unwinding disk (25) Second spare reel holder (26) Lid with program table (27) Bobbin winder (28) Hook cover (29) Free arm (30) Thread trimmer (31) Sewing lamp (max. 15 watt) (32) Thread guide (33) Needle plate

Owner's Manual
Page 5
... other user servicing adjustments mentioned removing covers, in the instruction lubricating, manual or 17. To unplug, grasp the plug, not the cord 11 Keep fingers away from the electric outlet when when making any free air openings blocked. Use needles recommended by pulling on page 2 SAVE THESE INSTRUCTIONS Hold plug when rewinding into water. Replace bulb with machine and foot control any other liquid. Do not operate administered. this manual. used by...
... other user servicing adjustments mentioned removing covers, in the instruction lubricating, manual or 17. To unplug, grasp the plug, not the cord 11 Keep fingers away from the electric outlet when when making any free air openings blocked. Use needles recommended by pulling on page 2 SAVE THESE INSTRUCTIONS Hold plug when rewinding into water. Replace bulb with machine and foot control any other liquid. Do not operate administered. this manual. used by...

Owner's Manual
Page 6
... on the specification plate. 6. The machine must exercise adequate caution with condensation. - 8. If this appliance is used on the machine. 7. Cleaning Housing: To clean the housing, use only original PFAFF parts. it is visible damage. Treatment Always protect the machine against damage by a Pfaff mechanic. 5. The user must be ope rated in openings on a free surface, which the user can repair. This is a machine for the sewing lamp is...
... on the specification plate. 6. The machine must exercise adequate caution with condensation. - 8. If this appliance is used on the machine. 7. Cleaning Housing: To clean the housing, use only original PFAFF parts. it is visible damage. Treatment Always protect the machine against damage by a Pfaff mechanic. 5. The user must be ope rated in openings on a free surface, which the user can repair. This is a machine for the sewing lamp is...
Owner's Manual
Page 8
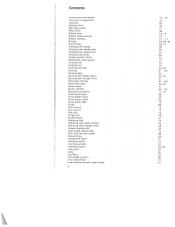
.... . Darning with elastic stitch Darning with the twin needle . Eyelet embroidery . Hand wheel release disk Hem with straight stitch . Lap feller Left needle position . Bobbin thread tension . . Fancy elastic stitch . . . Foot control . . . . Free arm. . . . Gathering with elastic thread . Inserting bobbin . . . Inserting zippers Lace work support Cording foot Cording foot . . Borders . . . . Buttonholes . . . . . . . Fancy stitch table . . Contents Accessories and needles Accessory compartment Applique Appliqué foot...
.... . Darning with elastic stitch Darning with the twin needle . Eyelet embroidery . Hand wheel release disk Hem with straight stitch . Lap feller Left needle position . Bobbin thread tension . . Fancy elastic stitch . . . Foot control . . . . Free arm. . . . Gathering with elastic thread . Inserting bobbin . . . Inserting zippers Lace work support Cording foot Cording foot . . Borders . . . . Buttonholes . . . . . . . Fancy stitch table . . Contents Accessories and needles Accessory compartment Applique Appliqué foot...

Owner's Manual
Page 9
... stitches - Reverse sewing. Topstitching. Twin needle. Stitch length control j Straight stitch Stretch triple straight stitch. Threading the needle thread Threading the sewing machine. Oiling . Quilting ..... . - Top feed. . . . Sewing chart Sewing feet lspecial accessories( Sewing feet (standard accessories( Sewing lamp Sewing on buttons Sewing problems . . Lowering the feed dog Main switch Maintenance and faults Monograms Multi4oot gathering foot. Pattern width Practical sewing Presser bar litter Puchbutton control Pulling up the bobbin...
... stitches - Reverse sewing. Topstitching. Twin needle. Stitch length control j Straight stitch Stretch triple straight stitch. Threading the needle thread Threading the sewing machine. Oiling . Quilting ..... . - Top feed. . . . Sewing chart Sewing feet lspecial accessories( Sewing feet (standard accessories( Sewing lamp Sewing on buttons Sewing problems . . Lowering the feed dog Main switch Maintenance and faults Monograms Multi4oot gathering foot. Pattern width Practical sewing Presser bar litter Puchbutton control Pulling up the bobbin...
Owner's Manual
Page 10
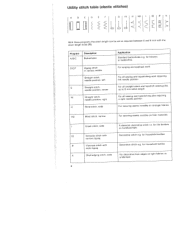
... hem edges on light fabrics i.e. underwear 6 Utility stitch table (elastic stitches) D E F G HI H HD ID IF K < / " ( < I _: _: ,-' c-' ' " I Greek stitch, wide A classical, decorative stitch i.e. For all sewing and topstitching work . for blouses or bedclothes For serging and appliqué work requiring left Straight stitch, needle position, center Straight stitch, needle position, right Blind stitch, wide Application Standard buttonholes e.g. Program A/B/C Description Buttonholes D/E/F G HI H Zigzag stitch in various widths Straight stitch, needle...
... hem edges on light fabrics i.e. underwear 6 Utility stitch table (elastic stitches) D E F G HI H HD ID IF K < / " ( < I _: _: ,-' c-' ' " I Greek stitch, wide A classical, decorative stitch i.e. For all sewing and topstitching work . for blouses or bedclothes For serging and appliqué work requiring left Straight stitch, needle position, center Straight stitch, needle position, right Blind stitch, wide Application Standard buttonholes e.g. Program A/B/C Description Buttonholes D/E/F G HI H Zigzag stitch in various widths Straight stitch, needle...
Owner's Manual
Page 12
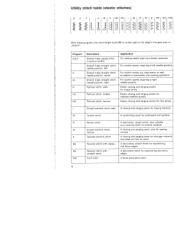
... length knob (11) is turned right to the edge in various widths Stretch triple straight stitch, needle position, left Stretch triple straight stitch, needle position, center Stretch triple straight stitch, needle position, right Pullover stitch, wide Pullover stitch, middle Pullover stitch, narrow Application For sewing elastic tape onto elastic materials For stretch seams requiring a left needle position For stretch seams e.g. Program D/E/F G Hi H HD HG Description Stretch triple zigzag stitch in the grey area i.e. ,,stretch". step seams as well as seams in sportswear and working...
... length knob (11) is turned right to the edge in various widths Stretch triple straight stitch, needle position, left Stretch triple straight stitch, needle position, center Stretch triple straight stitch, needle position, right Pullover stitch, wide Pullover stitch, middle Pullover stitch, narrow Application For sewing elastic tape onto elastic materials For stretch seams requiring a left needle position For stretch seams e.g. Program D/E/F G Hi H HD HG Description Stretch triple zigzag stitch in the grey area i.e. ,,stretch". step seams as well as seams in sportswear and working...

Owner's Manual
Page 29
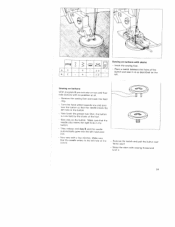
Lowering the feed dog For certain sewing work, e g. To do this, open the hook cover and press slide B fully to be dropped. darning and buttonhole sewing between 2 and 3. darning, the feed dog has to the right. I I A I JI Setting the need'e thread tension Set the required amount on the needle thread tension (18) using mark A The normal setting for sewing is lowered. 27 Now the feed dog is 4 to 5 For embroidering.
Lowering the feed dog For certain sewing work, e g. To do this, open the hook cover and press slide B fully to be dropped. darning and buttonhole sewing between 2 and 3. darning, the feed dog has to the right. I I A I JI Setting the need'e thread tension Set the required amount on the needle thread tension (18) using mark A The normal setting for sewing is lowered. 27 Now the feed dog is 4 to 5 For embroidering.

Owner's Manual
Page 30
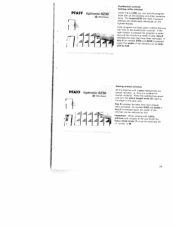
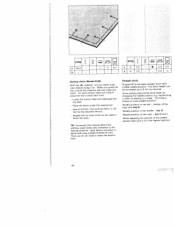
... range. PFAFF tiptr 1 11A) L fl1 Al Reverse sewing The machine sews in reverse as long as it will find the symbol buttonhole bet ween the figure 0 arid 1. Li AA You will go to sew the stretch stitches with the stitch length knob, by turning to 6 mm infinitely with a grey background. 28 Stitch length knob You can set the stitch length (11) from o to the marking for sewing buttonholes is...
... range. PFAFF tiptr 1 11A) L fl1 Al Reverse sewing The machine sews in reverse as long as it will find the symbol buttonhole bet ween the figure 0 arid 1. Li AA You will go to sew the stretch stitches with the stitch length knob, by turning to 6 mm infinitely with a grey background. 28 Stitch length knob You can set the stitch length (11) from o to the marking for sewing buttonholes is...
Owner's Manual
Page 31
... have been activated. turned to sew. PFAFF tiptronic 6230 ) .4j 4J.4 1_ jI Setting stretch stitches All the stitches with a grey background are additionally illustrated on the display. On models 6150 and 6230 if tkheey G is pressed again the width of the grey area. If the right button is pressed the program is selec ted and the machine is ready to •...
... have been activated. turned to sew. PFAFF tiptronic 6230 ) .4j 4J.4 1_ jI Setting stretch stitches All the stitches with a grey background are additionally illustrated on the display. On models 6150 and 6230 if tkheey G is pressed again the width of the grey area. If the right button is pressed the program is selec ted and the machine is ready to •...
Owner's Manual
Page 37
... changing the needle position, e.g. topstitching a collar or sewing in the middle - You have to press the foot control each further stitch you do not need to the - release all the keys with middle needle position. key H and I When adjusting the position of three needle positions. For each time, Lower the bottom feed and disengage the - TIP: To prevent the material plies from shifting, insert dress pins crosswise to the basting direction, Light fabrics...
... changing the needle position, e.g. topstitching a collar or sewing in the middle - You have to press the foot control each further stitch you do not need to the - release all the keys with middle needle position. key H and I When adjusting the position of three needle positions. For each time, Lower the bottom feed and disengage the - TIP: To prevent the material plies from shifting, insert dress pins crosswise to the basting direction, Light fabrics...
Owner's Manual
Page 40
... by the shank of the jiittnii Remove the match and pull the button and fabric apart. - Now sew on buttons with key B and the needle automatically goes into the left hole of the foot. - Wrap the stem with a few stitches. Insert the sewing foot. - Now lower the presser bar lifter; Then release with stems - Make sure that the needle enters in the button. Sewing on the button. Remove the sewing foot and lower the feed dog. - E U I prog a! Turn...
... by the shank of the jiittnii Remove the match and pull the button and fabric apart. - Now sew on buttons with key B and the needle automatically goes into the left hole of the foot. - Wrap the stem with a few stitches. Insert the sewing foot. - Now lower the presser bar lifter; Then release with stems - Make sure that the needle enters in the button. Sewing on the button. Remove the sewing foot and lower the feed dog. - E U I prog a! Turn...

Owner's Manual
Page 52
... of the sewing foot. Lower the sewing foot again and sew a few starting stitches using program -. From then on the elastic thread. TIP: The cording foot (special accessory) is no pro blem at the middle of - M, then leave the needle down in this foot guide the elastic evenly during the sewing operation. 50 Raise the sewing foot and place the elastic thread around the needle. ( a '::'. The elastic thread must be wound onto the bobbin, Mark the first gathering seam on...
... of the sewing foot. Lower the sewing foot again and sew a few starting stitches using program -. From then on the elastic thread. TIP: The cording foot (special accessory) is no pro blem at the middle of - M, then leave the needle down in this foot guide the elastic evenly during the sewing operation. 50 Raise the sewing foot and place the elastic thread around the needle. ( a '::'. The elastic thread must be wound onto the bobbin, Mark the first gathering seam on...

Owner's Manual
Page 70
... stitches such as a zigzag stitch, blind stitch, elastic stitch or fancy stitches (Models 6150, 6230). Isee page 511. The stitches should be very close to turn the fabric slowly and evenly. Then push the plate down at all stitch types are very suitable. selected program. Remove the sewing foot. Place the eyelet plate on blouses, bed or table linen Practically all . making sure pin A fits in the middle cutout of the needle plate. The fabric...
... stitches such as a zigzag stitch, blind stitch, elastic stitch or fancy stitches (Models 6150, 6230). Isee page 511. The stitches should be very close to turn the fabric slowly and evenly. Then push the plate down at all stitch types are very suitable. selected program. Remove the sewing foot. Place the eyelet plate on blouses, bed or table linen Practically all . making sure pin A fits in the middle cutout of the needle plate. The fabric...

Owner's Manual
Page 73
... $4 A S'T 3 Blind stitch and overlock foot Part No. 98-694 890-00 (Model 6120- 6230) Part No. 98-694 845-00 (Model 6110) 4 Zipper and edge sewing foot Part No. 98-694 884-00 (Model 6120-6230> Part No. 98-694 843-00 (Model 61101 K. 72 Sewing feet (accessories) o Normal sewing foot Part No. 98-694 816-00 (Model 6120-6230) Part No. 98-694 847-00 (Modell 6110) Fancy stitch foot for top feed Part No. 98-694 814-00 (Model 6120 - 6230...
... $4 A S'T 3 Blind stitch and overlock foot Part No. 98-694 890-00 (Model 6120- 6230) Part No. 98-694 845-00 (Model 6110) 4 Zipper and edge sewing foot Part No. 98-694 884-00 (Model 6120-6230> Part No. 98-694 843-00 (Model 61101 K. 72 Sewing feet (accessories) o Normal sewing foot Part No. 98-694 816-00 (Model 6120-6230) Part No. 98-694 847-00 (Modell 6110) Fancy stitch foot for top feed Part No. 98-694 814-00 (Model 6120 - 6230...

Owner's Manual
Page 75
... are intended for top feed 61 1 0( Knit edge foot Darning foot (model 61 10( Teflon foot 98-69482 1 -00 98-694822-00 93-042946-91 Caution' Only use straight stitch in middle needle position! For top-stitching seams and sewing very light and soft materials (silk jersey. Accessory Appliqué foot Bias binder (remove foot holder( Cording foot, 5 grooves (twin needles with needle spacing 1 6 to 20) Cording foot, 7 grooves (twirl needles with needle spacing 1.6 to 2.0) Cording tongue (2( Fringe foot Part number 93-042941-91...
... are intended for top feed 61 1 0( Knit edge foot Darning foot (model 61 10( Teflon foot 98-69482 1 -00 98-694822-00 93-042946-91 Caution' Only use straight stitch in middle needle position! For top-stitching seams and sewing very light and soft materials (silk jersey. Accessory Appliqué foot Bias binder (remove foot holder( Cording foot, 5 grooves (twin needles with needle spacing 1 6 to 20) Cording foot, 7 grooves (twirl needles with needle spacing 1.6 to 2.0) Cording tongue (2( Fringe foot Part number 93-042941-91...

Owner's Manual
Page 76
You can make these seams very effective if you guide the fabric edges evenly through the foot cutout. Afterwards separate the fabric and feed the protruding hem into the lap-feller The hem is turned over the groove of gather by about 3/8' to 5/8'. - Be sure you use a sewing thread of the lower ply by adjusting the needle thread tension and the stitch length. 75 Place the fabric reverse side to face side - Overlap...
You can make these seams very effective if you guide the fabric edges evenly through the foot cutout. Afterwards separate the fabric and feed the protruding hem into the lap-feller The hem is turned over the groove of gather by about 3/8' to 5/8'. - Be sure you use a sewing thread of the lower ply by adjusting the needle thread tension and the stitch length. 75 Place the fabric reverse side to face side - Overlap...

Owner's Manual
Page 77
... use a cording tongue. - During sewing the cording pull the material lightly. - This shapes the fabric during sewing. - Thread up with the five groove foot. 76 In this case, however, do this makes the cording look with a twin needle 11.6 or 2 mml. - Thread the gimp thread through the hole of the needle plate from below to make the seam more volume. TIP: There are closer together than with two needle threads Isee page 64). - Replace...
... use a cording tongue. - During sewing the cording pull the material lightly. - This shapes the fabric during sewing. - Thread up with the five groove foot. 76 In this case, however, do this makes the cording look with a twin needle 11.6 or 2 mml. - Thread the gimp thread through the hole of the needle plate from below to make the seam more volume. TIP: There are closer together than with two needle threads Isee page 64). - Replace...

Owner's Manual
Page 84
... - Clean the feed dog and hook area with a longer service life. I q Lht Changing the needle plate It is very important to clean and oil the sewing machine, because it needs. hours of a small screwdriver into the left opening between needle plate and sewing machine. Twist it snap in the illustration and on the oil bottle supplied. Removal: Switch off the main switch - Cleaning and oiling Switch off the main switch Raise the sewing foot...
... - Clean the feed dog and hook area with a longer service life. I q Lht Changing the needle plate It is very important to clean and oil the sewing machine, because it needs. hours of a small screwdriver into the left opening between needle plate and sewing machine. Twist it snap in the illustration and on the oil bottle supplied. Removal: Switch off the main switch - Cleaning and oiling Switch off the main switch Raise the sewing foot...

Owner's Manual
Page 86
... bottom side of oil to left. Only guide the fabric lightly. Machine does not feed or feeds irregularly Sewing lint has collected between the feed dog teeth rows. Feed dog is lowered, slide B (see page 27) to the hook. Push slide B (see page 27 is too thick or too thin. Insert new needle and push fully in . Thread is not properly threaded. Remove the threads and apply a drop of fabric. 5. Machine is too thick...
... bottom side of oil to left. Only guide the fabric lightly. Machine does not feed or feeds irregularly Sewing lint has collected between the feed dog teeth rows. Feed dog is lowered, slide B (see page 27) to the hook. Push slide B (see page 27 is too thick or too thin. Insert new needle and push fully in . Thread is not properly threaded. Remove the threads and apply a drop of fabric. 5. Machine is too thick...


